
Step 4: Enabling & Configuring LIA/POS LFP
Introduction and Business Impact
Local Product Inventory can be added by uploading a primary product feed. The primary product feed provides a list of items that can be sold in-store with attributes to describe them. This feed can contain different information depending on if the item is available only in-store or both in-store and online. Furthermore, you also need a local product inventory supplemental feed, this indicates how many of your products are for sale, the product's physical location, and at what price.
Creating a simple local product inventory feed is useful for a single merchant; however, as a POS data provider, this does not scale well. There are alternatives, for example, the Content API products request can be used to update inventory once a day.
Merchant Center also provides a variety of LFP inventory data feed providers, such as pointy from Google, that have pre-existing integrations set up with Google Merchant Center. However, as a Multi Client Account (MCA), it's important to become a trusted LFP data provider because this enables the usage of Merchant Center's POS APIs. These special APIs not only by-pass request inventory checks for newly on-boarded merchants but also automatically creates a product feed by matching the provided GTINs to Google's catalog.
The Local Feeds Partnership integration's primary focus is for LFP data providers who want to submit their transaction data to Google on behalf of their merchants or would like to submit their customers' data to Google for better visibility and management.
This section describes the best practices for enabling local inventory ads, creating a local inventory feed, and configuring a LFP data provider.
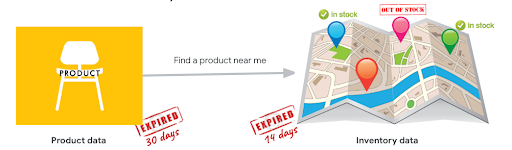
Local Inventory versus Product Data
| Product Data | Inventory Data |
|---|---|
| Expires in 30 days | Expires in 14 days |
| Product Attributes: ■ Title ■ Description ■ Image, |
Product in Store: ■ Which stores is this product sold ■ How many units available at each selling store ■ What price at each selling store ■ Availability |
Data Feeds
| Data Type | Traditional LIA Feed Type | LFP Feed Type |
|---|---|---|
| Product | Primary Feed | None |
| Local inventory | Local Product Inventory | POS Inventory POS Sales POS Stores |
For Product details, you create a primary feed based on the specification.The primary feed provides all the necessary data about the products that a merchant's business sells.
For merchants that push inventory data themselves without the help of Local Feed Providers Partners they can use the Local Product Inventory feed (through a file or by calling the API). This is normally used for single merchant accounts that don't have a POS Data Provider. Inventory checks are always required when using this method.
For Onboarding LFP Providers there are more integrated feed types: POS Inventory, POS Sales, and POS Store Management.
Google either needs POS Inventory or POS Sales. POS inventory lets you send inventory data (price and quantity) and product data through GTINs which are matched to Google's catalog offers. If POS Sales is chosen instead, Google attempts to run a learning model in the backend to determine the most likely price and quantity for a particular offer while also matching the offers' GTINs to Google's catalog.
POS Store is only needed if a partner is not in a position to link the Google business profile account to the correspondent Merchant Center account. This alternative is based on providing the Store Address by calling pos.insert. This method returns a
matchingStatusvalue of "matched" or "not matched". In case of failure, the API returns amatchingStatusHintwith values:- "linked-store-not-found": There aren't any Google Business Profile stores available for matching. Connect the Merchant Center account with the Google Business Profile account. Or add a new Google Business Profile store corresponding to the POS store.
- "store-match-not-found": The provided POS store couldn't be matched to any of the connected Google Business Profile stores. Merchant Center account is connected correctly and stores are available on Google Business Profile, but POS store location address does not match with Google Business Profile stores' addresses. Update POS store address or Google Business Profile store address to match correctly.
This is primarily used with Multi Client Account (MCA) who want to become a trusted partner to avoid having to do inventory checks for each newly onboarded customer.
POS Inventory API: Submit Inventory for the given merchant.
POS Sales API: Submit a sale event for the given merchant (instead of providing regular inventory updates through pos.inventory)
POS Store APIs (to be used only if Google Business Profile store codes aren't known / aren't available)
- Insert POS Store: Creates a store for the given merchant.
- Get POS Store: Retrieves information about the given store.
- Delete POS Store: Deletes a store for the given merchant.
- List POS Store: Lists the stores of the target merchant.
Value Mapping
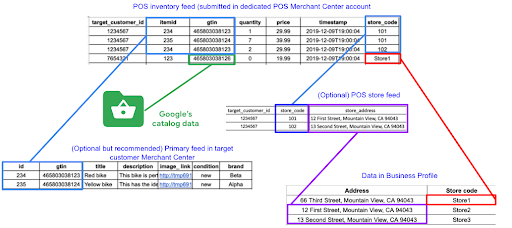
The submitted inventory or sales data is mapped to a specific merchant's store by usage of 'store code' field. The 'store code' should be either merchant's Business Profile store 'store code' or 'store code' value provided in the POS Stores feed. Thus the usage of the POS Stores feed is required only if you cannot reliably provide merchants' Business Profile store codes. The POS Stores feed helps provide store addresses which would be used for automatic mapping with merchants' Business Profile stores. The usage of this feed is less reliable than direct usage of Business Profile store codes, as the provided store addresses cannot be always matched correctly.
The following diagram illustrates the relationship of the various LFP and Product feed types:
Enable Free Local Product Listings
There are two ways to enable Free Local Product listings: using the UI or through the Content API using liasettings.update
To begin showing local product listings of inventory in your store, follow these steps to enable Free Local Product Listings.
Login to Merchant Center for the Merchant
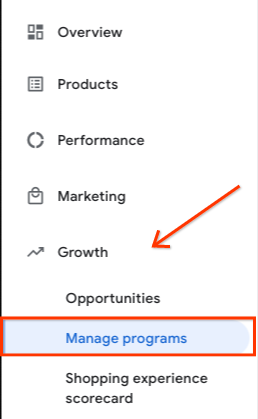
Go to the menu on the left-hand side of the screen. Select 'Growth' → 'Manage Programs'
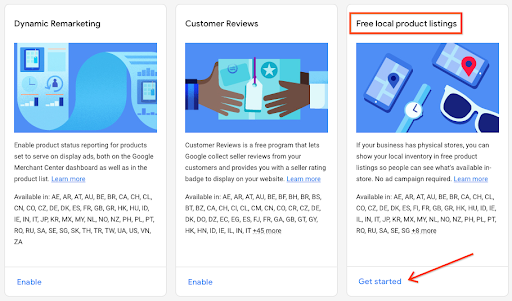
Click 'Get Started' under the Free local product listings tile.
Select a Country to sell into (United States Checked by Default), then Select 'Continue'.
Next, you are asked to attach the Business Profiles. If you completed Step 3: Google Business Profiles Account & Linking then these two items have a green check mark. Otherwise, complete the GBP linking process, then re-attach the business profile.
Upload a rectangular logo (optional)
At this point in the process, you begin configuring your Product Feed for the select countries.
Select one of the two paths:
Create a Simple Local Product Inventory Feed from File
Select, 'Direct product upload'
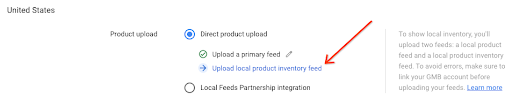
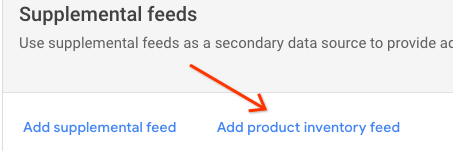
Select, 'Upload local product inventory feed', then, under Supplemental Feeds, Select, 'Add product inventory feed'.
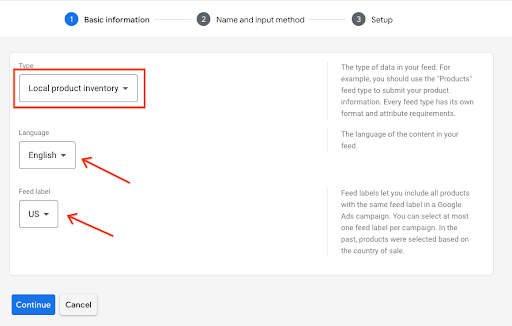
Under Type, Select "Local product inventory"; Under Language, Select your chosen language; Under Feed label, Select your chosen country. Then, Select "Continue".
Select "Upload a file now", and select browse for your selected file.
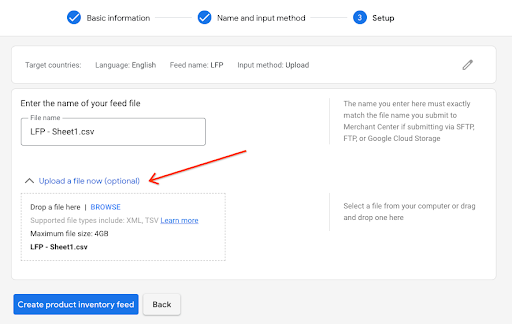
Select, "Create product inventory feed"
Link Account to the POS LFP Provider
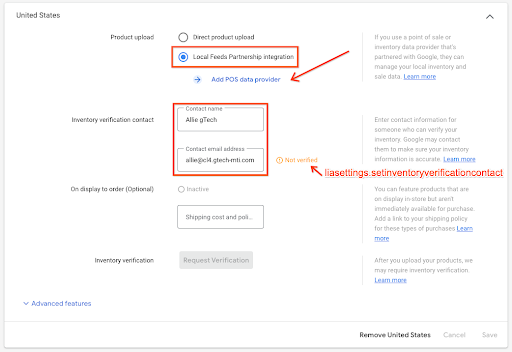
Under Product upload, select Local Feeds Partnership Integration.
This enables the Add POS data provider selector.
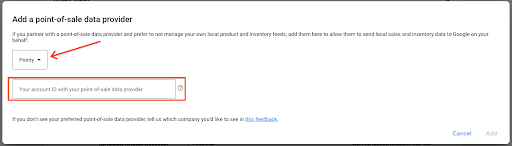
Click Add POS data provider, a modal appears which lets you select from a drop-down list of known trusted feed providers.
Example of Existing Trusted Partnership
Example of New Trusted Partnership, utilizing Client Merchant Account
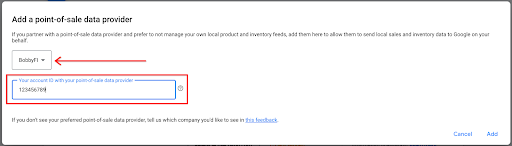
Populate the account identity that is linked with the point-of-sale data provider, and select "Add".
Under Inventory Verification Contact, enter the individual's first, last name and the email address. You can also use
liasettings.setinventoryverificationcontactAPI call to set the correct individual's detailsInventory Verification starts once the POS Data Provider & Inventory Verification Contact have been populated.
By setting your POS Data Provider & Inventory Verification Contact, you are ready for Step 5: Inventory Verification.
Before proceeding, Enable Free Local Inventory Ads.
Enable Local Inventory Ads
To begin showing local inventory for your store, follow these steps to enable Local Inventory Ads.
Login to Merchant Center for the Merchant
Go to the menu on the left-hand side of the screen. Select "Growth" → "Manage Programs"
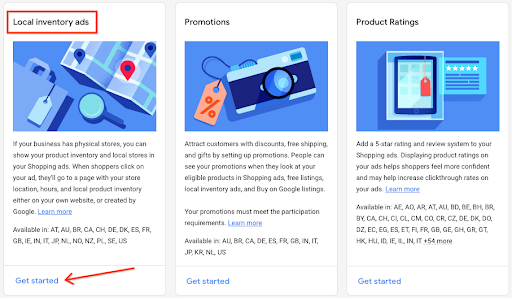
Click "Get Started" under the "Local inventory ads" tile.
Select a Country to sell into (United States Checked by Default), then Select "Continue"
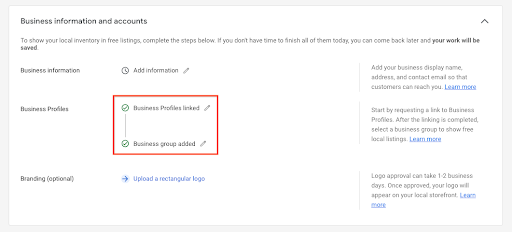
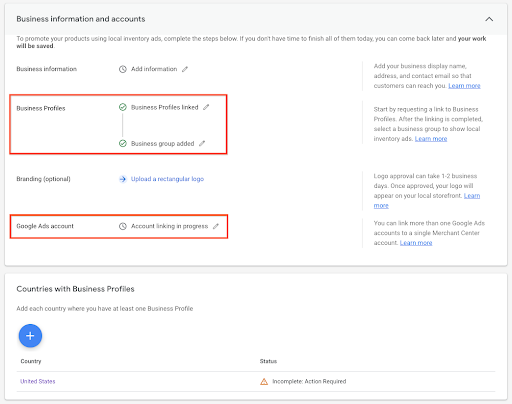
At the Business Information and Accounts Screen, if you completed Step 3: Google Business Profiles Account & Linking then these two items have a green check mark. Otherwise, complete the GBP linking process, then re-attach the business profile.
You can upload a rectangular logo, which is optional.
If you haven't done so already, create and link a Google Ads Account. Then, Select the Ads account from the screen.
UX Guidance
As you begin your merchant journey, begin to consider who the Inventory Verification Contact is going to be. Can you collect this data with the Merchant Information? All that is required is the full name of the person and their email address. This can assist you in making more efficient calls without having to disrupt the user journey.
Tech Guidance
Local Feeds Partnership
If the MCA already has an existing POS LFP Data Feed Provider,
liasettings.listposdataproviderscan be used to get a list of providers, including theirproviderIdandnames. This object can be large as it contains approved POS Data Providers for each country.Utilizing
lisasettings.setposdataprovider, authorized as the MCA account, set the following parameters:Path Parameters
merchantId: the MCA Aggregator IdentityaccountId: the sub-account or external merchant account
Query Parameters
country: the country code for the feed providerposDataProviderId: the ID returned fromlisasettings.setposdataprovider(the sub-account for the POS LFP Data Provider).posExternalAccountId- If you're using a new trusted partnership, then this should be your sub merchant account identity.
- If this is an existing POS LFP Data Provider, then use the recommended identity for that Data Provider.
After you've configured the POS LFP Data Feed Provider, call
liasettings.setinventoryverificationcontact, authorized as the MCA account, then set the following parameters:Path Parameters
merchantId: the MCA Aggregator IDaccountId: the account id of the sub account or external client account
Query Parameters
country: the country where the inventory contact is locatedlanguage: the spoken language of the inventory contactcontactName: the first and last name of the inventory contactcontactEmail: the email address of the inventory contact
Local Inventory Ads
To enable Local Inventory Ads programmatically, call
liasettings.updateusing theliasettingsobject which requires at minimal the account identification of the sub account or external client merchant account, and the population of theLiaCountrySettingsobject which is stored in thecountrySettingsobject. The only required field forLiaCountrySettingsis the country property, which is country code.There are no additional APIs that can be used to finalize the setup other than the Google Ads API for linking. At some point, you need to finish the Local Listings configuration through the UI.