Koleksiyonlar ile düzeninizi koruyun
İçeriği tercihlerinize göre kaydedin ve kategorilere ayırın.
6. Adım: Google Ads Kampanyası
Giriş ve İşletme Etkisi
Yerel envanter reklamları için Google Ads hesabınızı bağlamanız gerekir. Şuradan:
Yerel Envanter Reklamları için İşletme Bilgileri ve Hesaplar menüsünde,
hesabınızı bağlayın. Şu adrese giderek hesabınızı alabilir veya oluşturabilirsiniz:
Google Ads. Ekranın sağ üst köşesinde,
hesap profiliniz. Bu numarayı kopyalayıp Google Ads bağlantısı oluştur alanına yapıştırın
Hesap penceresi, ardından "Bağlantı İsteği Gönder"i seçin.
API istekleri için aşağıdaki kapsamı eklemeniz gerekir:
https://www.googleapis.com/auth/adwords
Merchant Center'da Ads hesabını bağlama
Merchant Center üzerinden Google Ads hesabı bağlayabilir veya oluşturabilirsiniz.
Daha fazla bilgiyi Merchant Center Yardım Kılavuzu'nda bulabilirsiniz.
Google Ads hesabınızı bağlayın
Google Ads'e Google Ads hesabınızı içeren hesapla giriş yapın.
Kampanyalar.
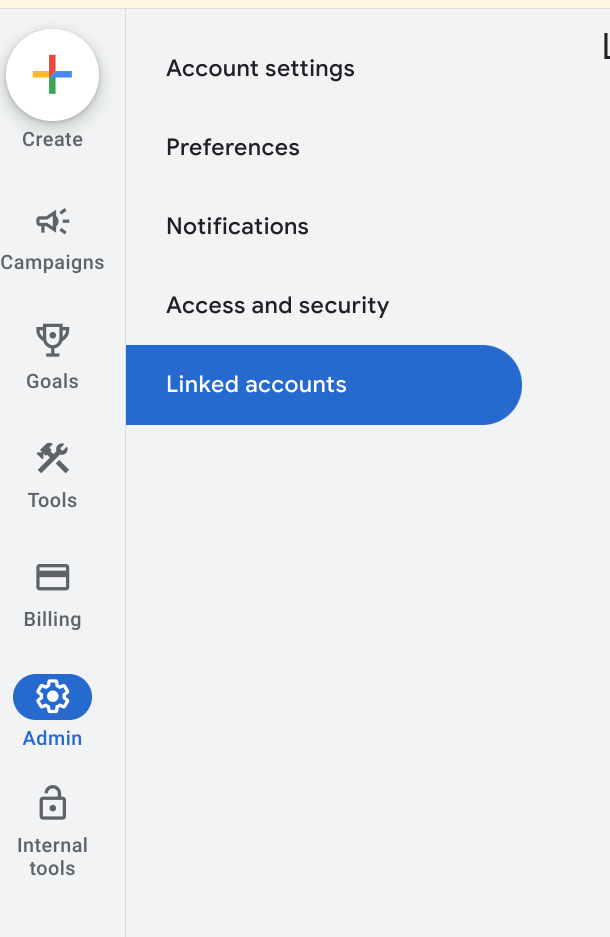
"Yönetici"yi tıklayın ayar çemberini tıklayın ve "Bağlı Hesaplar"ı seçin.
Bağlanabileceğiniz uygulamaların listesi görünür.
Yerel Envanter Reklamları etkinleştirilirken hesap kimliği, Google Merchant Center
en üstte, Yönetme ve Bağlantı. Google Merchant Center
genel liste, "Ayrıntılar" yanlış hesabı bağlamış olabilirsiniz,
yanlış Google Ads hesabına giriş yapmış veya
Tümü'ne dokunun. Aşağıdaki işlemleri yapmak için Ücretsiz Yerel Envanter Reklamları Listelemesini Etkinleştirme bölümünü ziyaret edin.
bu adımı tamamlayın. "Yönet ve Bağlantı" seçeneğini tıklayın.
Bağlı
Bağlantı kaldırıldı
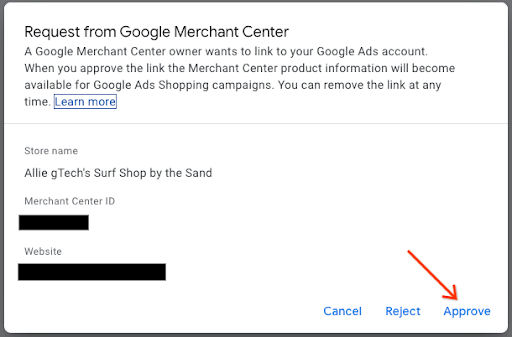
Bağlantı İstekleri penceresinde "İsteği Görüntüle"yi seçin.
Size söz konusu hesapla ilgili bilgi veren bir iletişim kutusu
bağlantı isteniyor. "Onayla"yı seçin.
Bağlandığında, yeni görünüm şunun durumuyla bağlantılı olan hesabı gösterir:
"Bağlı".
Google Ads Görünümü
Merchant Center Görünümü
Alışveriş reklamı kampanyası oluşturun ve yerel ürünleri etkinleştirin
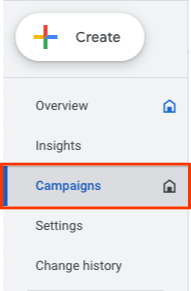
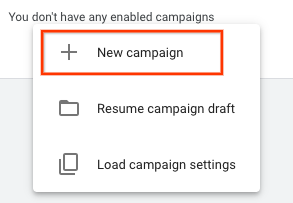
Ekranın sol tarafından "Kampanyalar"ı seçin, ardından
Kampanyalar penceresinde "Oluştur"u seçin. Bir pencere görünürse
"+ Yeni Kampanya."
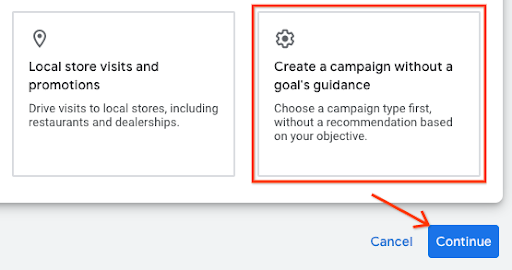
Kampanya seçim ekranı göründüğünde,
"Hedef kılavuzu olmadan bir kampanya oluşturun." Ardından "Devam"ı seçin.
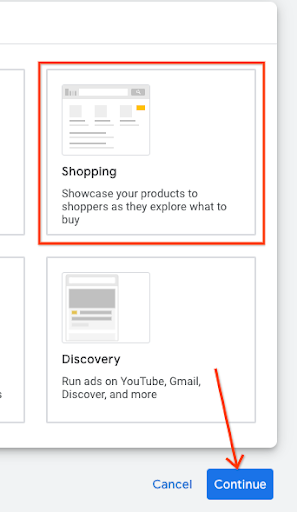
Sonraki seçeneklerde "Alışveriş"i seçin. karo
ardından "Devam"ı seçin.
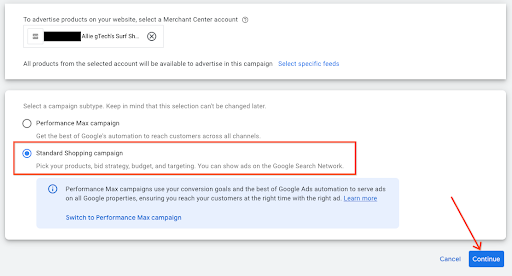
Hemen altında birkaç yeni seçenek görünür. Öncelikle, satıcınızın
hesap, metin alanında listelenen hesaptır. Ardından,
"Standart Alışveriş Kampanyası" Maksimum Performans kampanyası yerine
"Devam"ı seçin.
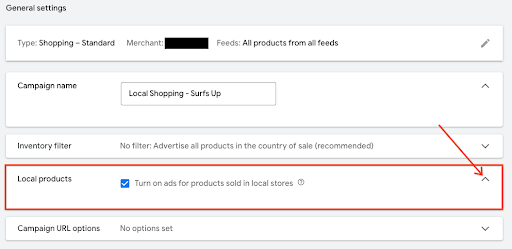
Sonraki menü Genel Ayarlar'ın altında görünür. Kampanya adı girin.
ardından yerel ürünler bölümünde, menüyü genişletmek için v ayracı tıklayın. Kutuyu işaretleyin
"Yerel mağazalarda satılan ürünlerin reklamlarını etkinleştir."
Alta gidin ve "Kampanya Oluştur"u seçin. Kaydedildiğinde,
yeni oluşturulan kampanya, kampanya ekranında görünür.
Kullanıcı Deneyimi Yönergeleri
Kampanyayı satıcının bir parçası olarak bağlayarak daha erken bağlantı kurulmasına yardımcı olabilirsiniz.
işleyeceğiz.
Teknoloji Rehberliği
Google Ads için API'yi kullanmak istiyorsanız
şu kapsam:
https://www.googleapis.com/auth/adwords.
Hesap bağlama için aşağıdaki isteği kullanırsınız:
CustomerClientLinkService Bu,
MutateCustomerClientLinkRequest, customer_id değerini kabul eder.
Programlı olarak yeni bir kampanya oluşturmak için
CampaignService.
[null,null,["Son güncelleme tarihi: 2025-07-25 UTC."],[[["\u003cp\u003eTo run local inventory ads, link your Google Ads account to your Merchant Center account, ensuring the correct account is selected for a seamless connection.\u003c/p\u003e\n"],["\u003cp\u003eCreate a Standard Shopping campaign in Google Ads and enable local products to display ads for items sold in your physical stores.\u003c/p\u003e\n"],["\u003cp\u003eFor API access, include the \u003ccode\u003ehttps://www.googleapis.com/auth/adwords\u003c/code\u003e scope to manage your Google Ads campaigns programmatically.\u003c/p\u003e\n"],["\u003cp\u003eMerchants can link an advertising account managed by a third party if they don't directly handle their own Google Ads campaigns.\u003c/p\u003e\n"]]],["To utilize local inventory ads, link your Google Ads account in Merchant Center by finding your account number on Google Ads and sending a link request. In Google Ads, navigate to \"Linked Accounts\" under the \"Admin\" settings and \"Approve\" the Merchant Center link request. To create a Shopping Ads campaign, select \"Campaigns\" then \"+New Campaign,\" choose \"Shopping,\" and \"Standard Shopping Campaign\". Finally, enable \"Turn on ads for products sold in local stores\" and create your campaign. For API access, add the `https://www.googleapis.com/auth/adwords` scope.\n"],null,["Step 6: Google Ads Campaign\n---------------------------\n\n### Introduction and Business Impact\n\n*** ** * ** ***\n\nFor local inventory ads, you need to link your Google Ads Account. From the\nBusiness Information and Accounts menu for Local Inventory Ads, there's a URL to\nlink your account. You can retrieve your account or create one by going to\n[Google Ads](https://ads.google.com). It's listed in the top-right corner of the screen next to\nyour account profile. Copy and paste this number in the Link a Google Ads\nAccount modal, then select, \"**Send Link Request**\".\n\nFor API requests, you need to add the following scope: \n\n https://www.googleapis.com/auth/adwords\n\n### Link the Ads Account in Merchant Center\n\nYou can link or create a Google Ads account through Merchant Center.\nMore details are available in the [Merchant Center Help guide](https://support.google.com/google-ads/answer/12499498).\n\n#### Link your Google Ads Account\n\n1. Login to [Google Ads](https://ads.google.com) with the account that contains your Google Ads\n Campaigns.\n\n2. Click the \"Admin\" settings wheel, then select \"**Linked Accounts**\".\n\n3. A list of applications appears that you can link to. If you linked the\n account identity while enabling Local Inventory Ads, Google Merchant Center\n should be at the top, with Manage \\& Link. Google Merchant Center is in the\n general list, with \"Details\" you may have either linked the wrong account,\n logged into the incorrect Google Ads account, or have not linked the account at\n all. Visit the [*Enabling Free Local Inventory Ads Listing*](https://developers.google.com/merchant/storebuilder/local/sections/4_0_enabling_and_configure_lia_pos#enabling_free_local_product_listings) section to\n complete this step. Select \"**Manage \\& Link**\".\n\n *Linked*\n\n *Unlinked*\n\n4. In the Link Requests window, select \"**View Request**\"\n\n5. A modal appears providing you information about the account that is\n requesting the link. Select \"**Approve**\"\n\n6. When linked, the new view shows the account that is linked with the status of\n \"**Linked**\".\n\n *Google Ads View*\n\n *Merchant Center View*\n\n#### Create Shopping Ads Campaign and Enable Local Products\n\n1. Login to [Google Ads](https://ads.google.com)\n\n2. Along the left hand side of the screen, select \"**Campaigns** \", then in the\n Campaigns windows, select \"**Create** .\" If a window appears, select\n \"+ **New Campaign**.\"\n\n3. When the campaign selection screen appears, select\n \"**Create a campaign without a goal's guidance** .\" Then, select \"**Continue**\".\n\n4. On the next set of options, select the \"**Shopping** \" tile,\n then select \"**Continue**.\"\n\n5. Just below, several new options appears. First, make sure your merchant\n account is the one that is listed in the text field. Then, select\n \"**Standard Shopping Campaign** \" instead of the Performance Max Campaign,\n select \"**Continue**.\"\n\n6. The next menu appears under General Settings. Provide a Campaign name,\n then under local products, click the chevron to expand the menu. Check the box,\n \"**Turn on ads for products sold in local stores**.\"\n\n7. Go to the bottom, and select \"**Create Campaign**.\" When saved,\n the newly created campaign appears on the campaign screen.\n\n### UX Guidance\n\n*** ** * ** ***\n\nYou can help link the campaign earlier by linking it as part of the merchant\ncollection process.\n\n### Tech Guidance\n\n*** ** * ** ***\n\n- For Google Ads, if you want to use the API, ensure that you've added the following scope:\n\n https://www.googleapis.com/auth/adwords.\n\n- For account linking, you consume the following request:\n CustomerClientLinkService. This takes the\n [MutateCustomerClientLinkRequest](https://developers.google.com/google-ads/api/reference/rpc/v13/MutateCustomerClientLinkRequest), which accepts a *customer_id*.\n\n- You can create a new campaign programmatically by consuming\n the [CampaignService](https://developers.google.com/google-ads/api/reference/rpc/v13/CampaignService).\n\n- For more information about how to use the Google Ads API, visit the following\n [Client Libraries and Example](https://developers.google.com/google-ads/api/docs/client-libs) page.\n\n| **Tip:** The merchant doesn't need to use their own Ads account. If the merchant's ad business is managed by a different account other than their own, they can use the same link method to link their account."]]