Trình quản lý thẻ của Google cung cấp thẻ theo dõi lượt chuyển đổi của Google Ads để hỗ trợ tính năng theo dõi lượt chuyển đổi Google Ads linh hoạt và dựa trên quy tắc cho các ứng dụng Android.
Hướng dẫn này cho bạn biết cách sử dụng Trình quản lý thẻ của Google để theo dõi lượt chuyển đổi cài đặt ứng dụng Android bằng Các thẻ theo dõi lượt chuyển đổi của Google Ads:
- Tạo lượt chuyển đổi mới trên Google Ads
- Tạo một điều kiện kích hoạt để kích hoạt lượt chuyển đổi trên Google Ads thẻ theo dõi
- Tạo thẻ theo dõi lượt chuyển đổi của Google Ads
- Cập nhật tệp
AndroidManifest.xml - Đẩy lượt chuyển đổi sự kiện đến lớp dữ liệu
- Ghi lại đường liên kết sâu
- Xuất bản vùng chứa
1. Tạo lượt chuyển đổi mới trên Google Ads
Cách tạo lượt chuyển đổi mới trong Google Ads:
- Đăng nhập vào tài khoản Google Ads.
- Trên thanh trình đơn, hãy chọn Tools (Công cụ) > Lượt chuyển đổi.
- Nhấp vào + LƯỢT CHUYỂN ĐỔI.
- Chọn Ứng dụng.
- Chọn Android và Lượt cài đặt ứng dụng (mở lần đầu) rồi nhấp vào Tiếp tục.
- Nhập những thông tin sau:
- Nhấp vào Name (Tên) cho tên của ứng dụng Android rồi nhấp vào hãy nhấp vào Xong.
- Nhấp vào Giá trị để nhập giá trị cho mỗi lượt cài đặt ứng dụng hoặc chọn Không chỉ định giá trị cho lượt cài đặt này rồi nhấp vào Xong.
- Nhấp vào Package name (Tên gói) để nhập tên gói cho ứng dụng Android trong Google Play rồi nhấp vào Xong.
- Nhấp vào Tối ưu hoá (bị tắt theo mặc định). Để bật tối ưu hoá, hãy nhấp TẮT để chuyển sang trạng thái BẬT rồi nhấp vào Xong.
- (Tùy chọn). Nhấp vào URL đăng lại để nhập URL từ nhà cung cấp dịch vụ phân tích nơi bạn muốn đăng lượt chuyển đổi và nhấp vào Xong.
- Nhấp vào Lưu và tiếp tục.
- Xem lại các chế độ cài đặt lượt chuyển đổi của bạn. Để thay đổi các chế độ cài đặt này, nhấp vào Chỉnh sửa chế độ cài đặt.
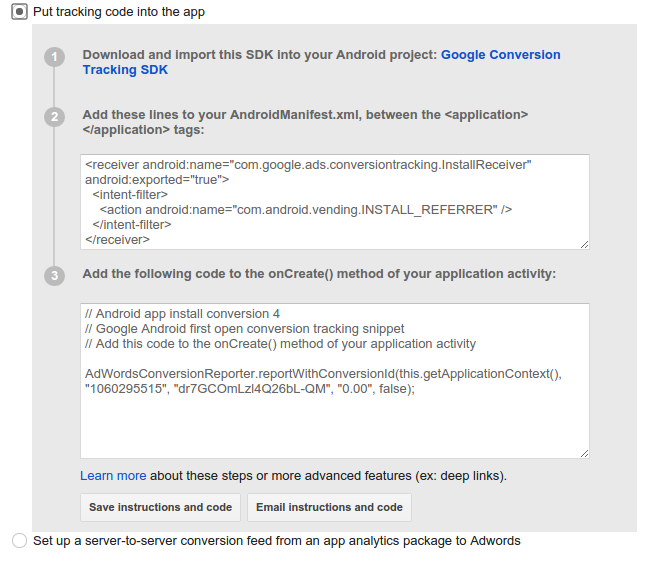
- Trong Thiết lập phương pháp theo dõi của bạn, hãy chọn Đặt mã theo dõi vào ứng dụng.
- Nhấp vào Lưu hướng dẫn và mã hoặc Gửi hướng dẫn và mã qua email để lưu mã chuyển đổi và Đây là nhãn chuyển đổi bắt buộc tạo thẻ theo dõi lượt chuyển đổi của Google Ads.
- Nhấp vào Xong.
2. Tạo một điều kiện kích hoạt để kích hoạt lượt chuyển đổi trên Google Ads thẻ theo dõi
Để tạo trình kích hoạt trong Trình quản lý thẻ của Google để kích hoạt Thẻ theo dõi lượt chuyển đổi của Google Ads:
- Đăng nhập vào Trình quản lý thẻ của Google. tài khoản.
- Chọn một vùng chứa thiết bị di động.
- Trên thanh điều hướng bên trái, hãy nhấp vào Điều kiện kích hoạt.
- Nhấp vào Mới.
- Trong Kích hoạt khi, hãy nhập các điều kiện sau:

- Nhấp vào Tạo điều kiện kích hoạt.
- Nhập tên điều kiện kích hoạt.
- Nhấp vào Lưu.
3. Tạo thẻ theo dõi lượt chuyển đổi của Google Ads
Cách tạo thẻ theo dõi lượt chuyển đổi của Google Ads:
- Đăng nhập vào Trình quản lý thẻ của Google. tài khoản.
- Chọn một vùng chứa thiết bị di động.
- Trên thanh điều hướng bên trái, hãy nhấp vào Thẻ.
- Nhấp vào Mới.
- Chọn Google Ads cho sản phẩm.
- Chọn loại thẻ Theo dõi lượt chuyển đổi Google Ads.
- Nhập Mã chuyển đổi và Nhãn chuyển đổi.
- Chọn Không thể lặp lại.
- Nhấp vào Tiếp tục.
- Trong phần Kích hoạt, hãy chọn sự kiện Tuỳ chỉnh.
- Chọn điều kiện kích hoạt được tạo ở bước 2.
- Nhấp vào Lưu.
- Nhấp vào Tạo thẻ.
- Nhập tên thẻ (ví dụ: Lượt chuyển đổi cài đặt ứng dụng Android).
- Nhấp vào Lưu.
4. Cập nhật tệp AndroidManifest.xml
Trong Android Studio, hãy mở tệp AndroidManifest.xml để thêm
như sau trong thẻ <application>:
<service android:name="com.google.android.gms.tagmanager.InstallReferrerService"/>
<receiver
   android:name="com.google.android.gms.tagmanager.InstallReferrerReceiver"
   android:exported="true">
   <intent-filter>
       <action android:name="com.android.vending.INSTALL_REFERRER" />
   </intent-filter>
</receiver>
5. Đẩy sự kiện chuyển đổi trên Google Ads vào lớp dữ liệu
Khởi chạy đầu tiên Trình quản lý thẻ của Google (GTM). Sau đó, hãy thêm mã sau đây vào ứng dụng của bạn để đẩy sự kiện chuyển đổi Google Ads vào lớp dữ liệu. Điều này sẽ cho phép GTM để đánh giá trình kích hoạt và kích hoạt thẻ so khớp:
DataLayer dataLayer = TagManager.getInstance(context).getDataLayer();
dataLayer.pushEvent("appLaunch", DataLayer.mapOf());
6. Ghi lại đường liên kết sâu
Nếu ứng dụng của bạn sử dụng tính năng liên kết sâu, để ghi lại lượt chuyển đổi liên kết sâu,
đẩy đường liên kết đến lớp dữ liệu dưới dạng "gtm.url" trong các hoạt động
được khởi chạy theo ý định của bạn:
if (this.getIntent() != null && this.getIntent().getData() != null ) {
  TagManager.getInstance(this).getDataLayer().push("gtm.url", this.getIntent().getData().toString());
}
7. Xuất bản vùng chứa
Bây giờ, bạn có thể xuất bản vùng chứa của mình để bắt đầu kích hoạt thẻ chuyển đổi Google Ads. Để biết chi tiết, hãy xem Thêm, cập nhật và xuất bản thẻ trên Thiết lập và quy trình làm việc (Ứng dụng dành cho thiết bị di động).

