이 가이드는 서버 측 태그 지정에 Cloud Run을 사용하여 비공개 미리보기 서버를 설정하려고 하는 개발자를 위한 가이드입니다.
서버 측 태그 지정을 사용하면 태그 지정 변경사항을 적용하기 전에 미리보기 및 디버그 모드에서 미리 볼 수 있습니다. 이 단계는 개발 워크플로에서 태그가 의도대로 작동하는지 확인하기 위한 중요한 부분입니다. 이 기능을 사용 설정하려면 태그 관리 서버용 하나, 미리보기 서버용 하나 등 두 개의 Cloud Run 배포가 필요합니다. 이 가이드에서는 두 서버가 커뮤니케이션하는 방법 및 엔터프라이즈 환경에서 서버를 구성하는 방법을 자세히 설명합니다.
개요
서버 측 태그 지정을 Cloud Run에 배포할 때 부하 분산기를 사용하거나 사용하지 않고 배포할 수 있습니다. 멀티 리전 배포의 경우 트래픽을 가장 가까운 인스턴스로 유도하기 위해 부하 분산기가 필요합니다.
부하 분산기를 사용하지 않음
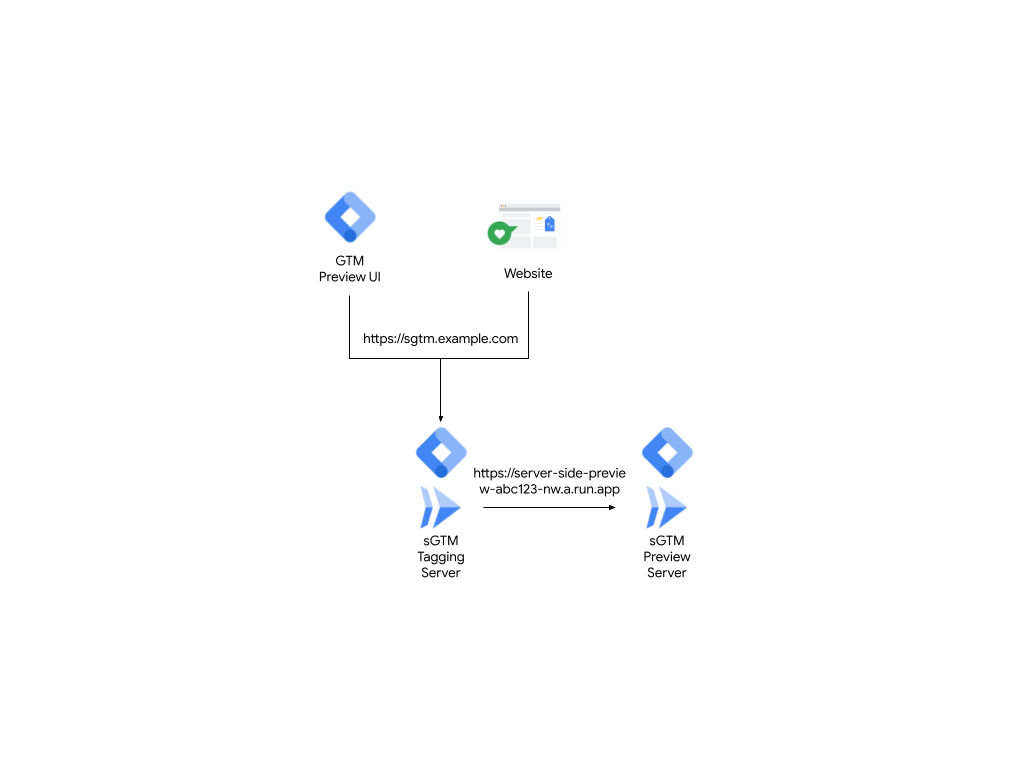
그림 1: 부하 분산기를 사용하지 않는 배포
부하 분산기 사용
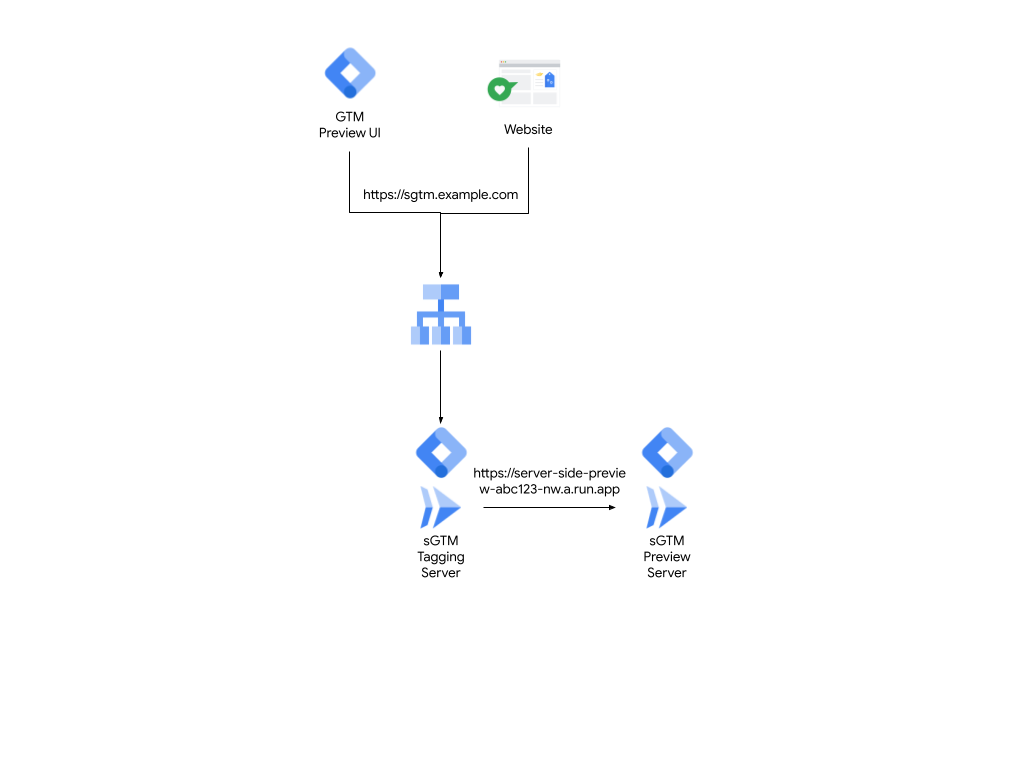
그림 2: 부하 분산기를 사용한 배포
두 배포에서 미리보기 서버와 프로덕션 태그 지정 환경의 진입점은 동일한 URL(예: sgtm.example.com)입니다. 태그 관리 서버는 미리보기 서버의 URL을 나타내는 PREVIEW_SERVER_URL이라고 하는 환경 변수를 사용하여 배포됩니다.
tagmanager.google.com을 방문하여 미리보기 서버를 열면 태그 관리자가 sgtm.example.com?id=[gtm_server_id]>m_auth=[auth_id]>m_preview=[env_id]로 이동하여 쿠키를 설정합니다. 그런 다음 동일한 브라우저를 사용하여 대상 웹사이트를 살펴보면 sgtm.example.com에 전송된 요청도 쿠키를 전달합니다. 쿠키 때문에 태그 관리 서버에서 이 이벤트가 사용자의 이벤트임을 알게 되므로, 사용자가 보고 문제를 해결할 수 있도록 이벤트를 미리보기 서버에만 전달합니다.
태그 관리 서버는 PREVIEW_SERVER_URL 환경 변수에 설정된 URL에 HTTP 요청을 보내 이러한 이벤트를 전달합니다.
공개용 미리보기 서버에 대한 정보
이 기본 동작을 실행하려면 미리보기 서버를 공개해야 합니다. 하지만, 일부 조직의 경우 공개할 수 있는 인프라에 대한 제한이 있고 일반적으로 부하 분산기를 통해 보안 조치가 적용되므로 미리보기 서버를 공개하는 데 문제가 있습니다. 부하 분산기는 다음과 같은 기능을 제공합니다.
- 암호화 스위트를 제한하기 위한 SSL 정책과 같은 더 세부적인 관리 기능
- 웹 애플리케이션 방화벽(WAF) 또는 DDoS에 대한 Cloud Armor와 기본 통합.
- 고급 트래픽 측정 기능
부하 분산기를 통해 미리보기 서버 라우팅
비공개 미리보기 서버를 만들려면 추가 하위 도메인이 있는 부하 분산기를 통해 호스트 기반 라우팅을 사용하세요. 이 가이드의 나머지 부분에서는 부하 분산기를 통해 미리보기 서버를 라우팅하는 방법을 설명합니다.
기본 요건
- 태그 관리 서버가 부하 분산기 뒤의 Cloud Run에 배포되어 있음
- Google Cloud 프로젝트에 대한 액세스 권한
- 미리보기 서버의 새 하위 도메인(예:
preview.sgtm.example.com)에 대한 액세스 권한
1단계: 새로운 하위 도메인을 사용하여 환경 변수 업데이트
새 미리보기 서버 도메인을 사용하려면 서버 측 태그 지정 서버 환경 변수 PREVIEW_SERVER_URL을 업데이트하세요.
- Cloud Run을 엽니다.
- 태그 관리 서버를 선택합니다.
- 수정 및 새 버전 배포를 클릭합니다.
- 변수 및 보안 비밀 탭 아래 컨테이너 섹션에서
PREVIEW_SERVER_URL을 새 도메인으로 변경합니다. 예:preview.sgtm.example.com.
2단계: 호스트 기반 라우팅을 사용하도록 기존 부하 분산기 구성
기존 부하 분산기를 구성하려면 호스트 기반 라우팅을 사용하여 올바른 서버에 트래픽을 보내세요.
- Cloud Run에서 부하 분산 페이지를 열고 부하 분산기의 이름을 클릭합니다.
- 수정 버튼을 클릭합니다.
- 백엔드 구성 페이지를 클릭하고 백엔드 서비스 및 백엔드 버킷 드롭다운을 엽니다.
- 백엔드 서비스 만들기를 클릭하고 다음을 완료합니다.
- 적절한 이름을 지정합니다(예:
preview-backend-service). - 백엔드 유형을 서버리스 네트워크 엔드포인트 그룹으로 선택합니다.
- 적절한 이름을 지정합니다(예:
- 백엔드 섹션에서 새 서버리스 네트워크 엔드포인트 그룹을 만들고 다음을 완료합니다.
- 이름을 지정하고 미리보기 서버가 호스팅되는 지역을 선택합니다.
- Cloud Run을 서버리스 네트워크 엔드포인트 그룹 유형으로 선택하고 미리보기 서버를 서비스로 선택합니다.
- 만들기를 클릭합니다.
- 필요에 따라 다른 설정을 변경하거나 기본값을 유지하고 만들기를 클릭합니다.
3단계: 새로운 규칙 추가 및 인그레스 제어 업데이트
새 호스트 URL에 대한 규칙을 추가하고 인그레스 제어를 업데이트하려면 다음 단계를 따르세요.
- 호스트 및 경로 규칙 페이지를 엽니다.
- 새 규칙을 추가합니다. 여기서,
- 호스트(새 URL):
preview.sgtm.example.com - 경로:
/* - 백엔드:
preview-backend-service
- 호스트(새 URL):
- 업데이트 버튼을 클릭하여 부하 분산기를 다시 배포합니다.
- Cloud Run으로 돌아가 미리보기 서버를 열고 네트워킹 탭을 선택합니다.
- 공개적으로 액세스할 수 없도록 인그레스 제어를 내부로 변경하고 외부 애플리케이션 부하 분산기의 트래픽 허용을 선택합니다.
결과: 이제 서버 아키텍처는 그림 3과 같습니다. 여기서, 트래픽 요청은 모두 태그 관리 서버에 전달되며 태그 관리 서버는 미리보기 서버로 요청을 전달할 수 있습니다.
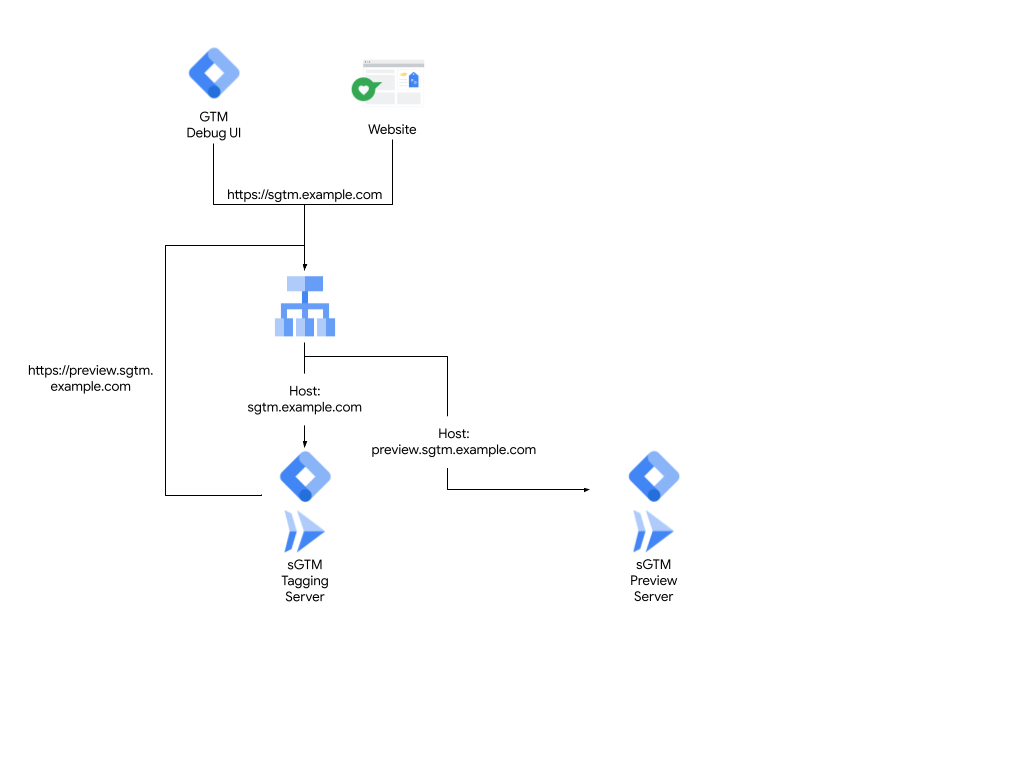
그림 3: 호스트 기반 라우팅
구성 확인
구성을 확인하려면 다음 단계를 따르세요.
- Google 태그 관리자를 엽니다.
- 서버 컨테이너를 엽니다.
- 관리 > 컨테이너 설정을 클릭하고 서버 컨테이너 URL을 미리보기 서버 URL로 설정합니다.
- 창을 닫고 작업공간을 미리 봅니다. 디버그 창이 열립니다. 웹사이트를 탐색하면 디버그 창에 이벤트가 표시됩니다.