
이 문서에서는 Google Tasks API를 사용하여 사용자의 작업을 표시하는 샘플 웹 애플리케이션을 통해 Java 서블릿을 사용하여 OAuth 2.0 승인 콜백 핸들러를 구현하는 방법을 설명합니다. 샘플 애플리케이션은 먼저 사용자의 Google Tasks에 액세스할 권한을 요청한 다음 기본 작업 목록에 사용자의 작업을 표시합니다.
잠재고객
이 문서는 Java 및 J2EE 웹 애플리케이션 아키텍처에 익숙한 사용자를 위해 작성되었습니다. OAuth 2.0 승인 흐름에 대한 지식이 있으면 좋습니다.
목차
이러한 완전히 작동하는 샘플을 사용하려면 다음 단계를 따라야 합니다.
- web.xml 파일에서 서블릿 매핑 선언
- 시스템에서 사용자를 인증하고 Tasks에 액세스할 수 있는 권한 요청
- Google 승인 엔드포인트에서 승인 코드 수신 대기
- 승인 코드를 갱신 및 액세스 토큰으로 교환
- 사용자의 할 일을 읽고 표시
web.xml 파일에서 서블릿 매핑 선언
이 애플리케이션은 다음 두 서블릿을 사용합니다.
- PrintTasksTitlesServlet (
/에 매핑됨): 사용자 인증을 처리하고 사용자의 작업을 표시하는 애플리케이션의 진입점 - OAuthCodeCallbackHandlerServlet (
/oauth2callback에 매핑됨): OAuth 승인 엔드포인트의 응답을 처리하는 OAuth 2.0 콜백
다음은 애플리케이션에서 이러한 두 서블릿을 URL에 매핑하는 web.xml 파일입니다.
<?xml version="1.0" encoding="UTF-8"?>
<web-app version="2.5" xmlns="http://java.sun.com/xml/ns/javaee"
    xmlns:xsi="http://www.w3.org/2001/XMLSchema-instance"
    xsi:schemaLocation="http://java.sun.com/xml/ns/javaee http://java.sun.com/xml/ns/javaee/web-app_2_5.xsd">

 <servlet>
   <servlet-name>PrintTasksTitles</servlet-name>
   <servlet-class>com.google.oauthsample.PrintTasksTitlesServlet</servlet-class>
 </servlet>

 <servlet-mapping>
   <servlet-name>PrintTasksTitles</servlet-name>
   <url-pattern>/</url-pattern>
 </servlet-mapping>

 <servlet>
   <servlet-name>OAuthCodeCallbackHandlerServlet</servlet-name>
   <servlet-class>com.google.oauthsample.OAuthCodeCallbackHandlerServlet</servlet-class>
 </servlet>

 <servlet-mapping>
   <servlet-name>OAuthCodeCallbackHandlerServlet</servlet-name>
   <url-pattern>/oauth2callback</url-pattern>
 </servlet-mapping>

</web-app>시스템에서 사용자를 인증하고 작업에 액세스할 수 있는 권한을 요청합니다.
사용자는 PrintTaskListsTitlesServlet 서블릿에 매핑된 루트 '/' URL을 통해 애플리케이션에 진입합니다. 이 서블릿에서는 다음 작업을 실행합니다.
- 사용자가 시스템에서 인증되었는지 확인합니다.
- 사용자가 인증되지 않은 경우 인증 페이지로 리디렉션됩니다.
- 사용자가 인증되면 데이터 저장소에 이미 있는 새로고침 토큰이 확인되며, 이는 아래
OAuthTokenDao에서 처리합니다. 사용자의 저장소에서 토큰을 사용할 수 없는 경우 사용자가 아직 애플리케이션에 작업 액세스 권한을 부여하지 않은 것입니다. 그런 다음 사용자는 Google의 OAuth 2.0 승인 엔드포인트로 리디렉션됩니다.
다음은 이를 구현하는 방법을 보여줍니다.
package com.google.oauthsample;

import ...

/**
 * Simple sample Servlet which will display the tasks in the default task list of the user.
 */
@SuppressWarnings("serial")
public class PrintTasksTitlesServlet extends HttpServlet {

  /**
   * The OAuth Token DAO implementation, used to persist the OAuth refresh token.
   * Consider injecting it instead of using a static initialization. Additionally, a
   * simple memory implementation is used as a mock. Change the implementation to
   * using the user's own user/login implementation.
   */
  public static OAuthTokenDao oauthTokenDao = new OAuthTokenDaoMemoryImpl();

  public void doGet(HttpServletRequest req, HttpServletResponse resp) throws IOException {
    // Getting the current user
    // This is using App Engine's User Service but you should replace this to
    // your own user/login implementation
    UserService userService = UserServiceFactory.getUserService();
    User user = userService.getCurrentUser();

    // If the user is not logged-in it is redirected to the login service, then back to this page
    if (user == null) {
      resp.sendRedirect(userService.createLoginURL(getFullRequestUrl(req)));
      return;
    }

    // Checking if we already have tokens for this user in store
    AccessTokenResponse accessTokenResponse = oauthTokenDao.getKeys(user.getEmail());

    // If tokens are not available for this user
    if (accessTokenResponse == null) {
      OAuthProperties oauthProperties = new OAuthProperties();
      // Redirects to the Google OAuth 2.0 authorization endpoint
      resp.sendRedirect(new GoogleAuthorizationRequestUrl(oauthProperties.getClientId(),
          OAuthCodeCallbackHandlerServlet.getOAuthCodeCallbackHandlerUrl(req), oauthProperties
              .getScopesAsString()).build());
      return;
    }
  }

  /**
   * Construct the request's URL without the parameter part.
   *
   * @param req the HttpRequest object
   * @return The constructed request's URL
   */
  public static String getFullRequestUrl(HttpServletRequest req) {
    String scheme = req.getScheme() + "://";
    String serverName = req.getServerName();
    String serverPort = (req.getServerPort() == 80) ? "" : ":" + req.getServerPort();
    String contextPath = req.getContextPath();
    String servletPath = req.getServletPath();
    String pathInfo = (req.getPathInfo() == null) ? "" : req.getPathInfo();
    String queryString = (req.getQueryString() == null) ? "" : "?" + req.getQueryString();
    return scheme + serverName + serverPort + contextPath + servletPath + pathInfo + queryString;
  }
}
참고: 위의 구현에서는 일부 App Engine 라이브러리를 사용합니다. 이는 단순화를 위해 사용됩니다. 다른 플랫폼용으로 개발하는 경우 사용자 인증을 처리하는 UserService 인터페이스를 다시 구현합니다.
애플리케이션은 DAO를 사용하여 사용자의 승인 토큰을 유지하고 액세스합니다.
이 샘플에서 사용되는 OAuthTokenDao 인터페이스와 모의 (메모리 내) 구현인 OAuthTokenDaoMemoryImpl은 다음 예에 나와 있습니다.
package com.google.oauthsample;

import com.google.api.client.auth.oauth2.draft10.AccessTokenResponse;

/**
 * Allows easy storage and access of authorization tokens.
 */
public interface OAuthTokenDao {

  /**
   * Stores the given AccessTokenResponse using the {@code username}, the OAuth
   * {@code clientID} and the tokens scopes as keys.
   *
   * @param tokens The AccessTokenResponse to store
   * @param userName The userName associated wit the token
   */
  public void saveKeys(AccessTokenResponse tokens, String userName);

  /**
   * Returns the AccessTokenResponse stored for the given username, clientId and
   * scopes. Returns {@code null} if there is no AccessTokenResponse for this
   * user and scopes.
   *
   * @param userName The username of which to get the stored AccessTokenResponse
   * @return The AccessTokenResponse of the given username
   */
  public AccessTokenResponse getKeys(String userName);
}
package com.google.oauthsample;

import com.google.api.client.auth.oauth2.draft10.AccessTokenResponse;
...

/**
 * Quick and Dirty memory implementation of {@link OAuthTokenDao} based on
 * HashMaps.
 */
public class OAuthTokenDaoMemoryImpl implements OAuthTokenDao {

  /** Object where all the Tokens will be stored */
  private static Map<String, AccessTokenResponse> tokenPersistance = new HashMap<String, AccessTokenResponse>();

  public void saveKeys(AccessTokenResponse tokens, String userName) {
    tokenPersistance.put(userName, tokens);
  }

  public AccessTokenResponse getKeys(String userName) {
    return tokenPersistance.get(userName);
  }
}
애플리케이션의 OAuth 2.0 사용자 인증 정보는 속성 파일에 저장됩니다.
또는 Java 클래스 중 하나의 어딘가에 상수로 저장할 수 있습니다.
다음은 샘플에서 사용되는 OAuthProperties 클래스와 oauth.properties 파일입니다.
package com.google.oauthsample;

import ...

/**
 * Object representation of an OAuth properties file.
 */
public class OAuthProperties {

  public static final String DEFAULT_OAUTH_PROPERTIES_FILE_NAME = "oauth.properties";

  /** The OAuth 2.0 Client ID */
  private String clientId;

  /** The OAuth 2.0 Client Secret */
  private String clientSecret;

  /** The Google APIs scopes to access */
  private String scopes;

  /**
   * Instantiates a new OauthProperties object reading its values from the
   * {@code OAUTH_PROPERTIES_FILE_NAME} properties file.
   *
   * @throws IOException IF there is an issue reading the {@code propertiesFile}
   * @throws OauthPropertiesFormatException If the given {@code propertiesFile}
   *           is not of the right format (does not contains the keys {@code
   *           clientId}, {@code clientSecret} and {@code scopes})
   */
  public OAuthProperties() throws IOException {
    this(OAuthProperties.class.getResourceAsStream(DEFAULT_OAUTH_PROPERTIES_FILE_NAME));
  }

  /**
   * Instantiates a new OAuthProperties object, reading its values from the given
   * properties file.
   *
   * @param propertiesFile the InputStream to read an OAuth Properties file. The
   *          file should contain the keys {@code clientId}, {@code
   *          clientSecret} and {@code scopes}
   * @throws IOException if there is an issue reading the {@code propertiesFile}
   * @throws OAuthPropertiesFormatException If the given {@code propertiesFile}
   *           is not in the correct format (does not contain the keys {@code
   *           clientId}, {@code clientSecret} and {@code scopes})
   */
  public OAuthProperties(InputStream propertiesFile) throws IOException {
    Properties oauthProperties = new Properties();
    oauthProperties.load(propertiesFile);
    clientId = oauthProperties.getProperty("clientId");
    clientSecret = oauthProperties.getProperty("clientSecret");
    scopes = oauthProperties.getProperty("scopes");
    if ((clientId == null) || (clientSecret == null) || (scopes == null)) {
      throw new OAuthPropertiesFormatException();
    }
  }

  /**
   * @return the clientId
   */
  public String getClientId() {
    return clientId;
  }

  /**
   * @return the clientSecret
   */
  public String getClientSecret() {
    return clientSecret;
  }

  /**
   * @return the scopes
   */
  public String getScopesAsString() {
    return scopes;
  }

  /**
   * Thrown when the OAuth properties file was not at the right format, i.e not
   * having the right properties names.
   */
  @SuppressWarnings("serial")
  public class OAuthPropertiesFormatException extends RuntimeException {
  }
}
애플리케이션의 OAuth 2.0 사용자 인증 정보를 포함하는 oauth.properties 파일은 다음 예에 표시되어 있습니다.
이 파일의 값을 변경해야 합니다.
# Client ID and secret. They can be found in the APIs console.
clientId=1234567890.apps.googleusercontent.com
clientSecret=aBcDeFgHiJkLmNoPqRsTuVwXyZ
# API scopes. Space separated.
scopes=https://www.googleapis.com/auth/tasks
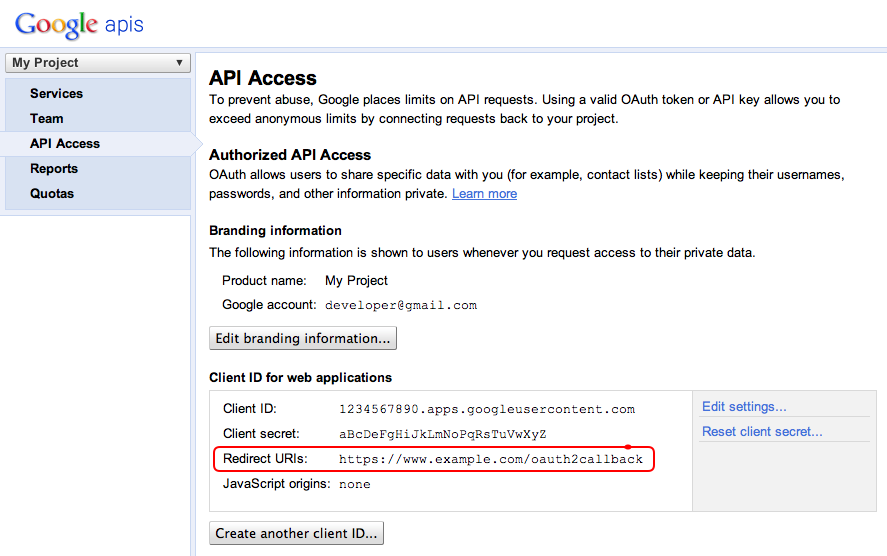
OAuth 2.0 클라이언트 ID와 클라이언트 보안 비밀은 애플리케이션을 식별하고 Tasks API가 애플리케이션에 정의된 필터와 할당량 규칙을 적용할 수 있도록 합니다. 클라이언트 ID와 보안 비밀은 Google API 콘솔에서 확인할 수 있습니다. 콘솔에 액세스한 후 사용자는 다음 단계를 따라야 합니다.
- 프로젝트를 만들거나 선택합니다.
- 서비스 목록에서 Tasks API 상태를 사용으로 설정하여 Tasks API를 사용 설정합니다.
- API 액세스에서 아직 OAuth 2.0 클라이언트 ID가 생성되지 않은 경우 생성합니다.
- 프로젝트의 OAuth 2.0 코드 콜백 핸들러 URL이 리디렉션 URI에 등록/허용 목록에 추가되어 있는지 확인합니다. 예를 들어 이 샘플 프로젝트에서 웹 애플리케이션이
https://www.example.com도메인에서 제공되는 경우 사용자는https://www.example.com/oauth2callback를 등록해야 합니다.
Google 승인 엔드포인트의 승인 코드 처리
사용자가 아직 애플리케이션의 작업 액세스를 승인하지 않아 Google의 OAuth 2.0 승인 엔드포인트로 리디렉션되는 경우 사용자에게 애플리케이션의 작업 액세스를 승인하라는 Google의 승인 대화상자가 표시됩니다.
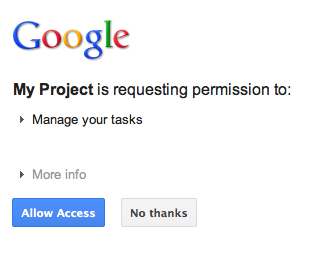
액세스를 부여하거나 거부한 후 사용자는 Google 승인 URL을 구성할 때 리디렉션/콜백으로 지정된 OAuth 2.0 코드 콜백 핸들러로 다시 리디렉션됩니다.
new GoogleAuthorizationRequestUrl(oauthProperties.getClientId(),
      OAuthCodeCallbackHandlerServlet.getOAuthCodeCallbackHandlerUrl(req), oauthProperties
          .getScopesAsString()).build()
OAuth 2.0 코드 콜백 핸들러인 OAuthCodeCallbackHandlerServlet는 Google OAuth 2.0 엔드포인트에서 리디렉션을 처리합니다. 처리해야 하는 두 가지 사례는 다음과 같습니다.
- 사용자가 액세스 권한을 부여했습니다. 요청이 파싱되어 URL 매개변수에서 OAuth 2.0 코드를 가져옵니다.
- 사용자가 액세스를 거부했습니다. 사용자에게 메시지가 표시됩니다.
package com.google.oauthsample;

import ...

/**
 * Servlet handling the OAuth callback from the authentication service. We are
 * retrieving the OAuth code, then exchanging it for a refresh and an access
 * token and saving it.
 */
@SuppressWarnings("serial")
public class OAuthCodeCallbackHandlerServlet extends HttpServlet {

  /** The name of the Oauth code URL parameter */
  public static final String CODE_URL_PARAM_NAME = "code";

  /** The name of the OAuth error URL parameter */
  public static final String ERROR_URL_PARAM_NAME = "error";

  /** The URL suffix of the servlet */
  public static final String URL_MAPPING = "/oauth2callback";

  public void doGet(HttpServletRequest req, HttpServletResponse resp) throws IOException {
    // Getting the "error" URL parameter
    String[] error = req.getParameterValues(ERROR_URL_PARAM_NAME);

    // Checking if there was an error such as the user denied access
    if (error != null && error.length > 0) {
      resp.sendError(HttpServletResponse.SC_NOT_ACCEPTABLE, "There was an error: \""+error[0]+"\".");
      return;
    }
    // Getting the "code" URL parameter
    String[] code = req.getParameterValues(CODE_URL_PARAM_NAME);

    // Checking conditions on the "code" URL parameter
    if (code == null || code.length == 0) {
      resp.sendError(HttpServletResponse.SC_BAD_REQUEST, "The \"code\" URL parameter is missing");
      return;
    }
  }

  /**
   * Construct the OAuth code callback handler URL.
   *
   * @param req the HttpRequest object
   * @return The constructed request's URL
   */
  public static String getOAuthCodeCallbackHandlerUrl(HttpServletRequest req) {
    String scheme = req.getScheme() + "://";
    String serverName = req.getServerName();
    String serverPort = (req.getServerPort() == 80) ? "" : ":" + req.getServerPort();
    String contextPath = req.getContextPath();
    String servletPath = URL_MAPPING;
    String pathInfo = (req.getPathInfo() == null) ? "" : req.getPathInfo();
    return scheme + serverName + serverPort + contextPath + servletPath + pathInfo;
  }
}
승인 코드를 갱신 및 액세스 토큰으로 교환
그런 다음 OAuthCodeCallbackHandlerServlet가 Auth 2.0 코드를 갱신 및 액세스 토큰으로 교환하고 데이터 저장소에 유지하며 사용자를 PrintTaskListsTitlesServlet URL로 다시 리디렉션합니다.
파일에 추가된 코드가 강조 표시됩니다.
package com.google.oauthsample;

import ...

/**
 * Servlet handling the OAuth callback from the authentication service. We are
 * retrieving the OAuth code, then exchanging it for a refresh and an access
 * token and saving it.
 */
@SuppressWarnings("serial")
public class OAuthCodeCallbackHandlerServlet extends HttpServlet {

  /** The name of the Oauth code URL parameter */
  public static final String CODE_URL_PARAM_NAME = "code";

  /** The name of the OAuth error URL parameter */
  public static final String ERROR_URL_PARAM_NAME = "error";

  /** The URL suffix of the servlet */
  public static final String URL_MAPPING = "/oauth2callback";
  /** The URL to redirect the user to after handling the callback. Consider
   * saving this in a cookie before redirecting users to the Google
   * authorization URL if you have multiple possible URL to redirect people to. */
  public static final String REDIRECT_URL = "/";

  /** The OAuth Token DAO implementation. Consider injecting it instead of using
   * a static initialization. Also we are using a simple memory implementation
   * as a mock. Change the implementation to using your database system. */
  public static OAuthTokenDao oauthTokenDao = new OAuthTokenDaoMemoryImpl();

  public void doGet(HttpServletRequest req, HttpServletResponse resp) throws IOException {
    // Getting the "error" URL parameter
    String[] error = req.getParameterValues(ERROR_URL_PARAM_NAME);

    // Checking if there was an error such as the user denied access
    if (error != null && error.length > 0) {
      resp.sendError(HttpServletResponse.SC_NOT_ACCEPTABLE, "There was an error: \""+error[0]+"\".");
      return;
    }

    // Getting the "code" URL parameter
    String[] code = req.getParameterValues(CODE_URL_PARAM_NAME);

    // Checking conditions on the "code" URL parameter
    if (code == null || code.length == 0) {
      resp.sendError(HttpServletResponse.SC_BAD_REQUEST, "The \"code\" URL parameter is missing");
      return;
    }
    // Construct incoming request URL
    String requestUrl = getOAuthCodeCallbackHandlerUrl(req);

    // Exchange the code for OAuth tokens
    AccessTokenResponse accessTokenResponse = exchangeCodeForAccessAndRefreshTokens(code[0],
        requestUrl);

    // Getting the current user
    // This is using App Engine's User Service, but the user should replace this
    // with their own user/login implementation
    UserService userService = UserServiceFactory.getUserService();
    String email = userService.getCurrentUser().getEmail();

    // Save the tokens
    oauthTokenDao.saveKeys(accessTokenResponse, email);

    resp.sendRedirect(REDIRECT_URL);
  }

  /**
   * Construct the OAuth code callback handler URL.
   *
   * @param req the HttpRequest object
   * @return The constructed request's URL
   */
  public static String getOAuthCodeCallbackHandlerUrl(HttpServletRequest req) {
    String scheme = req.getScheme() + "://";
    String serverName = req.getServerName();
    String serverPort = (req.getServerPort() == 80) ? "" : ":" + req.getServerPort();
    String contextPath = req.getContextPath();
    String servletPath = URL_MAPPING;
    String pathInfo = (req.getPathInfo() == null) ? "" : req.getPathInfo();
    return scheme + serverName + serverPort + contextPath + servletPath + pathInfo;
  }
  /**
   * Exchanges the given code for an exchange and a refresh token.
   *
   * @param code The code gotten back from the authorization service
   * @param currentUrl The URL of the callback
   * @param oauthProperties The object containing the OAuth configuration
   * @return The object containing both an access and refresh token
   * @throws IOException
   */
  public AccessTokenResponse exchangeCodeForAccessAndRefreshTokens(String code, String currentUrl)
      throws IOException {

    HttpTransport httpTransport = new NetHttpTransport();
    JacksonFactory jsonFactory = new JacksonFactory();

    // Loading the oauth config file
    OAuthProperties oauthProperties = new OAuthProperties();

    return new GoogleAuthorizationCodeGrant(httpTransport, jsonFactory, oauthProperties
        .getClientId(), oauthProperties.getClientSecret(), code, currentUrl).execute();
  }
}
참고: 위의 구현에서는 단순화를 위해 일부 App Engine 라이브러리를 사용합니다. 다른 플랫폼용으로 개발하는 경우 사용자 인증을 처리하는 UserService 인터페이스를 다시 구현합니다.
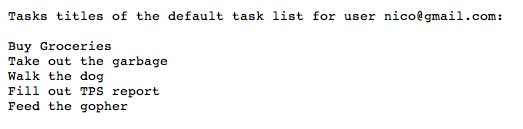
사용자의 작업을 읽고 표시
사용자가 애플리케이션에 작업 액세스 권한을 부여했습니다. 애플리케이션에 OAuthTokenDao를 통해 액세스할 수 있는 데이터 저장소에 저장된 갱신 토큰이 있습니다. 이제 PrintTaskListsTitlesServlet 서블릿이 이러한 토큰을 사용하여 사용자의 작업에 액세스하고 이를 표시할 수 있습니다.
파일에 추가된 코드가 강조 표시됩니다.
package com.google.oauthsample;

import ...

/**
 * Simple sample Servlet which will display the tasks in the default task list of the user.
 */
@SuppressWarnings("serial")
public class PrintTasksTitlesServlet extends HttpServlet {

  /**
   * The OAuth Token DAO implementation, used to persist the OAuth refresh token.
   * Consider injecting it instead of using a static initialization. Additionally, a
   * simple memory implementation is used as a mock. Change the implementation to
   * use your own database system.
   */
  public static OAuthTokenDao oauthTokenDao = new OAuthTokenDaoMemoryImpl();

  public void doGet(HttpServletRequest req, HttpServletResponse resp) throws IOException {
    // Getting the current user
    // This is using App Engine's User Service but you should replace this to
    // your own user/login implementation
    UserService userService = UserServiceFactory.getUserService();
    User user = userService.getCurrentUser();

    // If the user is not logged-in it is redirected to the login service, then back to this page
    if (user == null) {
      resp.sendRedirect(userService.createLoginURL(getFullRequestUrl(req)));
      return;
    }

    // Checking if we already have tokens for this user in store
    AccessTokenResponse accessTokenResponse = oauthTokenDao.getKeys(user.getEmail());

    // If we don't have tokens for this user
    if (accessTokenResponse == null) {
      OAuthProperties oauthProperties = new OAuthProperties();
      // Redirect to the Google OAuth 2.0 authorization endpoint
      resp.sendRedirect(new GoogleAuthorizationRequestUrl(oauthProperties.getClientId(),
          OAuthCodeCallbackHandlerServlet.getOAuthCodeCallbackHandlerUrl(req), oauthProperties
              .getScopesAsString()).build());
      return;
    }
// Prints the user's task list titles in the response
    resp.setContentType("text/plain");
    resp.getWriter().append("Task Lists titles for user " + user.getEmail() + ":\n\n");
    printTasksTitles(accessTokenResponse, resp.getWriter());
  }

  /**
   * Construct the request's URL without the parameter part.
   *
   * @param req the HttpRequest object
   * @return The constructed request's URL
   */
  public static String getFullRequestUrl(HttpServletRequest req) {
    String scheme = req.getScheme() + "://";
    String serverName = req.getServerName();
    String serverPort = (req.getServerPort() == 80) ? "" : ":" + req.getServerPort();
    String contextPath = req.getContextPath();
    String servletPath = req.getServletPath();
    String pathInfo = (req.getPathInfo() == null) ? "" : req.getPathInfo();
    String queryString = (req.getQueryString() == null) ? "" : "?" + req.getQueryString();
    return scheme + serverName + serverPort + contextPath + servletPath + pathInfo + queryString;
  }
  /**
   * Uses the Google Tasks API to retrieve a list of the user's tasks in the default
   * tasks list.
   *
   * @param accessTokenResponse The OAuth 2.0 AccessTokenResponse object
   *          containing the access token and a refresh token.
   * @param output The output stream writer to write the task list titles to.
   * @return A list of the user's task titles in the default task list.
   * @throws IOException
   */
  public void printTasksTitles(AccessTokenResponse accessTokenResponse, Writer output) throws IOException {

    // Initializing the Tasks service
    HttpTransport transport = new NetHttpTransport();
    JsonFactory jsonFactory = new JacksonFactory();
    OAuthProperties oauthProperties = new OAuthProperties();

    GoogleAccessProtectedResource accessProtectedResource = new GoogleAccessProtectedResource(
        accessTokenResponse.accessToken, transport, jsonFactory, oauthProperties.getClientId(),
        oauthProperties.getClientSecret(), accessTokenResponse.refreshToken);

    Tasks service = new Tasks(transport, accessProtectedResource, jsonFactory);

    // Using the initialized Tasks API service to query the list of tasks lists
    com.google.api.services.tasks.model.Tasks tasks = service.tasks.list("@default").execute();

    for (Task task : tasks.items) {
      output.append(task.title + "\n");
    }
  }
}
사용자의 작업이 표시됩니다.
샘플 애플리케이션
이 샘플 애플리케이션의 코드를 다운로드할 수 있습니다.