لتوفير بطاقة تعريف جديدة في الحرم الجامعي، يجب أن يكمل المستخدم عملية مصادقة وربط على جهازه. يؤدي ذلك إلى ربط حساب المستخدم الخارجي بحساب على "محفظة Google". يوضّح هذا المستند هذه العملية بشكل عام على مساحات عرض مختلفة.
الإضافة إلى "محفظة Google" من تطبيق Android
في هذا القسم، نوضّح الخطوات اللازمة لحفظ بطاقة في "محفظة Google" من تطبيق Android الخاص بمقدّم الخدمة.
مسار المستخدم
توضّح هذه الأشكال البيانية مسار المستخدم لتوفير بطاقة تعريف جامعية من منظور "محفظة Google".
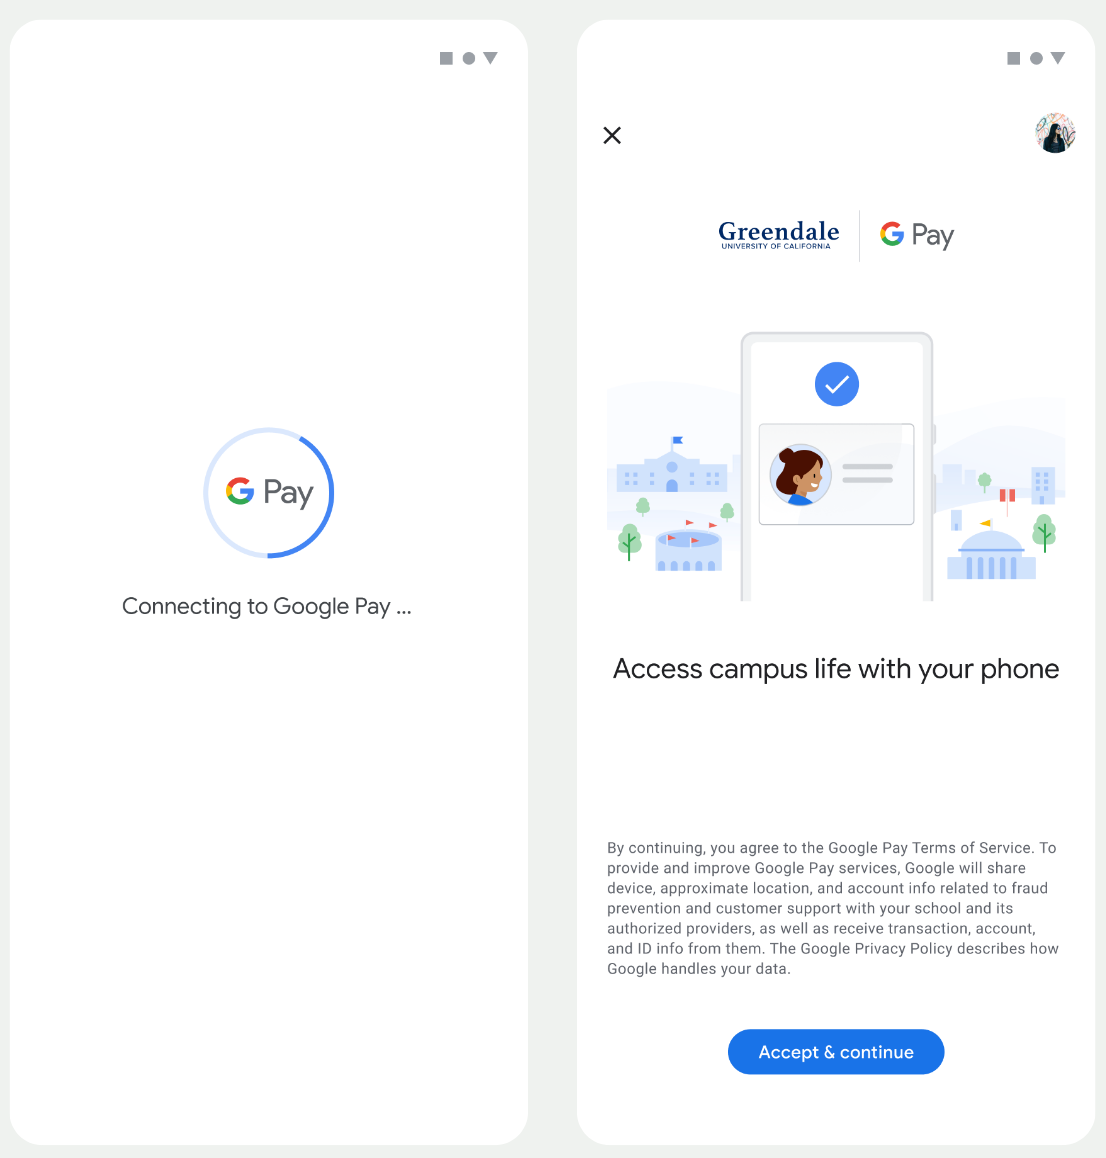
- يتم عرض صورة متحرّكة للاتصال أثناء إعداد اتصال الشبكة والخدمات الأولية.
- بعد اكتمال ذلك، يوافق المستخدم على بنود الخدمة ويواصل التدفق.
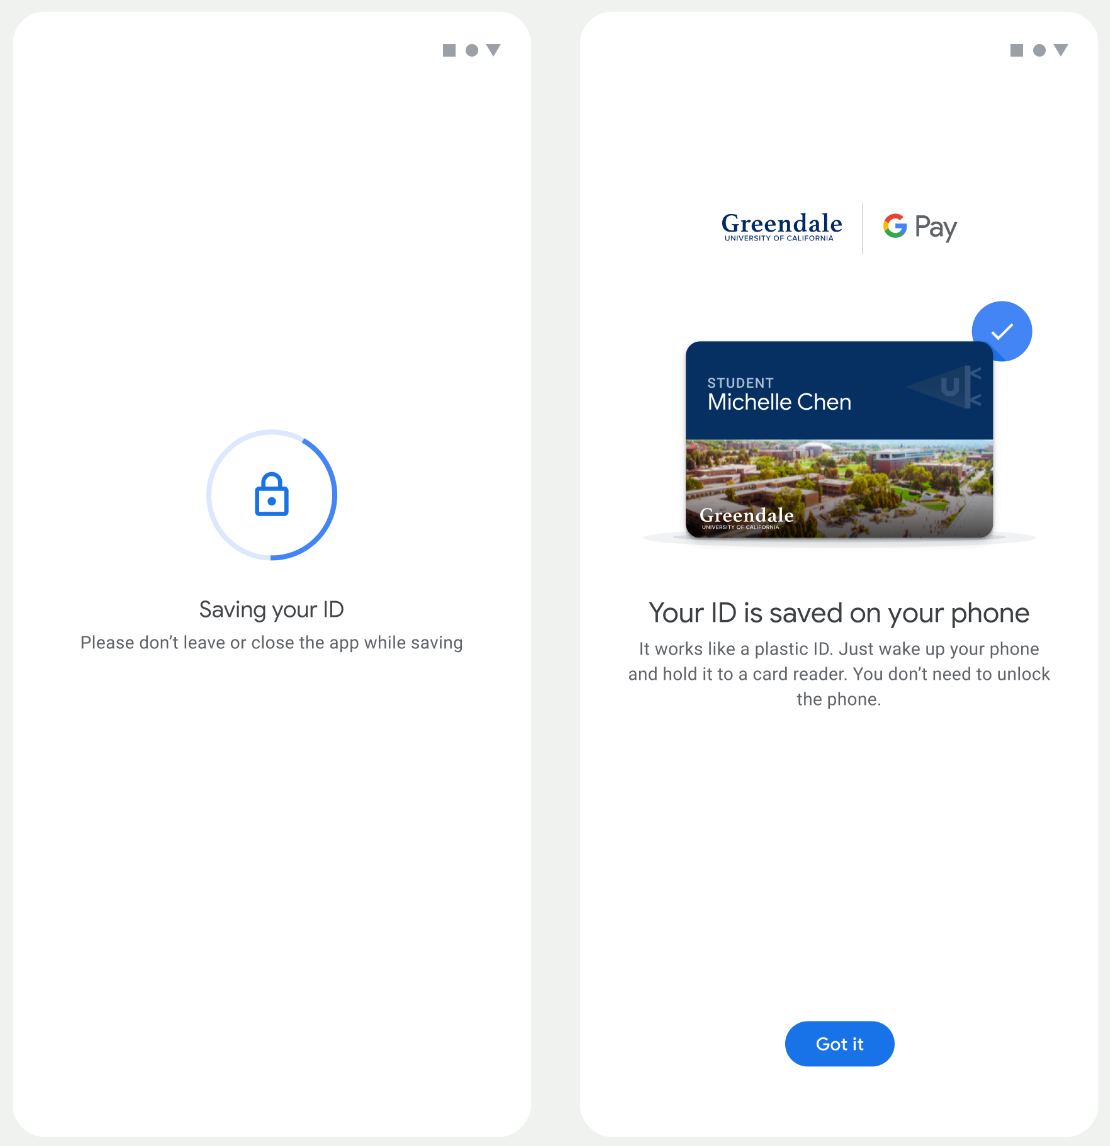
- يظهر للمستخدم رسم متحرّك لحفظ البيانات أثناء توفير الخدمات التي تعمل في الخلفية للحساب على الجهاز.
- بعد اكتمال الخدمات، ستظهر شاشة نجاح.
- قد يُطلب من المستخدم في الشاشات اللاحقة تنزيل تطبيق "محفظة Google" إذا لم يكن مثبّتًا على جهازه.
النقاط الرئيسية
- إذا كانت البطاقة محفوظة في حساب Google المحدّد، سيظهر للمستخدم بدلاً من ذلك رابط لفتح البطاقة في تطبيق "محفظة Google"، حيث يمكنه الاطّلاع على تفاصيل البطاقة.
- إذا كانت البطاقة محفوظة في حساب Google آخر غير الحساب الذي سجّل المستخدم الدخول إليه، ستظهر للمستخدم رسالة تشير إلى أنّ حساب Google آخر قد حفظ هذه البطاقة من قبل.
- إذا حاول المستخدم إضافة بطاقة ولم يكن لديه حساب على Google، ستظهر له رسالة تطلب منه إنشاء حساب. بعد إنشاء حساب Google، تستمر العملية بشكل طبيعي.
- يجب أن تتكامل التطبيقات التي تتيح استخدام بطاقة تعريف الطالب مع واجهات برمجة التطبيقات الخاصة بخدمات Google Play. ومع ذلك، لا تتوفّر استدعاءات الطُرق من تطبيق "مقدّم الخدمة" إلى "خدمات Google Play" في الإصدار الموزّع علنًا من خدمات Google Play. على مطوّر تطبيق مقدّم الخدمة إضافة وحدات مخصّصة والحصول على إذن الوصول إليها لاستدعاء طرق معيّنة. يُرجى التواصل مع مقدّم الخدمة للحصول على مزيد من المعلومات.
إضافة بطاقة إلى "محفظة Google" على جهاز قابل للارتداء من تطبيق Android
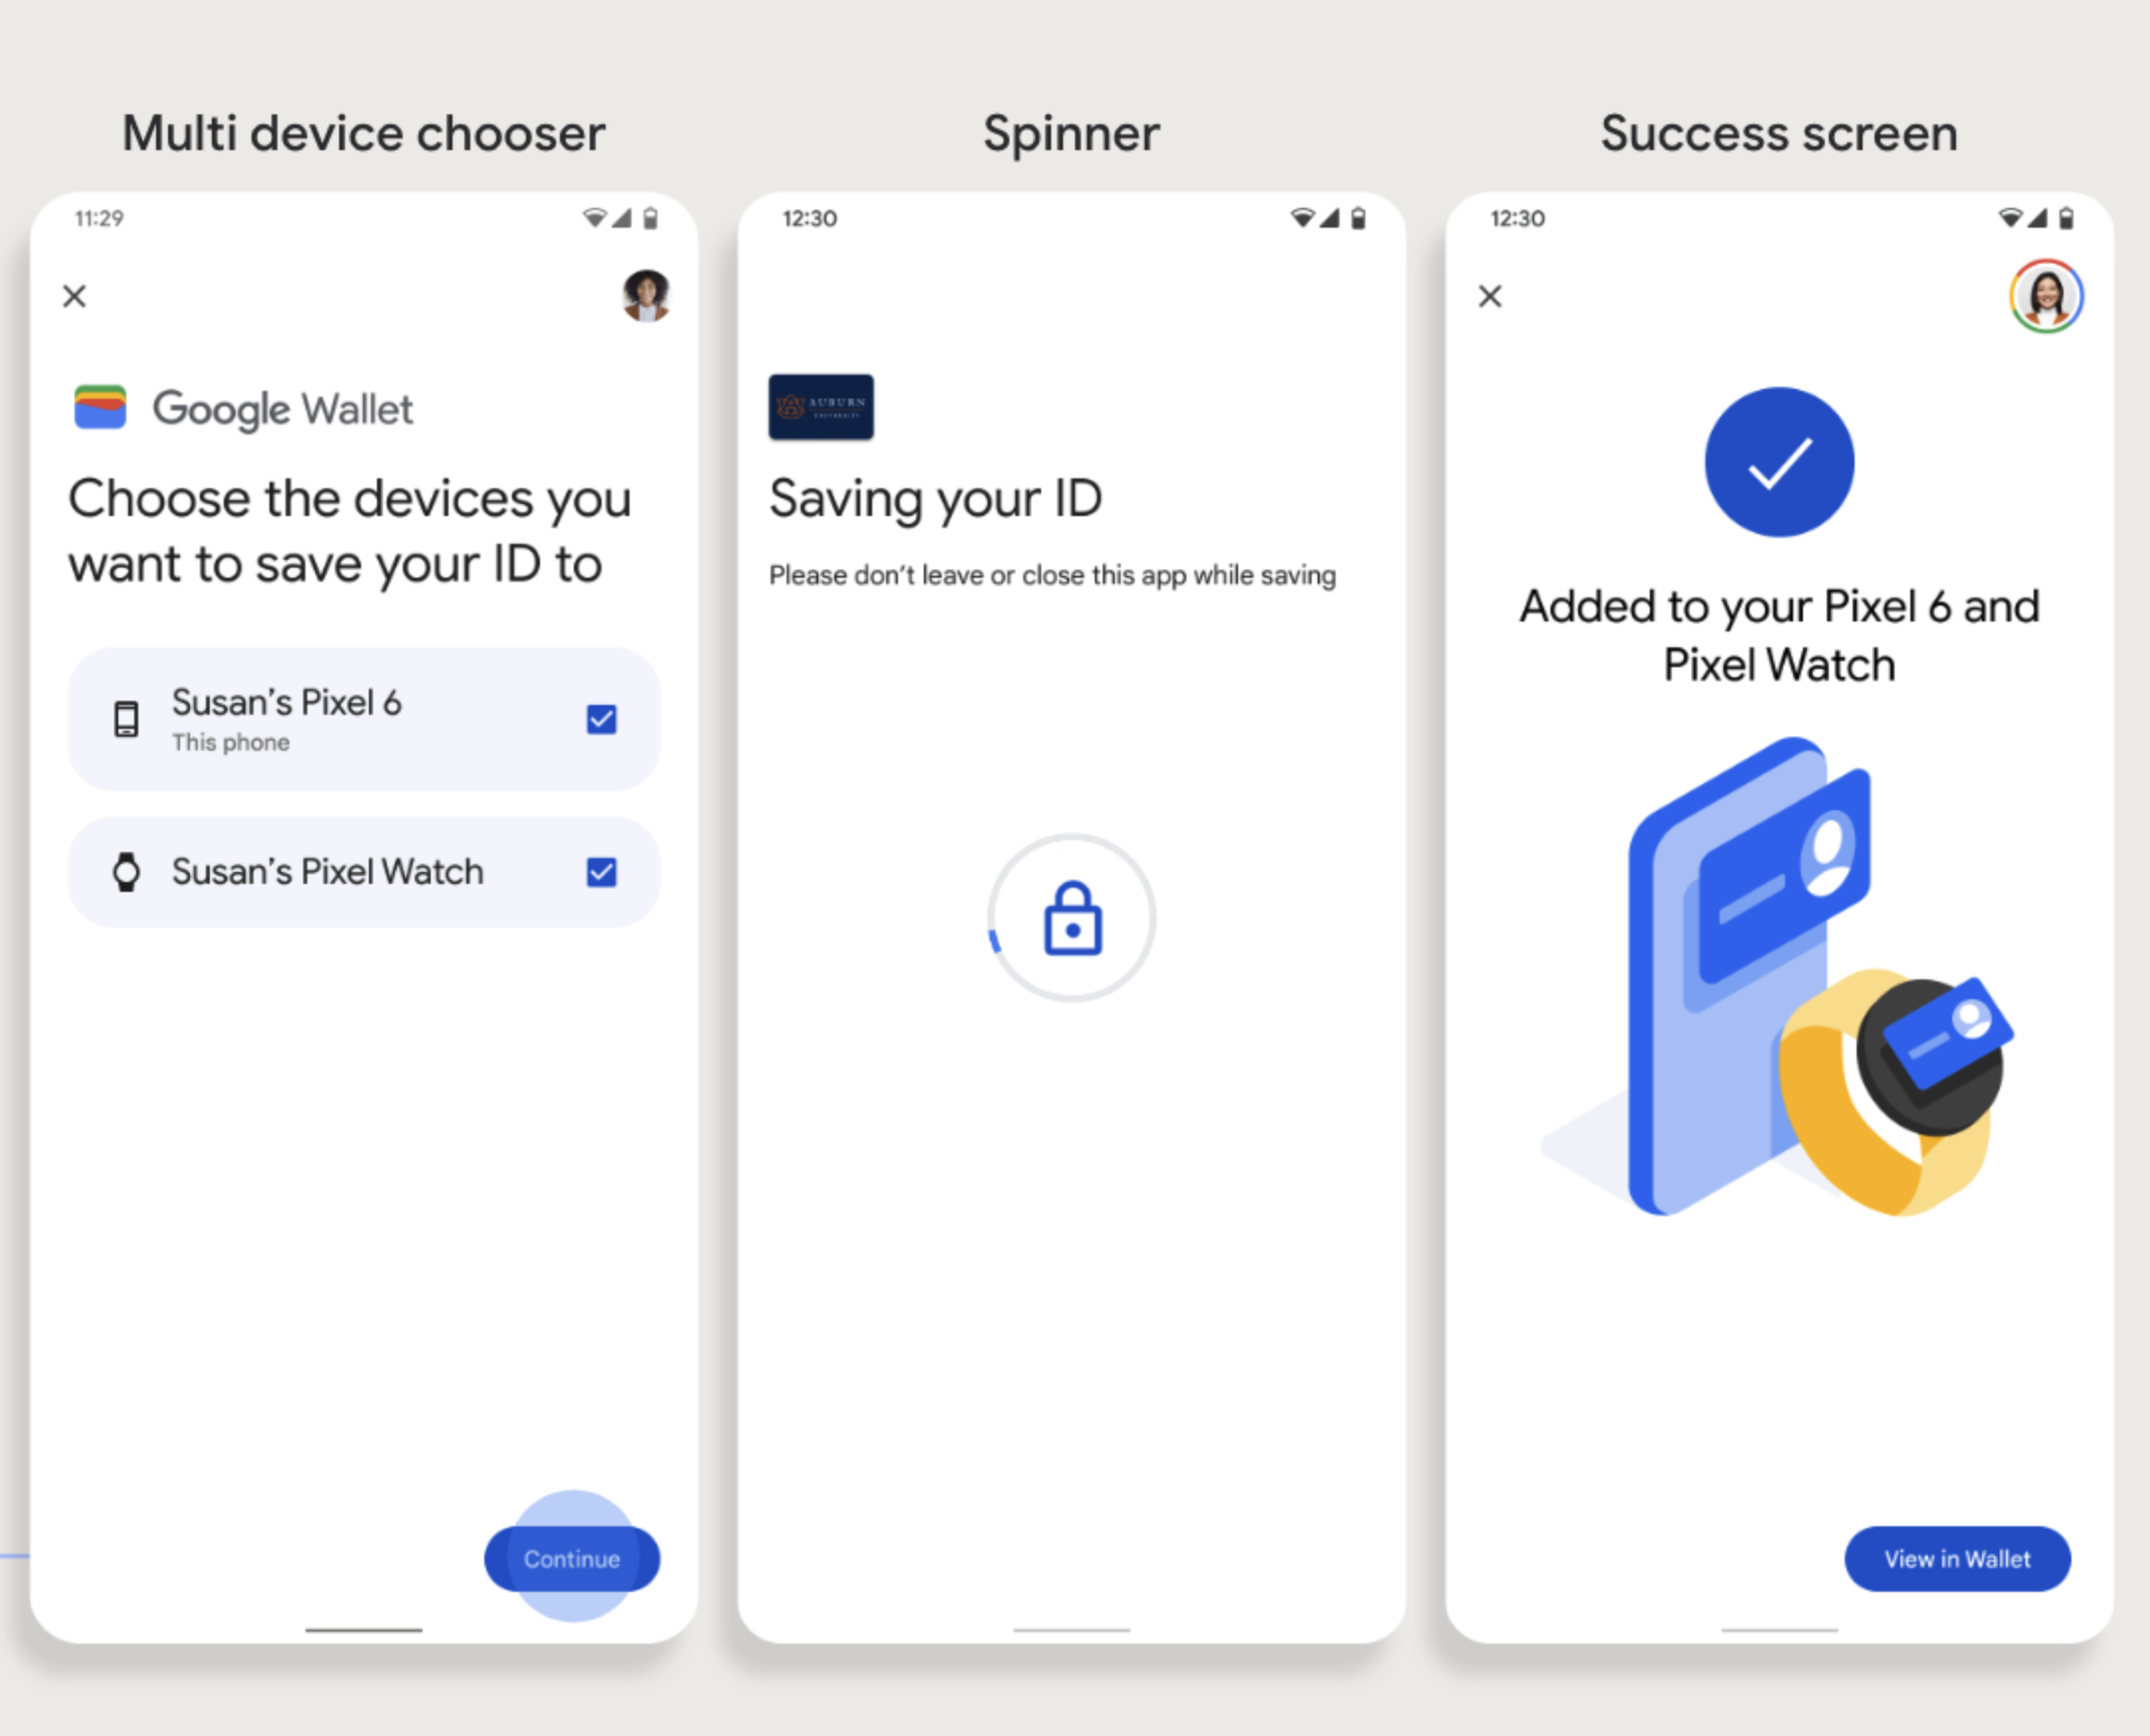
يمكن للمستخدمين إعداد أجهزتهم القابلة للارتداء من خلال بدء عملية الإعداد على هواتفهم واختيار جهاز واحد قابل للارتداء، كما هو موضّح في الشكل التالي:
النقاط الرئيسية
- يتطلّب توفير بطاقة على جهاز قابل للارتداء توفُّر هاتف يمكنه توفير بطاقة، لذا يجب ربط الجهازين.
- يمكن للمستخدمين إعداد البطاقة على هواتفهم وأجهزة Wearable في عملية واحدة، أو يمكنهم إعادة تشغيل العملية لإضافتها إلى جهاز Wearable بعد إكمال عملية الإعداد الأولى على هواتفهم.
- يجب أن يقتصر عدد الأجهزة القابلة للارتداء التي يوفّرها مقدّم الخدمة على جهاز واحد فقط.
- إذا تم إلغاء ربط جهاز Wearable بالهاتف، ستبقى البطاقة الرقمية على الجهاز، ولكن لن يتمكّن المستخدم من توفير بطاقة لجهاز Wearable ثانٍ بدون حذف البطاقة الأولى.
- استفسِر من مقدّم الخدمة عن إمكانية توفير الأجهزة القابلة للارتداء.
- يجب أن تتكامل التطبيقات التي تتيح استخدام بطاقة تعريف الطالب مع واجهات برمجة التطبيقات الخاصة بخدمات Google Play. ومع ذلك، لا تتوفّر استدعاءات الطُرق من تطبيق "مقدّم الخدمة" إلى "خدمات Google Play" في الإصدار الموزّع علنًا من خدمات Google Play. على مطوّر تطبيق مقدّم الخدمة إضافة وحدات مخصّصة والحصول على إذن الوصول إليها لاستدعاء طرق معيّنة. يُرجى التواصل مع مقدّم الخدمة للحصول على مزيد من المعلومات.