קל לארגן דפים בעזרת אוספים
אפשר לשמור ולסווג תוכן על סמך ההעדפות שלך.
כדי להקצות תג חברה חדש, המשתמש צריך להשלים תהליך אימות ושיוך במכשיר שלו. כך החשבון החיצוני של המשתמש מקושר לחשבון Google Wallet.
במסמך הזה מתוארים התהליך הזה ברמה גבוהה במגוון פלטפורמות.
הוספה ל-Google Wallet מאפליקציה ל-Android
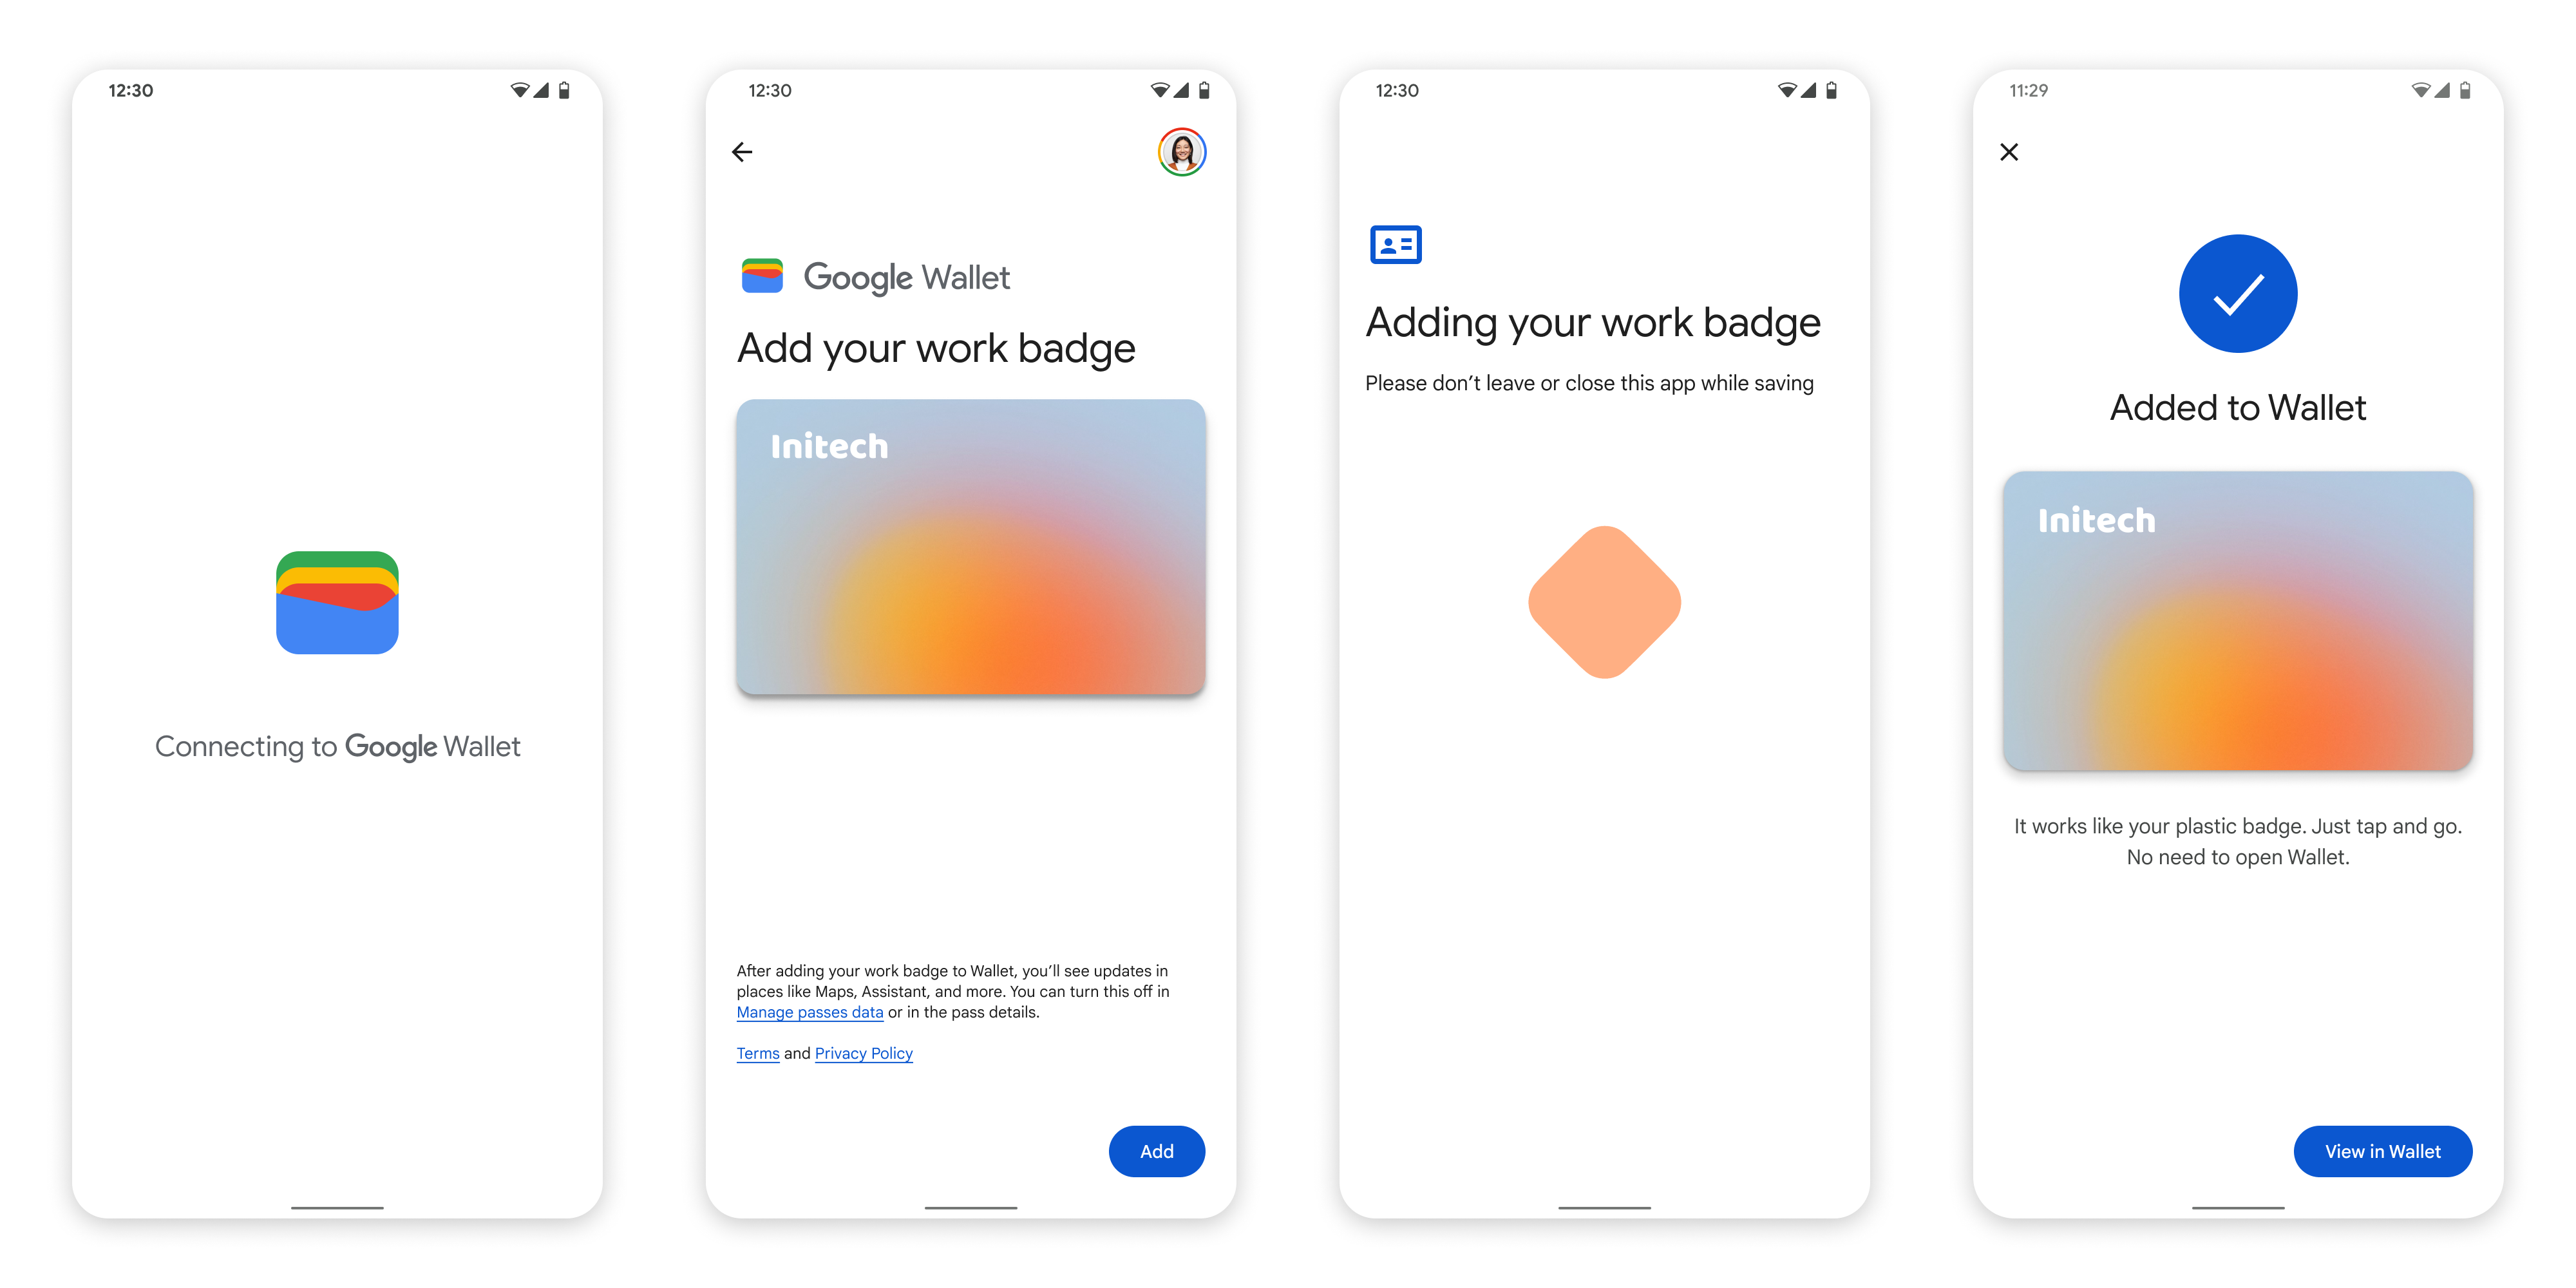
בקטע הזה מתוארת התהליך לשמירת כרטיס ב-Google Wallet מאפליקציית Android של ספק שירות.
מסלול המשתמש באפליקציה
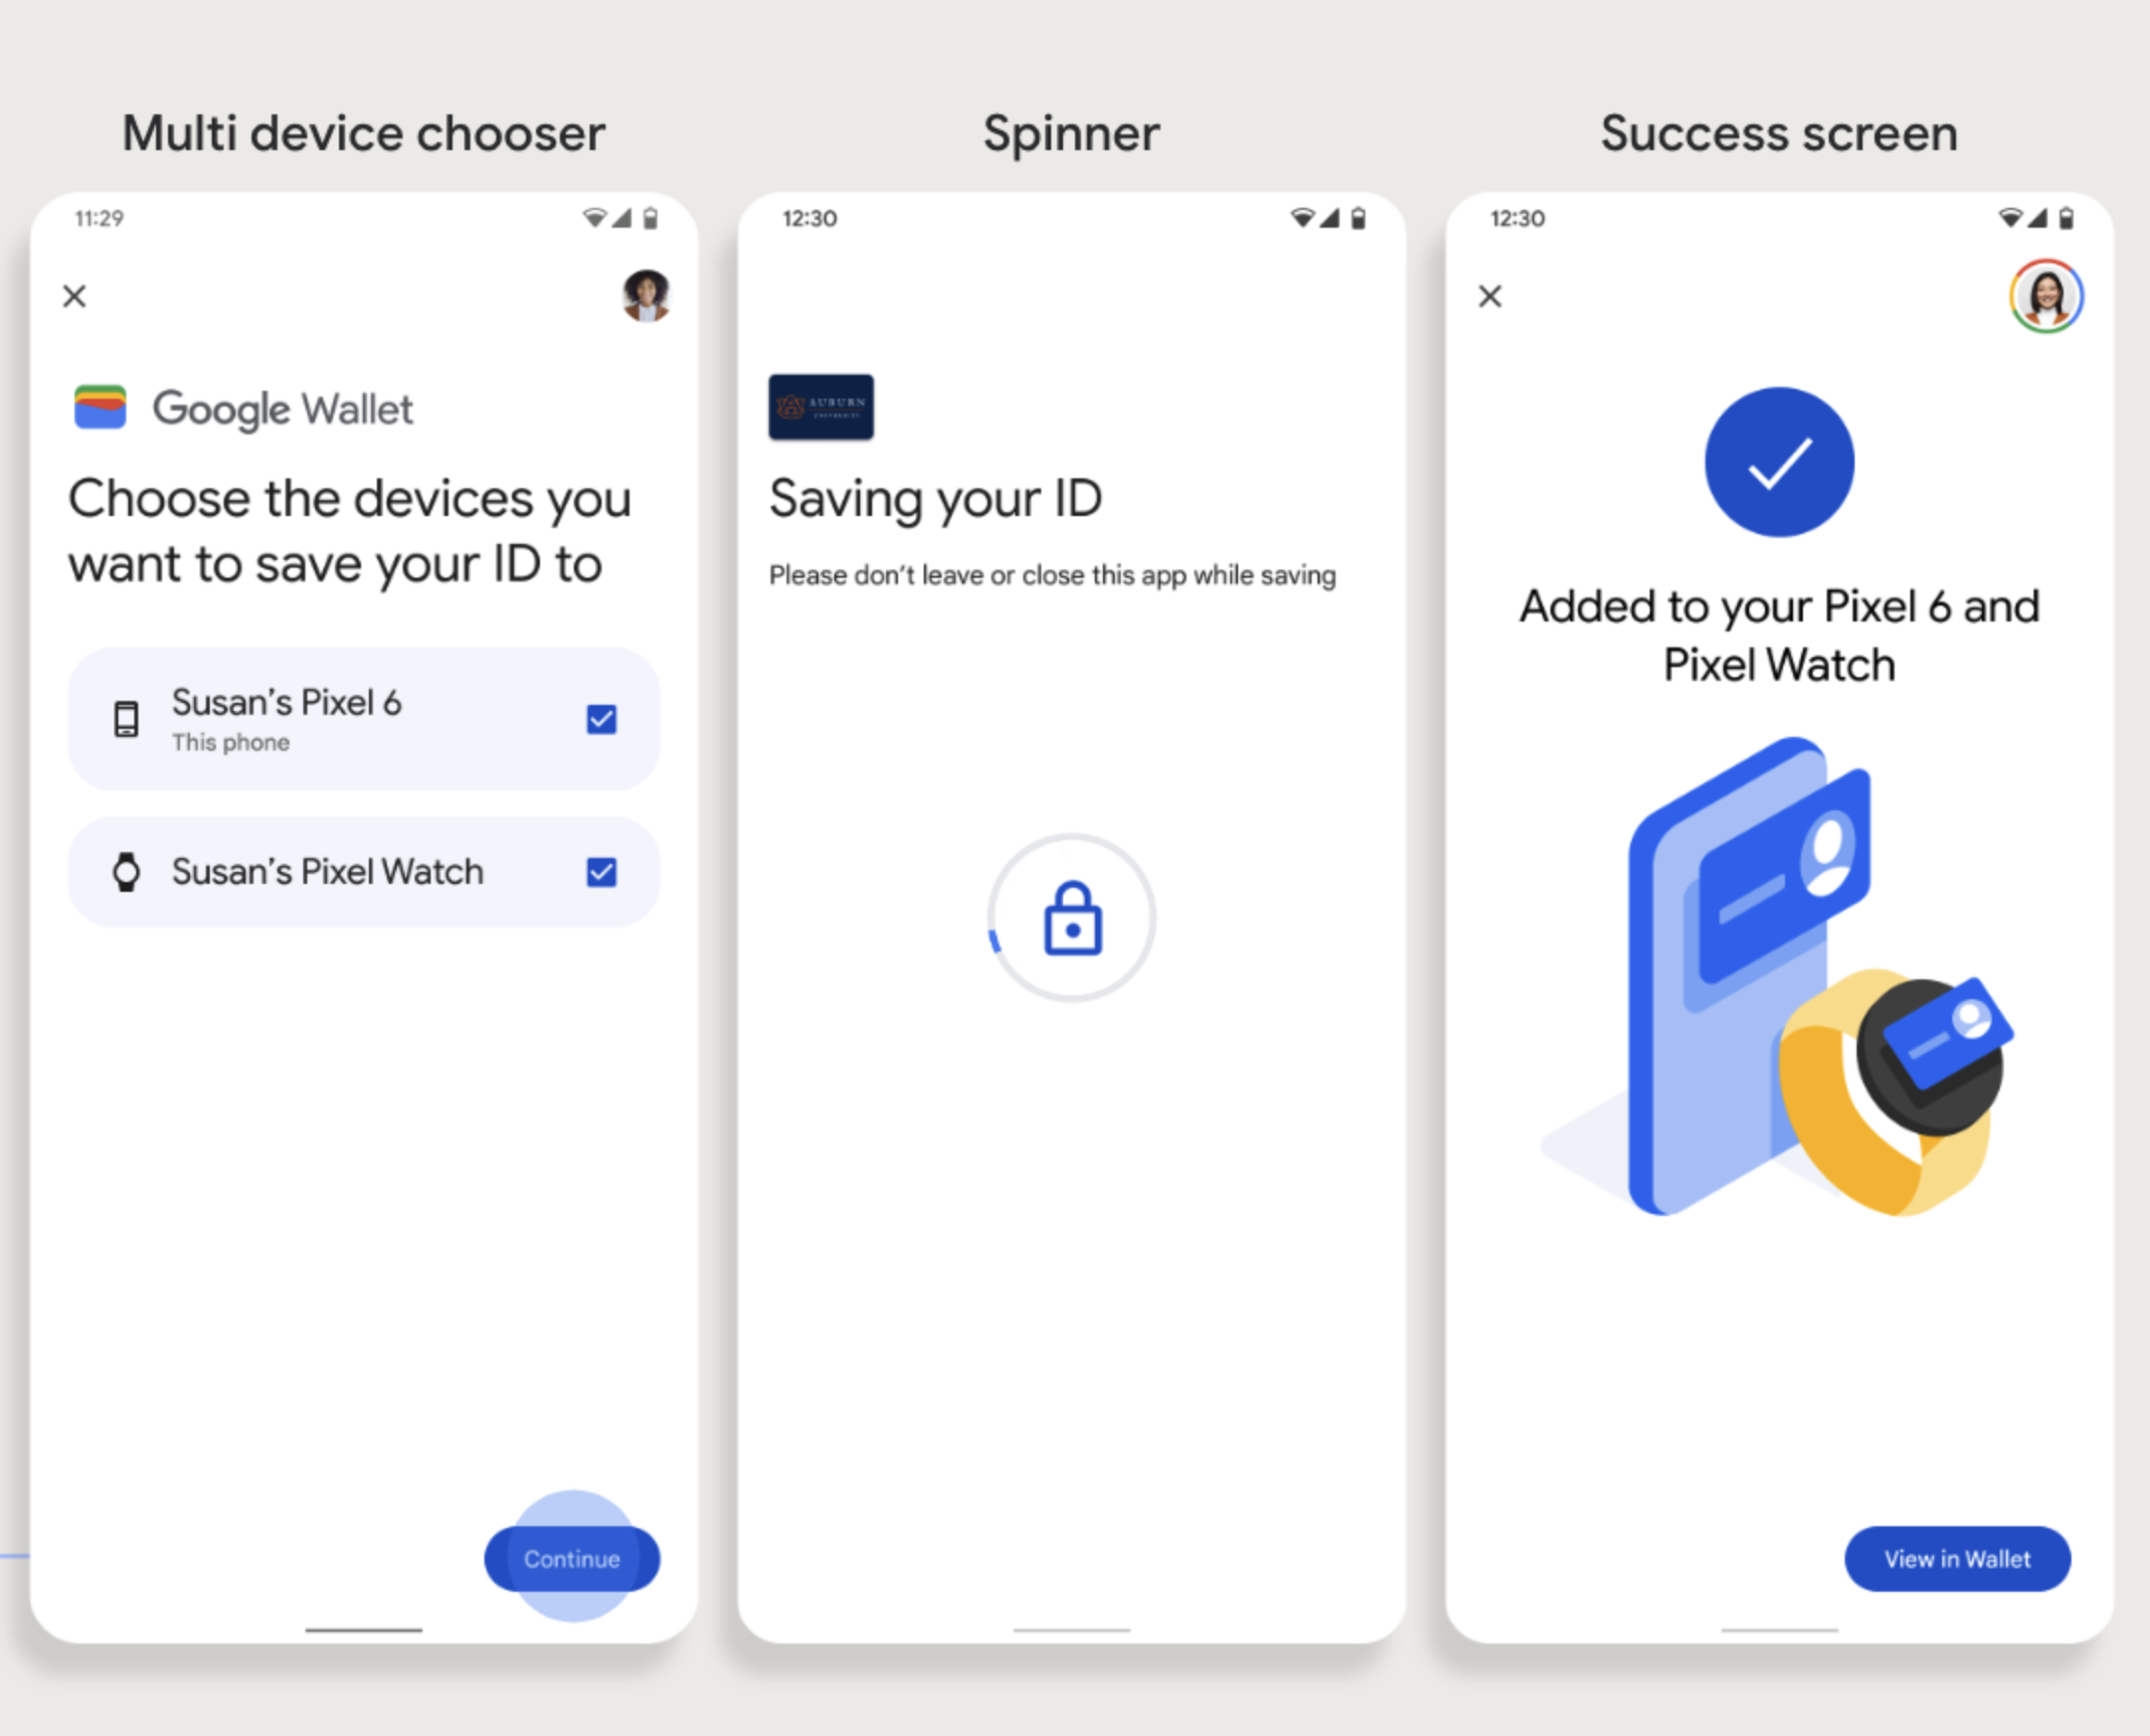
התרשימים האלה ממחישים את תהליך הקצאת תג עובד מנקודת המבט של Google Wallet.
איור 1: משתמש מתחיל להקצות את הכרטיס שלו ומאשר את התנאים וההגבלות.
אנימציה של חיבור מסתובב מוצגת למשתמש בזמן הגדרת הקישוריות לרשת והשירותים הראשוניים.
בסיום התהליך, המשתמש מאשר את התנאים וההגבלות וממשיך בתהליך.
איור 2: הקצאת הרשאות למשתמשים מסתיימת.
בזמן ששירותי הרקע מקצים את החשבון במכשיר, מוצגת למשתמש אנימציה של שמירה מסתובבת.
אחרי שהשירותים יושלמו, יופיע מסך הצלחה.
יכול להיות שבמסכים הבאים יוצג למשתמש בקשה להוריד את אפליקציית Google Wallet, אם היא עדיין לא מותקנת במכשיר שלו.
נקודות עיקריות
אם הכרטיס כבר נשמר בחשבון Google שנבחר, יוצג למשתמש קישור לפתיחת הכרטיס באפליקציית Google Wallet, שבו יוכל לראות את פרטי הכרטיס.
אם הכרטיס נשמר בחשבון Google שאינו החשבון שאליו המשתמש מחובר, הוא יקבל הודעה על כך שכבר נשמר כרטיס כזה בחשבון Google אחר.
אם המשתמש מנסה להוסיף כרטיס ואין לו חשבון Google, תוצג בקשה ליצור חשבון. אחרי יצירת חשבון Google, התהליך ממשיך כרגיל.
אפליקציות שתומכות בתהליכים של תגים ארגוניים צריכות לשלב את ממשקי ה-API של Google Play Services. עם זאת, קריאות ה-method מאפליקציית ספק השירות אל Google Play Services לא זמינות בגרסה של Google Play Services שפורסמה לציבור.
מפתח האפליקציה של ספק השירות צריך להוסיף מודולים מותאמים אישית ולקבל גישה אליהם כדי לבצע קריאות לשיטות מסוימות. לפרטים נוספים, אפשר לפנות לספק השירות.
הוספה ל-Google Wallet במכשיר לבישים מהתקן Android
המשתמשים יכולים להקצות את ההרשאות למכשירי Wearables שלהם על ידי הפעלת תהליך ההקצאה בטלפון ובחירה במכשיר Wearable אחד, כפי שמוצג באיור הזה:
תרשים 1: תהליך הקצאת הגאדג'ט לביש.
נקודות עיקריות
כדי להקצות מכשיר לביש, צריך טלפון שיכול להקצות כרטיס.
המשתמשים יכולים להקצות את השירות לטלפון ולמכשיר לביש בתהליך אחד, או להפעיל מחדש את התהליך כדי להוסיף אותו למכשיר לביש אחרי שההקצאה הראשונה לטלפון הושלמה.
ספקי השירות צריכים להגביל את המשתמשים להקצאה של מכשיר Wearable אחד בלבד.
כדאי לברר אצל ספק השירות אם אפשר להקצות מכשיר לבישים.
אפליקציות שתומכות בתהליכים של תגים ארגוניים צריכות לשלב את ממשקי ה-API של Google Play Services. עם זאת, קריאות ה-method מאפליקציית ספק השירות אל Google Play Services לא זמינות בגרסה של Google Play Services שפורסמה לציבור.
מפתח האפליקציה של ספק השירות צריך להוסיף מודולים מותאמים אישית ולקבל גישה אליהם כדי לבצע קריאות לשיטות מסוימות. מידע נוסף זמין אצל ספק השירות.
הוספה ל-Google Wallet מאתר
בקטע הזה מוסבר התהליך לשמירת כרטיס ב-Google Wallet מהאתר של המנפיק.
שלב 1: כניסה לאתר
השלב הראשון בתהליך הוא להיכנס לאתר של המנפיק ולבחור בלחצן 'הוספה ל-Google Wallet'.
איור 3: משתמש נכנס לאתר ומנווט ללחצן 'הוספה ל-Google Wallet'.
שלב 2: נכנסים באמצעות חשבון Google
המשתמש משלים את הכניסה באמצעות חשבון Google, ואז מוצג לו מסך טעינה באתר של המנפיק, לפני שהוא ינותב אל Google Wallet בשלב הבא.
איור 3: משתמש בוחר חשבון Google לקישור לתג הארגוני שלו.
שלב 3: השלמת ההקצאה
המשתמש משלים את תהליך ההקצאה ב-Google Wallet.
איור 3: משתמש ממשיך בתהליך ההקצאה, מאשר את התנאים וההגבלות ומסיים את התהליך.
[null,null,["עדכון אחרון: 2025-07-25 (שעון UTC)."],[[["\u003cp\u003eCorporate Badges are provisioned by linking an external user account to a Google Wallet account through an authentication and association flow.\u003c/p\u003e\n"],["\u003cp\u003eUsers can add Corporate Badges to Google Wallet from Android apps, Wearables (initiated from a phone), and websites.\u003c/p\u003e\n"],["\u003cp\u003eThe provisioning process involves accepting terms of service, account creation (if needed), and background service configuration.\u003c/p\u003e\n"],["\u003cp\u003eService Providers might have specific requirements and limitations regarding Wearable provisioning and access to Google Play services APIs for integration.\u003c/p\u003e\n"],["\u003cp\u003eWebsites initiating Corporate Badge provisioning should integrate "Sign in with Google" and leverage a loading screen during the redirect to Google Wallet.\u003c/p\u003e\n"]]],["Users provision a Corporate Badge by authenticating and associating their account with Google Wallet. From an Android app, users select \"Add to Google Wallet,\" accept terms, and wait for provisioning to complete. On Wearables, provisioning is initiated from a phone. From a website, users sign in, select \"Add to Google Wallet,\" link a Google account, and complete the process in Google Wallet. Google Account creation may be required. Service Provider apps must integrate with Google Play services APIs via custom modules.\n"],null,["# Provision a new card\n\nTo provision a new Corporate Badge, the user must complete an authentication\nand association flow on their device. This links their external\nuser account to a Google Wallet account.\nThis document describes that process at a high level across different surfaces.\n\nAdd to Google Wallet from an Android app\n----------------------------------------\n\nIn this section, we describe the flow to save a card to\nGoogle Wallet from a Service Provider's Android app.\n\n### User flow\n\nThese figures illustrate the user flow to provision a Corporate Badge from a\nGoogle Wallet perspective.\n| **Note:** Before this flow begins, the user must authenticate within the Service Provider's app. Next, they must select the [Add to Google Wallet](/wallet/access/corporate-badge/get-started/brand-guidelines#add-to-google-wallet-button) button. If the user doesn't have a Google Account, they complete a flow to create one and then continue the flow to provision their card.\n**Figure 1**: A user begins to provision their card and accepts the Terms of Service.\n\n\n- A spinning connection animation is shown to the user while network connectivity and initial services configure.\n- After this completes, the user accepts the Terms of Service and continues with the flow.\n\n\u003cbr /\u003e\n\n**Figure 2**: User provisioning completes.\n\n\n- A spinning save animation is shown to the user while background services provision the account on the device.\n- After the services complete, a success screen appears.\n- The user might be prompted in subsequent screens to download the Google Wallet app, if it doesn't already exist on their device.\n\n\u003cbr /\u003e\n\n\u003cbr /\u003e\n\n### Key points\n\n- If the card is already saved to the selected Google Account, the user is instead shown a link to open the card in the Google Wallet app, where they can view card details.\n- If the card is saved to a Google Account other than the one the user is logged into, the user receives a message that indicates another Google Account has already saved that card.\n- If the user attempts to add a card and doesn't have a Google Account, a prompt to create an account appears. After creation of the Google Account, the flow continues normally.\n- Apps that support Corporate Badge flows need to integrate with Google Play services APIs. However, the method calls from the Service Provider app to Google Play services aren't available in the publicly distributed version of [Google Play services](https://developers.google.com/android/guides/overview). The Service Provider app developer must add and get access to custom modules to call certain methods. Check with your Service Provider for more information.\n\nAdd to Google Wallet on a Wearable from an Android app\n------------------------------------------------------\n\nUsers can provision to their Wearables by initiating the provisioning flow on\ntheir phone and selecting a single Wearable, as seen in this figure:\n**Figure 1**: Wearable provisioning flow.\n\n### Key points\n\n- Provisioning to a Wearable requires a phone capable of provisioning a card.\n- Users can provision to their phone and Wearable in a single flow, or they can restart the flow to add it to a Wearable after the first provisioning to their phone is complete.\n- Users should be limited by the Service Provider to provisioning only a single Wearable.\n- Inquire with your Service Provider about the availability of Wearable provisioning.\n- Apps that support Corporate Badge flows need to integrate with Google Play services APIs. However, the method calls from the Service Provider app to Google Play services aren't available in the publicly distributed version of [Google Play services](https://developers.google.com/android/guides/overview). The Service Provider app developer must add and get access to custom modules to call certain methods. Check with your Service Provider for more information.\n\nAdd to Google Wallet from a Website\n-----------------------------------\n\nThis section describes the flow to save a card to Google Wallet from\nan issuer's website.\n\n### Step 1: Sign in to Website\n\nThe first step in the flow is to sign in to the issuer's website and select\nthe Add to Google Wallet button.\n**Figure 3**: A user logs into a website and navigates to the Add to Google Wallet button. **Important:** Google requires that your website authenticates users before you show the Add to Google Wallet button. Sending the user an email with a \"secret\" link is not sufficient authentication.\n\n### Step 2: Sign in with Google\n\nThe user completes Sign in with Google and then sees a loading screen\non the issuer's website before being redirected to Google Wallet in the next\nstep.\n**Figure 3**: A user chooses a Google Account to link to their Corporate Badge. **Note:** You can download this [loading gif](/static/wallet/access/images/web-provisioning-loading.gif) for use on your website's loading page if you would like to match the Google Wallet loading screen.\n\n### Step 3: Complete Provisioning\n\nThe user completes the provisioning flow within Google Wallet.\n**Figure 3**: A user continues with provisioning, accepts terms of service, and completes the flow."]]