Оптимизируйте свои подборки
Сохраняйте и классифицируйте контент в соответствии со своими настройками.
Чтобы создать новый многосемейный ключ, пользователь должен пройти процедуру аутентификации и привязки на своём устройстве. Это привяжет его внешний аккаунт к аккаунту Google Кошелька. В этом документе этот процесс подробно описан для различных устройств.
Добавить в Google Wallet из приложения для Android
В этом разделе мы описываем процесс сохранения карты в Google Wallet из Android-приложения поставщика услуг.
Поток пользователей
На этих рисунках показан процесс предоставления пользователем многосемейного ключа с точки зрения Google Wallet.
Рисунок 1 : Пользователь начинает подготовку своей карты и принимает Условия обслуживания.
Во время настройки сетевого подключения и начальных служб пользователю демонстрируется вращающаяся анимация соединения.
После этого пользователь принимает Условия обслуживания и продолжает работу.
Рисунок 2 : Подготовка пользователя завершена.
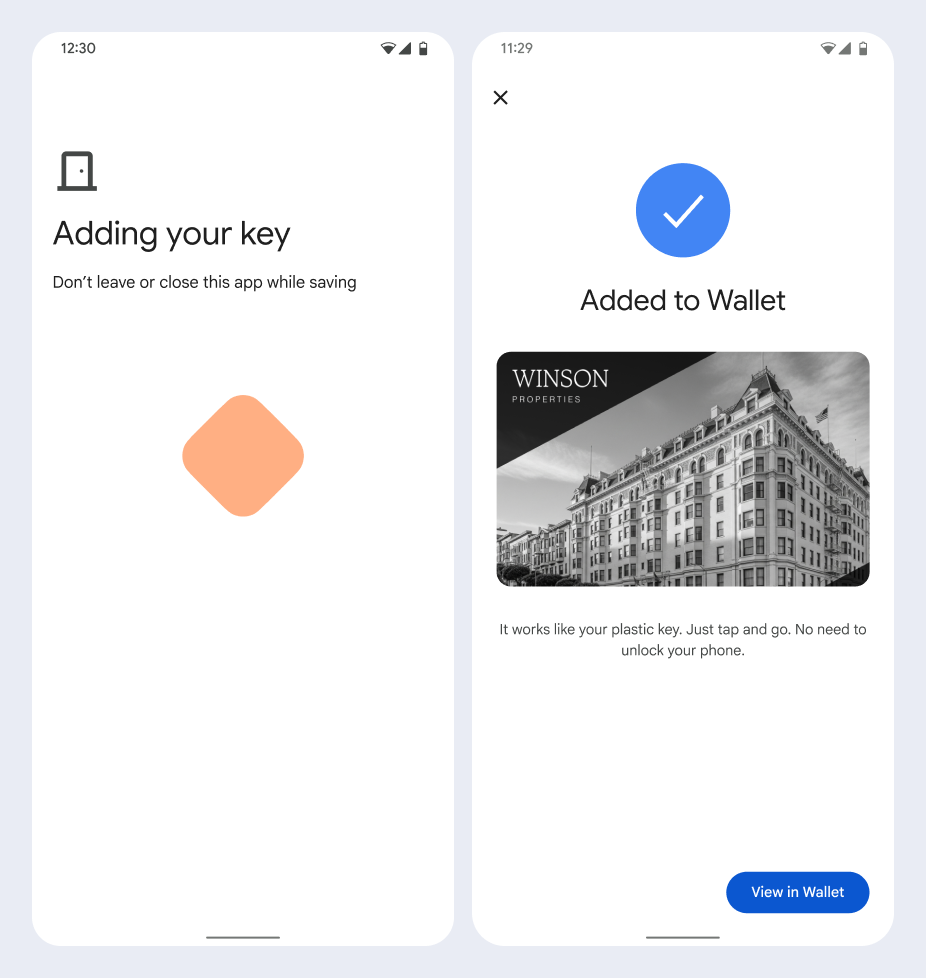
Пользователю демонстрируется вращающаяся анимация сохранения, пока фоновые службы подготавливают учетную запись на устройстве.
После завершения обслуживания появится экран успешного выполнения.
На последующих экранах пользователю может быть предложено загрузить приложение Google Wallet, если его еще нет на его устройстве.
Ключевые моменты
Если карта уже сохранена в выбранной учетной записи Google, пользователю вместо этого будет показана ссылка для открытия карты в приложении Google Wallet, где он сможет просмотреть данные карты.
Если карта сохранена в учетной записи Google, отличной от той, в которую вошел пользователь, пользователь получит сообщение о том, что другая учетная запись Google уже сохранила эту карту.
Если пользователь пытается добавить карту, не имея учётной записи Google, появляется запрос на её создание. После создания учётной записи Google процесс продолжается в обычном режиме.
Приложения, поддерживающие потоки Multi-family Keys, должны быть интегрированы с API сервисов Google Play. Однако вызовы методов из приложения поставщика услуг к сервисам Google Play недоступны в общедоступной версии сервисов Google Play . Разработчик приложения поставщика услуг должен добавить пользовательские модули и получить к ним доступ для вызова определённых методов. За дополнительной информацией обращайтесь к своему поставщику услуг.
Добавить в Google Wallet на носимом устройстве из приложения Android
Пользователи могут подключить свои носимые устройства, запустив процесс подготовки на своем телефоне и выбрав одно носимое устройство, как показано на этом рисунке:
Рисунок 1 : Процесс подготовки носимых устройств.
Ключевые моменты
Для подключения носимого устройства требуется телефон, поддерживающий функцию подготовки карты.
Пользователи могут подключиться к своему телефону и носимому устройству в рамках одного процесса или перезапустить процесс, чтобы добавить его к носимому устройству после завершения первой подготовки к телефону.
Поставщик услуг должен ограничить пользователей возможностью использования только одного носимого устройства.
Узнайте у своего поставщика услуг о возможности предоставления услуг носимых устройств.
Приложения, поддерживающие потоки Multi-family Keys, должны быть интегрированы с API сервисов Google Play. Однако вызовы методов из приложения поставщика услуг к сервисам Google Play недоступны в общедоступной версии сервисов Google Play . Разработчик приложения поставщика услуг должен добавить пользовательские модули и получить к ним доступ для вызова определённых методов. За дополнительной информацией обращайтесь к своему поставщику услуг.
Добавить в Google Wallet с веб-сайта
В этом разделе описывается процесс сохранения карты в Google Wallet с сайта эмитента.
Шаг 1: Войдите на сайт
Первым шагом в этом процессе является вход на сайт эмитента и нажатие кнопки «Добавить в Google Wallet».
Рисунок 3 : Пользователь заходит на сайт и переходит к кнопке «Добавить в Google Кошелек».
Шаг 2: Войдите через Google
Пользователь завершает вход через Google, после чего видит загрузочный экран на веб-сайте эмитента, после чего на следующем этапе перенаправляется в Google Wallet.
Рисунок 3 : Пользователь выбирает учетную запись Google для привязки к своему многосемейному ключу.
Шаг 3: Завершение подготовки
Пользователь завершает процесс подготовки в Google Wallet.
Рисунок 3 : Пользователь продолжает подготовку, принимает условия обслуживания и завершает процесс.
[null,null,["Последнее обновление: 2025-07-11 UTC."],[],[],null,["# Provision a new card\n\nTo provision a new Multi-family Key, the user must complete an authentication\nand association flow on their device. This links their external\nuser account to a Google Wallet account.\nThis document describes that process at a high level across different surfaces.\n\nAdd to Google Wallet from an Android app\n----------------------------------------\n\nIn this section, we describe the flow to save a card to\nGoogle Wallet from a Service Provider's Android app.\n\n### User flow\n\nThese figures illustrate the user flow to provision a Multi-family Key from a\nGoogle Wallet perspective.\n| **Note:** Before this flow begins, the user must authenticate within the Service Provider's app. Next, they must select the [Add to Google Wallet](/wallet/access/multi-family-key/get-started/brand-guidelines#add-to-google-wallet-button) button. If the user doesn't have a Google Account, they complete a flow to create one and then continue the flow to provision their card.\n**Figure 1**: A user begins to provision their card and accepts the Terms of Service.\n\n\n- A spinning connection animation is shown to the user while network connectivity and initial services configure.\n- After this completes, the user accepts the Terms of Service and continues with the flow.\n\n\u003cbr /\u003e\n\n**Figure 2**: User provisioning completes.\n\n\n- A spinning save animation is shown to the user while background services provision the account on the device.\n- After the services complete, a success screen appears.\n- The user might be prompted in subsequent screens to download the Google Wallet app, if it doesn't already exist on their device.\n\n\u003cbr /\u003e\n\n\u003cbr /\u003e\n\n### Key points\n\n- If the card is already saved to the selected Google Account, the user is instead shown a link to open the card in the Google Wallet app, where they can view card details.\n- If the card is saved to a Google Account other than the one the user is logged into, the user receives a message that indicates another Google Account has already saved that card.\n- If the user attempts to add a card and doesn't have a Google Account, a prompt to create an account appears. After creation of the Google Account, the flow continues normally.\n- Apps that support Multi-family Keys flows need to integrate with Google Play services APIs. However, the method calls from the Service Provider app to Google Play services aren't available in the publicly distributed version of [Google Play services](https://developers.google.com/android/guides/overview). The Service Provider app developer must add and get access to custom modules to call certain methods. Check with your Service Provider for more information.\n\nAdd to Google Wallet on a Wearable from an Android app\n------------------------------------------------------\n\nUsers can provision to their Wearables by initiating the provisioning flow on\ntheir phone and selecting a single Wearable, as seen in this figure:\n**Figure 1**: Wearable provisioning flow.\n\n### Key points\n\n- Provisioning to a Wearable requires a phone capable of provisioning a card.\n- Users can provision to their phone and Wearable in a single flow, or they can restart the flow to add it to a Wearable after the first provisioning to their phone is complete.\n- Users should be limited by the Service Provider to provisioning only a single Wearable.\n- Inquire with your Service Provider about the availability of Wearable provisioning.\n- Apps that support Multi-family Keys flows need to integrate with Google Play services APIs. However, the method calls from the Service Provider app to Google Play services aren't available in the publicly distributed version of [Google Play services](https://developers.google.com/android/guides/overview). The Service Provider app developer must add and get access to custom modules to call certain methods. Check with your Service Provider for more information.\n\nAdd to Google Wallet from a Website\n-----------------------------------\n\nThis section describes the flow to save a card to Google Wallet from\nan issuer's website.\n\n### Step 1: Sign in to Website\n\nThe first step in the flow is to sign in to the issuer's website and select\nthe Add to Google Wallet button.\n**Figure 3**: A user logs into a website and navigates to the Add to Google Wallet button. **Important:** Google requires that your website authenticates users before you show the Add to Google Wallet button. Sending the user an email with a \"secret\" link is not sufficient authentication.\n\n### Step 2: Sign in with Google\n\nThe user completes Sign in with Google and then sees a loading screen\non the issuer's website before being redirected to Google Wallet in the next\nstep.\n**Figure 3**: A user chooses a Google Account to link to their Multi-family Key. **Note:** You can download this [loading gif](/static/wallet/access/images/web-provisioning-loading.gif) for use on your website's loading page if you would like to match the Google Wallet loading screen.\n\n### Step 3: Complete Provisioning\n\nThe user completes the provisioning flow within Google Wallet.\n**Figure 3**: A user continues with provisioning, accepts terms of service, and completes the flow."]]