
程式碼程度:中階
時間長度:30 分鐘
專案類型:Google Workspace 外掛程式
目標
- 瞭解外掛程式的用途。
- 瞭解如何使用 Apps Script 建構外掛程式,以及瞭解 Apps Script 服務的功能。
- 設定環境。
- 設定指令碼。
- 執行指令碼。
關於這個 Google Workspace 外掛程式
在本範例中,您將建立 Google Workspace 外掛程式,在 Google 文件中預覽 Google 圖書的連結。在文件中輸入或貼上 Google 圖書網址時,外掛程式會辨識連結並觸發連結預覽。如要預覽連結,可以將連結轉換為智慧型方塊,然後將指標懸停在連結上,即可查看顯示書籍詳細資訊的資訊卡。
這個外掛程式會使用 Apps Script 的 UrlFetch 服務連線至 Google 圖書 API,並取得 Google 圖書的相關資訊,然後在 Google 文件中顯示。
運作方式
在 Google Workspace 外掛程式的資訊清單檔案中,指令碼會設定外掛程式,以便擴充 Google 文件,並針對符合 Google 圖書網站特定模式的網址 (https://books.google.com) 觸發連結預覽。
在程式碼檔案中,指令碼會連線至 Google Books API,並使用網址取得書籍資訊 (這是 Volume 資源的執行個體)。這項指令碼會使用這項資訊產生智慧型資訊方塊,顯示書籍的書名和預覽資訊卡,其中包含摘要、頁數、書封圖片和評分次數。
Apps Script 服務
這項外掛程式會使用下列服務:
- UrlFetch 服務:連線至 Google Books API,取得書籍相關資訊 (即 API 的
Volume資源例項)。 - Card Service:建立外掛程式的使用者介面。
必要條件
如要使用這個範例,您必須符合下列先決條件:
- Google 帳戶 (Google Workspace 帳戶可能需要管理員核准)。
可連上網際網路的網路瀏覽器。
已連結帳單帳戶的 Google Cloud 專案。請參閱「啟用專案的計費功能」。
設定環境
下列各節將設定建構外掛程式的環境。
在 Google Cloud 控制台中開啟 Cloud 專案
如果尚未開啟,請開啟您打算用於這個範例的 Cloud 專案:
- 在 Google Cloud 控制台中,前往「選取專案」頁面。
- 選取要使用的 Google Cloud 專案。或者,按一下「建立專案」,然後按照畫面上的指示操作。建立 Google Cloud 專案後,您可能需要為專案啟用計費功能。
啟用 Google Books API
這個外掛程式會連線至 Google Books API。 使用 Google API 前,您需要在 Google Cloud 專案中啟用這些 API。 您可以在單一 Google Cloud 專案中啟用一或多個 API。
在 Cloud 專案中啟用 Books API。
設定 OAuth 同意畫面
這個外掛程式需要已設定同意畫面的 Cloud 專案。設定 OAuth 同意畫面可定義 Google 向使用者顯示的內容,並註冊應用程式,以便稍後發布。
- 在 Google Cloud 控制台中,依序前往「Menu」(選單) > Google Auth platform >「Branding」(品牌)。
- 如果您已設定 Google Auth platform,可以在「Branding」(品牌)、「Audience」(目標對象) 和「Data Access」(資料存取權) 中設定下列 OAuth 同意畫面設定。如果看到「Get Started」(尚未設定)Google Auth platform 訊息,請按一下「開始使用」:
- 在「App Information」(應用程式資訊) 下方的「App name」(應用程式名稱) 欄位中,輸入應用程式名稱。
- 在「User support email」(使用者支援電子郵件) 中,選擇支援電子郵件地址,方便使用者在同意聲明方面有任何疑問時與您聯絡。
- 點選 [Next] (下一步)。
- 在「Audience」(目標對象) 下方,選取「Internal」(內部)。
- 點選 [Next] (下一步)。
- 在「Contact Information」(聯絡資訊) 下方,輸入可接收專案異動通知的電子郵件地址。
- 點選 [Next] (下一步)。
- 在「Finish」(完成) 部分,請詳閱《Google API 服務使用者資料政策》,然後選取「我同意《Google API 服務:使用者資料政策》」。
- 按一下 [Continue] (繼續)。
- 按一下「Create」(建立)。
- 目前可以略過新增範圍。 日後建立應用程式供 Google Workspace 機構以外的使用者使用時,請務必將「使用者類型」變更為「外部」。然後新增應用程式需要的授權範圍。詳情請參閱完整的「設定 OAuth 同意畫面」指南。
取得 Google Books API 金鑰
- 前往 Google Cloud 控制台。請確認您已開啟啟用計費功能的專案。
在 Google Cloud 控制台中,依序前往「選單」圖示 >「API 和服務」 >「憑證」。
依序按一下「建立憑證」>「API 金鑰」。
記下 API 金鑰,供後續步驟使用。
設定指令碼
以下各節將設定指令碼,用於建構外掛程式。
建立 Apps Script 專案
- 按一下下列按鈕,開啟 Google 圖書預覽連結
Apps Script 專案。
開啟專案 - 按一下「總覽」。
- 在總覽頁面中,按一下
 「建立副本」。
 - 在 Apps Script 專案副本中,前往
Code.gs檔案,然後將YOUR_API_KEY替換為您在上一個章節中產生的 API 金鑰。
複製 Cloud 專案編號
- 在 Google Cloud 控制台中,依序前往「Menu」(選單) >「IAM & Admin」(IAM 與管理) >「Settings」(設定)。
- 在「專案編號」欄位中,複製該值。
設定 Apps Script 專案的 Cloud 專案
- 在 Apps Script 專案中,按一下
 「專案設定」。
 - 點選「Google Cloud Platform (GCP) 專案」下方的「變更專案」。
- 在「GCP 專案編號」中,貼上 Google Cloud 專案編號。
- 點選「設定專案」。
測試外掛程式
以下各節將測試您建立的增效工具。
安裝測試部署作業
- 在 Apps Script 專案中,按一下 「編輯器」。
- 將
YOUR_API_KEY替換為您在上一節中建立的 Google Books API 金鑰。 - 依序點選「部署」>「測試部署作業」。
- 依序點選「安裝」>「完成」。
在 Google 文件中預覽連結
- 前往 docs.new 建立 Google 文件。
- 將下列網址貼到文件中,然後按下 Tab 鍵,將網址轉換成智慧型方塊:
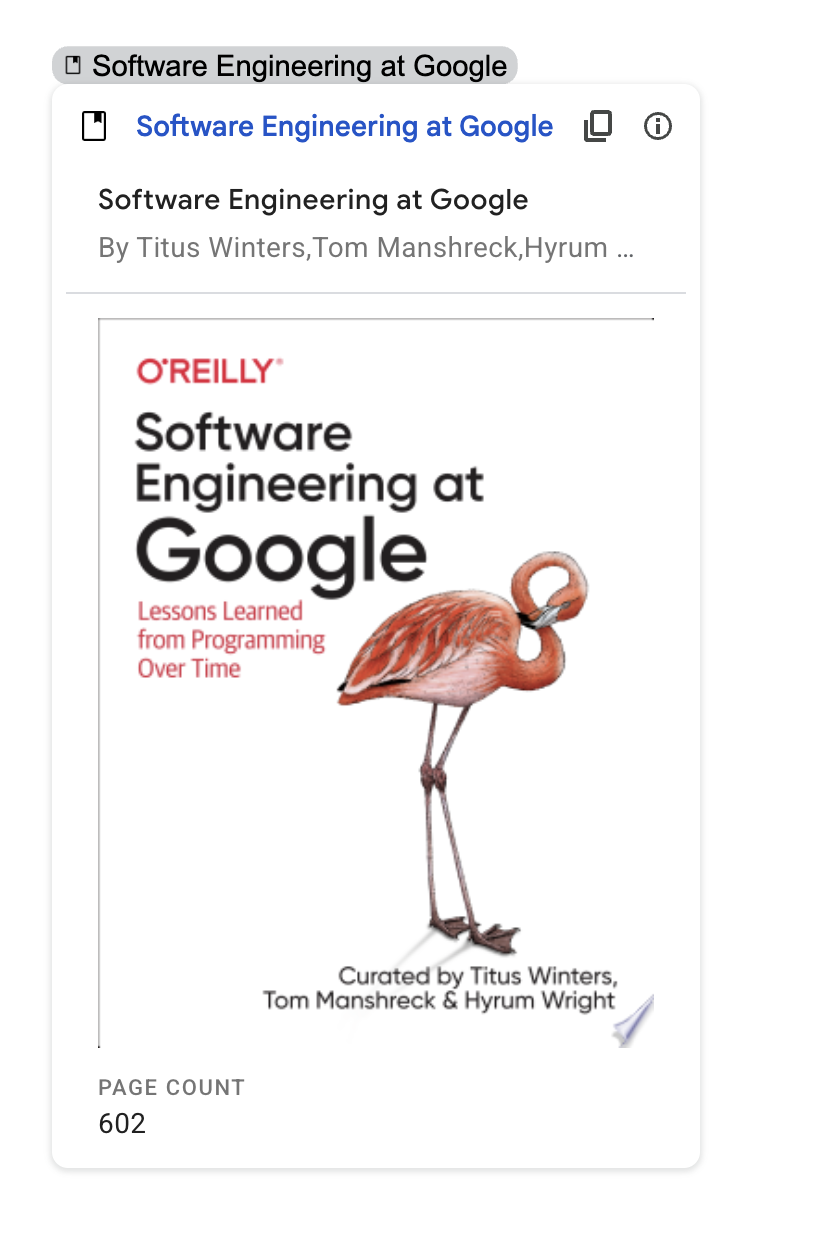
https://www.google.com/books/edition/Software_Engineering_at_Google/V3TTDwAAQBAJ - 將指標懸停在智慧型方塊上,並在系統提示時授權執行外掛程式。預覽資訊卡會顯示書籍資訊。
下圖顯示連結預覽畫面:

檢查程式碼
如要查看這個外掛程式的 Apps Script 程式碼,請按一下「查看原始碼」展開該部分: