광고 수익 창출을 위한 WebView API를 이용하면 인앱 광고 수익을 올리게 됩니다.
WebViewController
`WebViewController`를 통해 앱에서 애드센스 코드 또는Google 게시자 태그를 이용해 광고를 구현하는 웹 콘텐츠를 표시하는 경우 광고 수익을 올리려면 이 API를 사용하세요. 자세한 내용은
AdMob 정책을 참고하세요.

- Google Mobile Ads Flutter Plugin으로 광고를 요청하여 수익 창출
모바일 앱용 광고 형식을 구현하여 AdMob에 광고를 요청하면 앱에서 수익을 창출할 수 있습니다.Google Mobile Ads Flutter Plugin
- 광고 수익 창출을 위한 WebView API를 사용하여 수익 창출
앱에서
WebViewController를 이용해 Ad Manager 또는 AdSense의 광고를 게재하는 웹 콘텐츠를 표시하는 경우에는 광고 수익 창출을 위한 WebView API를 이용해WebViewController객체를 Google Mobile Ads Flutter Plugin에 등록하세요. 애드센스 코드 또는 Google 게시자 태그의 JavaScript가 광고 요청을 생성하고 전송하므로 SDK로 광고 요청을 하지 않아도 됩니다. 이러한 API를 이용하면 모바일 웹 및 데스크톱 웹 인벤토리 형식 만 사용할 수 있습니다.WebViewController에서 웹 콘텐츠를 소유하지 않은 경우에도 이 API를 이용하면 광고주를 스팸으로부터 보호하고 콘텐츠를 제공한 웹 게시자의 수익 창출을 개선하는 데 도움이 됩니다.
동일한 앱에서 두 옵션 중 하나 또는 둘 다 실행할 수 있습니다.
이 가이드에서는 광고 수익 창출을 위한 WebView API를 iOS 앱에 통합하는 방법을 설명합니다.
시작하기 전에
광고 수익 창출을 위한 WebView API를 사용하기 전에 다음을 실행해야 합니다.
- 앱에서 버전 3.0.0 이상의 Flutter 플러그인에 Google Mobile Ads Flutter Plugin를 사용합니다.
pubspec.yaml파일에webview_flutter를 종속 항목 으로 추가합니다.- 앱에 버전 3.7.0 이상의
webview_flutter_android를 추가합니다.
애플리케이션 식별자 확인 우회
Android
AndroidManifest.xml 파일에 다음 <meta-data> 태그를 추가하여 APPLICATION_ID 확인을
우회합니다. 이 단계를 놓치면
Google Mobile Ads Flutter Plugin 앱 시작 시
IllegalStateException
을 발생시킬 수 있습니다.
<!-- Bypass APPLICATION_ID check for WebView API for Ads -->
<meta-data
    android:name="com.google.android.gms.ads.INTEGRATION_MANAGER"
    android:value="webview"/>
iOS
아래 키와 문자열 값으로 Runner/Info.plist 파일을 업데이트하여 GADApplicationIdentifier 확인을 우회합니다. 이 단계를 놓치면
Google Mobile Ads Flutter Plugin이 앱 시작 시 GADInvalidInitializationException
을 발생시킬 수 있습니다.
<!-- Bypass GADApplicationIdentifier check for WebView API for Ads -->
<key>GADIntegrationManager</key>
<string>webview</string>
WebViewController 등록
애드센스 코드 또는 Google 게시자 태그를 사용하는
WebViewController 내에서 광고의 인앱 광고 수익 창출을 개선하려면 아래 단계를 따르세요.
WebViewController에서 JavaScript를 사용 설정합니다. 이렇게 하지 않으면 광고가 로드되지 않을 수 있습니다.사용자의 광고 경험을 개선하고 Chrome의 쿠키 정책을 준수하려면
AndroidWebViewController인스턴스에서 서드 파티 쿠키를 사용 설정하세요.WebViewController인스턴스를 Google Mobile Ads Flutter Plugin에서 제공하는registerWebView()메서드를 호출하여 등록합니다.
import 'package:google_mobile_ads/google_mobile_ads.dart';
import 'package:webview_flutter/webview_flutter.dart';
import 'package:webview_flutter_android/webview_flutter_android.dart';

@override
class WebViewExampleState extends State<WebViewExample> {
  late final WebViewController controller;

  @override
  void initState() {
    super.initState();

    createWebView();
  }

  void createWebView() async {
    controller = WebViewController();
    // 1. Enable JavaScript in the web view.
    await controller.setJavaScriptMode(JavaScriptMode.unrestricted);

    // 2. Enable third-party cookies for Android.
    if (controller.platform is AndroidWebViewController) {
      AndroidWebViewCookieManager cookieManager = AndroidWebViewCookieManager(
        const PlatformWebViewCookieManagerCreationParams());
      await cookieManager.setAcceptThirdPartyCookies(
        controller.platform as AndroidWebViewController, true);
    }

    // 3. Register the web view.
    await MobileAds.instance.registerWebView(controller);
  }
}
URL 로드
이제 URL을 로드하고 WebViewController를 통해 웹 콘텐츠를 표시할 수 있습니다.
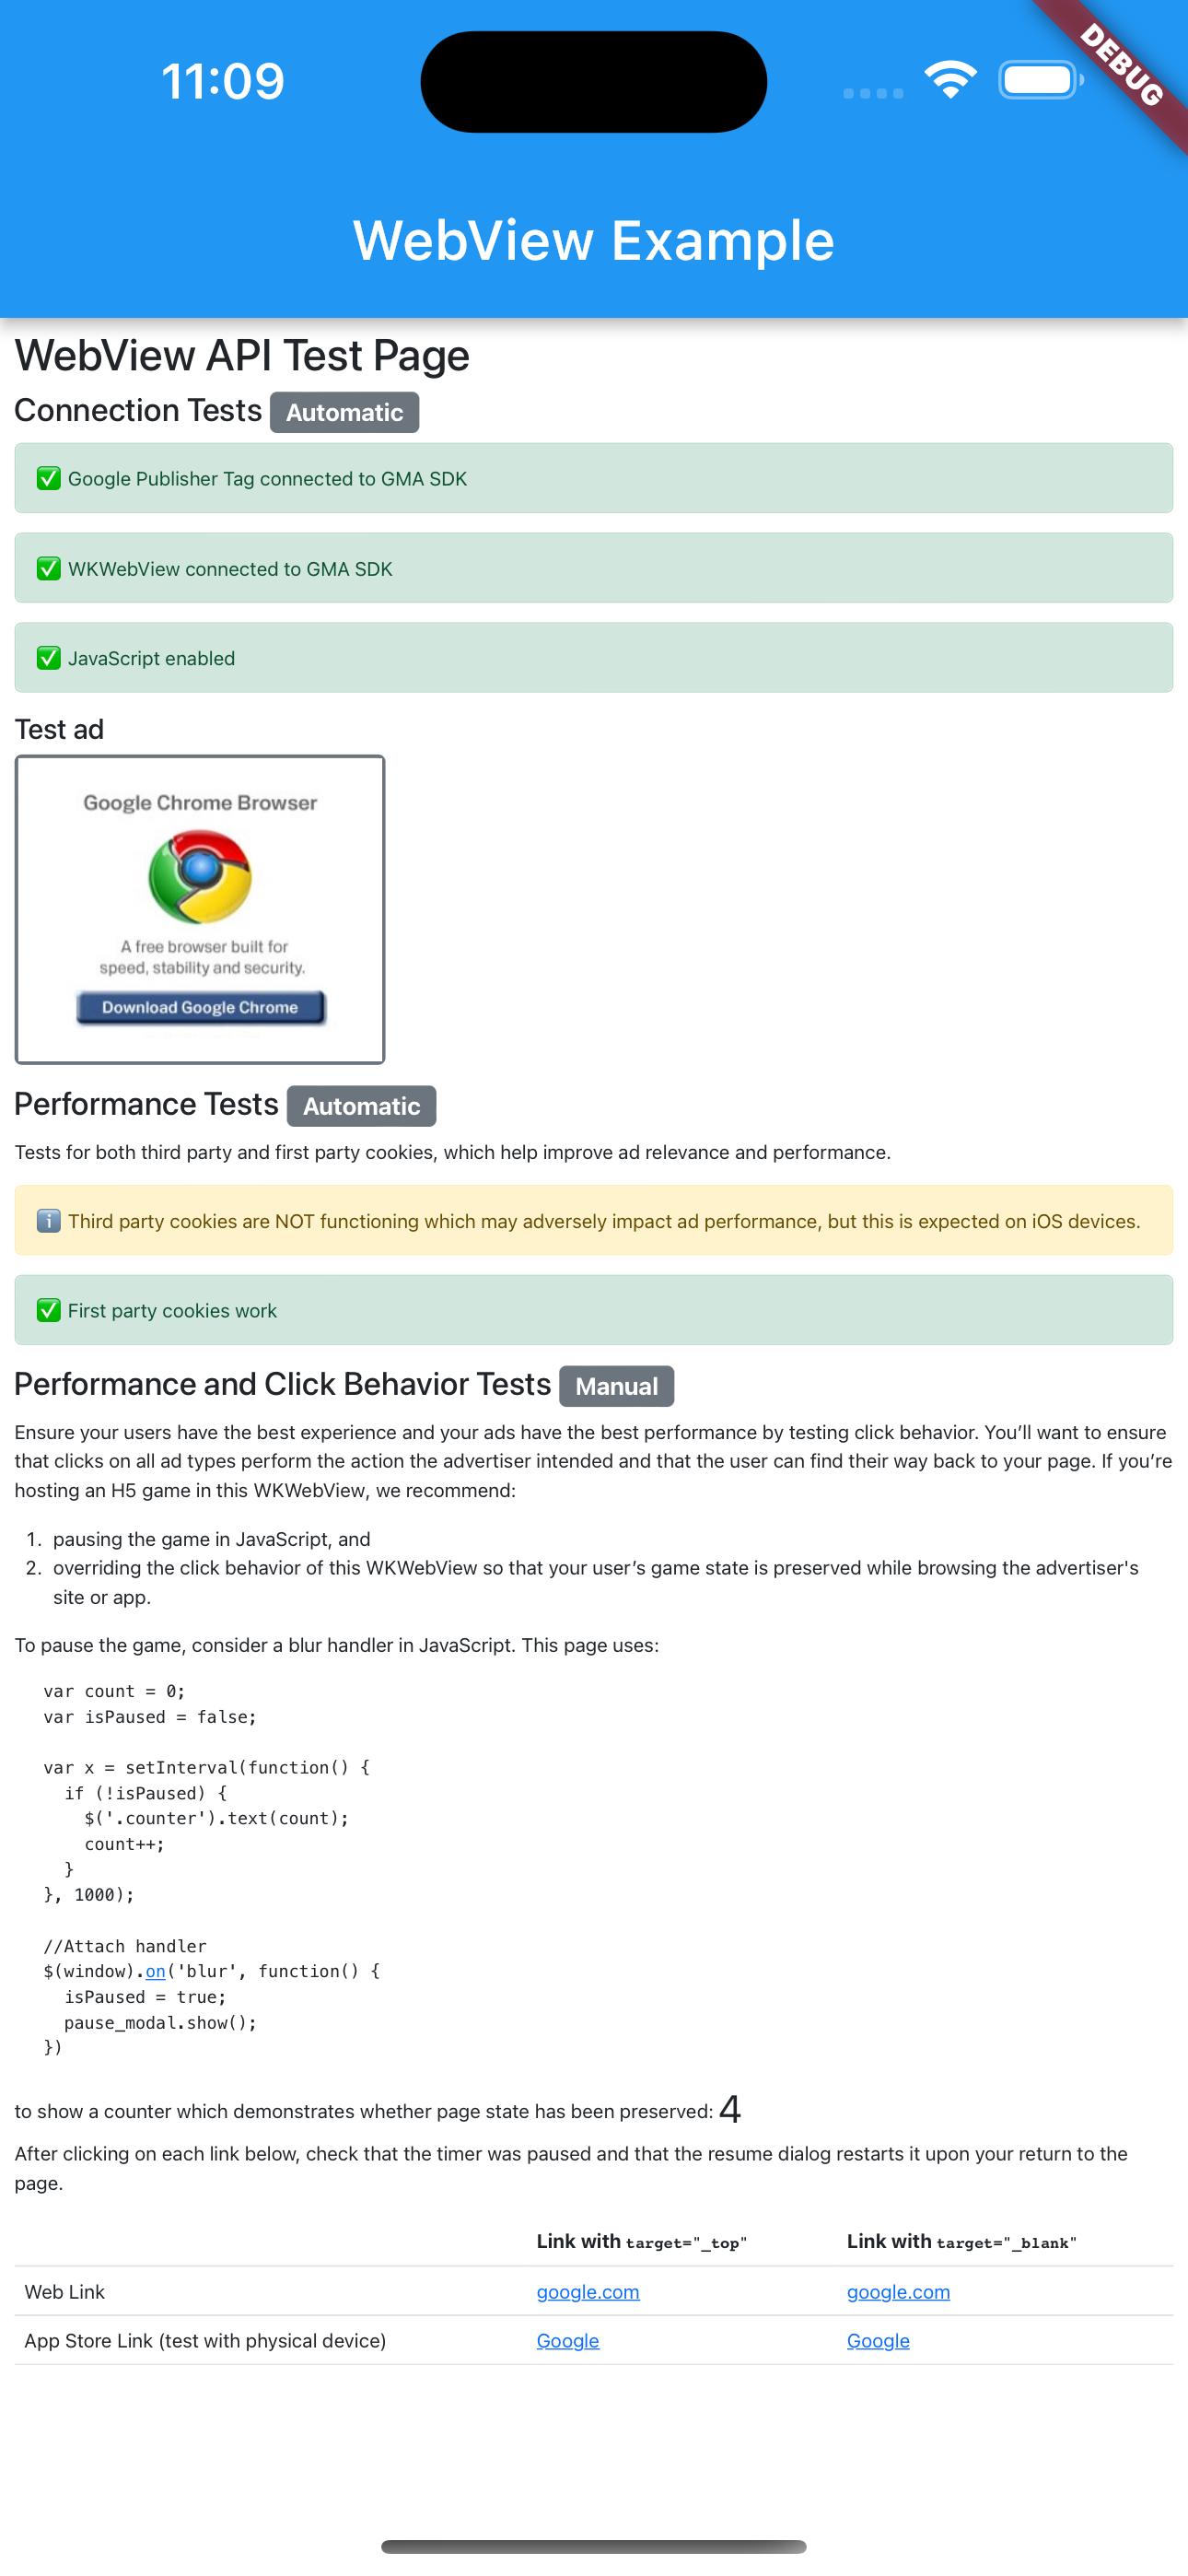
자체 테스트 URL을 사용하기 전에 테스트 URL(https://google.github.io/webview-ads/test/)을 로드하여 통합을 테스트하는 것이 좋습니다. JavaScript가 사용 설정되어 있지 않으면 웹페이지에 오류가 표시됩니다.
import 'package:google_mobile_ads/google_mobile_ads.dart';
import 'package:webview_flutter/webview_flutter.dart';
import 'package:webview_flutter_android/webview_flutter_android.dart';

@override
class WebViewExampleState extends State<WebViewExample> {
  late final WebViewController controller;

  @override
  void initState() {
    super.initState();

    createWebView();
  }

  void createWebView() async {
    controller = WebViewController();
    // 1. Enable JavaScript in the web view.
    await controller.setJavaScriptMode(JavaScriptMode.unrestricted);

    // 2. Enable third-party cookies for Android.
    if (controller.platform is AndroidWebViewController) {
      AndroidWebViewCookieManager cookieManager = AndroidWebViewCookieManager(
        const PlatformWebViewCookieManagerCreationParams());
      await cookieManager.setAcceptThirdPartyCookies(
        controller.platform as AndroidWebViewController, true);
    }

    // 3. Register the web view.
    await MobileAds.instance.registerWebView(controller);

    // 4. Load the URL.
    await controller.loadRequest(Uri.parse('https://google.github.io/webview-ads/test/'));
  }
다음 조건이 적용되는 경우 테스트 URL에 통합이 성공했음을 나타내는 녹색 상태 표시줄이 표시됩니다.
WebView이 Google Mobile Ads Flutter Plugin에 연결됨- JavaScript 사용 설정됨
- 서드 파티 쿠키가 작동함 (iOS 기기에서는 예상되지 않음)
- 퍼스트 파티 쿠키가 작동함
테스트 URL의 소스 코드
를 봅니다. 이제 테스트 URL을 원하는 URL로 바꿀 수 있습니다. 또한 Charles와 같은 프록시 도구를 이용해 앱의 HTTPS 트래픽을 포착하고 광고 요청에서 &scar= 매개변수를 검사할 수 있습니다.