
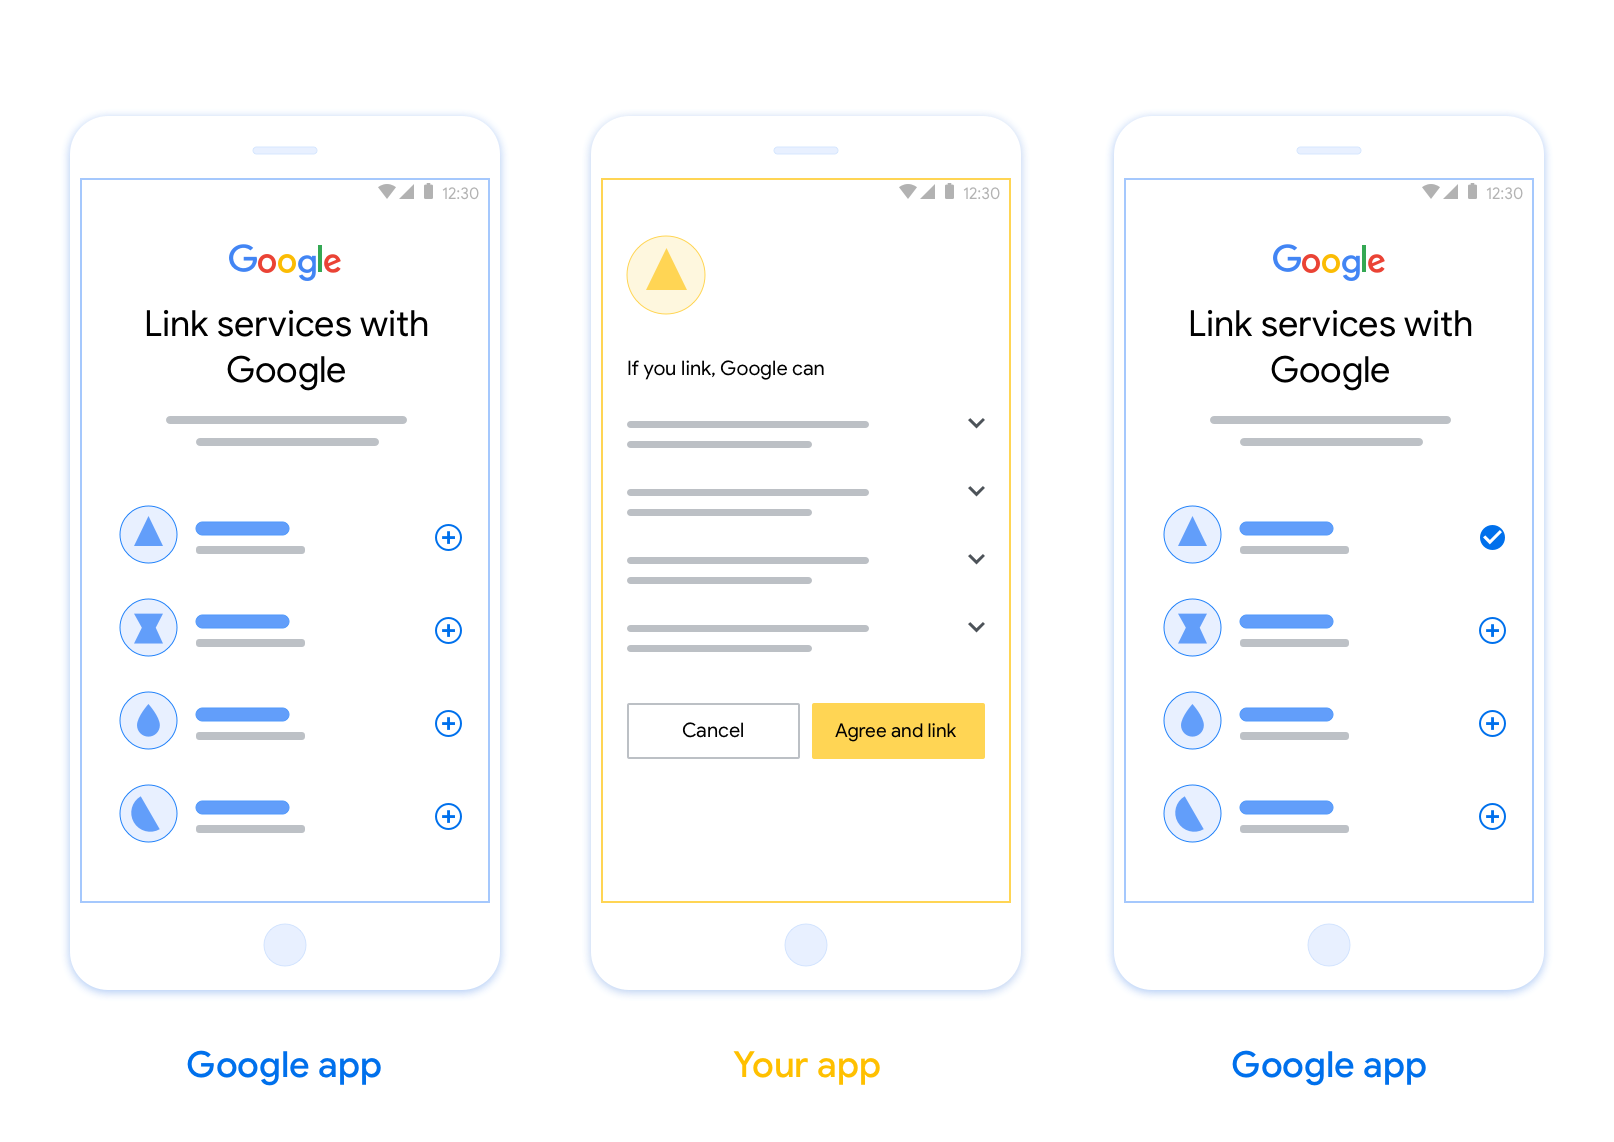
Mit der OAuth-basierten App-Flip-Verknüpfung (App-Flip) können Nutzer ihre Konten in Ihrem Authentifizierungssystem schnell mit ihren Google-Konten verknüpfen. Wenn Ihre App auf dem Smartphone des Nutzers installiert ist, wenn er den Kontoverknüpfungsvorgang startet, wird er nahtlos zu Ihrer App weitergeleitet, um die Nutzerautorisierung zu erhalten.
Dieser Ansatz bietet einen schnelleren Verknüpfungsvorgang, da der Nutzer seinen Nutzernamen und sein Passwort nicht noch einmal eingeben muss, um sich zu authentifizieren. Stattdessen werden die Anmeldedaten aus dem Konto des Nutzers in Ihrer App verwendet. Sobald ein Nutzer sein Google-Konto mit Ihrer App verknüpft hat, kann er alle von Ihnen entwickelten Integrationen nutzen.
Sie können App-Flip für iOS- und Android-Apps einrichten.
Voraussetzungen
Um App-Flip zu implementieren, müssen die folgenden Voraussetzungen erfüllt sein:
- Sie müssen eine Android- oder iOS-App haben.
- Sie müssen einen OAuth 2.0-Server besitzen, verwalten und warten, der den OAuth 2.0-Autorisierungscodevorgang unterstützt.
OAuth-basierter App-Flip-Vorgang
Das folgende Sequenzdiagramm beschreibt die Interaktion zwischen dem Nutzer, der Google App, Ihrer App und Ihrem Autorisierungsserver für App-Flip.
Rollen und Verantwortlichkeiten
In der folgenden Tabelle sind die Rollen und Verantwortlichkeiten der Akteure im App-Flip-Vorgang definiert.
| Akteur / Komponente | GAL-Rolle | Verantwortlichkeiten |
|---|---|---|
| Google App / Server | OAuth-Client | Initiiert den Verknüpfungsvorgang, löst einen Deeplink zu Ihrer mobilen App aus, tauscht den Autorisierungscode gegen Tokens ein und speichert diese sicher, um auf die APIs Ihres Dienstes zuzugreifen. |
| Ihre App | Autorisierungsagent | Authentifiziert den Nutzer (in der Regel mit vorhandenen App-Anmeldedaten), holt die Zustimmung ein und ruft einen Autorisierungscode von Ihrem Server ab. |
| Ihr Autorisierungsserver | Autorisierungsserver | Validiert Autorisierungscodes und Aktualisierungstokens und stellt Zugriffstokens für den Google-Server aus. |
Weitere Informationen zum OAuth-Verknüpfungsfluss mit Autorisierungscode finden Sie unter OAuth-Server implementieren.
Gestaltungsrichtlinien
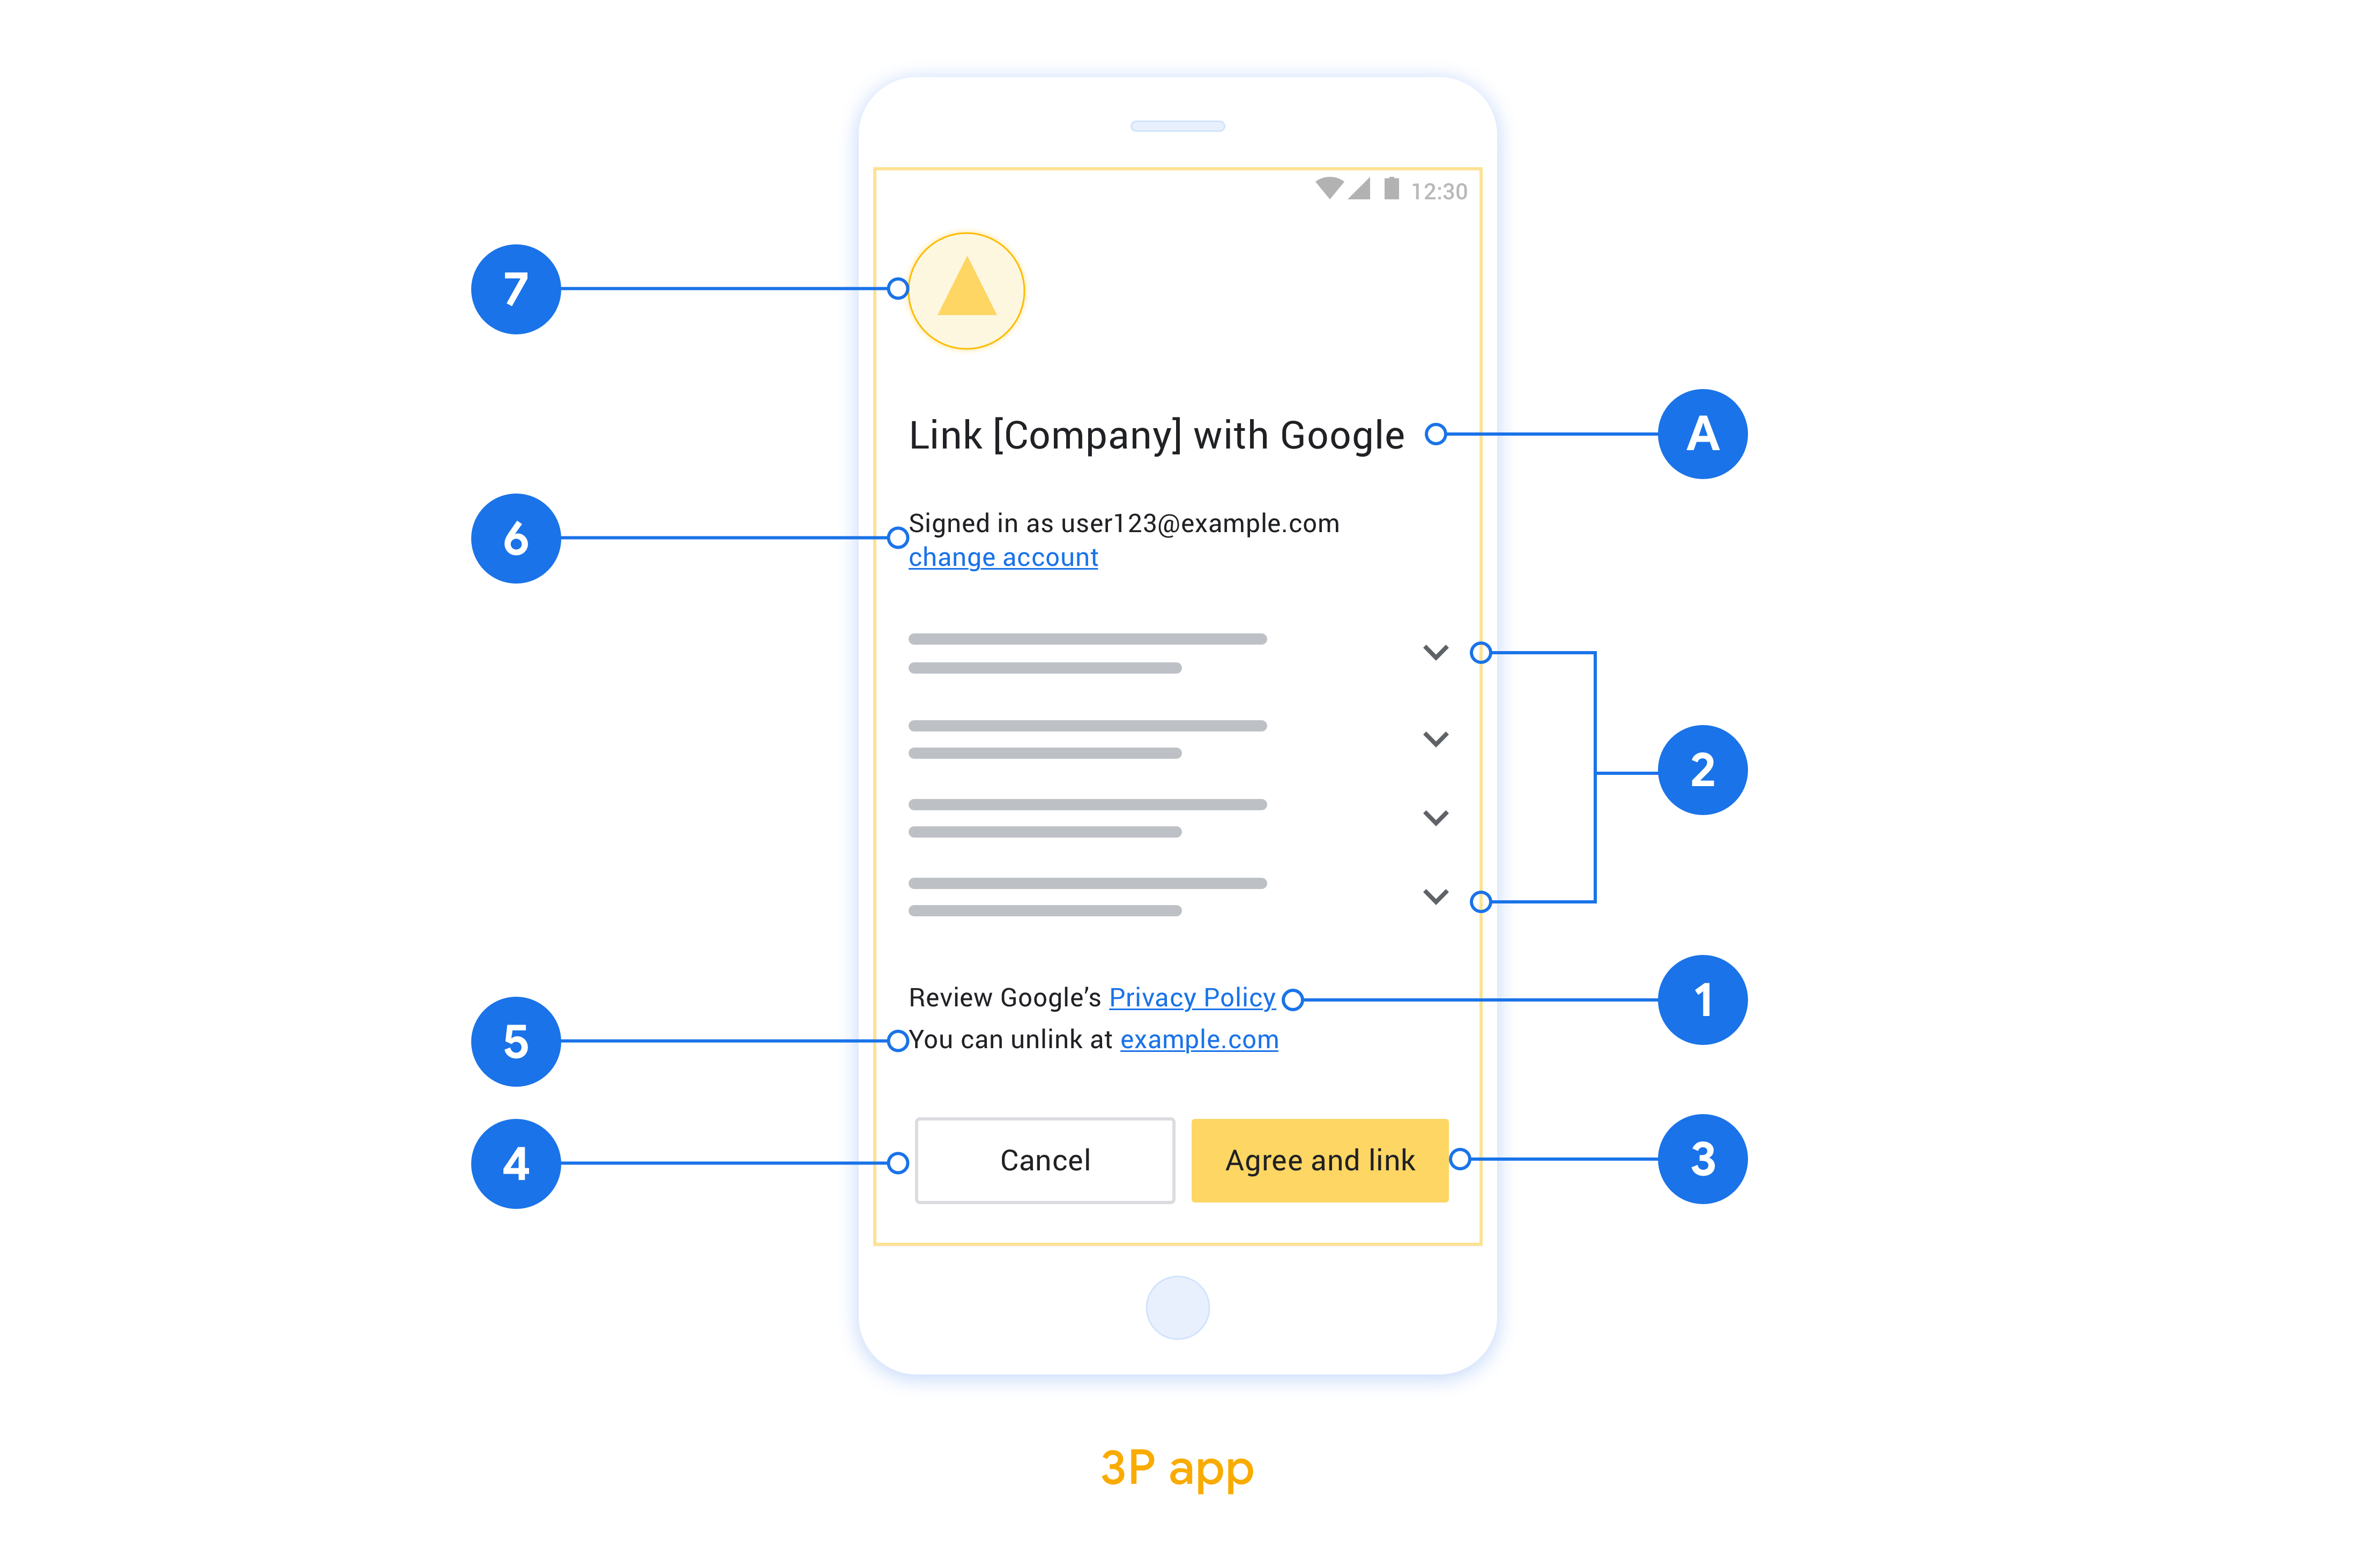
In diesem Abschnitt werden die Designanforderungen und ‑empfehlungen für den Zustimmungsbildschirm für die App-Flip-Kontoverknüpfung beschrieben. Nachdem Google Ihre App aufgerufen hat, zeigt Ihre App dem Nutzer den Zustimmungsbildschirm an.
Voraussetzungen
- Sie müssen dem Nutzer mitteilen, dass sein Konto mit Google verknüpft wird, nicht mit einem bestimmten Google-Produkt wie Google Home oder Google Assistant.
Empfehlungen
Wir empfehlen Folgendes:
Datenschutzerklärung von Google anzeigen Fügen Sie auf dem Zustimmungsbildschirm einen Link zur Datenschutzerklärung von Google ein.
Zu teilende Daten: Verwenden Sie eine klare und prägnante Sprache, um dem Nutzer mitzuteilen, welche seiner Daten Google benötigt und warum.
Klarer Call-to-Action: Geben Sie auf dem Einwilligungsbildschirm einen klaren Call-to-Action an, z. B. „Zustimmen und verknüpfen“. Nutzer müssen verstehen, welche Daten sie mit Google teilen müssen, um ihre Konten zu verknüpfen.
Möglichkeit zum Ablehnen oder Kündigen: Bieten Sie Nutzern die Möglichkeit, zurückzugehen, die Verknüpfung abzulehnen oder abzubrechen, wenn sie keine Verknüpfung wünschen.
Verknüpfung aufheben: Bieten Sie Nutzern eine Möglichkeit, die Verknüpfung aufzuheben, z. B. eine URL zu ihren Kontoeinstellungen auf Ihrer Plattform. Alternativ können Sie einen Link zu Google-Konto einfügen, über den Nutzer ihr verknüpftes Konto verwalten können.
Nutzerkonto ändern: Schlagen Sie Nutzern eine Methode vor, mit der sie ihr(e) Konto(s) wechseln können. Das ist besonders dann von Vorteil, wenn Nutzer mehrere Konten haben.
- Wenn ein Nutzer den Zustimmungsbildschirm schließen muss, um das Konto zu wechseln, senden Sie einen behebaren Fehler an Google, damit sich der Nutzer mit OAuth-Verknüpfung und dem impliziten Ablauf im gewünschten Konto anmelden kann.
Fügen Sie Ihr Logo ein. Ihr Unternehmenslogo auf dem Zustimmungsbildschirm anzeigen Platzieren Sie Ihr Logo gemäß Ihren Style-Richtlinien. Wenn Sie auch das Google-Logo anzeigen möchten, lesen Sie den Abschnitt Logos und Marken.
App Flip auf OAuth-Basis einrichten
In den folgenden Abschnitten werden die Voraussetzungen für den App-Flip auf OAuth-Basis und die Konfiguration Ihres App-Flip-Projekts in der Actions Console beschrieben.
Aktion erstellen und OAuth 2.0-Server einrichten
Bevor Sie App Flip konfigurieren können, müssen Sie Folgendes tun:
- Aktion erstellen Folgen Sie der Anleitung im Abschnitt Projekt erstellen, um eine Aktion zu erstellen.
- OAuth 2.0-Server einrichten Weitere Informationen zum Einrichten eines OAuth-Servers finden Sie unter OAuth-Kontoverknüpfung implementieren.
App Flip in der Actions Console konfigurieren
Im folgenden Abschnitt wird beschrieben, wie Sie App Flip in der Actions Console konfigurieren.
- Klicken Sie oben in der Navigationsleiste auf Entwickeln. Klicken Sie dann links in der Navigationsleiste auf Konto verknüpfen.
- Aktiviere den Schalter neben Kontoverknüpfung.
- Wählen Sie unter Kontoerstellung die Option Nein, ich möchte nur die Kontoerstellung auf meiner Website zulassen aus.
- Klicken Sie auf Weiter.
- Wählen Sie unter Verknüpfungstyp in den Drop-down-Menüs OAuth und Autorisierungscode aus.
- Klicken Sie auf Weiter.
- Füllen Sie alle Felder unter OAuth-Clientinformationen aus. Wenn App Flip nicht unterstützt wird, wird stattdessen das reguläre OAuth verwendet.
- Klicken Sie auf Weiter.
- Klicken Sie unter App für die Kontoverknüpfung verwenden (optional) das Kästchen Für iOS aktivieren an.
- Füllen Sie das Feld Universeller Link aus. Weitere Informationen zu universellen Links
- Wenn Sie Ihren Client optional konfigurieren möchten, fügen Sie unter Client konfigurieren (optional) Bereiche hinzu und klicken Sie auf Bereich hinzufügen. Klicken Sie andernfalls auf Weiter.
- Geben Sie unter „Testanleitung“
test(oder einen beliebigen anderen String) als Platzhalter ein. Das Ausfüllen dieses Felds mit einem Testkonto ist nur erforderlich, wenn Sie Ihre Action tatsächlich zur Veröffentlichung einreichen. - Klicken Sie auf Speichern.
Sie können jetzt mit dem nächsten Abschnitt fortfahren, um App Flip in Ihrer iOS- oder Android-App zu implementieren.
App Flip in Ihre nativen Apps implementieren
Wenn Sie App Flip implementieren möchten, müssen Sie den Nutzerautorisierungscode in Ihrer App so ändern, dass ein Deeplink von Google akzeptiert wird.
App Flip auf Ihrem Gerät testen
Nachdem Sie eine Aktion erstellt und App Flip in der Konsole und in Ihrer App konfiguriert haben, können Sie App Flip auf Ihrem Mobilgerät testen. Sie können die Google Assistant App verwenden, um App Flip zu testen.
So testen Sie App Flip über die Assistant App:
- Rufen Sie die Actions Console auf und wählen Sie Ihr Projekt aus.
- Klicken Sie oben in der Navigationsleiste auf Test.
- So starten Sie den Workflow zur Kontoverknüpfung über die Assistant App:
- Öffnen Sie die Google Assistant App.
- Klicken Sie auf Einstellungen.
- Klicken Sie auf dem Tab „Assistant“ auf Smart-Home-Steuerung.
- Klicken Sie auf Hinzufügen(+).
- Wählen Sie Ihre Aktion aus der Liste der Anbieter aus. In der Liste wird das Präfix „[test]“ vorangestellt. Wenn Sie Ihre [Test]-Aktion in der Liste auswählen, sollte Ihre App geöffnet werden.
- Prüfen Sie, ob Ihre App gestartet wurde, und beginnen Sie mit dem Test Ihres Autorisierungsablaufs.