基于 OAuth 的 Google 登录“精简”关联类型在基于 OAuth 的账号关联之上添加了 Google 登录。这不仅可为 Google 用户提供顺畅的语音关联体验,还可让使用非 Google 身份注册您服务的用户关联账号。
这种关联类型从 Google 登录开始,可让您检查用户的 Google 个人资料信息是否已存在于您的系统中。如果您的系统中未找到用户的信息,系统会开始执行标准 OAuth 流程。用户还可以选择使用其 Google 个人资料信息创建新账号。

如需使用简化的关联类型执行账号关联,请按以下常规步骤操作:
- 首先,请征求用户同意以访问其 Google 个人资料。
- 使用其个人资料中的信息来识别用户。
- 如果您在身份验证系统中找不到匹配的 Google 用户,系统会根据您在 Actions 控制台中配置的操作项目来确定后续流程,即允许通过语音创建用户账号,还是仅允许在您的网站上创建用户账号。
- 如果您允许通过语音创建账号,请验证从 Google 收到的 ID 令牌。然后,您可以根据 ID 令牌中包含的个人资料信息创建用户。
- 如果您不允许通过语音创建账号,系统会将用户转移到浏览器,用户可以在其中加载您的授权页面并完成用户创建流程。
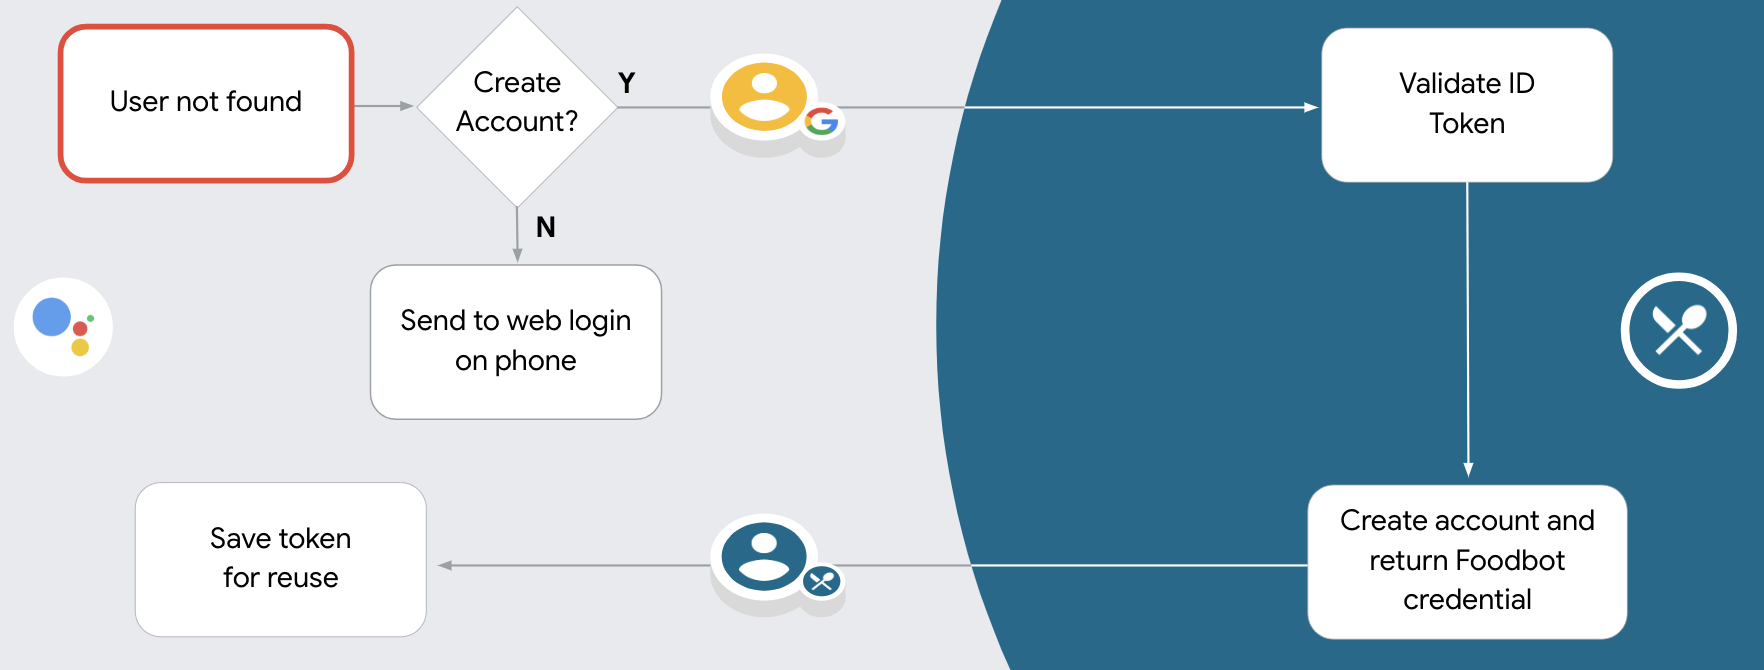
支持通过语音创建账号
如果您允许通过语音创建用户账号,助理会询问用户是否要执行以下操作:
- 使用其 Google 账号信息在您的系统上创建新账号,或
- 如果用户有现有的非 Google 账号,请使用其他账号登录您的身份验证系统。
如果您想尽可能减少账号创建流程中的阻力,建议允许通过语音创建账号。如果用户想使用现有的非 Google 账号登录,才需要退出语音流程。
禁止通过语音创建账号
如果您禁止通过语音创建用户账号,Google 助理会打开您为用户身份验证提供的网站网址。如果互动发生在没有屏幕的设备上,Google 助理会引导用户前往手机,以继续完成账号关联流程。
建议在以下情况下禁止创建:
您不希望允许没有 Google 账号的用户创建新用户账号,而是希望他们与您身份验证系统中的现有用户账号相关联。例如,如果您提供会员回馈计划,则可能需要确保用户不会丢失其现有账号中累积的积分。
您需要完全控制账号创建流程。例如,如果您需要在账号创建期间向用户显示服务条款,则可以禁止创建账号。
实现基于 OAuth 的 Google 登录“简化”关联
账号通过行业标准 OAuth 2.0 流程进行关联。 Actions on Google 支持隐式流程和授权代码流程。
在隐式代码流程中,Google 会在用户浏览器中打开您的授权端点。成功登录后,系统会向 Google 返回长期访问令牌。现在,从 Google 助理向你的 Action 发送的每个请求中都包含此访问令牌。
在授权代码流程中,您需要两个端点:
- 授权端点,该端点负责向尚未登录的用户显示登录界面,并以短期授权代码的形式记录所请求的访问。
- 令牌交换端点,负责两种类型的交换:
- 将授权代码交换为长期刷新令牌和短期访问令牌。用户完成帐号关联流程后,系统会进行这种交换。
- 将长期刷新令牌换成短期访问令牌。Google 需要新访问令牌时,由于此令牌已过期,因此会进行此交换。
虽然隐式代码流程的实现更简单,但 Google 建议通过隐式流程发出的访问令牌永远不会过期,因为将令牌过期与隐式流程一起使用会强制用户再次关联其帐号。如果出于安全考虑需要令牌到期,强烈建议您考虑使用身份验证代码流程。
配置项目
如需将项目配置为使用精简版关联,请按以下步骤操作:
- 打开 Actions 控制台,然后选择要使用的项目。
- 点击开发标签页,然后选择账号关联。
- 启用账号关联旁边的开关。
- 在账号创建部分中,选择是。
在关联类型中,选择 OAuth 和 Google 登录以及隐式。
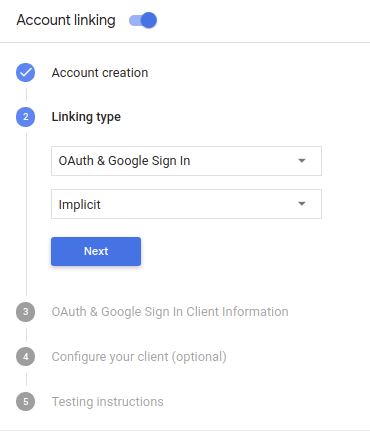
在客户信息中,执行以下操作:
- 为 Actions 发给 Google 的客户端 ID 赋值,以标识来自 Google 的请求。
- 插入授权端点和令牌交换端点的网址。
点击保存。
实现 OAuth 服务器
为了支持 OAuth 2.0 隐式流程,您的服务会进行授权 端点。此端点负责 就数据访问征得用户同意。授权端点 向尚未登录的用户显示登录界面,并记录 同意所请求的访问。
当您的 Action 需要调用您的某项授权的 API 时,Google 会使用 此端点来获得用户许可,以在其上调用这些 API 。
由 Google 发起的典型 OAuth 2.0 隐式流会话具有以下特征: 以下流程:
- Google 会在用户的浏览器中打开您的授权端点。通过 如果用户尚未登录,则可以登录,并且授予 Google 访问 通过您的 API 访问其数据(如果尚未授予权限)。
- 您的服务会创建一个访问令牌并将其返回给 通过使用访问令牌将用户的浏览器重定向回 Google, 附件。
- Google 调用您的服务的 API,并使用 。您的服务会验证访问令牌是否向 Google 授予 访问 API 的授权,然后完成 API 调用。
处理授权请求
当您的 Action 需要通过 OAuth 2.0 隐式流程执行账号关联时, Google 会通过包含以下内容的请求将用户发送到您的授权端点: 以下参数:
| 授权端点参数 | |
|---|---|
client_id |
您分配给 Google 的客户 ID。 |
redirect_uri |
此请求的响应发送到的网址。 |
state |
将一个在 重定向 URI。 |
response_type |
要在响应中返回的值的类型。对于 OAuth 2.0 隐式
则响应类型始终为 token。 |
例如,如果您的授权端点可通过 https://myservice.example.com/auth 访问,
请求可能如下所示:
GET https://myservice.example.com/auth?client_id=GOOGLE_CLIENT_ID&redirect_uri=REDIRECT_URI&state=STATE_STRING&response_type=token
为了让授权端点能够处理登录请求,请执行以下步骤:
验证
client_id和redirect_uri值, 防止向意外或配置错误的客户端应用授予访问权限:- 确认
client_id是否与您的客户端 ID 匹配 分配给 Google。 - 确认
redirect_uri指定的网址 参数的格式如下:https://oauth-redirect.googleusercontent.com/r/YOUR_PROJECT_ID
- 确认
检查用户是否已登录您的服务。如果用户未登录 中,完成服务的登录或注册流程。
生成 Google 将用于访问您的 API 的访问令牌。通过 访问令牌可以是任何字符串值,但必须唯一地表示 令牌对应的用户和客户端,且不得被猜到。
发送 HTTP 响应,将用户浏览器重定向到相应网址 由
redirect_uri参数指定。添加所有 以下参数:access_token:您刚刚生成的访问令牌token_type:字符串bearerstate:原始状态的未修改状态值 请求 以下是生成的网址示例:https://oauth-redirect.googleusercontent.com/r/YOUR_PROJECT_ID#access_token=ACCESS_TOKEN&token_type=bearer&state=STATE_STRING
Google 的 OAuth 2.0 重定向处理程序将收到访问令牌并确认
state 值没有更改。在 Google 获得
访问令牌,则 Google 会将该令牌附加到后续调用
作为 AppRequest 的一部分添加到您的 Action。
处理自动关联
在用户同意你的 Action 访问他们的 Google 个人资料后,Google 发送请求,其中包含 Google 用户身份的已签名断言。 该断言包含的信息包括用户的 Google 账号 ID、姓名、 和电子邮件地址。为项目配置的令牌交换端点处理 请求。
如果您的身份验证系统中已经存在相应的 Google 账号,
您的令牌交换端点为用户返回令牌。如果 Google 账号没有
匹配现有用户,您的令牌交换端点会返回 user_not_found 错误。
请求的格式如下:
POST /token HTTP/1.1
Host: oauth2.example.com
Content-Type: application/x-www-form-urlencoded

grant_type=urn:ietf:params:oauth:grant-type:jwt-bearer&intent=get&assertion=JWT&consent_code=CONSENT_CODE&scope=SCOPES
您的令牌交换端点必须能够处理以下参数:
| 令牌端点参数 | |
|---|---|
grant_type |
所交换的令牌的类型。对于这类请求
参数的值为 urn:ietf:params:oauth:grant-type:jwt-bearer。 |
intent |
对于这些请求,此参数的值为 `get`。 |
assertion |
一个 JSON Web 令牌 (JWT),提供 Google 用户身份。JWT 包含的信息包括 账号 ID、名称和电子邮件地址。 |
consent_code |
可选:一个一次性代码(如果存在)用于表明 用户已同意你的 Action 访问指定范围。 |
scope |
可选:您配置 Google 向用户请求的任何范围。 |
当您的令牌交换端点收到关联请求时,它应该 以下:
验证和解码 JWT 断言
您可以使用适用于您语言的 JWT 解码库来验证和解码 JWT 断言。 使用 Google 的公钥(适用于 JWK 或 PEM 格式)来验证令牌的 签名。
解码后,JWT 断言如以下示例所示:
{
  "sub": 1234567890,        // The unique ID of the user's Google Account
  "iss": "https://accounts.google.com",        // The assertion's issuer
  "aud": "123-abc.apps.googleusercontent.com", // Your server's client ID
  "iat": 233366400,         // Unix timestamp of the assertion's creation time
  "exp": 233370000,         // Unix timestamp of the assertion's expiration time
  "name": "Jan Jansen",
  "given_name": "Jan",
  "family_name": "Jansen",
  "email": "jan@gmail.com", // If present, the user's email address
  "locale": "en_US"
}
除了验证令牌的签名之外,还要验证断言的颁发者
(iss 字段)为 https://accounts.google.com,且受众群体(aud 字段)
是分配给您的 Action 的客户端 ID。
检查您的身份验证系统中是否已存在该 Google 账号
请检查以下任一条件是否成立:
- Google 账号 ID 可在断言的
sub字段中找到,也可位于您的用户数据库中。 - 断言中的电子邮件地址与用户数据库中的用户匹配。
如果满足上述任一条件,则表明用户已经注册,您可以发出 访问令牌。
如果断言中指定的 Google 账号 ID 和电子邮件地址都没有
与您数据库中的用户匹配,表示该用户尚未注册。在这种情况下,您的
令牌交换端点应回复 HTTP 401 错误,指定 error=user_not_found,
如以下示例中所示:
HTTP/1.1 401 Unauthorized
Content-Type: application/json;charset=UTF-8

{
  "error":"user_not_found",
}
user_not_found 错误的 401 错误响应时,
使用 intent 参数的值调用您的令牌交换端点
设置为 create 并发送包含用户个人资料信息的 ID 令牌
一起发送。
通过 Google 登录功能处理账号创建
当用户需要在您的服务中创建账号时,Google 会
向令牌交换端点发送的请求
intent=create,如以下示例所示:
POST /token HTTP/1.1
Host: oauth2.example.com
Content-Type: application/x-www-form-urlencoded

response_type=token&grant_type=urn:ietf:params:oauth:grant-type:jwt-bearer&scope=SCOPES&intent=create&consent_code=CONSENT_CODE&assertion=JWT[&NEW_ACCOUNT_INFO]
assertion 参数包含 JSON Web 令牌 (JWT),可提供
Google 用户的身份的已签名断言。JWT 包含
其中包含用户的 Google 账号 ID、姓名和电子邮件地址
为您的服务创建一个新账号。
如需响应账号创建请求,您的令牌交换端点必须执行以下操作 以下:
验证和解码 JWT 断言
您可以使用适用于您语言的 JWT 解码库来验证和解码 JWT 断言。 使用 Google 的公钥(适用于 JWK 或 PEM 格式)来验证令牌的 签名。
解码后,JWT 断言如以下示例所示:
{
  "sub": 1234567890,        // The unique ID of the user's Google Account
  "iss": "https://accounts.google.com",        // The assertion's issuer
  "aud": "123-abc.apps.googleusercontent.com", // Your server's client ID
  "iat": 233366400,         // Unix timestamp of the assertion's creation time
  "exp": 233370000,         // Unix timestamp of the assertion's expiration time
  "name": "Jan Jansen",
  "given_name": "Jan",
  "family_name": "Jansen",
  "email": "jan@gmail.com", // If present, the user's email address
  "locale": "en_US"
}
除了验证令牌的签名之外,还要验证断言的颁发者
(iss 字段)为 https://accounts.google.com,且受众群体(aud 字段)
是分配给您的 Action 的客户端 ID。
验证用户信息并创建新账号
请检查以下任一条件是否成立:
- Google 账号 ID 可在断言的
sub字段中找到,也可位于您的用户数据库中。 - 断言中的电子邮件地址与用户数据库中的用户匹配。
如果满足上述任一条件,则提示用户将其现有账号关联
通过使用 HTTP 401 错误响应请求
error=linking_error,并将用户的电子邮件地址为 login_hint,如
示例:
HTTP/1.1 401 Unauthorized
Content-Type: application/json;charset=UTF-8

{
  "error":"linking_error",
  "login_hint":"foo@bar.com"
}
如果以上两个条件都不满足,请使用相应信息创建一个新的用户账号 。新账号通常不会设置密码。时间是 建议您将 Google 登录功能添加到其他平台,以便用户能够 在您的应用的各个界面上通过 Google 投放广告。或者,您也可以 通过电子邮件向用户发送链接,启动密码恢复流程,以便用户设置 密码,以便在其他平台上登录。
创建完成后,发出一个访问令牌 并在 HTTPS 响应的正文,如以下示例所示:
{
  "token_type": "Bearer",
  "access_token": "ACCESS_TOKEN",

  "expires_in": SECONDS_TO_EXPIRATION
}
为身份验证流程设计语音界面
检查用户是否已通过验证,并启动账号关联流程
- 在 Actions 控制台中打开您的 Actions Builder 项目。
- 创建新场景以在您的 Action 中启动账号关联:
- 点击场景。
- 点击添加 (+) 图标以添加新场景。
- 在新创建的场景中,点击条件的添加 add 图标。
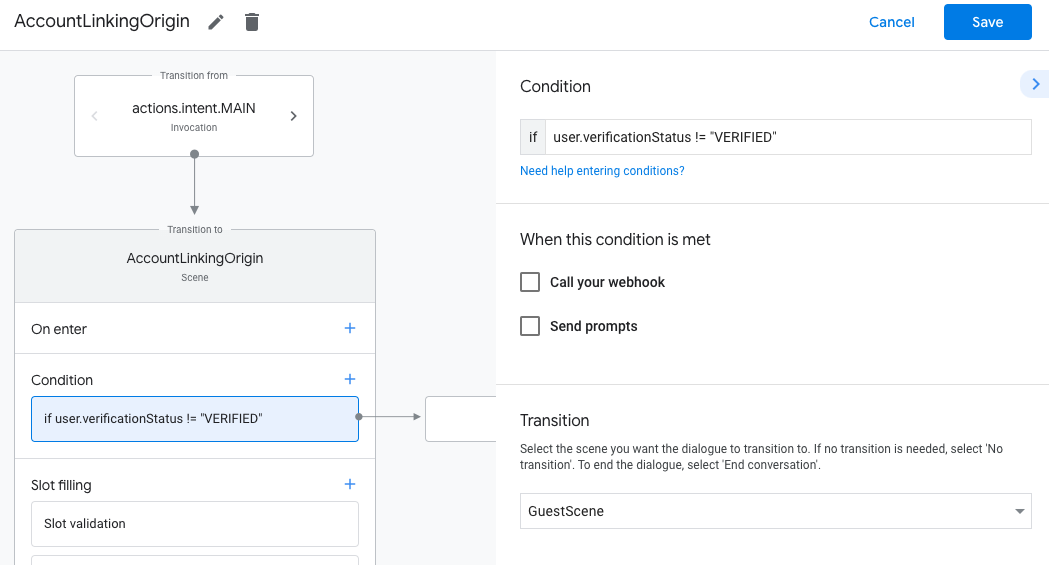
- 添加一个条件,用于检查与对话关联的用户是否为已验证的用户。如果检查失败,您的 Action 将无法在对话期间执行账号关联,并且应回退到提供无需账号关联的功能。
- 在条件下的
Enter new expression字段中,输入以下逻辑:user.verificationStatus != "VERIFIED" - 在过渡下,选择不需要关联账号的场景,或选择仅限访客使用的功能的入口点场景。
- 在条件下的
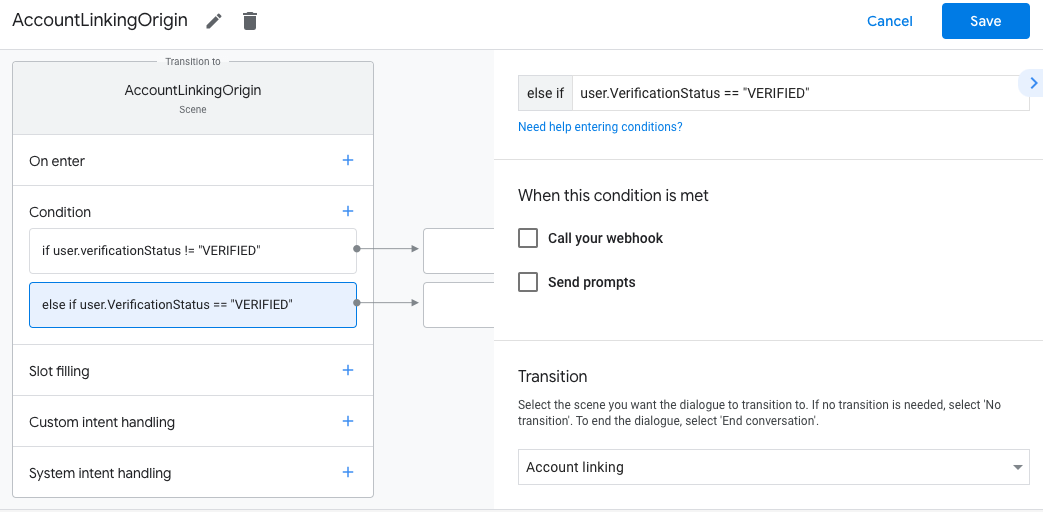
- 点击条件对应的添加 add 图标。
- 添加一个条件,以便在用户没有关联身份时触发账号关联流程。
- 在条件下的
Enter new expression字段中,输入以下逻辑:user.verificationStatus == "VERIFIED" - 在过渡下,选择账号关联系统场景。
- 点击保存。
- 在条件下的
保存后,系统会在您的项目中添加一个名为 <SceneName>_AccountLinking 的新账号关联系统场景。
自定义账号关联场景
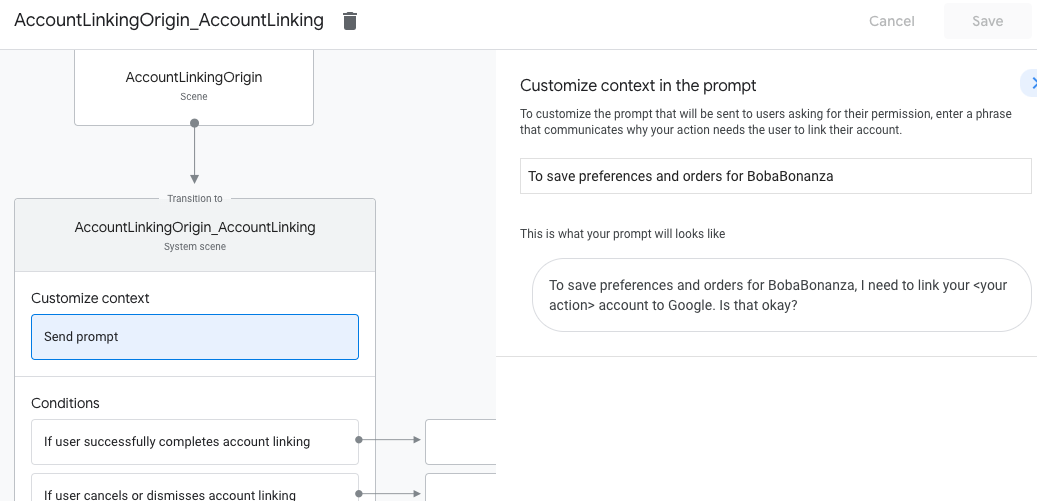
- 在场景下,选择账号关联系统场景。
- 点击发送提示,然后添加简短的句子,向用户说明该操作需要访问其身份信息的原因(例如“保存您的偏好设置”)。
- 点击保存。
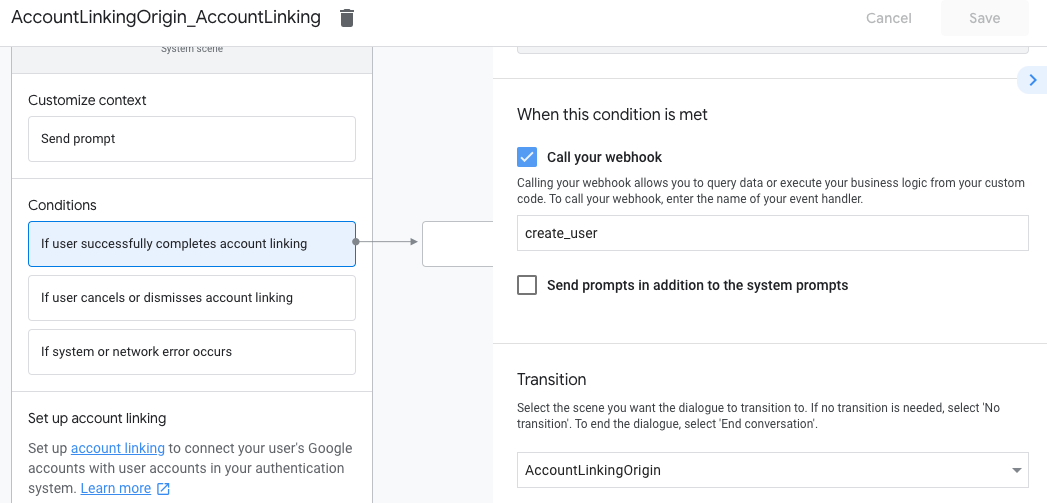
- 在条件下,点击如果用户成功完成账号关联。
- 配置用户同意关联账号后,流程应如何继续。 例如,调用网络钩子来处理所需的任何自定义业务逻辑,然后转换回原始场景。
- 点击保存。
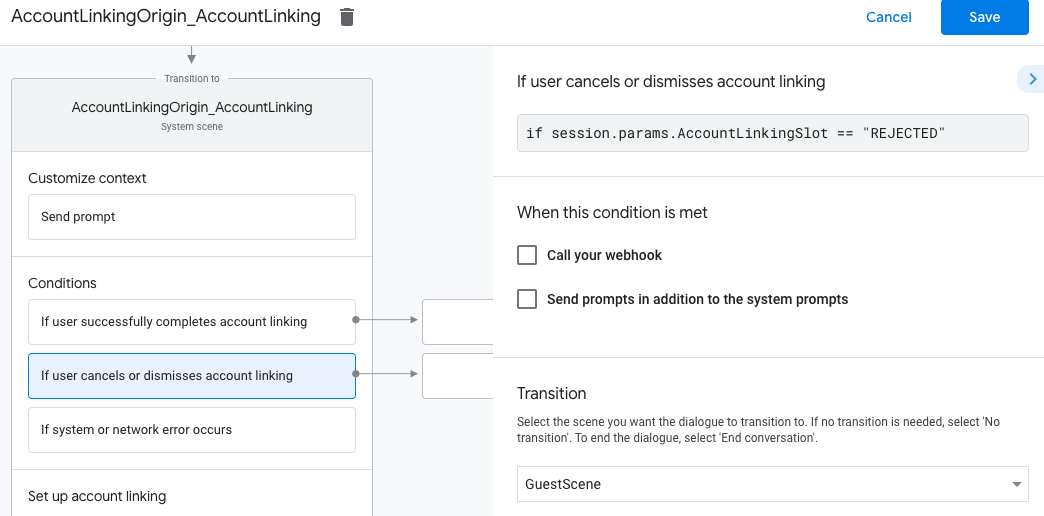
- 在条件下,点击如果用户取消或关闭账号关联。
- 配置用户不同意关联账号时流程应如何继续。例如,发送确认消息并重定向到提供不需要关联账号的功能的场景。
- 点击保存。
- 在条件下,点击如果发生系统或网络错误。
- 配置在因系统或网络错误而无法完成账号关联流程时,流程应如何继续。 例如,发送确认消息并重定向到提供不需要关联账号的功能的场景。
- 点击保存。
处理数据访问请求
如果助理请求包含访问令牌,请先检查该访问令牌是否有效且未过期,然后从用户账号数据库中检索与该令牌关联的用户账号。

