تنظيم صفحاتك في مجموعات
يمكنك حفظ المحتوى وتصنيفه حسب إعداداتك المفضّلة.
إنّ تسجيل الدخول باستخدام حساب Google في "مساعد Google" يوفّر تجربة المستخدم أبسط وأسهل.
للمستخدمين والمطوّرين على حدّ سواء لربط الحسابات أو إنشائها. الإجراء الخاص بك
طلب الوصول إلى الملف الشخصي للمستخدم في حساب Google أثناء محادثة،
بما في ذلك اسم المستخدم وعنوان بريده الإلكتروني وصورة ملفه الشخصي
يمكن استخدام معلومات الملف الشخصي لتقديم تجربة مخصّصة للمستخدم.
في الإجراء الخاص بك. إذا كانت لديك تطبيقات على أنظمة أساسية أخرى وتستخدم تسجيل الدخول بحساب Google،
يمكنك أيضًا العثور على حساب مستخدم حالي وربطه، وإنشاء حساب جديد،
وتنشئ قناة اتصال مباشرة للمستخدم.
لربط الحساب باستخدام ميزة "تسجيل الدخول باستخدام حساب Google"، يجب أن تطلب من المستخدم منح موافقته
للوصول إلى ملفه الشخصي في Google. يمكنك بعد ذلك استخدام المعلومات الموجودة في ملفه الشخصي
مثل عنوان بريده الإلكتروني، للتعرف على المستخدم في نظامك.
تنفيذ عملية ربط حساب "تسجيل الدخول بحساب Google"
يُرجى اتّباع الخطوات الواردة في الأقسام التالية لإضافة ربط حساب "تسجيل الدخول بحساب Google" إلى
الحركة.
ضبط المشروع
لضبط مشروعك على استخدام ربط حساب "تسجيل الدخول بحساب Google"، اتّبِع الخطوات التالية:
افتح "وحدة تحكّم المهام" واختَر مشروعًا.
انقر على علامة التبويب تطوير واختَر ربط الحساب.
فعِّل مفتاح التبديل بجانب ربط الحساب.
في القسم إنشاء الحساب، اختَر نعم.
في نوع الربط، اختَر تسجيل الدخول بحساب Google.
افتح معلومات العميل ودوِّن قيمة رقم تعريف العميل الصادرة عن Google لإجراءاتك.
انقر على حفظ.
تصميم واجهة مستخدم صوتية لتدفق المصادقة
تحقَّق مما إذا تم التحقّق من هوية المستخدم وابدأ خطوات ربط الحساب.
أنشِئ مشهدًا جديدًا لبدء ربط الحساب في الإجراء الخاص بك:
انقر على المَشاهد.
انقر على الرمز إضافة (+) لإضافة مشهد جديد.
في المشهد الذي تم إنشاؤه حديثًا، انقر على رمز الإضافة add.
رمز الشروط.
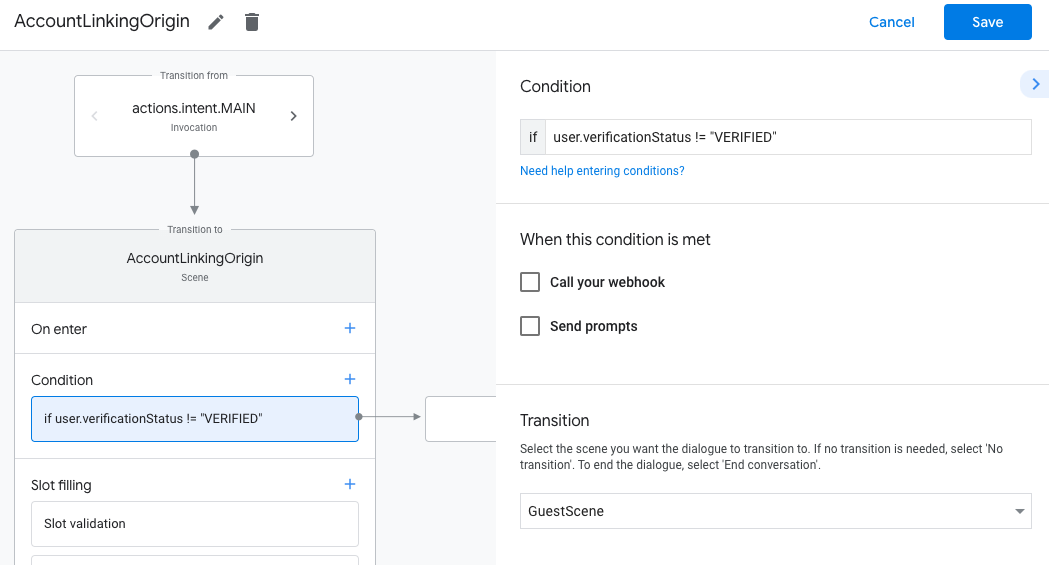
أضِف شرطًا يتحقّق مما إذا كان المستخدم المرتبط بالمحادثة
مستخدم معتمد. إذا تعذَّر التحقّق، لن يتمكّن الإجراء من ربط الحساب.
أثناء المحادثة، وينبغي أن يعود لتوفير الوصول إلى
بوظيفة لا تتطلب ربط الحسابات.
في الحقل Enter new expression ضمن الشرط، أدخِل المنطق التالي:
user.verificationStatus != "VERIFIED"
ضمن نقل، اختَر مشهدًا لا يتطلّب ربط الحساب أو
المشهد الذي يمثل نقطة دخول إلى وظيفة الضيوف فقط.
انقر على رمز إضافة add من أجل الشروط.
إضافة شرط لبدء عملية ربط الحساب إذا لم يكن لدى المستخدم
بهوية مرتبطة.
في الحقل Enter new expression ضمن الشرط، أدخِل المنطق التالي:
user.verificationStatus == "VERIFIED"
ضمن الانتقال، اختَر مشهد النظام ربط الحساب.
انقر على حفظ.
بعد الحفظ، تم إنشاء مشهد جديد لنظام ربط الحسابات يُسمى <SceneName>_AccountLinking.
تمت إضافته إلى مشروعك.
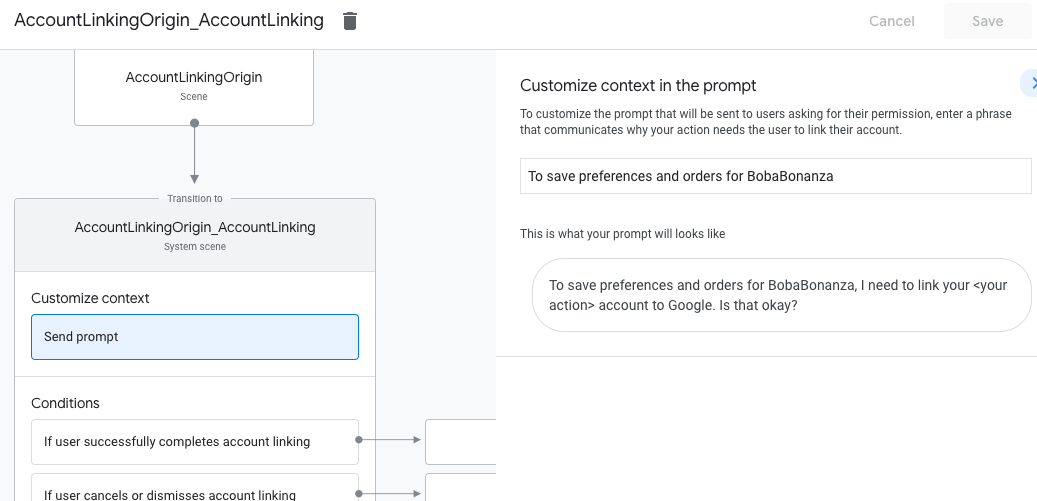
تخصيص مشهد ربط الحسابات
ضمن المَشاهد، اختَر مشهد نظام ربط الحسابات.
انقر على إرسال طلب وأضِف جملة قصيرة تصفها للمستخدم.
سبب احتياج الإجراء إلى الوصول إلى هويته (مثلاً، "حفظ إعداداتك المفضّلة").
انقر على حفظ.
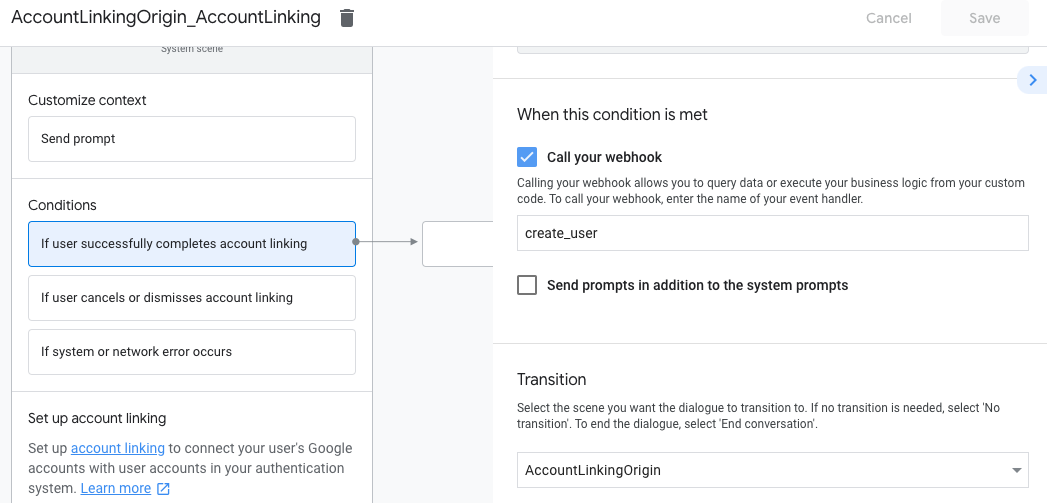
ضمن الشروط، انقر على إذا أكمل المستخدم ربط الحساب بنجاح.
يمكنك ضبط كيفية متابعة التدفق إذا وافق المستخدم على ربط حسابه.
مثلاً، يمكنك طلب الردّ التلقائي على الويب لمعالجة أي منطق مخصّص للنشاط التجاري.
والعودة إلى المشهد الأصلي.
انقر على حفظ.
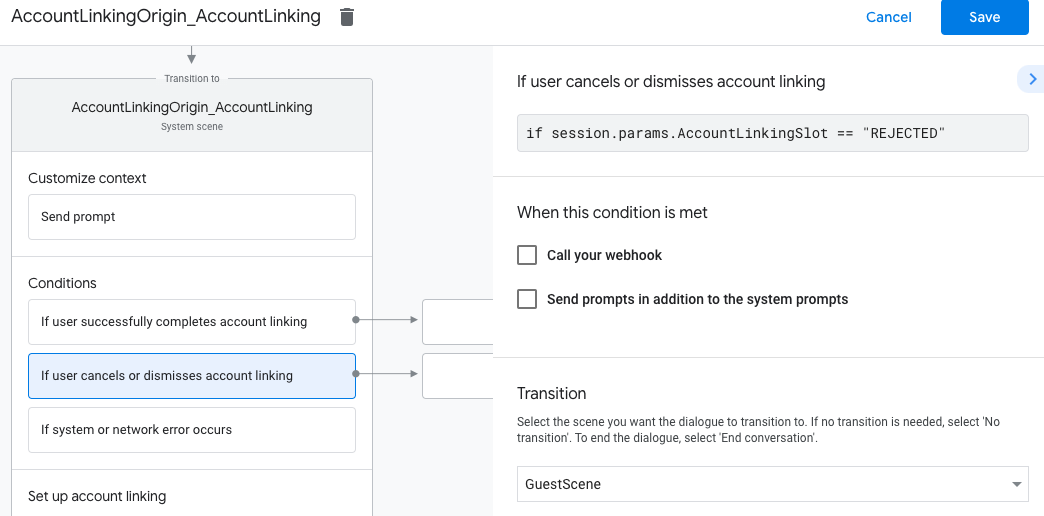
ضمن الشروط، انقر على إذا ألغى المستخدم ربط الحساب أو رفضه.
قم بتهيئة كيفية متابعة التدفق إذا لم يوافق المستخدم على ربط
الحساب. على سبيل المثال، يمكنك إرسال رسالة إقرار وإعادة التوجيه إلى المشاهد.
التي توفّر وظائف لا تتطلّب ربط الحسابات.
انقر على حفظ.
ضمن الشروط، انقر على في حال حدوث خطأ في النظام أو الشبكة.
اضبط كيفية سير العملية إذا تعذّر إكمال عملية ربط الحساب
اكتمل بسبب أخطاء في النظام أو الشبكة.
على سبيل المثال، يمكنك إرسال رسالة إقرار وإعادة التوجيه إلى المشاهد.
التي توفّر وظائف لا تتطلّب ربط الحسابات.
انقر على حفظ.
الوصول إلى معلومات الملف الشخصي في الخلفية
بعد أن يفوّض المستخدم الإجراء للوصول إلى ملفه الشخصي على Google، ستتلقّى
رمز مميز لمعرف Google يحتوي على معلومات الملف الشخصي للمستخدم في كل عملية
طلبك إلى الإجراء الخاص بك.
للوصول إلى معلومات الملف الشخصي للمستخدم، عليك أولاً التحقّق من الرمز المميّز وفك ترميزه.
من خلال تنفيذ ما يلي:
استخدِم مكتبة فك ترميز JWT بلغتك لفك ترميز
واستخدام مفاتيح Google العامة (المتوفرة في JWK
أو PEM) للتحقق من توقيع الرمز المميّز.
تأكَّد من أنّ جهة إصدار الرمز المميّز (الحقل iss في الرمز المميّز الذي تم فك ترميزه) هي https://accounts.google.com.
وأن الجمهور (الحقل aud في الرمز المميز تم فك ترميزه) هي قيمة
معرّف العميل الذي أصدرته Google لـ "مهامك"، الذي يتم تعيينه لمشروعك
في وحدة تحكّم المهام.
في ما يلي مثال على رمز مميّز تم فك ترميزه:
{"sub":1234567890,// The unique ID of the user's Google Account"iss":"https://accounts.google.com",// The token's issuer"aud":"123-abc.apps.googleusercontent.com",// Client ID assigned to your Actions project"iat":233366400,// Unix timestamp of the token's creation time"exp":233370000,// Unix timestamp of the token's expiration time"name":"Jan Jansen","given_name":"Jan","family_name":"Jansen","email":"jan@gmail.com",// If present, the user's email address"locale":"en_US"}
إذا كنت تستخدم مكتبة تنفيذ الإجراءات على Google لنظام Node.js،
فهو يتولى التحقق من صحة الرمز وفك ترميزه نيابةً عنك، ويتيح لك الوصول إلى
لمحتوى الملف الشخصي، كما هو موضح في مقتطفات الرمز التالية.
لمعالجة طلب الوصول إلى البيانات، ما عليك سوى التأكد من تأكيد المستخدم من خلال رقم تعريف Google.
الرمز المميز موجودًا بالفعل في قاعدة البيانات الخاصة بك. يعرض مقتطف الرمز التالي:
مثال على كيفية التحقق مما إذا كانت طلبات مستخدم ما موجودة بالفعل في قاعدة بيانات Firestore:
...app.handle('Place_Order',asyncconv=>{constorder=conv.session.params.order;constuserDoc=dbs.user.doc(conv.user.params.uid);constorderHistory=userDoc.collection("orderHistory");if(orderHistory){//Orderhistoryexists,sotheuseralreadyplacedanorder.//Updatecounterforordertype.awaitorderHistory.doc(order).update({count:admin.firestore.FieldValue.increment(1)});}else{//FirstordertheyplaceawaitorderHistory.doc(order).set({option:order,count:1});options.forEach(opt=>{if(opt!=order){orderHistory.doc(opt).set({option:opt,count:0});}});}returnconv.add(`Your ${order} has been placed. `+'Thanks for using Boba Bonanza, see you soon!');});
تاريخ التعديل الأخير: 2025-07-25 (حسب التوقيت العالمي المتفَّق عليه)
[null,null,["تاريخ التعديل الأخير: 2025-07-25 (حسب التوقيت العالمي المتفَّق عليه)"],[[["\u003cp\u003eGoogle Sign-In for Assistant simplifies account linking and creation for both users and developers, enabling access to user profiles for personalized experiences.\u003c/p\u003e\n"],["\u003cp\u003eDevelopers can leverage Google Sign-In to link or create user accounts across platforms, facilitating seamless user journeys and communication.\u003c/p\u003e\n"],["\u003cp\u003eImplementing Google Sign-In involves configuring the project in Actions Console, designing the authentication flow in Actions Builder, and handling data access requests securely in your backend.\u003c/p\u003e\n"],["\u003cp\u003eUser profile information, such as name, email, and profile picture, can be accessed after user authorization and token validation, allowing for customized interactions within the Action.\u003c/p\u003e\n"],["\u003cp\u003eActions using account linking for financial information are subject to additional policies and review, requiring compliance with financial services policies before submission.\u003c/p\u003e\n"]]],[],null,["# Account linking with Google Sign-In\n\nGoogle Sign-In for the Assistant provides the simplest and easiest user experience\nto users and developers both for account linking and account creation. Your Action\ncan request access to your user's Google profile during a conversation,\nincluding the user's name, email address, and profile picture.\n\nThe profile information can be used to create a personalized user experience\nin your Action. If you have apps on other platforms and they use Google Sign-In,\nyou can also find and link to an existing user's account, create a new account,\nand establish a direct channel of communication to the user.\n\nTo perform account linking with Google Sign-In, you ask the user to give consent\nto access their Google profile. You then use the information in their profile, for\nexample their email address, to identify the user in your system.\n\nImplement Google Sign-In account linking\n----------------------------------------\n\nFollow the steps in the following sections to add Google Sign-In account linking to your\nAction.\n| **Note:** If you're implementing account linking to handle financial information, note that additional policies may apply to your Action. It can take us up to six weeks to review an Action with account linking for financial information, so factor that time in when planning your release schedule. To ease the review process, make sure you comply with the [financial services policies](/assistant/console/policies/general-policies#financial_services) before submitting your Action for review.\n\n### Configure the project\n\nTo configure your project to use Google Sign-In account linking, follow these steps:\n\n1. Open the Actions Console and select a project.\n2. Click the **Develop** tab and choose **Account linking**.\n3. Enable the switch next to **Account linking**.\n4. In the **Account creation** section, select **Yes**.\n5. In **Linking type** , select **Google Sign In**.\n\n6. Open **Client Information** and take note of the value of **Client ID issued by Google to your Actions**.\n\n7. Click **Save**.\n\n### Design the voice user interface for the authentication flow\n\n| **Warning:** Don't give users a required account linking prompt at the start of the conversation with your Action. Instead, give unauthenticated users a guest flow to show how your Action works, and then only ask for account linking if it's necessary to proceed. If users are leaving the Action consistently because of account linking issues, Google will not actively promote the Action, which may decrease the Action's user traffic.\n|\n|\n| **Note:** You must use [Actions Builder](/assistant/conversational/build#actions_builder) to build an Action that implements account linking.\n\n#### Check if the user is verified and start the account linking flow\n\n1. Open your Actions Builder project in the [Actions Console](https://console.actions.google.com).\n2. Create a new scene to start account linking in your Action:\n 1. Click **Scenes**.\n 2. Click the **add** (+) icon to add a new scene.\n3. In the newly created scene, click the add *add* icon for **Conditions**.\n4. Add a condition that checks if the user associated with the conversation is a a verified user. If the check fails, your Action can't perform account linking during the conversation, and should fall back to providing access to functionality that doesn't require account linking.\n 1. In the `Enter new expression` field under **Condition** , enter the following logic: `user.verificationStatus != \"VERIFIED\"`\n 2. Under **Transition**, select a scene that doesn't require account linking or a scene that is the entry point to guest-only functionality.\n\n1. Click the add *add* icon for **Conditions**.\n2. Add a condition to trigger an account linking flow if the user doesn't have an associated identity.\n 1. In the `Enter new expression` field under **Condition** , enter the following logic:: `user.verificationStatus == \"VERIFIED\"`\n 2. Under **Transition** , select the **Account Linking** system scene.\n 3. Click **Save**.\n\nAfter saving, a new account linking system scene called `\u003cSceneName\u003e_AccountLinking`\nis added to your project.\n\n#### Customize the account linking scene\n\n1. Under **Scenes**, select the account linking system scene.\n2. Click **Send prompt** and add a short sentence to describe to the user why the Action needs to access their identity (for example \"To save your preferences\").\n3. Click **Save**.\n\n1. Under **Conditions** , click **If user successfully completes account linking**.\n2. Configure how the flow should proceed if the user agrees to link their account. For example, call the webhook to process any custom business logic required and transition back to the originating scene.\n3. Click **Save**.\n\n1. Under **Conditions** , click **If user cancels or dismisses account linking**.\n2. Configure how the flow should proceed if the user doesn't agree to link their account. For example, send an acknowledging message and redirect to scenes that provide functionality that doesn't require account linking.\n3. Click **Save**.\n\n1. Under **Conditions** , click **If system or network error occurs**.\n2. Configure how the flow should proceed if the account linking flow can't be completed because of system or network errors. For example, send an acknowledging message and redirect to scenes that provide functionality that doesn't require account linking.\n3. Click **Save**.\n\n### Access profile information in your backend\n\nAfter the user authorizes your action to access their Google profile, you will receive\na Google ID token that contains the user's Google profile information in every subsequent\nrequest to your action.\n\nTo access the user's profile information, you need to first validate and decode the token\nby doing the following:\n\n1. Use a [JWT-decoding library](https://jwt.io/) for your language to decode the token, and use Google's public keys (available in [JWK](https://www.googleapis.com/oauth2/v3/certs) or [PEM](https://www.googleapis.com/oauth2/v1/certs) format) to verify the token's signature.\n2. Verify that the token's issuer (`iss` field in the decoded token) is `https://accounts.google.com` and that the audience (`aud` field in the decoded token) is the value of **Client ID issued by Google to your Actions**, which is assigned to your project in the Actions console.\n\nThe following is an example of a decoded token: \n\n```carbon\n{\n \"sub\": 1234567890, // The unique ID of the user's Google Account\n \"iss\": \"https://accounts.google.com\", // The token's issuer\n \"aud\": \"123-abc.apps.googleusercontent.com\", // Client ID assigned to your Actions project\n \"iat\": 233366400, // Unix timestamp of the token's creation time\n \"exp\": 233370000, // Unix timestamp of the token's expiration time\n \"name\": \"Jan Jansen\",\n \"given_name\": \"Jan\",\n \"family_name\": \"Jansen\",\n \"email\": \"jan@gmail.com\", // If present, the user's email address\n \"locale\": \"en_US\"\n}\n```\n\nIf you use the [Actions on Google Fulfillment library for Node.js](https://github.com/actions-on-google/assistant-conversation-nodejs),\nit takes care of validating and decoding the token for you, and gives you access to\nthe profile content, as shown in the following code snippets. \n\n```gdscript\n...\nconst app = conversation({\n // REPLACE THE PLACEHOLDER WITH THE CLIENT_ID OF YOUR ACTIONS PROJECT\n clientId: CLIENT_ID,\n});\n...\n// Invoked on successful completion of account linking flow, check if we need to\n// create a Firebase user.\napp.handle('linkAccount', async conv =\u003e {\n let payload = conv.headers.authorization;\n if (payload) {\n // Get UID for Firebase auth user using the email of the user\n const email = payload.email;\n if (!conv.user.params.uid && email) {\n try {\n conv.user.params.uid = (await auth.getUserByEmail(email)).uid;\n } catch (e) {\n if (e.code !== 'auth/user-not-found') {\n throw e;\n }\n // If the user is not found, create a new Firebase auth user\n // using the email obtained from Google Assistant\n conv.user.params.uid = (await auth.createUser({email})).uid;\n }\n }\n }\n});\n```\n\n### Handle data access requests\n\nTo handle data access request, just verify that the user asserted by the Google ID\ntoken is already present in your database. The following snippet of code shows\nan example of how to check if orders for a user already exist in a Firestore database: \n\n```perl\n...\napp.handle('Place_Order', async conv =\u003e {\n const order = conv.session.params.order;\n const userDoc = dbs.user.doc(conv.user.params.uid);\n const orderHistory = userDoc.collection(\"orderHistory\");\n if (orderHistory) {\n // Order history exists, so the user already placed an order.\n // Update counter for order type.\n await orderHistory.doc(order).update({ count: admin.firestore.FieldValue.increment(1)});\n } else {\n // First order they place\n await orderHistory.doc(order).set({ option: order, count: 1});\n options.forEach(opt =\u003e {\n if (opt != order) {\n orderHistory.doc(opt).set({ option: opt, count: 0});\n }\n });\n }\n return conv.add(`Your ${order} has been placed. ` +\n 'Thanks for using Boba Bonanza, see you soon!');\n});\n```\n\n\u003cbr /\u003e"]]