OAuth リンクタイプは、インプリシット フローと認可コードフローの 2 通りの業界標準 OAuth 2.0 フローをサポートします。
インプリシット コードフローでは、Google がユーザーのブラウザで認可エンドポイントを開きます。ログインに成功すると、長期間有効なアクセス トークンが Google に返されます。このアクセス トークンは、アシスタントからアクションに送信されるすべてのリクエストに含まれるようになりました。
認可コードフローでは、次の 2 つのエンドポイントが必要になります。
- 認可エンドポイント。まだログインしていないユーザーにログイン用の UI を表示し、リクエストされたアクセスへの同意を短期の認可コードの形式で記録します。
- トークン交換エンドポイント。次の 2 種類の交換を行います。
- 長期の更新トークンと短期のアクセス トークンの認可コードを交換します。この処理は、ユーザーがアカウントのリンクフローを行ったときに発生します。
- 長期の更新トークンを短期のアクセス トークンと交換します。この処理は、トークンが期限切れになり、新しいアクセス トークンが必要になった場合に発生します。
暗黙的コードフローは実装が簡単ですが、暗黙的フローで発行されたアクセス トークンに有効期限を設定しないことをおすすめします。暗黙的フローでトークンの有効期限を設定すると、ユーザーは再びアカウントをリンクする必要があります。セキュリティ上の理由によりトークンの有効期限が必要な場合は、代わりに認証コードフローの使用を検討してください。
OAuth によるアカウント リンクを実装する
プロジェクトを構成する
プロジェクトで OAuth リンクを使用するよう構成するには、次の手順に従います。
- アクション コンソールを開き、使用するプロジェクトを選択します。
- [Develop](開発)タブをクリックして、[Account linking](アカウント リンク)を選択します。
- [アカウントのリンク] の横にあるスイッチをオンにします。
- [Account creation](アカウントの作成)セクションで、[No, I only want to allow account creation on my website](いいえ、自分のウェブサイトでのアカウントの作成のみを許可します)を選択します。
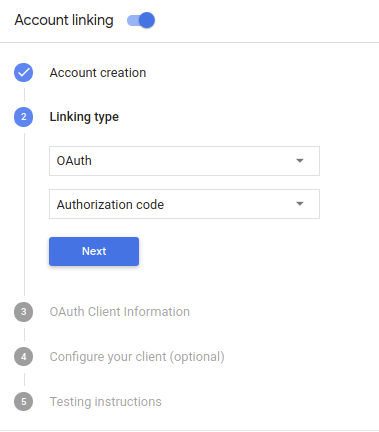
[Linking type](リンクタイプ)で、[OAuth] と [Authorization code](認可コード)を選択します。

[Client Information](クライアント情報)で、次のことを行います。
- [Client ID issued by your Actions to Google] に、Google からのリクエストを識別する値を割り当てます。
- [Client ID issued by Google to your Actions](Google がアクションに対して発行したクライアント ID)の値をメモします。
- 認可エンドポイントとトークン交換エンドポイントの URL を挿入します。
- [保存] をクリックします。
OAuth サーバーを実装する
認可コードフローの OAuth 2.0 サーバー実装は、 2 つのエンドポイント(サービスから HTTPS で利用可能)最初のエンドポイント 認可エンドポイントであり、サービス アカウントの検索、 ユーザーの同意を得る。認可エンドポイントは、ログインしていないユーザーにログイン用の UI を表示し、リクエストされたアクセスへの同意を記録します。2 つ目のエンドポイントはトークン交換エンドポイントで、トークンという暗号化された文字列を取得し、アクションのユーザーにサービスへのアクセスを許可します。
アクションでサービスの API を呼び出す必要がある場合、Google はこれらのエンドポイントを使用して、API の呼び出し許可をユーザーから取得します。
Google が開始する OAuth 2.0 認可コードフローのセッションは次のような流れになります。
- Google がユーザーのブラウザで認可エンドポイントを開きます。フローが 音声のみのデバイスで開始した場合、Google は ダウンロードします
ユーザーがログインし(ログインしていない場合)、Google が API を使用してデータにアクセスすることを承諾します(まだ許可していない場合)。
サービスによって認証コードが作成され、次の方法によって Google に返されます。 認証コードを使用してユーザーのブラウザを Google にリダイレクトします。 リクエストに添付されます
Google がトークン交換エンドポイントに認証コードを送信します。 コードの真正性を検証し、アクセス トークンと 更新トークン。アクセス トークンは有効期間の短いトークンであり、サービス を受け入れて、API にアクセスするための認証情報です。更新トークンは有効期間が長い トークンを保存し、新しいアクセス トークンを取得するために Google が使用 期限が切れます。
ユーザーがアカウントのリンクのフローを完了すると、それ以降は リクエストには、 できます。
認可リクエストの処理
アクションが OAuth 2.0 認証コードを使用してアカウント リンクを実行する必要がある場合 リクエストが送信されると、Google はユーザーを認可エンドポイントに送信します。 次のパラメータが含まれます。
| 認可エンドポイントのパラメータ | |
|---|---|
client_id |
Google に登録した Google クライアント ID。 |
redirect_uri |
このリクエストに対するレスポンスを送信する URL。 |
state |
リダイレクト URL で変更されずに Google に返される会計上の値。 |
scope |
省略可: Google が許可を求めているデータ範囲を表す、スペースで区切られた文字列。 |
response_type |
文字 code。 |
たとえば、認可エンドポイントが https://myservice.example.com/auth にある場合、
次のようなリクエストになります。
GET https://myservice.example.com/auth?client_id=GOOGLE_CLIENT_ID&redirect_uri=REDIRECT_URI&state=STATE_STRING&scope=REQUESTED_SCOPES&response_type=code
認可エンドポイントでログイン リクエストを処理する場合は、次の手順に従います。
client_idが、登録した Google クライアント ID と一致することを確認します。redirect_uriが Google 提供のリダイレクト URL と一致していること。 おすすめしますこのチェックは、プロジェクト、フォルダ、プロジェクト、 構成ミスのあるクライアント アプリを検出できます。複数の OAuth 2.0 フローをサポートしている場合は、
response_typeはcodeです。ユーザーがサービスにログインしているかどうか確認します。ユーザーがログインしていない場合は サービスのログインまたは登録のフローを完了します。
Google が API へのアクセスに使用する認証コードを生成します。 認証コードには任意の文字列値を使用できますが、一意である必要があります。 は、ユーザー、トークンの対象となるクライアント、コードの有効期限を表します。 推測できないようにします。通常、約 10 分後に期限切れになる認可コードを発行します。
redirect_uriパラメータで指定された URL を確認する 次の形式になります。https://oauth-redirect.googleusercontent.com/r/YOUR_PROJECT_ID
ユーザーのブラウザを
redirect_uriパラメータ。その際、認証コードを リダイレクトしたときに、変更されていない元の状態値がcodeパラメータとstateパラメータを追加します。結果の URL は次のようになります。https://oauth-redirect.googleusercontent.com/r/YOUR_PROJECT_ID?code=AUTHORIZATION_CODE&state=STATE_STRING
トークン交換リクエストの処理
サービスのトークン交換エンドポイントは、次の 2 種類のトークン交換を処理します。
- 認可コードとアクセス トークンおよび更新トークンとの交換
- 更新トークンとアクセス トークンの交換
トークン交換リクエストには、次のパラメータを使用します。
| トークン交換エンドポイントのパラメータ | |
|---|---|
client_id |
リクエスト元を Google として識別する文字列。この文字列は、Google の一意の識別子としてシステムに登録されている必要があります。 |
client_secret |
Google に登録したサービスのシークレット文字列。 |
grant_type |
交換されるトークンの種類。どちらでもかまわない
authorization_code または refresh_token。 |
code |
grant_type=authorization_code の場合、Google
トークン交換エンドポイントから受信します。 |
redirect_uri |
grant_type=authorization_code の場合、このパラメータは
最初の承認リクエストで使用される URL。 |
refresh_token |
grant_type=refresh_token の場合、更新トークンの Google
トークン交換エンドポイントから受信します。 |
認可コードとアクセス トークンおよび更新トークンとの交換
ユーザーがログインして認可エンドポイントが短期の認可コードを Google に返すと、Google がリクエストをトークン交換エンドポイントに送信し、アクセス トークンと更新トークンの認可コードを交換します。
これらのリクエストでは、grant_type の値は authorization_code、値は
code は、以前に Google に付与した認証コードの値です。
以下は、認証コードを認証トークンと交換するリクエストの例です。
更新トークンが含まれています。
POST /token HTTP/1.1
Host: oauth2.example.com
Content-Type: application/x-www-form-urlencoded

client_id=GOOGLE_CLIENT_ID&client_secret=GOOGLE_CLIENT_SECRET&grant_type=authorization_code&code=AUTHORIZATION_CODE&redirect_uri=REDIRECT_URI
アクセス トークンと更新トークンの認可コードを交換するため、トークン交換エンドポイントが次の処理を行い、POST リクエストに応答します。
client_idがリクエスト元を承認済みの送信元として識別していることを確認します。client_secretが期待値と一致することを確認します。- 以下を確認します。
<ph type="x-smartling-placeholder">
- </ph>
- 認証コードが有効で有効期限が切れていないこと、およびクライアントが リクエストで指定された ID が、リクエストに関連付けられたクライアント ID と 認証コード。
redirect_uriパラメータで指定された URL が同一です 初期承認リクエストで使用されている値に設定します。
- 上記の条件すべてを確認できない場合は、HTTP リクエスト
本文が
{"error": "invalid_grant"}の 400 Bad Request エラー。 - それ以外の場合は、認可コードのユーザー ID を使用して、更新トークンとアクセス トークンを生成します。これらのトークンには任意の文字列値を設定できますが、トークンを使用するユーザーとクライアントを一意に表し、簡単に推測されない文字列にする必要があります。アクセス トークンには、トークンの有効期限(通常はトークンを発行してから 1 時間)も記録します。更新トークンに有効期限はありません。
- HTTPS レスポンスの本文で次の JSON オブジェクトを返します。
{
"token_type": "Bearer",
"access_token": "ACCESS_TOKEN",
"refresh_token": "REFRESH_TOKEN",
"expires_in": SECONDS_TO_EXPIRATION
}
Google は、ユーザーのアクセス トークンと更新トークンを保存し、アクセス トークンの有効期限を記録します。アクセス トークンの有効期限が切れると、Google は更新トークンを使用してトークン交換エンドポイントから新しいアクセス トークンを取得します。
更新トークンとアクセス トークンの交換
アクセス トークンが期限切れになると、トークン交換エンドポイントにリクエストを送信し、更新トークンと新しいアクセス トークンを交換します。
これらのリクエストでは、grant_type の値は refresh_token、値は
refresh_token は、以前に Google に付与した更新トークンの値です。
以下は、更新トークンを新しいトークンに交換するリクエストの例です。
アクセス トークン:
POST /token HTTP/1.1
Host: oauth2.example.com
Content-Type: application/x-www-form-urlencoded

client_id=GOOGLE_CLIENT_ID&client_secret=GOOGLE_CLIENT_SECRET&grant_type=refresh_token&refresh_token=REFRESH_TOKEN
更新トークンとアクセス トークンを交換するため、トークン交換エンドポイントが次の処理を行い、POST リクエストに応答します。
client_idがリクエストの送信元を次として識別していることを確認します。client_secretが想定された ID と一致するか あります。- 更新トークンが有効で、リクエストで指定されたクライアント ID が更新に関連付けられたクライアント ID と一致していることを確認します。
- 上記の条件すべてを確認できない場合は、HTTP リクエスト
本文が
{"error": "invalid_grant"}の 400 Bad Request エラー。 - それ以外の場合は、更新トークンのユーザー ID を使用してアクセス トークンを生成します。これらのトークンは任意の文字列値にできますが、一意に表す必要があります。 トークンが対象のユーザーとクライアントを識別します。また、これらは推測できないようにする必要があります。 アクセス トークンの場合は、トークンの有効期限も記録する (通常はトークンの発行から 1 時間後)。
- HTTPS レスポンスの本文で次の JSON オブジェクトを返します。
{
"token_type": "Bearer",
"access_token": "ACCESS_TOKEN",
"expires_in": SECONDS_TO_EXPIRATION
}
認証フローの音声ユーザー インターフェースを設計する
ユーザーが確認済みかどうかを確認し、アカウントのリンクフローを開始する
- Actions Console で Actions Builder プロジェクトを開きます。
- アクションでアカウント リンクを開始する新しいシーンを作成します。
- [シーン] をクリックします。
- [追加](+)アイコンをクリックして、新しいシーンを追加します。
- 新しく作成したシーンで、[条件] の追加アイコン add をクリックします。
- 会話に関連付けられているユーザーが確認済みのユーザーかどうかを確認する条件を追加します。チェックに失敗した場合、アクションは会話中にアカウント リンクを実行できず、アカウント リンクを必要としない機能へのアクセスを提供するようにフォールバックする必要があります。
- [条件] の
Enter new expressionフィールドに、次のロジックを入力します。user.verificationStatus != "VERIFIED" - [Transition] で、アカウント リンクを必要としないシーン、またはゲスト専用機能のエントリ ポイントとなるシーンを選択します。
- [条件] の

- [条件] の追加アイコン add をクリックします。
- ユーザーに関連付けられた ID がない場合にアカウント リンクフローをトリガーする条件を追加します。
- [条件] の
Enter new expressionフィールドに、次のロジックを入力します。user.verificationStatus == "VERIFIED" - [移行] で、[アカウント リンク] システム シーンを選択します。
- [保存] をクリックします。
- [条件] の

保存すると、<SceneName>_AccountLinking という新しいアカウント リンク システム シーンがプロジェクトに追加されます。
アカウント リンク シーンをカスタマイズする
- [Scenes] で、アカウント リンク システム シーンを選択します。
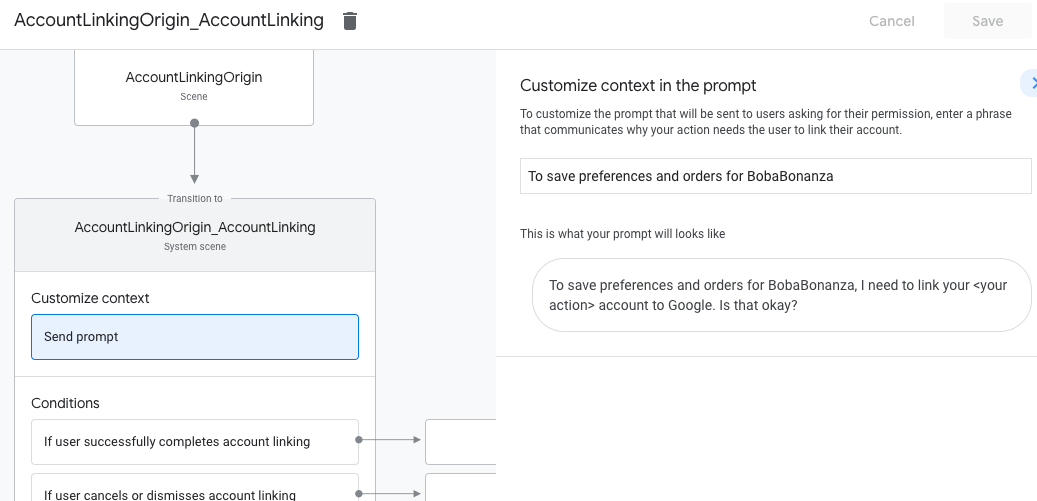
- [プロンプトを送信] をクリックし、アクションがユーザーの ID にアクセスする必要がある理由を説明する短い文言を追加します(例: 「設定を保存するため」)。
- [保存] をクリックします。

- [条件] で [ユーザーがアカウントのリンクを正常に完了した場合] をクリックします。
- ユーザーがアカウントのリンクに同意した場合のフローの進行方法を設定します。たとえば、Webhook を呼び出して必要なカスタム ビジネス ロジックを処理し、元のシーンに戻ります。
- [保存] をクリックします。

- [条件] で、[ユーザーがアカウントのリンクをキャンセルまたは閉じた場合] をクリックします。
- ユーザーがアカウントのリンクに同意しない場合のフローの進行方法を設定します。たとえば、確認メッセージを送信し、アカウントのリンクを必要としない機能を提供するシーンにリダイレクトします。
- [保存] をクリックします。

- [条件] で [システムエラーまたはネットワーク エラーが発生した場合] をクリックします。
- システム エラーやネットワーク エラーが原因でアカウント リンクフローを完了できない場合に、フローをどのように続行するかを設定します。たとえば、確認メッセージを送信し、アカウントのリンクを必要としない機能を提供するシーンにリダイレクトします。
- [保存] をクリックします。
データアクセス リクエストを処理する
アシスタントのリクエストにアクセス トークンが含まれている場合は、まずそのアクセス トークンが有効で期限切れになっていないことを確認してから、関連付けられているユーザー アカウントをデータベースから取得します。

