
OAuth bağlantısı türü, iki endüstri standardı OAuth 2.0 akışını (dolaylı ve yetkilendirme kodu akışları) destekler.
Dolaylı kod akışında Google, yetkilendirme uç noktanızı kullanıcının tarayıcısında açar. Başarılı bir şekilde oturum açtıktan sonra Google'a uzun ömürlü bir erişim jetonu döndürürsünüz. Bu erişim jetonu artık Asistan'dan Action'ınıza gönderilen her isteğe dahil edilir.
Yetkilendirme kodu akışında iki uç noktaya ihtiyacınız vardır:
- Oturum açma kullanıcı arayüzünü henüz oturum açmamış kullanıcılara sunmaktan ve istenen erişime kısa süreli bir yetkilendirme kodu biçiminde izin kaydetmekten sorumlu olan yetkilendirme uç noktası.
- İki tür exchange'den sorumlu olan jeton değişimi uç noktası:
- Yetkilendirme kodunu uzun ömürlü yenileme jetonu ve kısa ömürlü erişim jetonu ile değiştirir. Bu değişim, kullanıcı hesap bağlama akışından geçer.
- Kısa ömürlü bir erişim jetonu için uzun süreli yenileme jetonunu değiştirir. Bu exchange, Google'ın süresi dolmuş olduğundan yeni bir erişim jetonuna ihtiyacı olduğunda gerçekleşir.
Örtülü akış kullanılarak verilen erişim jetonlarının geçerlilik süresinin hiçbir zaman dolmaması, Google'ın örtülü akışla kullanılması nedeniyle kullanıcının hesabını tekrar bağlamayı zorunlu kıldığı için Google, örtülü akış akışının uygulanmasını önerir. Güvenlik nedeniyle jetonun süresinin dolması gerekiyorsa kimlik doğrulama kodu akışını kullanmanız önerilir.
OAuth hesap bağlamayı uygulama
Projeyi yapılandırma
Projenizi OAuth bağlantısı kullanacak şekilde yapılandırmak için aşağıdaki adımları uygulayın:
- Actions Console'u açın ve kullanmak istediğiniz projeyi seçin.
- Geliştir sekmesini tıklayın ve Hesap bağlama'yı seçin.
- Hesap bağlama'nın yanındaki anahtarı etkinleştirin.
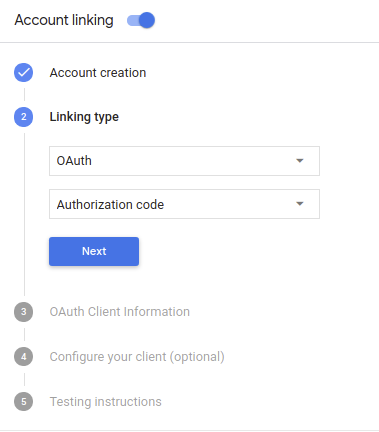
- Hesap oluşturma bölümünde Hayır, yalnızca web sitemde hesap oluşturulmasına izin vermek istiyorum'u seçin.
Bağlantı türü bölümünde OAuth ve Yetkilendirme kodu'nu seçin.
Müşteri Bilgileri bölümünde:
- Google'dan gelen istekleri tanımlamak için Google'a yönelik İşlemleriniz tarafından verilen istemci kimliği özelliğine bir değer atayın.
- Google tarafından İşlemlerinize verilen istemci kimliğinin değerini not edin;
- Yetkilendirme ve Jeton Değişimi uç noktalarınızın URL'lerini ekleyin.
- Kaydet'i tıklayın.
OAuth sunucunuzu uygulama
Yetkilendirme kodu akışının OAuth 2.0 sunucusu uygulaması aşağıdakilerden oluşur: iki uç noktanız vardır. İlk uç nokta kimlik doğrulama uç noktasıdır. Bu, kullanıcılara veri erişimi için kullanıcılardan izin almalarını Yetkilendirme uç noktası, oturum açma bilgilerini sunar. Henüz oturum açmamış ve erişim isteğinde bulundu. İkinci uç nokta ise üçüncü uç noktadır. İşlem kullanıcısını yetkilendiren jetonlar adı verilen şifrelenmiş dizeleri elde etmek için kullanılır hizmetinize erişin.
İşleminizin, hizmetinizin API'lerinden birini çağırması gerektiğinde Google, bu API'leri kullanır noktaları birleştirip kullanıcılarınızdan bu API'leri anlamına gelir.
Google tarafından başlatılan OAuth 2.0 yetkilendirme kodu akışı oturumu şu akışa sahiptir:
- Google, yetkilendirme uç noktanızı kullanıcının tarayıcısında açar. Akış bir işlem için yalnızca ses özellikli bir cihazda başlatıldığında Google, yürütme sürecidir.
Kullanıcı oturum açar (henüz oturum açmamışsa) ve Google'a şunları yapması için izin verir: Henüz izin vermediyse verilerine API'nizle erişebilir.
Hizmetiniz bir yetkilendirme kodu oluşturur ve bu kodu Google'a geri gönderir. Kullanıcının tarayıcısını yetkilendirme koduyla tekrar Google'a yönlendirme ekleyebilirsiniz.
Google, yetkilendirme kodunu jeton değişimi uç noktanıza gönderir. Bu işlem kodun orijinalliğini doğrular ve bir erişim jetonu ve yenileme jetonu. Erişim jetonu, hizmetinizin Google tarafından API'lere erişmek için kimlik bilgisi olarak kabul eder. Yenileme jetonu uzun ömürlü yeni erişim jetonları almak üzere saklayabileceği ve kullanabileceği bir jeton olarak sona erecektir.
Kullanıcı hesap bağlama akışını tamamladıktan sonra, Asistan'dan sipariş karşılama webhook'unuza gönderilen istekte erişim jetonu.
Yetkilendirme isteklerini işleme
İşleminizin OAuth 2.0 yetkilendirme kodu aracılığıyla hesap bağlama işlemi yapması gerektiğinde akışında, Google, kullanıcıyı yetkilendirme uç noktanıza bir istek göndererek aşağıdaki parametreleri içerir:
| Yetkilendirme uç noktası parametreleri | |
|---|---|
client_id |
Google'a kaydolduğunuz Google istemci kimliği. |
redirect_uri |
Bu isteğe yanıt gönderdiğiniz URL. |
state |
yönlendirme URI'si. |
scope |
İsteğe bağlı: Google'ın yetkilendirme istediği veriler. |
response_type |
code dizesi. |
Örneğin, yetkilendirme uç noktanız https://myservice.example.com/auth üzerinde mevcutsa,
talep şu şekilde görünebilir:
GET https://myservice.example.com/auth?client_id=GOOGLE_CLIENT_ID&redirect_uri=REDIRECT_URI&state=STATE_STRING&scope=REQUESTED_SCOPES&response_type=code
Yetkilendirme uç noktanızın oturum açma isteklerini işlemesi için aşağıdaki adımları uygulayın:
client_idbilgisinin, kaydolurken kullandığınız Google müşteri kimliğiyle eşleştiğini doğrulayın. veredirect_urideğerinin Google tarafından sağlanan yönlendirme URL'si ile eşleştiğinden hizmetiniz için. Bu kontroller, istenmeyen veya yanlış yapılandırılmış istemci uygulamaları olabilir.Birden fazla OAuth 2.0 akışını destekliyorsanız
response_typecode.Kullanıcının hizmetinizde oturum açıp açmadığını kontrol edin. Kullanıcı oturum açmamışsa hizmetinizin oturum açma veya kayıt akışını tamamlayın.
Google'ın API'nize erişmek için kullanacağı yetkilendirme kodu oluşturun. Yetkilendirme kodu herhangi bir dize değeri olabilir, ancak benzersiz bir şekilde kullanıcıyı, jetonun ait olduğu istemciyi ve kodun geçerlilik bitiş tarihini ve tahmin edilebilir olmamalıdır. Genellikle, her ay web sitesinde sonra süresi dolan kodları kullanır.
redirect_uriparametresi tarafından belirtilen URL'yi doğrulayın aşağıdaki biçimdedir:https://oauth-redirect.googleusercontent.com/r/YOUR_PROJECT_ID
Kullanıcının tarayıcısını
redirect_uriparametresinden yararlanın. Alacağınız yetkilendirme kodunu URL'nin otomatik olarak oluşturulmuş ve orijinal, değiştirilmemiş durum değerinicodevestateparametrelerini ekleyerek. Aşağıda, bununla ilgili bir örnek elde edilir:https://oauth-redirect.googleusercontent.com/r/YOUR_PROJECT_ID?code=AUTHORIZATION_CODE&state=STATE_STRING
Jeton değişimi isteklerini işleme
Hizmetinizin jeton değişimi uç noktası iki tür jetondan sorumludur takaslar:
- Erişim jetonları ve yenileme jetonları için yetkilendirme kodlarını gönderip alın
- Erişim jetonları için yenileme jetonları değişimi
Jeton değişimi istekleri aşağıdaki parametreleri içerir:
| Jeton değişimi uç nokta parametreleri | |
|---|---|
client_id |
İstek kaynağını Google olarak tanımlayan bir dize. Bu dize sisteminizde Google'ın benzersiz tanımlayıcısı olarak kayıtlı olmalıdır. |
client_secret |
Hizmetiniz için Google'a kaydettiğiniz gizli dize. |
grant_type |
Değişen jetonun türü. İkisinden biri
authorization_code veya refresh_token. |
code |
grant_type=authorization_code olduğunda, Google kodu
oturum açma veya jeton değişimi uç noktasından
gelen tüm verileri içerir. |
redirect_uri |
grant_type=authorization_code olduğunda bu parametre
İlk yetkilendirme isteğinde kullanılan URL. |
refresh_token |
grant_type=refresh_token olduğunda, yenileme jetonu Google
yeni bir değer atanmasını sağlar. |
Erişim jetonları ve yenileme jetonları için yetkilendirme kodlarını gönderip alın
Kullanıcı oturum açtıktan ve yetkilendirme uç noktanız kısa ömürlü bir yetkilendirme döndürdükten sonra Google'dan exchange'de veri alışverişi için jeton değişimi uç noktanıza bir istek ve yenileme jetonu için yetkilendirme kodu oluşturabilirsiniz.
Bu istekler için grant_type değeri authorization_code ve
code değeri, Google'a daha önce verdiğiniz yetkilendirme kodunun değeridir.
Aşağıda,
erişim jetonu ve bir yenileme jetonu bulunur:
POST /token HTTP/1.1
Host: oauth2.example.com
Content-Type: application/x-www-form-urlencoded

client_id=GOOGLE_CLIENT_ID&client_secret=GOOGLE_CLIENT_SECRET&grant_type=authorization_code&code=AUTHORIZATION_CODE&redirect_uri=REDIRECT_URI
Bir erişim jetonu ve yenileme jetonuyla yetkilendirme kodları değişimi yapmak için
jeton değişimi uç noktası, aşağıdaki adımları yürüten POST isteklerine yanıt verir:
client_idöğesinin, istek kaynağını yetkili bir kaynak olarak tanımladığını doğrulayın. veclient_secretdeğerinin beklenen değerle eşleştiğinden emin olun.- Aşağıdakileri doğrulayın:
- Yetkilendirme kodu geçerli ve süresi dolmuş değil ve istemci İstekte belirtilen kimlik, yetkilendirme kodu.
redirect_uriparametresi tarafından belirtilen URL aynı ilk yetkilendirme isteğinde kullanılan değerle aynıdır.
- Yukarıdaki ölçütlerin tümünü doğrulayamazsanız bir HTTP döndürün
Gövde olarak
{"error": "invalid_grant"}kullanılırken 400 Hatalı İstek hatası. - Aksi takdirde, yetkilendirme kodundaki kullanıcı kimliğini kullanarak jetonu ve erişim jetonu bulunur. Bu jetonlar herhangi bir dize değeri olabilir, ancak jetonun ait olduğu kullanıcıyı ve istemciyi benzersiz şekilde temsil etmeli, tahmin edilemez. Erişim jetonları için jetonun geçerlilik süresini de kaydedin (genellikle jetonu vermenizden bir saat sonra). Yenileme jetonlarının geçerlilik süresi sona ermez.
- HTTPS yanıtının gövdesinde aşağıdaki JSON nesnesini döndürün:
{
"token_type": "Bearer",
"access_token": "ACCESS_TOKEN",
"refresh_token": "REFRESH_TOKEN",
"expires_in": SECONDS_TO_EXPIRATION
}
Google, kullanıcı için erişim jetonunu ve yenileme jetonunu depolar ve geçerlilik süresi sona erecektir. Erişim jetonunun süresi dolduğunda Google, jeton değişimi uç noktasından yeni bir erişim jetonu almak için jeton.
Erişim jetonları için yenileme jetonları değişimi
Bir erişim jetonunun süresi dolduğunda Google, jeton değişimi uç noktanıza bir istek gönderir yeni bir erişim jetonuyla yenileme jetonu alın.
Bu istekler için grant_type değeri refresh_token ve
refresh_token, daha önce Google'a verdiğiniz yenileme jetonunun değeridir.
Aşağıda, bir
erişim jetonu:
POST /token HTTP/1.1
Host: oauth2.example.com
Content-Type: application/x-www-form-urlencoded

client_id=GOOGLE_CLIENT_ID&client_secret=GOOGLE_CLIENT_SECRET&grant_type=refresh_token&refresh_token=REFRESH_TOKEN
Yenileme jetonunu bir erişim jetonuyla değiştirmek için jeton değişimi uç noktanız
aşağıdaki adımları yürüten POST isteklerine yanıt verir:
client_idöğesinin, istek kaynağını veclient_secretdeğerinin beklenen değer.- Yenileme jetonunun geçerli olduğunu ve İstek, yenileme jetonuyla ilişkili istemci kimliğiyle eşleşir.
- Yukarıdaki ölçütlerin tümünü doğrulayamazsanız bir HTTP döndürün
Gövde olarak
{"error": "invalid_grant"}kullanılırken 400 Hatalı İstek hatası. - Aksi takdirde, erişim oluşturmak için yenileme jetonundaki kullanıcı kimliğini kullanın. jeton. Bu jetonlar herhangi bir dize değeri olabilir, ancak bu jetonları benzersiz bir şekilde temsil etmelidir jetonun ait olduğu kullanıcı ve istemciyi kapsamalıdır ve tahmin edilebilir olmamalıdır. Erişim jetonları için jetonun geçerlilik süresini de kaydedin (genellikle jetonu vermenizden bir saat sonra).
- HTTPS gövdesinde aşağıdaki JSON nesnesini döndürün
yanıt:
{
"token_type": "Taşıyıcı",
"access_token": "ACCESS_TOKEN",
"expires_in": SECONDS_TO_EXPIRATION
}
Kimlik doğrulama akışı için sesli kullanıcı arayüzünü tasarlama
Kullanıcının doğrulanıp doğrulanmadığını kontrol edin ve hesap bağlama akışını başlatın.
- Actions Builder projenizi Actions Console'da açın.
- İşleminizde hesap bağlama işlemini başlatmak için yeni bir sahne oluşturun:
- Sahneler'i tıklayın.
- Yeni bir sahne eklemek için ekle (+) simgesini tıklayın.
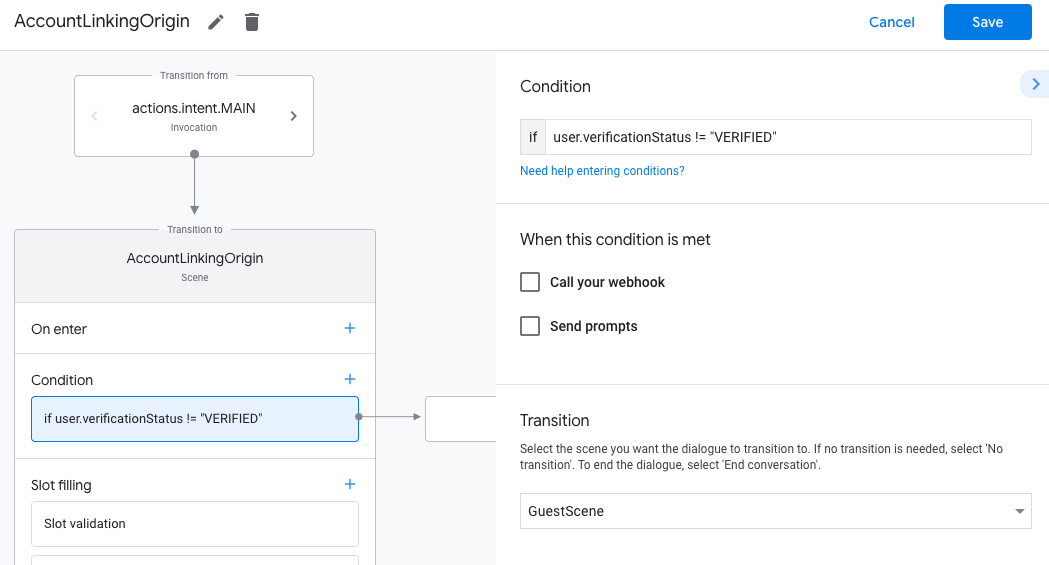
- Yeni oluşturulan sahnede, Koşullar için ekle simgesini add tıklayın.
- Sohbetle ilişkili kullanıcının doğrulanmış bir kullanıcı olup olmadığını kontrol eden bir koşul ekleyin. Kontrol başarısız olursa İşleminiz, görüşme sırasında hesap bağlama işlemini gerçekleştiremez ve hesap bağlama gerektirmeyen işlevlere erişim sağlamaya geri dönmelidir.
- Koşul bölümündeki
Enter new expressionalanına aşağıdaki mantığı girin:user.verificationStatus != "VERIFIED" - Geçiş bölümünde, hesap bağlama gerektirmeyen veya yalnızca konuklara özel işlevlerin giriş noktası olan bir sahne seçin.
- Koşul bölümündeki
- Koşullar için ekle simgesini add tıklayın.
- Kullanıcının ilişkili bir kimliği yoksa hesap bağlama akışını tetikleyecek bir koşul ekleyin.
- Koşul bölümündeki
Enter new expressionalanına aşağıdaki mantığı girin:user.verificationStatus == "VERIFIED" - Geçiş bölümünde Hesap Bağlama sistem sahnesini seçin.
- Kaydet'i tıklayın.
- Koşul bölümündeki
![]()
Kaydettikten sonra projenize <SceneName>_AccountLinking adlı yeni bir hesap bağlama sistemi sahnesi eklenir.
Hesap bağlama sahnesini özelleştirme
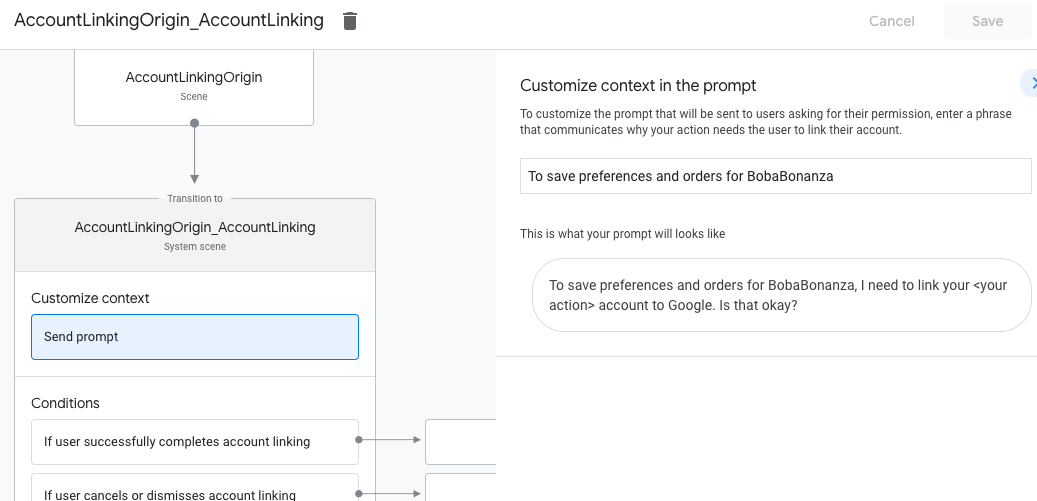
- Sahneler bölümünde hesap bağlama sistemi sahnesini seçin.
- İstemi gönder'i tıklayın ve kullanıcıya İşlem'in kimliğine neden erişmesi gerektiğini açıklayan kısa bir cümle ekleyin (örneğin, "Tercihlerinizi kaydetmek için").
- Kaydet'i tıklayın.
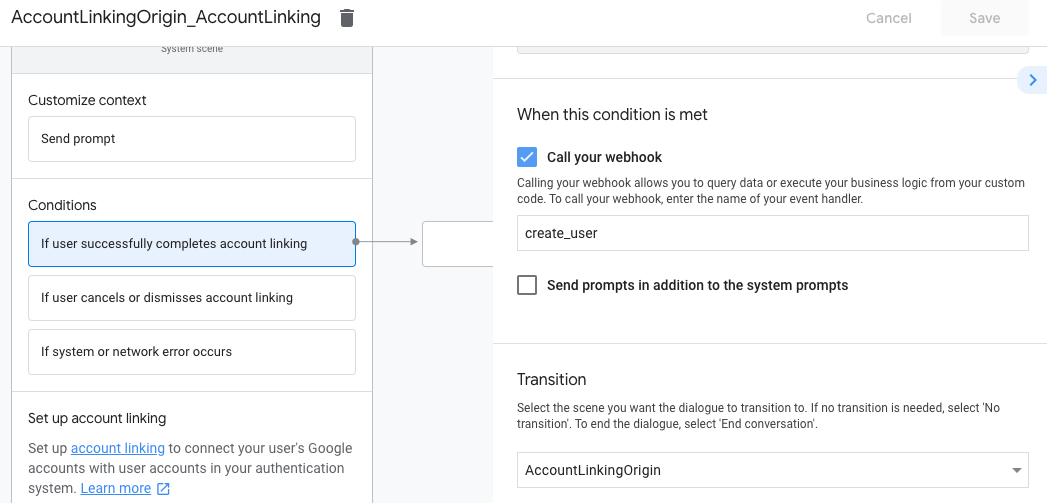
- Koşullar bölümünde Kullanıcı hesap bağlama işlemini başarıyla tamamlarsa'yı tıklayın.
- Kullanıcı hesabını bağlamayı kabul ederse akışın nasıl devam edeceğini yapılandırın. Örneğin, gerekli özel işletme mantığını işlemek ve başlangıç sahnesine geri dönmek için webhook'u çağırın.
- Kaydet'i tıklayın.
- Koşullar bölümünde Kullanıcı hesap bağlantısını iptal ederse veya kapatırsa'yı tıklayın.
- Kullanıcı hesabını bağlamayı kabul etmezse akışın nasıl devam edeceğini yapılandırın. Örneğin, onay mesajı gönderin ve hesap bağlama gerektirmeyen işlevler sunan sahnelere yönlendirin.
- Kaydet'i tıklayın.
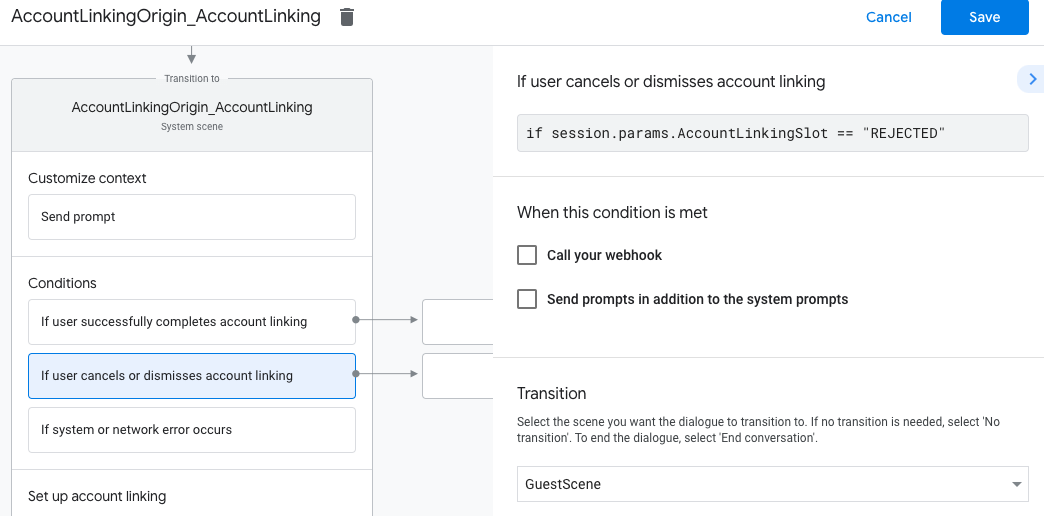
- Koşullar bölümünde Sistem veya ağ hatası oluşursa'yı tıklayın.
- Hesap bağlama akışı, sistem veya ağ hataları nedeniyle tamamlanamazsa akışın nasıl devam edeceğini yapılandırın. Örneğin, onay mesajı gönderin ve hesap bağlama gerektirmeyen işlevler sunan sahnelere yönlendirin.
- Kaydet'i tıklayın.
Veri erişimi isteklerini ele alma
Asistan isteği erişim jetonu içeriyorsa, önce erişim jetonunun geçerli (ve süresinin dolmamış) olup olmadığını kontrol edin, ardından ilişkili kullanıcı hesabını veritabanınızdan alın.