
Il tipo Collegamento OAuth supporta due flussi OAuth 2.0 standard di settore, i flussi implicito e codice di autorizzazione.
在隐式代码流程中,Google 会在用户浏览器中打开您的授权端点。成功登录后,系统会向 Google 返回长期访问令牌。现在,从 Google 助理向你的 Action 发送的每个请求中都包含此访问令牌。
在授权代码流程中,您需要两个端点:
- 授权端点,该端点负责向尚未登录的用户显示登录界面,并以短期授权代码的形式记录所请求的访问。
- 令牌交换端点,负责两种类型的交换:
- 将授权代码交换为长期刷新令牌和短期访问令牌。用户完成帐号关联流程后,系统会进行这种交换。
- 将长期刷新令牌换成短期访问令牌。Google 需要新访问令牌时,由于此令牌已过期,因此会进行此交换。
虽然隐式代码流程的实现更简单,但 Google 建议通过隐式流程发出的访问令牌永远不会过期,因为将令牌过期与隐式流程一起使用会强制用户再次关联其帐号。如果出于安全考虑需要令牌到期,强烈建议您考虑使用身份验证代码流程。
Implementare il collegamento all'account OAuth
Configurare il progetto
Per configurare il progetto in modo che utilizzi il collegamento OAuth:
- Apri la console Actions e seleziona il progetto che vuoi utilizzare.
- Fai clic sulla scheda Sviluppa e scegli Collegamento dell'account.
- Attiva l'opzione accanto a Collegamento degli account.
- Nella sezione Creazione account, seleziona No, voglio consentire la creazione di account solo sul mio sito web.
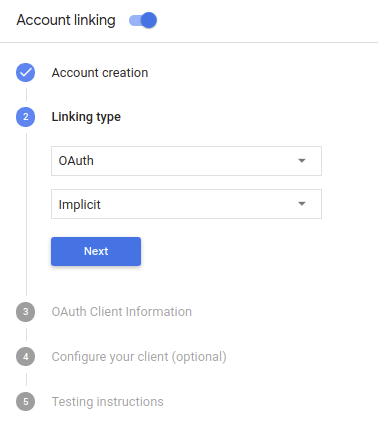
In Tipo di collegamento, seleziona OAuth e Implicito.
In Informazioni sul cliente:
- Assegna un valore a ID client emesso da Actions on Google per identificare le richieste provenienti da Google.
- Inserisci gli URL per gli endpoint di autorizzazione e scambio di token.
- Fai clic su Salva.
Implementa il server OAuth
To support the OAuth 2.0 implicit flow, your service makes an authorization endpoint available by HTTPS. This endpoint is responsible for authenticating and obtaining consent from users for data access. The authorization endpoint presents a sign-in UI to your users that aren't already signed in and records consent to the requested access.
When your Action needs to call one of your service's authorized APIs, Google uses this endpoint to get permission from your users to call these APIs on their behalf.
A typical OAuth 2.0 implicit flow session initiated by Google has the following flow:
- Google opens your authorization endpoint in the user's browser. The user signs in if not signed in already, and grants Google permission to access their data with your API if they haven't already granted permission.
- Your service creates an access token and returns it to Google by redirecting the user's browser back to Google with the access token attached to the request.
- Google calls your service's APIs, and attaches the access token with each request. Your service verifies that the access token grants Google authorization to access the API and then completes the API call.
Handle authorization requests
When your Action needs to perform account linking via an OAuth 2.0 implicit flow, Google sends the user to your authorization endpoint with a request that includes the following parameters:
| Authorization endpoint parameters | |
|---|---|
client_id |
The client ID you assigned to Google. |
redirect_uri |
The URL to which you send the response to this request. |
state |
A bookkeeping value that is passed back to Google unchanged in the redirect URI. |
response_type |
The type of value to return in the response. For the OAuth 2.0 implicit
flow, the response type is always token. |
For example, if your authorization endpoint is available at https://myservice.example.com/auth,
a request might look like:
GET https://myservice.example.com/auth?client_id=GOOGLE_CLIENT_ID&redirect_uri=REDIRECT_URI&state=STATE_STRING&response_type=token
For your authorization endpoint to handle sign-in requests, do the following steps:
Verify the
client_idandredirect_urivalues to prevent granting access to unintended or misconfigured client apps:- Confirm that the
client_idmatches the client ID you assigned to Google. - Confirm that the URL specified by the
redirect_uriparameter has the following form:https://oauth-redirect.googleusercontent.com/r/YOUR_PROJECT_ID
- Confirm that the
Check if the user is signed in to your service. If the user isn't signed in, complete your service's sign-in or sign-up flow.
Generate an access token that Google will use to access your API. The access token can be any string value, but it must uniquely represent the user and the client the token is for and must not be guessable.
Send an HTTP response that redirects the user's browser to the URL specified by the
redirect_uriparameter. Include all of the following parameters in the URL fragment:access_token: the access token you just generatedtoken_type: the stringbearerstate: the unmodified state value from the original request The following is an example of the resulting URL:https://oauth-redirect.googleusercontent.com/r/YOUR_PROJECT_ID#access_token=ACCESS_TOKEN&token_type=bearer&state=STATE_STRING
Google's OAuth 2.0 redirect handler will receive the access token and confirm
that the state value hasn't changed. After Google has obtained an
access token for your service, Google will attach the token to subsequent calls
to your Action as part of the AppRequest.
Progettare l'interfaccia utente vocale per il flusso di autenticazione
Verifica se l'utente è verificato e avvia il flusso di collegamento degli account
- Apri il progetto Actions Builder nella console Actions.
- Crea una nuova scena per avviare il collegamento dell'account nella tua azione:
- Fai clic su Scene.
- Fai clic sull'icona Aggiungi (+) per aggiungere una nuova scena.
- Nella scena appena creata, fai clic sull'icona Aggiungi add per Condizioni.
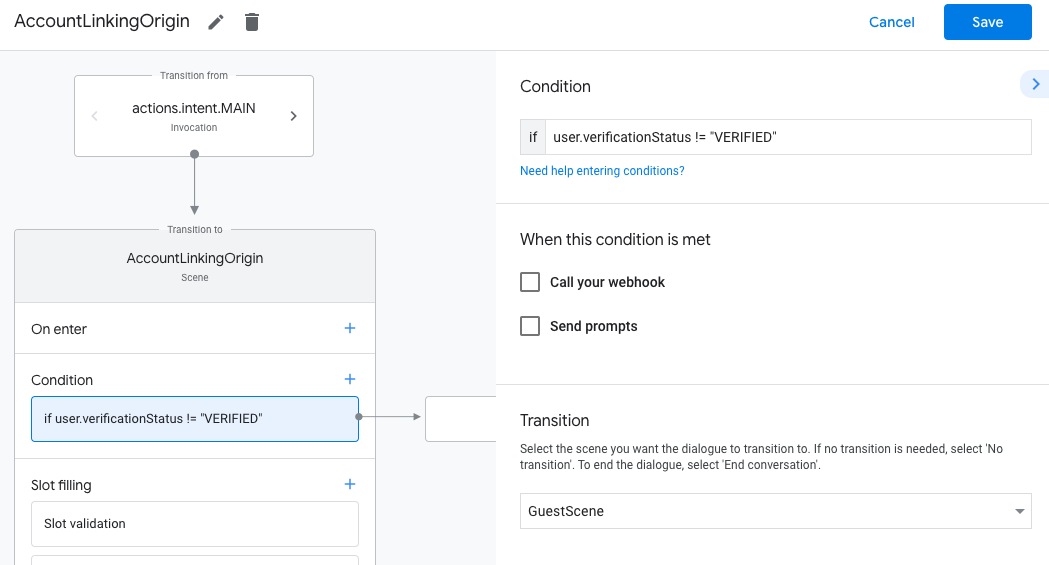
- Aggiungi una condizione che verifichi se l'utente associato alla conversazione è un
utente verificato. Se il controllo non va a buon fine, l'Azione non può eseguire il collegamento dell'account
durante la conversazione e deve ripiegare sull'accesso
a funzionalità che non richiedono il collegamento dell'account.
- Nel campo
Enter new expressionin Condizione, inserisci la seguente logica:user.verificationStatus != "VERIFIED" - In Transizione, seleziona una scena che non richiede il collegamento dell'account o una scena che è il punto di accesso alla funzionalità solo per gli ospiti.
- Nel campo
- Fai clic sull'icona di aggiunta add per Condizioni.
- Aggiungi una condizione per attivare un flusso di collegamento dell'account se l'utente non ha
un'identità associata.
- Nel campo
Enter new expressionin Condizione, inserisci la seguente logica:user.verificationStatus == "VERIFIED" - Nella sezione Transizione, seleziona la scena di sistema Collegamento dell'account.
- Fai clic su Salva.
- Nel campo
![]()
Dopo il salvataggio, al progetto viene aggiunta una nuova scena del sistema di collegamento degli account chiamata <SceneName>_AccountLinking.
Personalizzare la scena di collegamento degli account
- Nella sezione Scene, seleziona la scena del sistema di collegamento degli account.
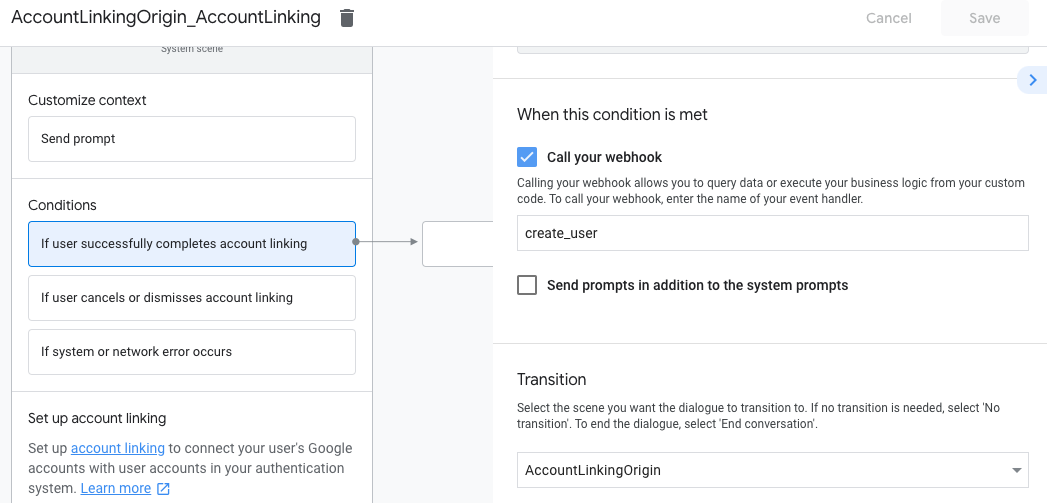
- Fai clic su Invia prompt e aggiungi una breve frase per descrivere all'utente perché l'azione deve accedere alla sua identità (ad esempio "Per salvare le tue preferenze").
- Fai clic su Salva.

- In Condizioni, fai clic su Se l'utente completa correttamente il collegamento degli account.
- Configura la modalità di avanzamento del flusso se l'utente accetta di collegare il proprio account. Ad esempio, chiama il webhook per elaborare qualsiasi logica di business personalizzata richiesta e torna alla scena di origine.
- Fai clic su Salva.
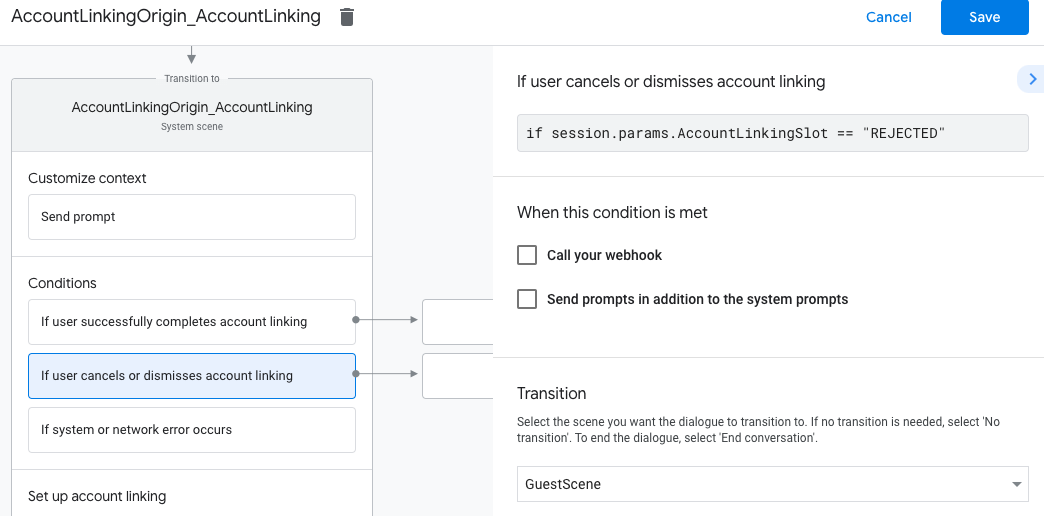
- Nella sezione Condizioni, fai clic su Se l'utente annulla o ignora il collegamento all'account.
- Configura la modalità di procedere del flusso se l'utente non accetta di collegare il proprio account. Ad esempio, invia un messaggio di conferma e reindirizza alle scene che forniscono funzionalità che non richiedono il collegamento dell'account.
- Fai clic su Salva.
- Nella sezione Condizioni, fai clic su Se si verifica un errore di sistema o di rete.
- Configura la modalità di procedere del flusso se il flusso di collegamento dell'account non può essere completato a causa di errori di sistema o di rete. Ad esempio, invia un messaggio di conferma e reindirizza alle scene che forniscono funzionalità che non richiedono il collegamento dell'account.
- Fai clic su Salva.
Gestire le richieste di accesso ai dati
Se la richiesta dell'assistente contiene un token di accesso, verifica innanzitutto che il token di accesso sia valido (e non scaduto), quindi recupera l'account utente associato dal tuo database.