
Page Summary
-
OAuth linking supports the implicit and authorization code flows for account linking.
-
The implicit flow is simpler to implement, returning a long-lived access token directly to Google after successful sign-in.
-
The authorization code flow requires separate authorization and token exchange endpoints for managing access and refresh tokens, and is recommended if token expiration is needed.
-
To implement OAuth linking, configure your project in the Actions Console and implement an OAuth server with an authorization endpoint to handle authentication requests.
-
Design a voice user interface for the authentication flow by creating and customizing an account linking scene in Actions Builder.
The OAuth linking type supports two industry standard OAuth 2.0 flows, the implicit and authorization code flows.
In the implicit code flow, Google opens your authorization endpoint in the user's browser. After successful sign in, you return a long-lived access token to Google. This access token is now included in every request sent from the Assistant to your Action.
In the authorization code flow, you need two endpoints:
- The authorization endpoint, which is responsible for presenting the sign-in UI to your users that aren't already signed in and recording consent to the requested access in the form of a short-lived authorization code.
- The token exchange endpoint, which is responsible for two types of exchanges:
- Exchanges an authorization code for a long-lived refresh token and a short-lived access token. This exchange happens when the user goes through the account linking flow.
- Exchanges a long-lived refresh token for a short-lived access token. This exchange happens when Google needs a new access token because the one it had expired.
Although the implicit code flow is simpler to implement, Google recommends that access tokens issued using the implicit flow never expire, because using token expiration with the implicit flow forces the user to link their account again. If you need token expiration for security reasons, you should strongly consider using the auth code flow instead.
Implement OAuth account linking
Configure the project
To configure your project to use OAuth linking, follow these steps:
- Open the Actions Console and select the project you want to use.
- Click the Develop tab and choose Account linking.
- Enable the switch next to Account linking.
- In the Account creation section, select No, I only want to allow account creation on my website.
In Linking type, select OAuth and Implicit.
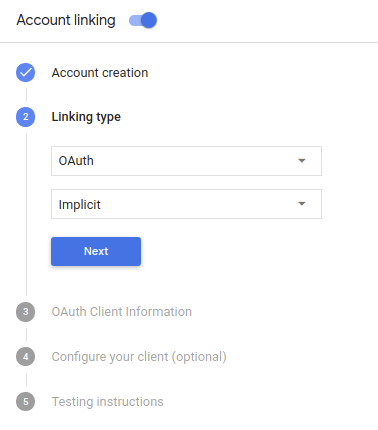
In Client Information:
- Assign a value to Client ID issued by your Actions to Google to identify requests coming from Google.
- Insert the URLs for your Authorization and Token Exchange endpoints.
- Click Save.
Implement your OAuth server
To support the OAuth 2.0 implicit flow, your service makes an authorization endpoint available by HTTPS. This endpoint is responsible for authenticating and obtaining consent from users for data access. The authorization endpoint presents a sign-in UI to your users that aren't already signed in and records consent to the requested access.
When your Action needs to call one of your service's authorized APIs, Google uses this endpoint to get permission from your users to call these APIs on their behalf.
A typical OAuth 2.0 implicit flow session initiated by Google has the following flow:
- Google opens your authorization endpoint in the user's browser. The user signs in if not signed in already, and grants Google permission to access their data with your API if they haven't already granted permission.
- Your service creates an access token and returns it to Google by redirecting the user's browser back to Google with the access token attached to the request.
- Google calls your service's APIs, and attaches the access token with each request. Your service verifies that the access token grants Google authorization to access the API and then completes the API call.
Handle authorization requests
When your Action needs to perform account linking via an OAuth 2.0 implicit flow, Google sends the user to your authorization endpoint with a request that includes the following parameters:
| Authorization endpoint parameters | |
|---|---|
client_id |
The client ID you assigned to Google. |
redirect_uri |
The URL to which you send the response to this request. |
state |
A bookkeeping value that is passed back to Google unchanged in the redirect URI. |
response_type |
The type of value to return in the response. For the OAuth 2.0 implicit
flow, the response type is always token. |
For example, if your authorization endpoint is available at https://myservice.example.com/auth,
a request might look like:
GET https://myservice.example.com/auth?client_id=GOOGLE_CLIENT_ID&redirect_uri=REDIRECT_URI&state=STATE_STRING&response_type=token
For your authorization endpoint to handle sign-in requests, do the following steps:
Verify the
client_idandredirect_urivalues to prevent granting access to unintended or misconfigured client apps:- Confirm that the
client_idmatches the client ID you assigned to Google. - Confirm that the URL specified by the
redirect_uriparameter has the following form:https://oauth-redirect.googleusercontent.com/r/YOUR_PROJECT_ID
- Confirm that the
Check if the user is signed in to your service. If the user isn't signed in, complete your service's sign-in or sign-up flow.
Generate an access token that Google will use to access your API. The access token can be any string value, but it must uniquely represent the user and the client the token is for and must not be guessable.
Send an HTTP response that redirects the user's browser to the URL specified by the
redirect_uriparameter. Include all of the following parameters in the URL fragment:access_token: the access token you just generatedtoken_type: the stringbearerstate: the unmodified state value from the original request The following is an example of the resulting URL:https://oauth-redirect.googleusercontent.com/r/YOUR_PROJECT_ID#access_token=ACCESS_TOKEN&token_type=bearer&state=STATE_STRING
Google's OAuth 2.0 redirect handler will receive the access token and confirm
that the state value hasn't changed. After Google has obtained an
access token for your service, Google will attach the token to subsequent calls
to your Action as part of the AppRequest.
Design the voice user interface for the authentication flow
Check if the user is verified and start the account linking flow
- Open your Actions Builder project in the Actions Console.
- Create a new scene to start account linking in your Action:
- Click Scenes.
- Click the add (+) icon to add a new scene.
- In the newly created scene, click the add add icon for Conditions.
- Add a condition that checks if the user associated with the conversation is a
a verified user. If the check fails, your Action can't perform account linking
during the conversation, and should fall back to providing access to
functionality that doesn't require account linking.
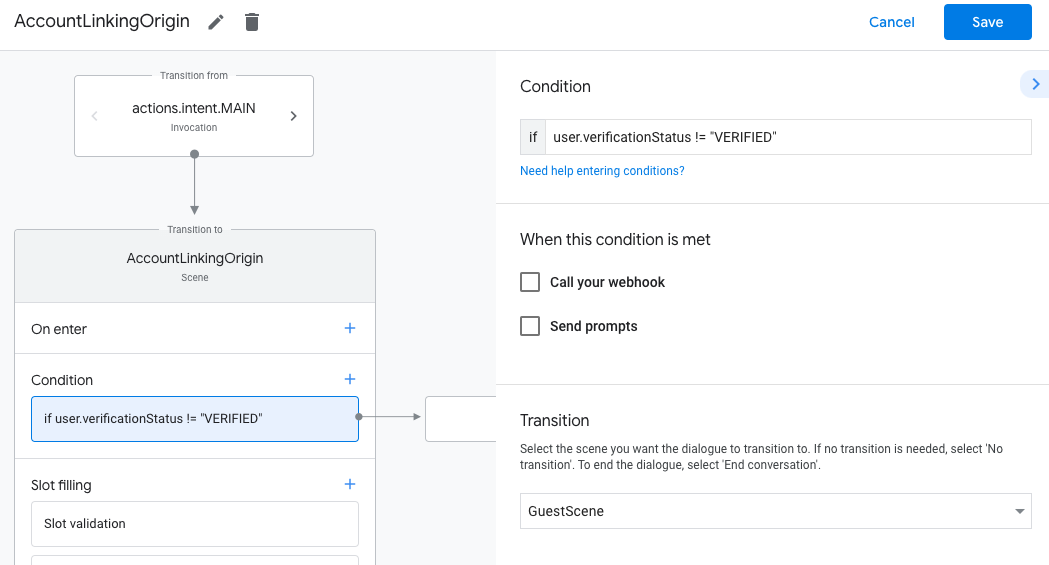
- In the
Enter new expressionfield under Condition, enter the following logic:user.verificationStatus != "VERIFIED" - Under Transition, select a scene that doesn't require account linking or a scene that is the entry point to guest-only functionality.
- In the
- Click the add add icon for Conditions.
- Add a condition to trigger an account linking flow if the user doesn't have
an associated identity.
- In the
Enter new expressionfield under Condition, enter the following logic::user.verificationStatus == "VERIFIED" - Under Transition, select the Account Linking system scene.
- Click Save.
- In the
![]()
After saving, a new account linking system scene called <SceneName>_AccountLinking
is added to your project.
Customize the account linking scene
- Under Scenes, select the account linking system scene.
- Click Send prompt and add a short sentence to describe to the user why the Action needs to access their identity (for example "To save your preferences").
- Click Save.

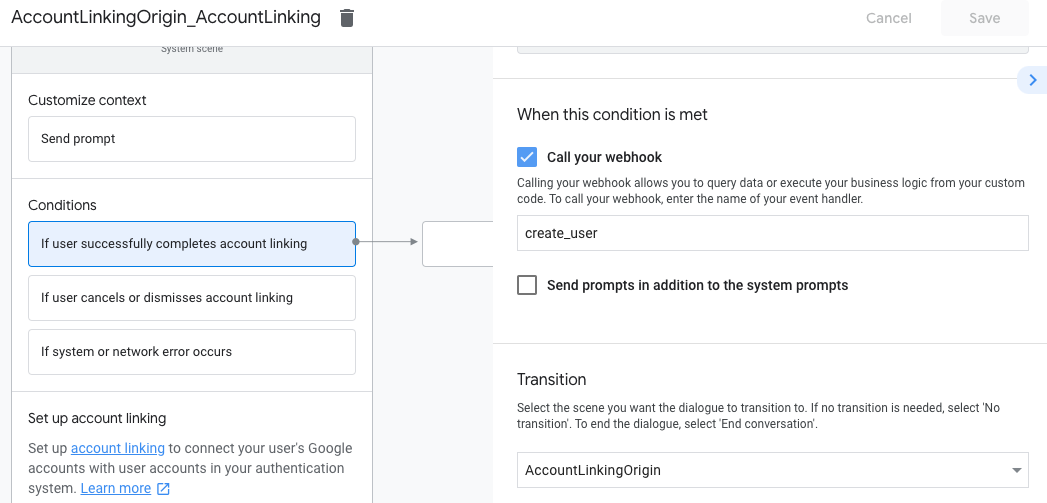
- Under Conditions, click If user successfully completes account linking.
- Configure how the flow should proceed if the user agrees to link their account. For example, call the webhook to process any custom business logic required and transition back to the originating scene.
- Click Save.
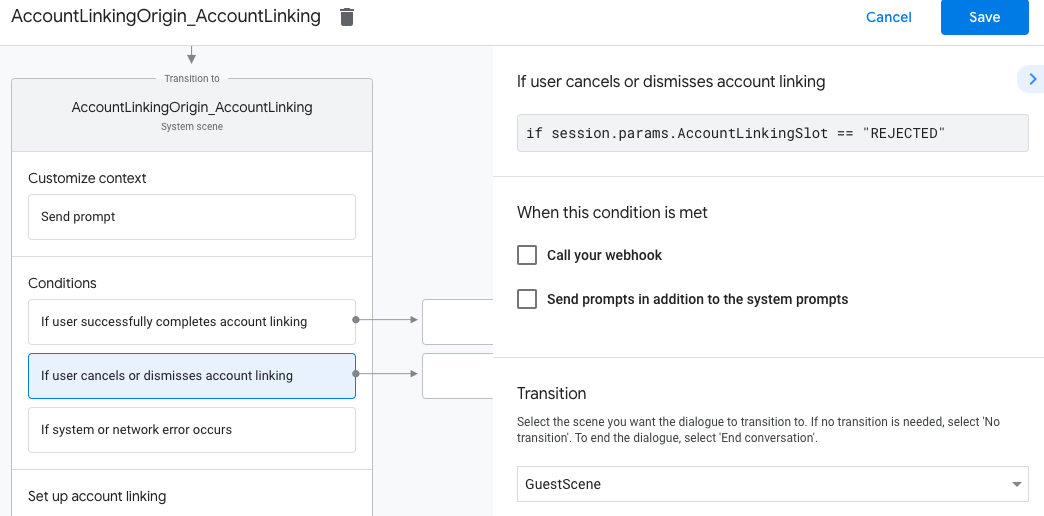
- Under Conditions, click If user cancels or dismisses account linking.
- Configure how the flow should proceed if the user doesn't agree to link their account. For example, send an acknowledging message and redirect to scenes that provide functionality that doesn't require account linking.
- Click Save.
- Under Conditions, click If system or network error occurs.
- Configure how the flow should proceed if the account linking flow can't be completed because of system or network errors. For example, send an acknowledging message and redirect to scenes that provide functionality that doesn't require account linking.
- Click Save.
Handle data access requests
If the Assistant request contains an access token, first check that the access token is valid (and not expired) and then retrieve the associated user account from your database.