1. Overview

This codelab will teach you how to modify an existing Android video app to cast content on a Google Cast-enabled device.
What is Google Cast?
Google Cast allows users to cast content from a mobile device to a TV. Users can then use their mobile device as a remote control for media playback on the TV.
The Google Cast SDK lets you extend your app to control a TV or sound system. The Cast SDK allows you to add the necessary UI components based on the Google Cast Design Checklist.
The Google Cast Design Checklist is provided to make the Cast user experience simple and predictable across all supported platforms.
What are we going to be building?
When you have completed this codelab, you will have an Android video app that will be able to cast videos to a Google Cast-enabled device.
What you'll learn
- How to add the Google Cast SDK to a sample video app.
- How to add the Cast button for selecting a Google Cast device.
- How to connect to a Cast device and launch a media receiver.
- How to cast a video.
- How to add a Cast mini controller to your app.
- How to support media notifications and lock screen controls.
- How to add an expanded controller.
- How to provide an introductory overlay.
- How to customize Cast widgets.
- How to integrate with Cast Connect
What you'll need
- The latest Android SDK.
- Android Studio version 3.2+
- One mobile device with Android 4.1+ Jelly Bean (API level 16).
- A USB data cable to connect your mobile device to your development computer.
- A Google Cast device such as a Chromecast or Android TV configured with internet access.
- A TV or monitor with HDMI input.
- A Chromecast with Google TV is required to test Cast Connect integration but is optional for the rest of the Codelab. If you do not have one, feel free to skip the Add Cast Connect Support step, towards the end of this tutorial.
Experience
- You will need to have previous Kotlin and Android development knowledge.
- You will also need previous knowledge of watching TV :)
How will you use this tutorial?
How would you rate your experience with building Android apps?
How would you rate your experience with watching TV?
2. Get the sample code
You can download all the sample code to your computer...
and unpack the downloaded zip file.
3. Run the sample app

First, let's see what the completed sample app looks like. The app is a basic video player. The user can select a video from a list and can then play the video locally on the device or Cast it to a Google Cast device.
With the code downloaded, the following instructions describe how to open and run the completed sample app in Android Studio:
Select the Import Project on the welcome screen or the File > New > Import Project... menu options.
Select the 
app-done directory from the sample code folder and click OK.
Click File >  Sync Project with Gradle Files.
Enable USB debugging on your Android device – on Android 4.2 and higher, the Developer options screen is hidden by default. To make it visible, go to Settings > About phone and tap Build number seven times. Return to the previous screen, go to System > Advanced and tap on Developer options near the bottom, then tap on USB debugging to turn it on.
Plug in your Android device and click the  Run button in Android Studio. You should see the video app named Cast Videos appear after a few seconds.
Click the Cast button in the video app and select your Google Cast device.
Select a video and click on the play button.
The video will start playing on your Google Cast device.
The expanded controller will be displayed. You can use the play/pause button to control the playback.
Navigate back to the list of videos.
A mini controller is now visible at the bottom of the screen. 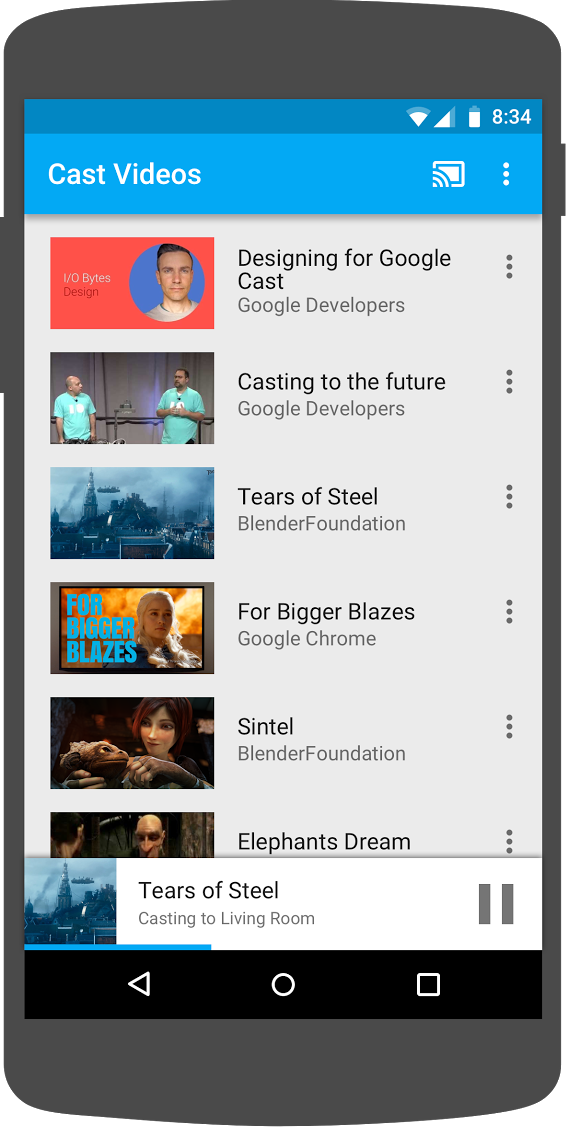
Click on the pause button in the mini controller to pause the video on the receiver. Click on the play button in the mini controller to continue playing the video again.
Click on the mobile device home button. Pull down notifications and you should now see a notification for the Cast session.
Lock your phone and when you unlock it, you should see a notification on the lock screen to control the media playback or stop casting.
Return to the video app and click on the Cast button to stop casting on the Google Cast device.
Frequently asked questions
4. Prepare the start project
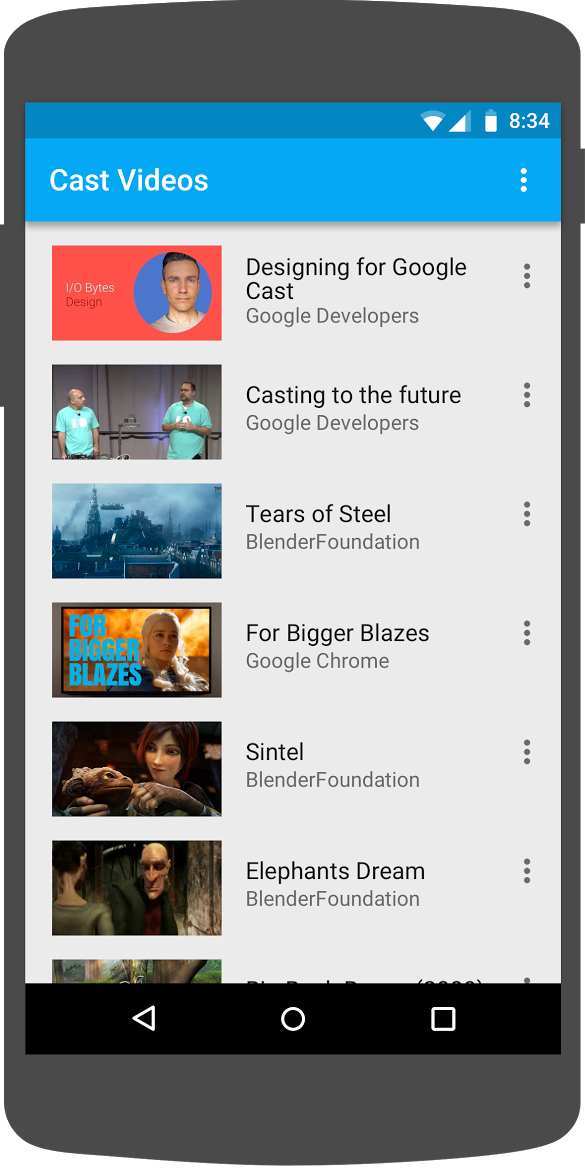
We need to add support for Google Cast to the start app you downloaded. Here is some Google Cast terminology that we will be using in this codelab:
- a sender app runs on a mobile device or laptop,
- a receiver app runs on the Google Cast device.
Now you're ready to build on top of the starter project using Android Studio:
- Select the

app-startdirectory from your sample code download (Select Import Project on the welcome screen or the File > New > Import Project... menu option). - Click the
 Sync Project with Gradle Files button.
 - Click the
 Run button to run the app and explore the UI.
App design
The app fetches a list of videos from a remote web server and provides a list for the user to browse. Users can select a video to see the details or play the video locally on the mobile device.
The app consists of two main activities: VideoBrowserActivity and LocalPlayerActivity. In order to integrate Google Cast functionality, the Activities need to inherit from either the AppCompatActivity or its parent the FragmentActivity. This limitation exists since we would need to add the MediaRouteButton (provided in the MediaRouter support library) as an MediaRouteActionProvider and this will only work if the activity is inheriting from the above-mentioned classes. The MediaRouter support library depends on the AppCompat support library which provides the required classes.
VideoBrowserActivity
This activity contains a Fragment (VideoBrowserFragment). This list is backed by an ArrayAdapter (VideoListAdapter). The list of videos and their associated metadata are hosted on a remote server as a JSON file. An AsyncTaskLoader (VideoItemLoader) fetches this JSON and processes it to build a list of MediaItem objects.
A MediaItem object models a video and its associated metadata, such as its title, description, URL for the stream, URL for the supporting images, and associated Text Tracks (for closed captions) if any. The MediaItem object is passed between activities, so MediaItem has utility methods to convert it to a Bundle and vice versa.
When the loader builds the list of MediaItems, it passes that list to the VideoListAdapter which then presents the MediaItems list in the VideoBrowserFragment. The user is presented with a list of video thumbnails with a short description for each video. When an item is selected, the corresponding MediaItem is converted into a Bundle and is passed to the LocalPlayerActivity.
LocalPlayerActivity
This activity displays the metadata about a particular video and allows the user to play the video locally on the mobile device.
The activity hosts a VideoView, some media controls, and a text area to show the description of the selected video. The player covers the top portion of the screen, leaving room for the detailed description of the video beneath. The user can play/pause or seek the local playback of videos.
Dependencies
Since we are using AppCompatActivity, we need the AppCompat support library. For managing the list of videos and asynchronously getting the images for the list, we are using the Volley library.
Frequently asked questions
5. Adding the Cast button
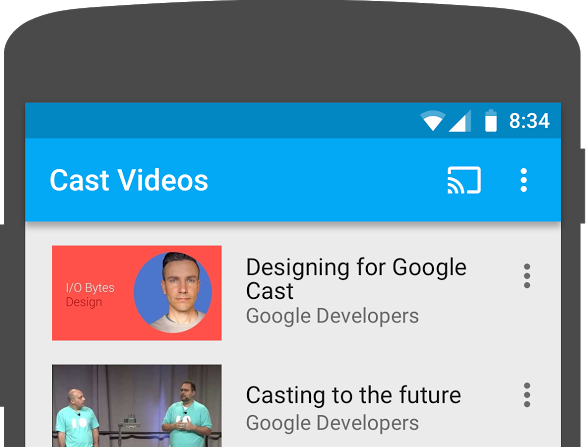
A Cast-enabled application displays the Cast button in each of its activities. Clicking on the Cast button displays a list of Cast devices which a user can select. If the user was playing content locally on the sender device, selecting a Cast device starts or resumes playback on that Cast device. At any time during a Cast session, the user can click on the Cast button and stop casting your application to the Cast device. The user must be able to connect to or disconnect from the Cast device while in any activity of your application, as described in the Google Cast Design Checklist.
Dependencies
Update the app build.gradle file to include the necessary library dependencies:
dependencies {
    implementation 'androidx.appcompat:appcompat:1.5.0'
    implementation 'androidx.mediarouter:mediarouter:1.3.1'
    implementation 'androidx.recyclerview:recyclerview:1.2.1'
    implementation 'com.google.android.gms:play-services-cast-framework:21.1.0'
    implementation 'com.android.volley:volley:1.2.1'
    implementation "androidx.core:core-ktx:1.8.0"
    implementation "org.jetbrains.kotlin:kotlin-stdlib-jdk8:$kotlin_version"
}
Sync the project to confirm the project builds without errors.
Initialization
The Cast framework has a global singleton object, the CastContext, which coordinates all the Cast interactions.
You must implement the OptionsProvider interface to supply CastOptions needed to initialize the CastContext singleton. The most important option is the receiver application ID, which is used to filter Cast device discovery results and to launch the receiver application when a Cast session is started.
When you develop your own Cast-enabled app, you have to register as a Cast developer and then obtain an application ID for your app. For this codelab, we will be using a sample app ID.
Add the following new CastOptionsProvider.kt file to the com.google.sample.cast.refplayer package of the project:
package com.google.sample.cast.refplayer

import android.content.Context
import com.google.android.gms.cast.framework.OptionsProvider
import com.google.android.gms.cast.framework.CastOptions
import com.google.android.gms.cast.framework.SessionProvider

class CastOptionsProvider : OptionsProvider {
    override fun getCastOptions(context: Context): CastOptions {
        return CastOptions.Builder()
                .setReceiverApplicationId(context.getString(R.string.app_id))
                .build()
    }

    override fun getAdditionalSessionProviders(context: Context): List<SessionProvider>? {
        return null
    }
}
Now declare the OptionsProvider within the "application" tag of the app AndroidManifest.xml file:
<meta-data
    android:name="com.google.android.gms.cast.framework.OPTIONS_PROVIDER_CLASS_NAME"
    android:value="com.google.sample.cast.refplayer.CastOptionsProvider" />
Lazily initialize the CastContext in the VideoBrowserActivity onCreate method:
import com.google.android.gms.cast.framework.CastContext

private var mCastContext: CastContext? = null

override fun onCreate(savedInstanceState: Bundle?) {
    super.onCreate(savedInstanceState)
    setContentView(R.layout.video_browser)
    setupActionBar()

    mCastContext = CastContext.getSharedInstance(this)
}
Add the same initialization logic to the LocalPlayerActivity.
Cast button
Now that the CastContext is initialized, we need to add the Cast button to allow the user to select a Cast device. The Cast button is implemented by the MediaRouteButton from the MediaRouter support library. Like any action icon that you can add to your activity (using either an ActionBar or a Toolbar), you first need to add the corresponding menu item to your menu.
Edit the res/menu/browse.xml file and add the MediaRouteActionProvider item in the menu before the settings item:
<item
    android:id="@+id/media_route_menu_item"
    android:title="@string/media_route_menu_title"
    app:actionProviderClass="androidx.mediarouter.app.MediaRouteActionProvider"
    app:showAsAction="always"/>
Override the onCreateOptionsMenu() method of VideoBrowserActivity by using CastButtonFactory to wire up the MediaRouteButton to the Cast framework:
import com.google.android.gms.cast.framework.CastButtonFactory

private var mediaRouteMenuItem: MenuItem? = null

override fun onCreateOptionsMenu(menu: Menu): Boolean {
     super.onCreateOptionsMenu(menu)
     menuInflater.inflate(R.menu.browse, menu)
     mediaRouteMenuItem = CastButtonFactory.setUpMediaRouteButton(getApplicationContext(), menu,
                R.id.media_route_menu_item)
     return true
}
Override onCreateOptionsMenu in LocalPlayerActivity in a similar way.
Click the  Run button to run the app on your mobile device. You should see a Cast button in the app's action bar and when you click on it, it will list the Cast devices on your local network. Device discovery is managed automatically by the
 CastContext. Select your Cast device and the sample receiver app will load on the Cast device. You can navigate between the browse activity and the local player activity and the Cast button state is kept in sync.
We haven't hooked up any support for media playback, so you can't play videos on the Cast device yet. Click on the Cast button to disconnect.
6. Casting video content

We will extend the sample app to also play videos remotely on a Cast device. To do that we need to listen to the various events generated by the Cast framework.
Casting media
At a high level, if you want to play a media on a Cast device, you need to do these things:
- Create a
MediaInfoobject that models a media item. - Connect to the Cast device and launch your receiver application.
- Load the
MediaInfoobject into your receiver and play the content. - Track the media status.
- Send playback commands to the receiver based on user interactions.
We have already done the Step 2 in the previous section. Step 3 is easy to do with the Cast framework. Step 1 amounts to mapping one object to another; MediaInfo is something that the Cast framework understands and MediaItem is our app's encapsulation for a media item; we can easily map a MediaItem to a MediaInfo.
The sample app LocalPlayerActivity already distinguishes between local vs remote playback by using this enum:
private var mLocation: PlaybackLocation? = null

enum class PlaybackLocation {
    LOCAL, REMOTE
}

enum class PlaybackState {
    PLAYING, PAUSED, BUFFERING, IDLE
}
It's not important in this codelab for you to understand exactly how all the sample player logic works. It is important to understand that your app's media player will have to be modified to be aware of the two playback locations in a similar way.
At the moment the local player is always in the local playback state since it doesn't know anything about the Casting states yet. We need to update the UI based on state transitions that happen in the Cast framework. For example, if we start casting, we need to stop the local playback and disable some controls. Similarly, if we stop casting when we are in this activity, we need to transition to local playback. To handle that we need to listen to the various events generated by the Cast framework.
Cast session management
For the Cast framework a Cast session combines the steps of connecting to a device, launching (or joining), connecting to a receiver application, and initializing a media control channel if appropriate. The media control channel is how the Cast framework sends and receives messages from the receiver media player.
The Cast session will be started automatically when user selects a device from the Cast button, and will be stopped automatically when user disconnects. Reconnecting to a receiver session due to networking issues is also automatically handled by the Cast SDK.
Let's add a SessionManagerListener to the LocalPlayerActivity:
import com.google.android.gms.cast.framework.CastSession
import com.google.android.gms.cast.framework.SessionManagerListener
...

private var mSessionManagerListener: SessionManagerListener<CastSession>? = null
private var mCastSession: CastSession? = null
...

private fun setupCastListener() {
    mSessionManagerListener = object : SessionManagerListener<CastSession> {
        override fun onSessionEnded(session: CastSession, error: Int) {
            onApplicationDisconnected()
        }

        override fun onSessionResumed(session: CastSession, wasSuspended: Boolean) {
            onApplicationConnected(session)
        }

        override fun onSessionResumeFailed(session: CastSession, error: Int) {
            onApplicationDisconnected()
        }

        override fun onSessionStarted(session: CastSession, sessionId: String) {
            onApplicationConnected(session)
        }

        override fun onSessionStartFailed(session: CastSession, error: Int) {
            onApplicationDisconnected()
        }

        override fun onSessionStarting(session: CastSession) {}
        override fun onSessionEnding(session: CastSession) {}
        override fun onSessionResuming(session: CastSession, sessionId: String) {}
        override fun onSessionSuspended(session: CastSession, reason: Int) {}
        private fun onApplicationConnected(castSession: CastSession) {
            mCastSession = castSession
            if (null != mSelectedMedia) {
                if (mPlaybackState == PlaybackState.PLAYING) {
                    mVideoView!!.pause()
                    loadRemoteMedia(mSeekbar!!.progress, true)
                    return
                } else {
                    mPlaybackState = PlaybackState.IDLE
                    updatePlaybackLocation(PlaybackLocation.REMOTE)
                }
            }
            updatePlayButton(mPlaybackState)
            invalidateOptionsMenu()
        }

        private fun onApplicationDisconnected() {
            updatePlaybackLocation(PlaybackLocation.LOCAL)
            mPlaybackState = PlaybackState.IDLE
            mLocation = PlaybackLocation.LOCAL
            updatePlayButton(mPlaybackState)
            invalidateOptionsMenu()
       }
   }
}
In LocalPlayerActivity activity, we are interested to be informed when we get connected or disconnected from the Cast device so we can switch to or from the local player. Note that connectivity can be disrupted not only by the instance of your application running on your mobile device, but it can also be disrupted by another instance of your (or another) application running on a different mobile device.
The currently active session is accessible as SessionManager.getCurrentSession(). Sessions are created and torn down automatically in response to user interactions with the Cast dialogs.
We need to register our session listener and initialize some variables that we will use in the activity. Change the LocalPlayerActivity onCreate method to:
import com.google.android.gms.cast.framework.CastContext
...

private var mCastContext: CastContext? = null
...

override fun onCreate(savedInstanceState: Bundle?) {
    ...
    mCastContext = CastContext.getSharedInstance(this)
    mCastSession = mCastContext!!.sessionManager.currentCastSession
    setupCastListener()
    ...
    loadViews()
    ...
    val bundle = intent.extras
    if (bundle != null) {
        ....
        if (shouldStartPlayback) {
              ....

        } else {
            if (mCastSession != null && mCastSession!!.isConnected()) {
                updatePlaybackLocation(PlaybackLocation.REMOTE)
            } else {
                updatePlaybackLocation(PlaybackLocation.LOCAL)
            }
            mPlaybackState = PlaybackState.IDLE
            updatePlayButton(mPlaybackState)
        }
    }
    ...
}
Loading media
In the Cast SDK, the RemoteMediaClient provides a set of convenient APIs for managing the remote media playback on the receiver. For a CastSession that supports media playback, an instance of RemoteMediaClient will be created automatically by the SDK. It can be accessed by calling getRemoteMediaClient() method on the CastSession instance. Add the following methods to LocalPlayerActivity to load the currently selected video on the receiver:
import com.google.android.gms.cast.framework.media.RemoteMediaClient
import com.google.android.gms.cast.MediaInfo
import com.google.android.gms.cast.MediaLoadOptions
import com.google.android.gms.cast.MediaMetadata
import com.google.android.gms.common.images.WebImage
import com.google.android.gms.cast.MediaLoadRequestData

private fun loadRemoteMedia(position: Int, autoPlay: Boolean) {
    if (mCastSession == null) {
        return
    }
    val remoteMediaClient = mCastSession!!.remoteMediaClient ?: return
    remoteMediaClient.load( MediaLoadRequestData.Builder()
                .setMediaInfo(buildMediaInfo())
                .setAutoplay(autoPlay)
                .setCurrentTime(position.toLong()).build())
}

private fun buildMediaInfo(): MediaInfo? {
    val movieMetadata = MediaMetadata(MediaMetadata.MEDIA_TYPE_MOVIE)
    mSelectedMedia?.studio?.let { movieMetadata.putString(MediaMetadata.KEY_SUBTITLE, it) }
    mSelectedMedia?.title?.let { movieMetadata.putString(MediaMetadata.KEY_TITLE, it) }
    movieMetadata.addImage(WebImage(Uri.parse(mSelectedMedia!!.getImage(0))))
    movieMetadata.addImage(WebImage(Uri.parse(mSelectedMedia!!.getImage(1))))
    return mSelectedMedia!!.url?.let {
        MediaInfo.Builder(it)
            .setStreamType(MediaInfo.STREAM_TYPE_BUFFERED)
            .setContentType("videos/mp4")
            .setMetadata(movieMetadata)
            .setStreamDuration((mSelectedMedia!!.duration * 1000).toLong())
            .build()
    }
}
Now update various existing methods to use the Cast session logic to support remote playback:
private fun play(position: Int) {
    startControllersTimer()
    when (mLocation) {
        PlaybackLocation.LOCAL -> {
            mVideoView!!.seekTo(position)
            mVideoView!!.start()
        }
        PlaybackLocation.REMOTE -> {
            mPlaybackState = PlaybackState.BUFFERING
            updatePlayButton(mPlaybackState)
            //seek to a new position within the current media item's new position
            //which is in milliseconds from the beginning of the stream
            mCastSession!!.remoteMediaClient?.seek(position.toLong())
        }
        else -> {}
    }
    restartTrickplayTimer()
}
private fun togglePlayback() {
    ...
    PlaybackState.IDLE -> when (mLocation) {
        ...
        PlaybackLocation.REMOTE -> {
            if (mCastSession != null && mCastSession!!.isConnected) {
                loadRemoteMedia(mSeekbar!!.progress, true)
            }
        }
        else -> {}
    }
    ...
}
override fun onPause() {
    ...
    mCastContext!!.sessionManager.removeSessionManagerListener(
                mSessionManagerListener!!, CastSession::class.java)
}
override fun onResume() {
    Log.d(TAG, "onResume() was called")
    mCastContext!!.sessionManager.addSessionManagerListener(
            mSessionManagerListener!!, CastSession::class.java)
    if (mCastSession != null && mCastSession!!.isConnected) {
        updatePlaybackLocation(PlaybackLocation.REMOTE)
    } else {
        updatePlaybackLocation(PlaybackLocation.LOCAL)
    }
    super.onResume()
}
For the updatePlayButton method, change the value of the isConnected variable:
private fun updatePlayButton(state: PlaybackState?) {
    ...
    val isConnected = (mCastSession != null
                && (mCastSession!!.isConnected || mCastSession!!.isConnecting))
    ...
}
Now, click the  Run button to run the app on your mobile device. Connect to your Cast device and start playing a video. You should see the video playing on the receiver.
7. Mini controller
The Cast Design Checklist requires that all Cast app provide a mini controller that appears when the user navigates away from the current content page. The mini controller provides instant access and a visible reminder for the current Cast session.
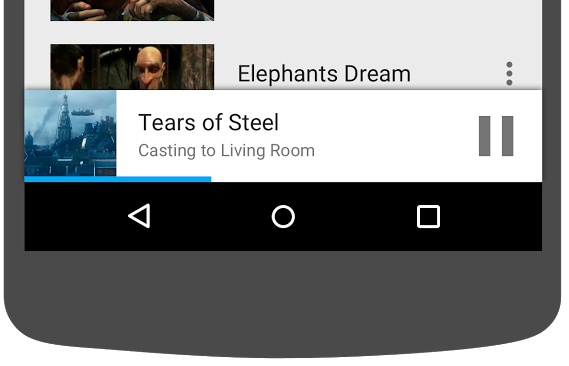
The Cast SDK provides a custom view, MiniControllerFragment, which can be added to the app layout file of the activities in which you want to show the mini controller.
Add the following fragment definition to the bottom of both res/layout/player_activity.xml and res/layout/video_browser.xml:
<fragment
    android:id="@+id/castMiniController"
    android:layout_width="fill_parent"
    android:layout_height="wrap_content"
    android:layout_alignParentBottom="true"
    android:visibility="gone"
    class="com.google.android.gms.cast.framework.media.widget.MiniControllerFragment"/>
Click the  Run button to run the app and cast a video. When playback starts on the receiver you should see the mini controller appear at the bottom of each activity. You can control the remote playback using the mini controller. If you navigate between the browse activity and the local player activity, the mini controller state should stay in sync with the receiver media playback status.
8. Notification and lock screen
The Google Cast design checklist requires a sender app to implement media controls from a notification and the lock screen.
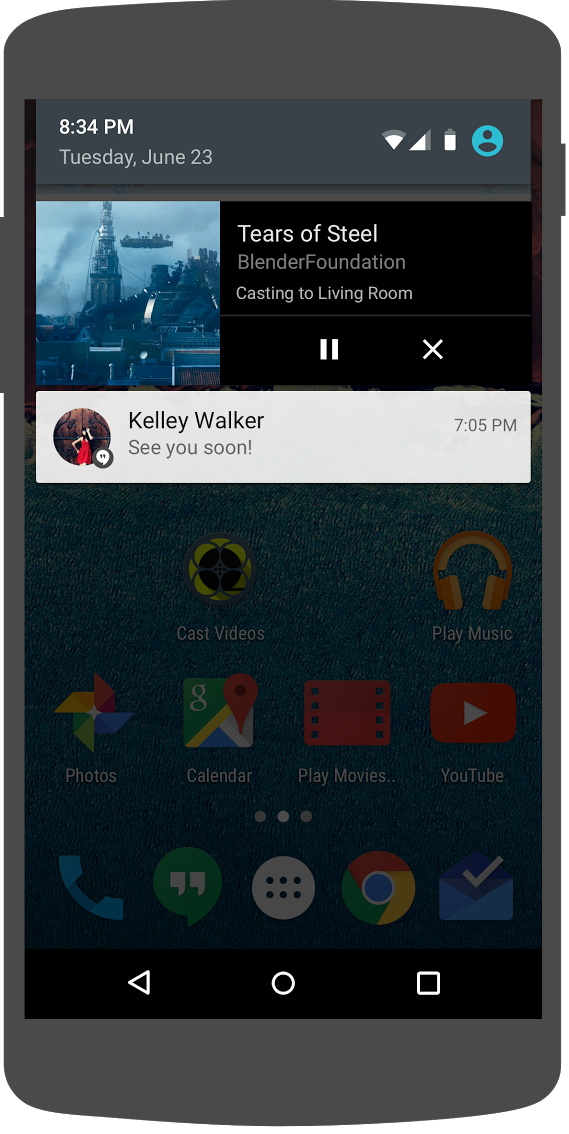
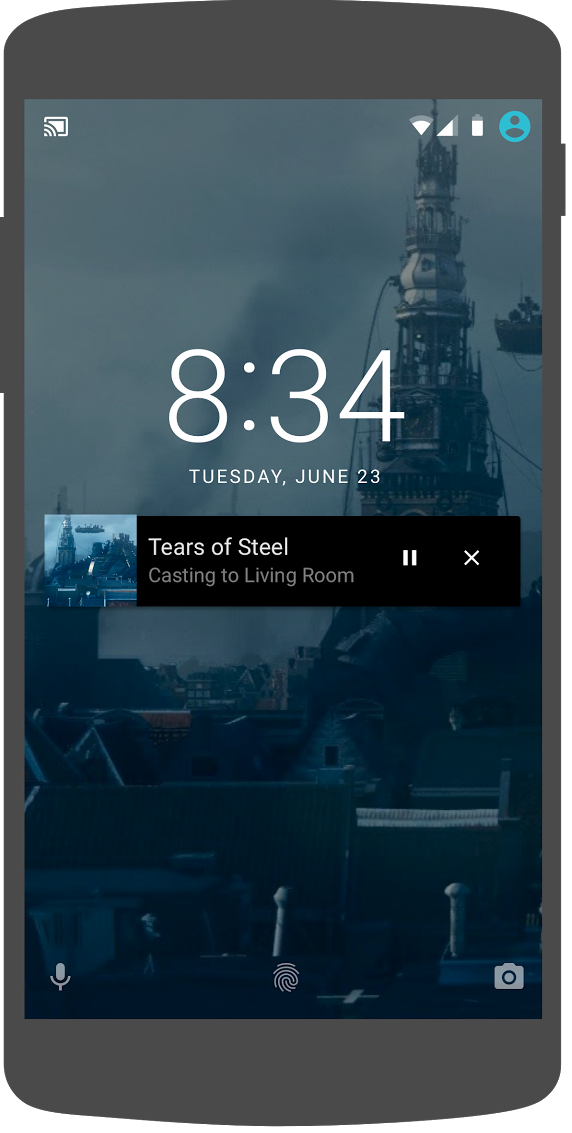
The Cast SDK provides a MediaNotificationService to help the sender app build media controls for the notification and lock screen. The service is automatically merged into your app's manifest by gradle.
The MediaNotificationService will run in the background when sender is casting, and will show a notification with an image thumbnail and metadata about the current casting item, a play/pause button, and a stop button.
The notification and lock screen controls can be enabled with the CastOptions when initializing the CastContext. Media controls for the notification and lock screen are turned on by default. The lock screen feature is turned on as long as notification is turned on.
Edit the CastOptionsProvider and change the getCastOptions implementation to match this code:
import com.google.android.gms.cast.framework.media.CastMediaOptions
import com.google.android.gms.cast.framework.media.NotificationOptions

override fun getCastOptions(context: Context): CastOptions {
   val notificationOptions = NotificationOptions.Builder()
            .setTargetActivityClassName(VideoBrowserActivity::class.java.name)
            .build()
    val mediaOptions = CastMediaOptions.Builder()
            .setNotificationOptions(notificationOptions)
            .build()
   return CastOptions.Builder()
                .setReceiverApplicationId(context.getString(R.string.app_id))
                .setCastMediaOptions(mediaOptions)
                .build()
}
Click the  Run button to run the app on your mobile device. Cast a video and navigate away from the sample app. There should be a notification for the video currently playing on the receiver. Lock your mobile device and the lock screen should now display controls for the media playback on the Cast device.
9. Introductory overlay
The Google Cast design checklist requires a sender app to introduce the Cast button to existing users to let them know that the sender app now supports casting and also helps users new to Google Cast.
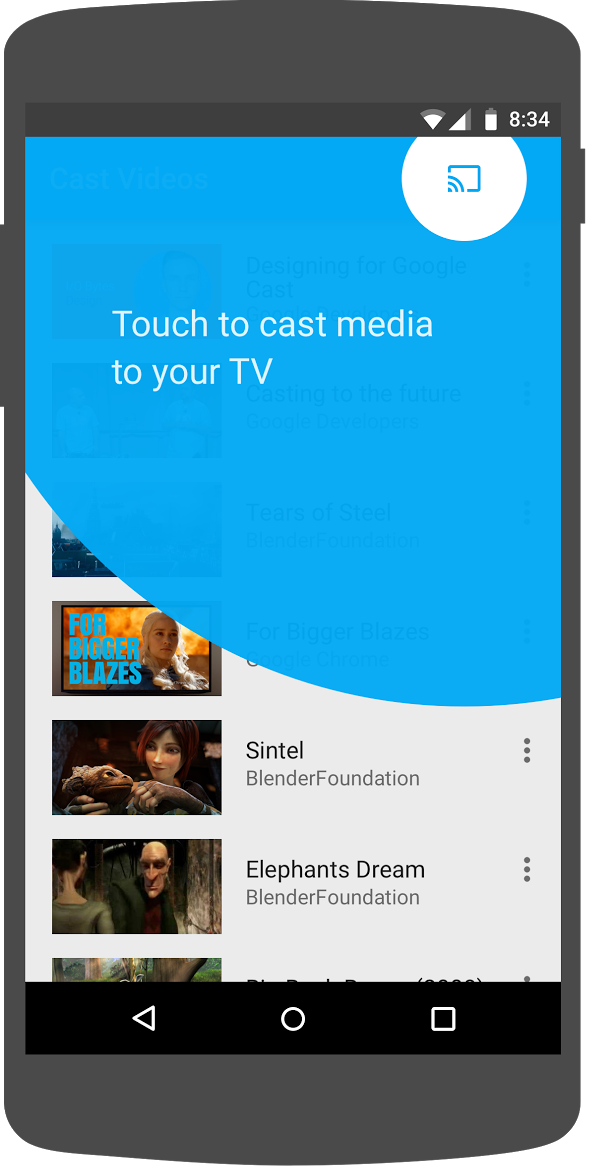
The Cast SDK provides a custom view, IntroductoryOverlay, that can be used to highlight the Cast button when it is first shown to users. Add the following code to VideoBrowserActivity:
import com.google.android.gms.cast.framework.IntroductoryOverlay
import android.os.Looper

private var mIntroductoryOverlay: IntroductoryOverlay? = null

private fun showIntroductoryOverlay() {
    mIntroductoryOverlay?.remove()
    if (mediaRouteMenuItem?.isVisible == true) {
       Looper.myLooper().run {
           mIntroductoryOverlay = com.google.android.gms.cast.framework.IntroductoryOverlay.Builder(
                    this@VideoBrowserActivity, mediaRouteMenuItem!!)
                   .setTitleText("Introducing Cast")
                   .setSingleTime()
                   .setOnOverlayDismissedListener(
                           object : IntroductoryOverlay.OnOverlayDismissedListener {
                               override fun onOverlayDismissed() {
                                   mIntroductoryOverlay = null
                               }
                          })
                   .build()
          mIntroductoryOverlay!!.show()
        }
    }
}
Now, add a CastStateListener and call the showIntroductoryOverlay method when a Cast device is available by modifying the onCreate method and override onResume and onPause methods to match the following:
import com.google.android.gms.cast.framework.CastState
import com.google.android.gms.cast.framework.CastStateListener

private var mCastStateListener: CastStateListener? = null

override fun onCreate(savedInstanceState: Bundle?) {
    super.onCreate(savedInstanceState)
    setContentView(R.layout.video_browser)
    setupActionBar()
    mCastStateListener = object : CastStateListener {
            override fun onCastStateChanged(newState: Int) {
                if (newState != CastState.NO_DEVICES_AVAILABLE) {
                    showIntroductoryOverlay()
                }
            }
        }
    mCastContext = CastContext.getSharedInstance(this)
}

override fun onResume() {
    super.onResume()
    mCastContext?.addCastStateListener(mCastStateListener!!)
}

override fun onPause() {
    super.onPause()
    mCastContext?.removeCastStateListener(mCastStateListener!!)
}
Clear the app data or remove the app from your device. Then, click the  Run button to run the app on your mobile device and you should see the introductory overlay (clear the app data if the overlay does not display).
10. Expanded controller
The Google Cast design checklist requires a sender app to provide expanded controller for the media being cast. The expanded controller is a full screen version of the mini controller.
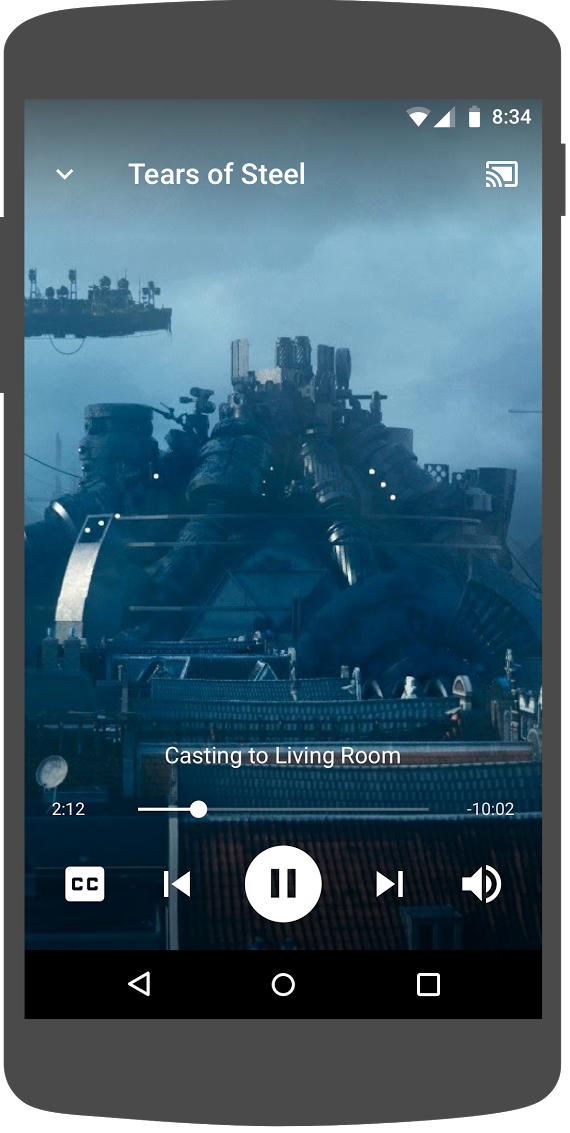
The Cast SDK provides a widget for the expanded controller called ExpandedControllerActivity. This is an abstract class you have to subclass to add a Cast button.
Firstly, create a new menu resource file, called expanded_controller.xml, for the expanded controller to provide the Cast button:
<?xml version="1.0" encoding="utf-8"?>

<menu xmlns:android="http://schemas.android.com/apk/res/android"
      xmlns:app="http://schemas.android.com/apk/res-auto">

    <item
            android:id="@+id/media_route_menu_item"
            android:title="@string/media_route_menu_title"
            app:actionProviderClass="androidx.mediarouter.app.MediaRouteActionProvider"
            app:showAsAction="always"/>

</menu>
Create a new package expandedcontrols in the com.google.sample.cast.refplayer package. Next, create a new file called ExpandedControlsActivity.kt in the com.google.sample.cast.refplayer.expandedcontrols package.
package com.google.sample.cast.refplayer.expandedcontrols

import android.view.Menu
import com.google.android.gms.cast.framework.media.widget.ExpandedControllerActivity
import com.google.sample.cast.refplayer.R
import com.google.android.gms.cast.framework.CastButtonFactory

class ExpandedControlsActivity : ExpandedControllerActivity() {
    override fun onCreateOptionsMenu(menu: Menu): Boolean {
        super.onCreateOptionsMenu(menu)
        menuInflater.inflate(R.menu.expanded_controller, menu)
        CastButtonFactory.setUpMediaRouteButton(this, menu, R.id.media_route_menu_item)
        return true
    }
}
Now declare the ExpandedControlsActivity in the AndroidManifest.xml within the application tag above the OPTIONS_PROVIDER_CLASS_NAME:
<application>
    ...
    <activity
        android:name="com.google.sample.cast.refplayer.expandedcontrols.ExpandedControlsActivity"
        android:label="@string/app_name"
        android:launchMode="singleTask"
        android:theme="@style/Theme.CastVideosDark"
        android:screenOrientation="portrait"
        android:exported="true">
        <intent-filter>
            <action android:name="android.intent.action.MAIN"/>
        </intent-filter>
        <meta-data
            android:name="android.support.PARENT_ACTIVITY"
            android:value="com.google.sample.cast.refplayer.VideoBrowserActivity"/>
    </activity>
    ...
</application>
Edit the CastOptionsProvider and change NotificationOptions and CastMediaOptions to set the target activity to the ExpandedControlsActivity:
import com.google.sample.cast.refplayer.expandedcontrols.ExpandedControlsActivity

override fun getCastOptions(context: Context): CastOptions {
    val notificationOptions = NotificationOptions.Builder()
            .setTargetActivityClassName(ExpandedControlsActivity::class.java.name)
            .build()
    val mediaOptions = CastMediaOptions.Builder()
            .setNotificationOptions(notificationOptions)
            .setExpandedControllerActivityClassName(ExpandedControlsActivity::class.java.name)
            .build()
    return CastOptions.Builder()
            .setReceiverApplicationId(context.getString(R.string.app_id))
            .setCastMediaOptions(mediaOptions)
            .build()
}
Update the LocalPlayerActivity loadRemoteMedia method to display the ExpandedControlsActivity when the remote media is loaded:
import com.google.sample.cast.refplayer.expandedcontrols.ExpandedControlsActivity

private fun loadRemoteMedia(position: Int, autoPlay: Boolean) {
    if (mCastSession == null) {
        return
    }
    val remoteMediaClient = mCastSession!!.remoteMediaClient ?: return
    remoteMediaClient.registerCallback(object : RemoteMediaClient.Callback() {
        override fun onStatusUpdated() {
            val intent = Intent(this@LocalPlayerActivity, ExpandedControlsActivity::class.java)
            startActivity(intent)
            remoteMediaClient.unregisterCallback(this)
        }
    })
    remoteMediaClient.load(MediaLoadRequestData.Builder()
                .setMediaInfo(buildMediaInfo())
                .setAutoplay(autoPlay)
                .setCurrentTime(position.toLong()).build())
}
Click the  Run button to run the app on your mobile device and cast a video. You should see the expanded controller. Navigate back to the list of videos and when you click on the mini controller, the expanded controller will be loaded again. Navigate away from the app to see the notification. Click on the notification image to load the expanded controller.
11. Add Cast Connect support
The Cast Connect library allows existing sender applications to communicate with Android TV applications via the Cast protocol. Cast Connect builds on top of the Cast infrastructure, with your Android TV app acting as a receiver.
Dependencies
Note: For implementing Cast Connect, the play-services-cast-framework needs to be 19.0.0 or higher.
LaunchOptions
In order to launch the Android TV application, also referred to as the Android Receiver, we need to set the setAndroidReceiverCompatible flag to true in the LaunchOptions object. This LaunchOptions object dictates how the receiver is launched and is passed to the CastOptions returned by the CastOptionsProvider class. Setting the above mentioned flag to false, will launch the web receiver for the defined App ID in the Cast Developer Console.
In the CastOptionsProvider.kt file add the following to the getCastOptions method:
import com.google.android.gms.cast.LaunchOptions
...
val launchOptions = LaunchOptions.Builder()
            .setAndroidReceiverCompatible(true)
            .build()
return new CastOptions.Builder()
        .setLaunchOptions(launchOptions)
        ...
        .build()
Set Launch Credentials
On the sender side, you can specify CredentialsData to represent who is joining the session. The credentials is a string which can be user-defined, as long as your ATV app can understand it. The CredentialsData is only passed to your Android TV app during launch or join time. If you set it again while you are connected, it won't be passed to your Android TV app.
In order to set Launch Credentials CredentialsData needs to be defined and passed to the LaunchOptions object. Add the following code to getCastOptions method in your CastOptionsProvider.kt file:
import com.google.android.gms.cast.CredentialsData
...

val credentialsData = CredentialsData.Builder()
        .setCredentials("{\"userId\": \"abc\"}")
        .build()
val launchOptions = LaunchOptions.Builder()
       ...
       .setCredentialsData(credentialsData)
       .build()
Set Credentials on LoadRequest
In case your Web Receiver app and your Android TV app handle credentials differently, you might need to define separate credentials for each. In order to take care of that, add the following code in your LocalPlayerActivity.kt file under loadRemoteMedia function:
remoteMediaClient.load(MediaLoadRequestData.Builder()
       ...
       .setCredentials("user-credentials")
       .setAtvCredentials("atv-user-credentials")
       .build())
Depending on the receiver app your sender is casting to, the SDK would now automatically handle which credentials to use for the current session.
Testing Cast Connect
Steps to install the Android TV APK on Chromecast with Google TV
- Find the IP Address of your Android TV device. Usually, it's available under Settings > Network & Internet > (Network name your device is connected to). On the right hand it will show the details and your device's IP on the network.
- Use the IP address for your device to connect to it via ADB using the terminal:
$ adb connect <device_ip_address>:5555
- From your terminal window, navigate into the top level folder for the codelab samples that you downloaded at the start of this codelab. For example:
$ cd Desktop/android_codelab_src
- Install the .apk file in this folder to your Android TV by running:
$ adb -s <device_ip_address>:5555 install android-tv-app.apk
- You should now be able to see an app by the name of Cast Videos in the Your Apps menu on your Android TV device.
- Return to your Android Studio project and, click the Run button to install & run the sender app on your physical mobile device. On the upper right hand corner, click the cast icon and select your Android TV device from the available options. You should now see the Android TV app launched on your Android TV device and playing a video should enable you to control the video playback using your Android TV remote.
12. Customize Cast widgets
You can customize Cast widgets by setting the colors, styling the buttons, text, and thumbnail appearance, and by choosing the types of buttons to display.
Update res/values/styles_castvideo.xml
<style name="Theme.CastVideosTheme" parent="Theme.AppCompat.Light.NoActionBar">
    ...
    <item name="mediaRouteTheme">@style/CustomMediaRouterTheme</item>
    <item name="castIntroOverlayStyle">@style/CustomCastIntroOverlay</item>
    <item name="castMiniControllerStyle">@style/CustomCastMiniController</item>
    <item name="castExpandedControllerStyle">@style/CustomCastExpandedController</item>
    <item name="castExpandedControllerToolbarStyle">
        @style/ThemeOverlay.AppCompat.ActionBar
    </item>
    ...
</style>
Declare the following custom themes:
<!-- Customize Cast Button -->
<style name="CustomMediaRouterTheme" parent="Theme.MediaRouter">
    <item name="mediaRouteButtonStyle">@style/CustomMediaRouteButtonStyle</item>
</style>
<style name="CustomMediaRouteButtonStyle" parent="Widget.MediaRouter.Light.MediaRouteButton">
    <item name="mediaRouteButtonTint">#EEFF41</item>
</style>

<!-- Customize Introductory Overlay -->
<style name="CustomCastIntroOverlay" parent="CastIntroOverlay">
    <item name="castButtonTextAppearance">@style/TextAppearance.CustomCastIntroOverlay.Button</item>
    <item name="castTitleTextAppearance">@style/TextAppearance.CustomCastIntroOverlay.Title</item>
</style>
<style name="TextAppearance.CustomCastIntroOverlay.Button" parent="android:style/TextAppearance">
    <item name="android:textColor">#FFFFFF</item>
</style>
<style name="TextAppearance.CustomCastIntroOverlay.Title" parent="android:style/TextAppearance.Large">
    <item name="android:textColor">#FFFFFF</item>
</style>

<!-- Customize Mini Controller -->
<style name="CustomCastMiniController" parent="CastMiniController">
    <item name="castShowImageThumbnail">true</item>
    <item name="castTitleTextAppearance">@style/TextAppearance.AppCompat.Subhead</item>
    <item name="castSubtitleTextAppearance">@style/TextAppearance.AppCompat.Caption</item>
    <item name="castBackground">@color/accent</item>
    <item name="castProgressBarColor">@color/orange</item>
</style>

<!-- Customize Expanded Controller -->
<style name="CustomCastExpandedController" parent="CastExpandedController">
    <item name="castButtonColor">#FFFFFF</item>
    <item name="castPlayButtonDrawable">@drawable/cast_ic_expanded_controller_play</item>
    <item name="castPauseButtonDrawable">@drawable/cast_ic_expanded_controller_pause</item>
    <item name="castStopButtonDrawable">@drawable/cast_ic_expanded_controller_stop</item>
</style>
13. Congratulations
You now know how to Cast-enable a video app using the Cast SDK widgets on Android.
For more details, see the Android Sender developer guide.