סקירה כללית
קישור פשוט יותר של כניסה באמצעות חשבון Google שמבוסס על OAuth מוסיף את כניסה באמצעות חשבון Google לקישור OAuth. כך המשתמשים ב-Google יכולים לקשר את החשבון שלהם בצורה חלקה, וגם ליצור חשבון חדש בשירות שלכם באמצעות חשבון Google שלהם.
כדי לבצע קישור חשבון באמצעות OAuth ו-Google Sign-In, צריך לבצע את השלבים הכלליים הבאים:
- קודם צריך לבקש מהמשתמש לתת הסכמה לגישה לפרופיל שלו ב-Google.
- משתמשים במידע בפרופיל כדי לבדוק אם חשבון המשתמש קיים.
- למשתמשים קיימים, מקשרים את החשבונות.
- אם לא מצאתם התאמה למשתמש ב-Google במערכת האימות, צריך לאמת את אסימון המזהה שקיבלתם מ-Google. לאחר מכן תוכלו ליצור משתמש על סמך פרטי הפרופיל שמכיל אסימון המזהה.
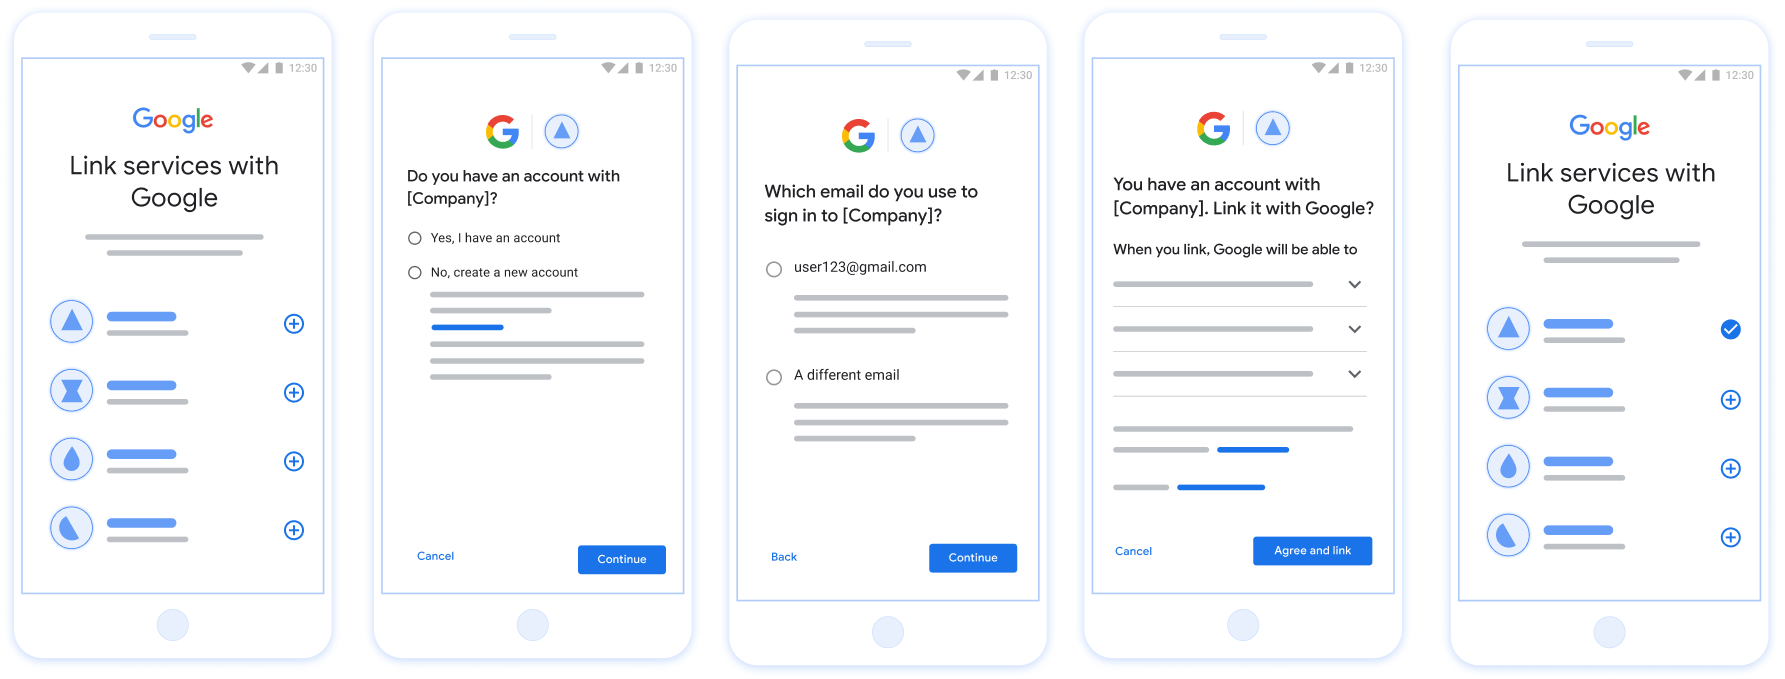
איור 1. קישור חשבון בטלפון של המשתמש באמצעות קישור פשוט
הדרישות לקישור פשוט
- מטמיעים את התהליך של קישור בסיסי של OAuth לאינטרנט. השירות צריך לתמוך בנקודות קצה של הרשאה והחלפת אסימונים שתואמות ל-OAuth 2.0.
- נקודת הקצה של החלפת האסימון חייבת לתמוך בהצהרות נכוֹנוּת (assertions) של אסימון אינטרנט מסוג JSON (JWT) ולהטמיע את הכוונות
check,createו-get.
הטמעת שרת OAuth
נקודת הקצה של המרת האסימון חייבת לתמוך בכוונות check, create ו-get. בהמשך מפורטים השלבים שבוצעו בתהליך הקישור של החשבון, ומופיע ציון של הזמנים שבהם מתבצעות הקריאות לכוונות השונות:
- האם למשתמש יש חשבון במערכת האימות שלכם? (המשתמש מחליט על ידי בחירה באפשרות 'כן' או 'לא')
- כן : האם המשתמש משתמש בכתובת האימייל שמשויכת לחשבון Google שלו כדי להיכנס לפלטפורמה? (המשתמש מחליט על ידי בחירה באפשרות 'כן' או 'לא')
- כן : האם למשתמש יש חשבון תואם במערכת האימות? (
check intentמתקשר לווידוא)- כן :
get intentנקרא והחשבון מקושר אם הפונקציה get intent מחזירה נתונים. - לא : יצירת חשבון חדש? (המשתמש מחליט על ידי בחירה באפשרות 'כן' או 'לא')
- כן :
create intentנקרא והחשבון מקושר אם הפונקציה create intent מחזירה נתונים. - לא : תהליך OAuth באינטרנט מופעל, המשתמש מופנה לדפדפן שלו והוא מקבל אפשרות לקשר עם כתובת אימייל אחרת.
- כן :
- כן :
- לא : תהליך OAuth לאינטרנט מופעל, המשתמש מופנה לדפדפן שלו וניתנת לו אפשרות לקשר עם כתובת אימייל אחרת.
- כן : האם למשתמש יש חשבון תואם במערכת האימות? (
- לא : האם למשתמש יש חשבון תואם במערכת האימות? (
check intentמתקשר כדי לאשר)- כן :
get intentנקרא והחשבון מקושר אם הפונקציה get intent מחזירה נתונים. - לא :
create intentנקרא והחשבון מקושר אם הפונקציה create intent מחזירה נתונים.
- כן :
- כן : האם המשתמש משתמש בכתובת האימייל שמשויכת לחשבון Google שלו כדי להיכנס לפלטפורמה? (המשתמש מחליט על ידי בחירה באפשרות 'כן' או 'לא')
חיפוש חשבון משתמש קיים (בדיקת הכוונה)
אחרי שהמשתמש מביע הסכמה לגשת לפרופיל Google שלו, Google שולחת בקשה שמכילה טענת נכוֹנוּת (assertion) חתומה של זהות המשתמש ב-Google. טענת הנכוֹנוּת (assertion) מכילה מידע שכולל את מספר חשבון Google של המשתמש, שם וכתובת אימייל. נקודת הקצה להחלפת אסימונים שהוגדרה עבור בפרויקט הזה יטפל בבקשה הזו.
אם חשבון Google התואם כבר קיים באימות
המערכת, נקודת הקצה של המרת האסימונים מגיבה עם account_found=true. אם
חשבון Google לא תואם למשתמש קיים, שהוא נקודת הקצה של המרת האסימונים
מחזירה שגיאת HTTP 404 Not Found (לא נמצא) עם account_found=false.
הבקשה מוצגת בפורמט הבא:
POST /token HTTP/1.1
Host: oauth2.example.com
Content-Type: application/x-www-form-urlencoded

grant_type=urn:ietf:params:oauth:grant-type:jwt-bearer&intent=check&assertion=JWT&scope=SCOPES&client_id=GOOGLE_CLIENT_ID&client_secret=GOOGLE_CLIENT_SECRET
נקודת הקצה (endpoint) של המרת האסימונים חייבת להיות מסוגלת לטפל בפרמטרים הבאים:
| פרמטרים של נקודת קצה של אסימון | |
|---|---|
intent |
בבקשות האלה, הערך של הפרמטר הזה הוא
check |
grant_type |
סוג האסימון המוחלף. בבקשות האלה,
מכיל את הערך urn:ietf:params:oauth:grant-type:jwt-bearer. |
assertion |
אסימון רשת מבוסס JSON (JWT) שמספק טענת נכוֹנוּת (assertion) חתומה של זהות המשתמש. ה-JWT מכיל מידע שכולל את שם המשתמש מספר חשבון Google, שם וכתובת אימייל. |
client_id |
מזהה הלקוח שהקצית ל-Google. |
client_secret |
סוד הלקוח שהקצית ל-Google. |
כדי להגיב לבקשות Intent מסוג check, נקודת הקצה (endpoint) של המרת האסימונים חייבת לבצע את השלבים הבאים:
- לאמת ולפענח את טענת הנכוֹנוּת (assertion) של JWT.
- בודקים אם חשבון Google כבר קיים במערכת האימות.
אימות ופענוח של טענת הנכוֹנוּת (assertion) של JWT
אפשר לאמת ולפענח את טענת הנכוֹנוּת (assertion) של JWT באמצעות ספריית פענוח קוד JWT לשפה שלכם. כדאי להשתמש המפתחות הציבוריים של Google זמינים ב JWK או של PEM לצורך אימות לחתימה של האסימון.
אחרי הפענוח, טענת הנכוֹנוּת (assertion) של ה-JWT תיראה כמו הדוגמה הבאה:
{
  "sub": "1234567890",      // The unique ID of the user's Google Account
  "iss": "https://accounts.google.com",        // The assertion's issuer
  "aud": "123-abc.apps.googleusercontent.com", // Your server's client ID
  "iat": 233366400,         // Unix timestamp of the assertion's creation time
  "exp": 233370000,         // Unix timestamp of the assertion's expiration time
  "name": "Jan Jansen",
  "given_name": "Jan",
  "family_name": "Jansen",
  "email": "jan@gmail.com", // If present, the user's email address
  "email_verified": true,   // true, if Google has verified the email address
  "hd": "example.com",      // If present, the host domain of the user's GSuite email address
                            // If present, a URL to user's profile picture
  "picture": "https://lh3.googleusercontent.com/a-/AOh14GjlTnZKHAeb94A-FmEbwZv7uJD986VOF1mJGb2YYQ",
  "locale": "en_US"         // User's locale, from browser or phone settings
}
בנוסף לאימות החתימה של האסימון, צריך לוודא
מנפיק (השדה iss) הוא https://accounts.google.com, שהקהל
(השדה aud) הוא מזהה הלקוח שהוקצה לך, ושתוקף האסימון לא פג
(השדה exp).
באמצעות השדות email, email_verified ו-hd אפשר לקבוע אם
Google מארחת כתובת אימייל מסוימת, והיא מהימן. במקרים שבהם Google
מהימן, כרגע ידוע שהמשתמש הוא הבעלים החוקיים של החשבון
ותוכלו לדלג על סיסמה או על שיטות אחרות לאתגרים. אחרת, השיטות האלה
יכול לשמש לאימות החשבון לפני הקישור.
מקרים שבהם Google היא מהימן:
- ל-
emailיש סיומת@gmail.com. זהו חשבון Gmail. email_verifiedמוגדר כ-True ו-hdמוגדר. זהו חשבון G Suite.
משתמשים יכולים להירשם לחשבונות Google בלי להשתמש ב-Gmail או ב-G Suite. מתי
email לא מכיל סיומת @gmail.com ו-hd חסר Google
מומלץ לאמת סיסמה או סיסמה או שיטות אחרות לאימות
למשתמש. email_verified יכול להיות גם נכון כי Google אימתה בהתחלה את
משתמש כשחשבון Google נוצר, אבל בעלות על הצד השלישי
ייתכן שחשבון האימייל השתנה מאז.
בודקים אם חשבון Google כבר קיים במערכת האימות
בודקים אם אחד מהתנאים הבאים מתקיים:
- מספר חשבון Google, שנמצא בשדה
subבטענת הנכונות (assertion) שלך, נמצא אצל המשתמש. מסד נתונים. - כתובת האימייל בטענת הנכונות (assertion) תואמת למשתמש במסד הנתונים של המשתמשים.
אם אחד מהתנאים מתקיים, המשתמש כבר נרשם. במקרה הזה, תשובה כזו:
HTTP/1.1 200 Success
Content-Type: application/json;charset=UTF-8

{
  "account_found":"true",
}
אם מספר חשבון Google או כתובת האימייל לא צוינו
טענת הנכוֹנוּת (assertion) תואמת למשתמש במסד הנתונים, המשתמש עדיין לא נרשם. לחשבון
במקרה הזה, נקודת הקצה (endpoint) של המרת האסימון צריכה להשיב עם שגיאת HTTP 404
שמציין את "account_found": "false", כמו בדוגמה הבאה:
HTTP/1.1 404 Not found
Content-Type: application/json;charset=UTF-8

{
  "account_found":"false",
}
טיפול בקישור אוטומטי (השגת כוונה)
אחרי שהמשתמש מביע הסכמה לגשת לפרופיל Google שלו, Google שולחת בקשה שמכילה טענת נכוֹנוּת (assertion) חתומה של זהות המשתמש ב-Google. טענת הנכוֹנוּת (assertion) מכילה מידע שכולל את מספר חשבון Google של המשתמש, שם וכתובת אימייל. נקודת הקצה להחלפת אסימונים שהוגדרה עבור בפרויקט הזה יטפל בבקשה הזו.
אם חשבון Google התואם כבר קיים באימות
נקודת הקצה (endpoint) של המרת האסימון מחזירה אסימון עבור המשתמש. אם
חשבון Google לא תואם למשתמש קיים, שהוא נקודת הקצה של המרת האסימון
מחזירה שגיאת linking_error ושדה login_hint אופציונלי.
הבקשה מוצגת בפורמט הבא:
POST /token HTTP/1.1
Host: oauth2.example.com
Content-Type: application/x-www-form-urlencoded

grant_type=urn:ietf:params:oauth:grant-type:jwt-bearer&intent=get&assertion=JWT&scope=SCOPES&client_id=GOOGLE_CLIENT_ID&client_secret=GOOGLE_CLIENT_SECRET
נקודת הקצה (endpoint) של המרת האסימונים חייבת להיות מסוגלת לטפל בפרמטרים הבאים:
| פרמטרים של נקודת קצה של אסימון | |
|---|---|
intent |
בבקשות האלה, הערך של הפרמטר הזה הוא get. |
grant_type |
סוג האסימון המוחלף. בבקשות האלה,
מכיל את הערך urn:ietf:params:oauth:grant-type:jwt-bearer. |
assertion |
אסימון רשת מבוסס JSON (JWT) שמספק טענת נכוֹנוּת (assertion) חתומה של זהות המשתמש. ה-JWT מכיל מידע שכולל את שם המשתמש מספר חשבון Google, שם וכתובת אימייל. |
scope |
אופציונלי: היקפי הרשאות שהגדרתם ל-Google לבקש מהם משתמשים. |
client_id |
מזהה הלקוח שהקצית ל-Google. |
client_secret |
סוד הלקוח שהקצית ל-Google. |
כדי להגיב לבקשות Intent מסוג get, נקודת הקצה (endpoint) של המרת האסימונים חייבת לבצע את השלבים הבאים:
- לאמת ולפענח את טענת הנכוֹנוּת (assertion) של JWT.
- בודקים אם חשבון Google כבר קיים במערכת האימות.
אימות ופענוח של טענת הנכוֹנוּת (assertion) של JWT
אפשר לאמת ולפענח את טענת הנכוֹנוּת (assertion) של JWT באמצעות ספריית פענוח קוד JWT לשפה שלכם. כדאי להשתמש המפתחות הציבוריים של Google זמינים ב JWK או של PEM לצורך אימות לחתימה של האסימון.
אחרי הפענוח, טענת הנכוֹנוּת (assertion) של ה-JWT תיראה כמו הדוגמה הבאה:
{
  "sub": "1234567890",      // The unique ID of the user's Google Account
  "iss": "https://accounts.google.com",        // The assertion's issuer
  "aud": "123-abc.apps.googleusercontent.com", // Your server's client ID
  "iat": 233366400,         // Unix timestamp of the assertion's creation time
  "exp": 233370000,         // Unix timestamp of the assertion's expiration time
  "name": "Jan Jansen",
  "given_name": "Jan",
  "family_name": "Jansen",
  "email": "jan@gmail.com", // If present, the user's email address
  "email_verified": true,   // true, if Google has verified the email address
  "hd": "example.com",      // If present, the host domain of the user's GSuite email address
                            // If present, a URL to user's profile picture
  "picture": "https://lh3.googleusercontent.com/a-/AOh14GjlTnZKHAeb94A-FmEbwZv7uJD986VOF1mJGb2YYQ",
  "locale": "en_US"         // User's locale, from browser or phone settings
}
בנוסף לאימות החתימה של האסימון, צריך לוודא
מנפיק (השדה iss) הוא https://accounts.google.com, שהקהל
(השדה aud) הוא מזהה הלקוח שהוקצה לך, ושתוקף האסימון לא פג
(השדה exp).
באמצעות השדות email, email_verified ו-hd אפשר לקבוע אם
Google מארחת כתובת אימייל מסוימת, והיא מהימן. במקרים שבהם Google
מהימן, כרגע ידוע שהמשתמש הוא הבעלים החוקיים של החשבון
ותוכלו לדלג על סיסמה או על שיטות אחרות לאתגרים. אחרת, השיטות האלה
יכול לשמש לאימות החשבון לפני הקישור.
מקרים שבהם Google היא מהימן:
- ל-
emailיש סיומת@gmail.com. זהו חשבון Gmail. email_verifiedמוגדר כ-True ו-hdמוגדר. זהו חשבון G Suite.
משתמשים יכולים להירשם לחשבונות Google בלי להשתמש ב-Gmail או ב-G Suite. מתי
email לא מכיל סיומת @gmail.com ו-hd חסר Google
מומלץ לאמת סיסמה או סיסמה או שיטות אחרות לאימות
למשתמש. email_verified יכול להיות גם נכון כי Google אימתה בהתחלה את
משתמש כשחשבון Google נוצר, אבל בעלות על הצד השלישי
ייתכן שחשבון האימייל השתנה מאז.
בודקים אם חשבון Google כבר קיים במערכת האימות
בודקים אם אחד מהתנאים הבאים מתקיים:
- מספר חשבון Google, שנמצא בשדה
subבטענת הנכונות (assertion) שלך, נמצא אצל המשתמש. מסד נתונים. - כתובת האימייל בטענת הנכונות (assertion) תואמת למשתמש במסד הנתונים של המשתמשים.
אם נמצא חשבון למשתמש, מנפיקים אסימון גישה ומחזירים את הערכים באובייקט JSON בגוף תגובת ה-HTTPS, כמו בדוגמה הבאה:
{
  "token_type": "Bearer",
  "access_token": "ACCESS_TOKEN",
  "refresh_token": "REFRESH_TOKEN",
  "expires_in": SECONDS_TO_EXPIRATION
}
במקרים מסוימים, קישור חשבונות שמבוסס על אסימון מזהה עלול להיכשל עבור המשתמש. אם
מכל סיבה שהיא, נקודת הקצה של המרת אסימונים צריכה להשיב באמצעות HTTP
שגיאת 401 שמציינת error=linking_error, כמו בדוגמה הבאה:
HTTP/1.1 401 Unauthorized
Content-Type: application/json;charset=UTF-8

{
  "error":"linking_error",
  "login_hint":"foo@bar.com"
}
כש-Google מקבלת תגובה לשגיאה 401 עם linking_error, Google שולחת
המשתמש בנקודת הקצה של ההרשאה עם login_hint כפרמטר.
משתמש משלים את קישור החשבון באמצעות תהליך הקישור של OAuth בדפדפן שלו.
טיפול ביצירת חשבון דרך הכניסה באמצעות חשבון Google (יצירת כוונה)
כשמשתמש צריך ליצור חשבון בשירות שלך, Google שולחת בקשה
לנקודת הקצה של המרת האסימון שמציינת את intent=create.
הבקשה מוצגת בפורמט הבא:
POST /token HTTP/1.1
Host: oauth2.example.com
Content-Type: application/x-www-form-urlencoded

response_type=token&grant_type=urn:ietf:params:oauth:grant-type:jwt-bearer&scope=SCOPES&intent=create&assertion=JWT&client_id=GOOGLE_CLIENT_ID&client_secret=GOOGLE_CLIENT_SECRET
נקודת הקצה (endpoint) של המרת האסימונים חייבת להתמודד עם הפרמטרים הבאים:
| פרמטרים של נקודת קצה של אסימון | |
|---|---|
intent |
בבקשות האלה, הערך של הפרמטר הזה הוא create. |
grant_type |
סוג האסימון המוחלף. בבקשות האלה,
מכיל את הערך urn:ietf:params:oauth:grant-type:jwt-bearer. |
assertion |
אסימון רשת מבוסס JSON (JWT) שמספק טענת נכוֹנוּת (assertion) חתומה של זהות המשתמש. ה-JWT מכיל מידע שכולל את שם המשתמש מספר חשבון Google, שם וכתובת אימייל. |
client_id |
מזהה הלקוח שהקצית ל-Google. |
client_secret |
סוד הלקוח שהקצית ל-Google. |
ה-JWT בתוך הפרמטר assertion מכיל את מספר חשבון Google של המשתמש.
שם משתמש ספציפי וכתובת אימייל, שבהם אפשר להשתמש כדי ליצור חשבון חדש
לאחר השיפור.
כדי להגיב לבקשות Intent מסוג create, נקודת הקצה (endpoint) של המרת האסימונים חייבת לבצע את השלבים הבאים:
- לאמת ולפענח את טענת הנכוֹנוּת (assertion) של JWT.
- אימות פרטי המשתמש ויצירת חשבון חדש.
אימות ופענוח של טענת הנכוֹנוּת (assertion) של JWT
אפשר לאמת ולפענח את טענת הנכוֹנוּת (assertion) של JWT באמצעות ספריית פענוח קוד JWT לשפה שלכם. כדאי להשתמש המפתחות הציבוריים של Google זמינים ב JWK או של PEM לצורך אימות לחתימה של האסימון.
אחרי הפענוח, טענת הנכוֹנוּת (assertion) של ה-JWT תיראה כמו הדוגמה הבאה:
{
  "sub": "1234567890",      // The unique ID of the user's Google Account
  "iss": "https://accounts.google.com",        // The assertion's issuer
  "aud": "123-abc.apps.googleusercontent.com", // Your server's client ID
  "iat": 233366400,         // Unix timestamp of the assertion's creation time
  "exp": 233370000,         // Unix timestamp of the assertion's expiration time
  "name": "Jan Jansen",
  "given_name": "Jan",
  "family_name": "Jansen",
  "email": "jan@gmail.com", // If present, the user's email address
  "email_verified": true,   // true, if Google has verified the email address
  "hd": "example.com",      // If present, the host domain of the user's GSuite email address
                            // If present, a URL to user's profile picture
  "picture": "https://lh3.googleusercontent.com/a-/AOh14GjlTnZKHAeb94A-FmEbwZv7uJD986VOF1mJGb2YYQ",
  "locale": "en_US"         // User's locale, from browser or phone settings
}
בנוסף לאימות החתימה של האסימון, צריך לוודא
מנפיק (השדה iss) הוא https://accounts.google.com, שהקהל
(השדה aud) הוא מזהה הלקוח שהוקצה לך, ושתוקף האסימון לא פג
(השדה exp).
באמצעות השדות email, email_verified ו-hd אפשר לקבוע אם
Google מארחת כתובת אימייל מסוימת, והיא מהימן. במקרים שבהם Google
מהימן, כרגע ידוע שהמשתמש הוא הבעלים החוקיים של החשבון
ותוכלו לדלג על סיסמה או על שיטות אחרות לאתגרים. אחרת, השיטות האלה
יכול לשמש לאימות החשבון לפני הקישור.
מקרים שבהם Google היא מהימן:
- ל-
emailיש סיומת@gmail.com. זהו חשבון Gmail. email_verifiedמוגדר כ-True ו-hdמוגדר. זהו חשבון G Suite.
משתמשים יכולים להירשם לחשבונות Google בלי להשתמש ב-Gmail או ב-G Suite. מתי
email לא מכיל סיומת @gmail.com ו-hd חסר Google
מומלץ לאמת סיסמה או סיסמה או שיטות אחרות לאימות
למשתמש. email_verified יכול להיות גם נכון כי Google אימתה בהתחלה את
משתמש כשחשבון Google נוצר, אבל בעלות על הצד השלישי
ייתכן שחשבון האימייל השתנה מאז.
אימות פרטי המשתמש ויצירת חשבון חדש
בודקים אם אחד מהתנאים הבאים מתקיים:
- מספר חשבון Google, שנמצא בשדה
subבטענת הנכונות (assertion) שלך, נמצא אצל המשתמש. מסד נתונים. - כתובת האימייל בטענת הנכונות (assertion) תואמת למשתמש במסד הנתונים של המשתמשים.
אם אחד מהתנאים מתקיים, מבקשים מהמשתמש לקשר את החשבון הקיים
לחשבון Google שלהם. כדי לעשות את זה, צריך להשיב לבקשה עם שגיאת HTTP 401.
שמציין את error=linking_error ונותן את כתובת האימייל של המשתמש
login_hint. התגובה הבאה היא לדוגמה:
HTTP/1.1 401 Unauthorized
Content-Type: application/json;charset=UTF-8

{
  "error":"linking_error",
  "login_hint":"foo@bar.com"
}
כש-Google מקבלת תגובה לשגיאה 401 עם linking_error, Google שולחת
המשתמש בנקודת הקצה של ההרשאה עם login_hint כפרמטר.
משתמש משלים את קישור החשבון באמצעות תהליך הקישור של OAuth בדפדפן שלו.
אם אף אחד מהתנאים לא מתקיים, צריך ליצור חשבון משתמש חדש עם המידע הזה שצוינו ב-JWT. לחשבונות חדשים בדרך כלל לא מוגדרת סיסמה. זו מומלץ להוסיף כניסה באמצעות חשבון Google לפלטפורמות אחרות, כדי לאפשר למשתמשים להתחבר באמצעות Google בפלטפורמות השונות של האפליקציה שלכם. לחלופין, יכול לשלוח למשתמש באימייל קישור שמתחיל את תהליך שחזור הסיסמה כדי לאפשר משתמש להגדיר סיסמה כדי להיכנס לחשבון בפלטפורמות אחרות.
כשהיצירה הושלמה, צריך להנפיק אסימון גישה ורענון אסימון ומחזירים את הערכים באובייקט JSON הגוף של תגובת ה-HTTPS, כמו בדוגמה הבאה:
{
  "token_type": "Bearer",
  "access_token": "ACCESS_TOKEN",
  "refresh_token": "REFRESH_TOKEN",
  "expires_in": SECONDS_TO_EXPIRATION
}
קבלת מזהה הלקוח ב-Google API
תצטרכו לספק את מזהה הלקוח של Google API במהלך תהליך הרישום לקישור החשבון.
כדי לקבל את מזהה הלקוח של ה-API באמצעות הפרויקט שיצרתם במהלך ביצוע השלבים לקישור OAuth. כדי לעשות זאת, מבצעים את השלבים הבאים:
יוצרים או בוחרים פרויקט ב-Google APIs.
אם לפרויקט אין מזהה לקוח לסוג אפליקציית האינטרנט, לוחצים על Create Client (יצירת לקוח) כדי ליצור מזהה לקוח. חשוב לכלול את הדומיין של האתר בתיבה Authorized JavaScript origins. כשמבצעים פיתוח או בדיקות מקומיות, צריך להוסיף את
http://localhostואתhttp://localhost:<port_number>לשדה Authorized JavaScript origins.
אימות ההטמעה
אפשר לאמת את ההטמעה באמצעות הכלי OAuth 2.0 Playground.
בכלי, מבצעים את הפעולות הבאות:
- לוחצים על Configuration (הגדרה) כדי לפתוח את חלון ההגדרה של OAuth 2.0.
- בשדה תהליך OAuth, בוחרים באפשרות צד הלקוח.
- בשדה נקודות קצה של OAuth, בוחרים באפשרות בהתאמה אישית.
- מציינים את נקודת הקצה (endpoint) של OAuth 2.0 ואת מזהה הלקוח שהקציתם ל-Google בשדות המתאימים.
- בקטע שלב 1, לא בוחרים היקפי גישה של Google. במקום זאת, צריך להשאיר את השדה הזה ריק או להקליד היקף תקין לשרת (או מחרוזת שרירותית אם לא משתמשים בהיקפים של OAuth). בסיום, לוחצים על Authorize API.
- בקטעים שלב 2 ושלב 3, מבצעים את התהליך OAuth 2.0 ומוודאים שכל שלב פועל כמו שצריך.
אפשר לאמת את ההטמעה באמצעות הכלי הדגמה של קישור לחשבון Google.
בכלי, מבצעים את השלבים הבאים:
- לוחצים על הלחצן כניסה באמצעות חשבון Google.
- בוחרים את החשבון שרוצים לקשר.
- מזינים את מזהה השירות.
- אפשר להזין היקף אחד או יותר שלגביו רוצים לבקש גישה.
- לוחצים על התחלת הדגמה.
- כשמופיעה הבקשה, מאשרים את האפשרות להביע הסכמה לדחיית בקשת הקישור.
- מוודאים שאתם מופנים מחדש לפלטפורמה שלכם.