概要
OAuth ベースの Google ログイン スムーズ リンクは、OAuth リンクの上層に Google ログインを追加します。これにより、Google ユーザーはシームレスにリンクできます。また、アカウント作成も有効になり、ユーザーは Google アカウントを使用してサービスに新しいアカウントを作成できます。
OAuth と Google ログインを使用してアカウント リンクを行うには、次の一般的な手順に従います。
- まず、ユーザーの Google プロフィールにアクセスすることについてユーザーに同意を求めます。
- プロフィールの情報を使用して、ユーザー アカウントが存在するかどうかを確認します。
- 既存のユーザーの場合は、アカウントをリンクします。
- 認証システムで Google ユーザーに一致するユーザーが見つからない場合は、Google から受け取った ID トークンを検証します。その後、ID トークンに含まれているプロフィール情報に基づいてユーザー アカウントを作成できます。
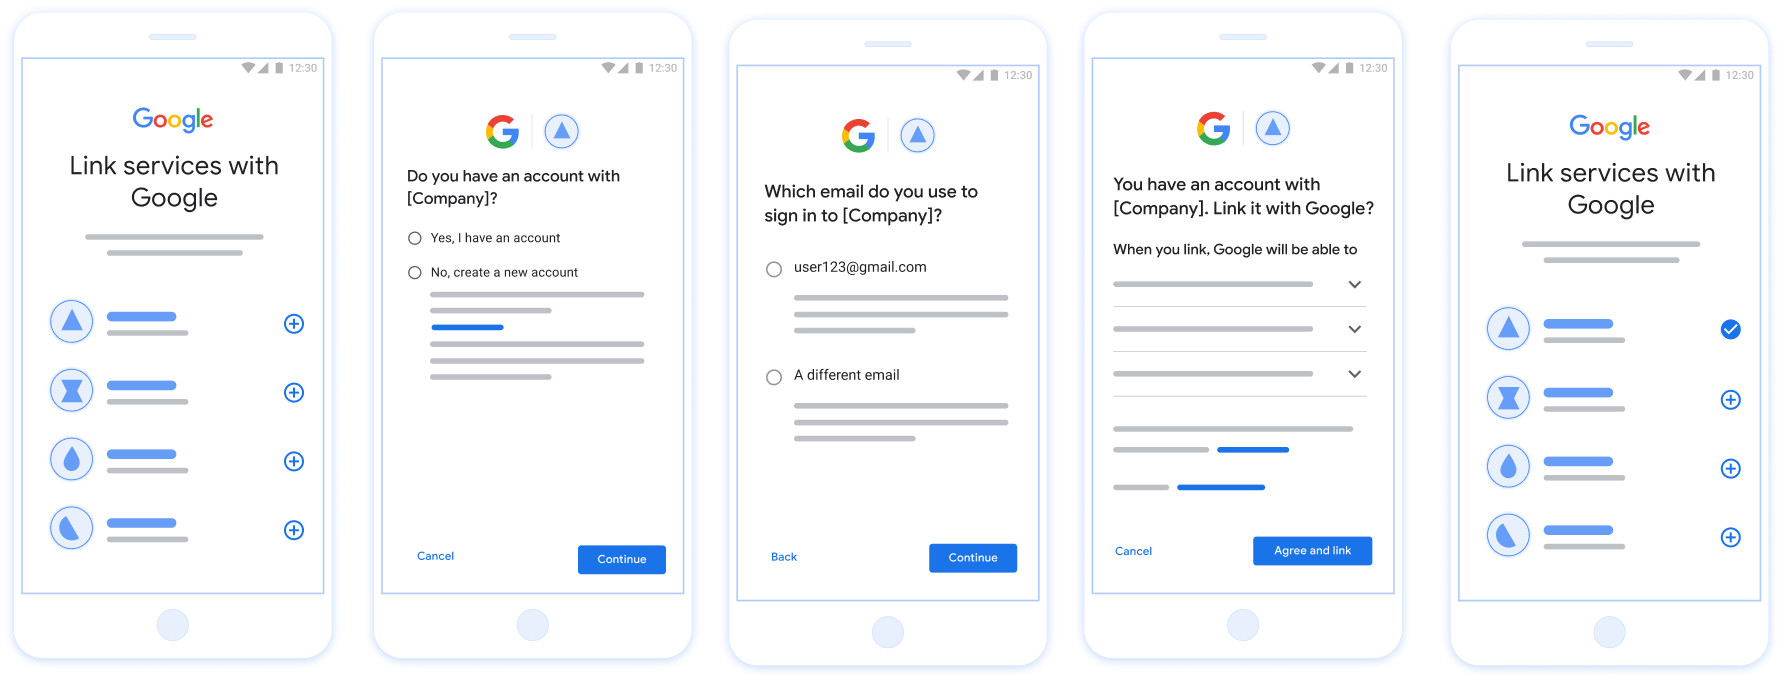
図 1. 簡素化されたリンクを使用したユーザーのスマートフォンでのアカウント リンク
簡素化されたリンクの要件
- 基本的なウェブ OAuth リンクフローを実装します。サービスは、OAuth 2.0 準拠の認可エンドポイントとトークン交換エンドポイントをサポートする必要があります。
- トークン交換エンドポイントは、JSON Web Token(JWT)アサーションをサポートし、
check、create、getインテントを実装する必要があります。
OAuth サーバーを実装する
トークン交換エンドポイントは、check、create、get インテントをサポートする必要があります。以下の図は、アカウントのリンクフローで完了する手順と、さまざまなインテントの呼び出しタイミングを示しています。
- ユーザーは認証システムにアカウントを持っていますか?(ユーザーが [はい] または [いいえ] を選択して決定)
- はい : ユーザーは Google アカウントに関連付けられているメールアドレスを使用してプラットフォームにログインしていますか?(ユーザーが [はい] または [いいえ] を選択して決定)
- はい : ユーザーの認証システムに一致するアカウントがありますか?(確認のために
check intentが呼び出されます)- YES :
get intentが呼び出され、get intent が正常に返された場合はアカウントがリンクされます。 - 「いいえ」の場合 : 新しいアカウントを作成しますか?(ユーザーが [はい] または [いいえ] を選択して決定)
- YES :
create intentが呼び出され、作成インテントの戻り値が成功した場合はアカウントがリンクされます。 - いいえ : ウェブ OAuth フローがトリガーされ、ユーザーはブラウザにリダイレクトされ、別のメールアドレスでリンクするオプションが表示されます。
- YES :
- YES :
- いいえ : ウェブ OAuth フローがトリガーされ、ユーザーはブラウザにリダイレクトされ、別のメールアドレスにリンクするオプションが表示されます。
- はい : ユーザーの認証システムに一致するアカウントがありますか?(確認のために
- 「いいえ」の場合 : ユーザーの認証システムに一致するアカウントがありますか?(確認のために
check intentが呼び出されます)- YES :
get intentが呼び出され、get intent が正常に返された場合はアカウントがリンクされます。 - いいえ :
create intentが呼び出され、作成インテントの戻り値が正常であればアカウントがリンクされます。
- YES :
- はい : ユーザーは Google アカウントに関連付けられているメールアドレスを使用してプラットフォームにログインしていますか?(ユーザーが [はい] または [いいえ] を選択して決定)
检查现有用户账号(检查 intent)
在用户同意访问其 Google 个人资料后,Google 会发送 请求,其中包含 Google 用户身份的已签名断言。通过 断言包含的信息包括用户的 Google 账号 ID、 姓名和电子邮件地址为您的 Google Cloud 控制台配置的令牌交换端点 项目处理该请求。
如果您的身份验证中已有相应的 Google 账号
系统时,您的令牌交换端点会返回 account_found=true。如果
Google 账号与现有用户不匹配,您的令牌交换端点
返回“HTTP 404 Not Found”错误以及 account_found=false。
请求的格式如下:
POST /token HTTP/1.1
Host: oauth2.example.com
Content-Type: application/x-www-form-urlencoded

grant_type=urn:ietf:params:oauth:grant-type:jwt-bearer&intent=check&assertion=JWT&scope=SCOPES&client_id=GOOGLE_CLIENT_ID&client_secret=GOOGLE_CLIENT_SECRET
您的令牌交换端点必须能够处理以下参数:
| 令牌端点参数 | |
|---|---|
intent |
对于这些请求,此参数的值为
check。 |
grant_type |
所交换的令牌的类型。对于这类请求
参数的值为 urn:ietf:params:oauth:grant-type:jwt-bearer。 |
assertion |
一个 JSON Web 令牌 (JWT),提供 Google 用户身份。JWT 包含的信息包括用户 Google 账号 ID、姓名和电子邮件地址。 |
client_id |
您分配给 Google 的客户 ID。 |
client_secret |
您分配给 Google 的客户端密钥。 |
如需响应 check intent 请求,您的令牌交换端点必须执行以下步骤:
- 验证和解码 JWT 断言。
- 检查您的身份验证系统中是否已存在该 Google 账号。
验证和解码 JWT 断言
您可以使用 适用于您所用语言的 JWT 解码库。使用 Google 的公钥,在 JWK 或 PEM 格式,用于验证 令牌的签名。
解码后,JWT 断言如以下示例所示:
{
  "sub": "1234567890",      // The unique ID of the user's Google Account
  "iss": "https://accounts.google.com",        // The assertion's issuer
  "aud": "123-abc.apps.googleusercontent.com", // Your server's client ID
  "iat": 233366400,         // Unix timestamp of the assertion's creation time
  "exp": 233370000,         // Unix timestamp of the assertion's expiration time
  "name": "Jan Jansen",
  "given_name": "Jan",
  "family_name": "Jansen",
  "email": "jan@gmail.com", // If present, the user's email address
  "email_verified": true,   // true, if Google has verified the email address
  "hd": "example.com",      // If present, the host domain of the user's GSuite email address
                            // If present, a URL to user's profile picture
  "picture": "https://lh3.googleusercontent.com/a-/AOh14GjlTnZKHAeb94A-FmEbwZv7uJD986VOF1mJGb2YYQ",
  "locale": "en_US"         // User's locale, from browser or phone settings
}
除了验证令牌的签名之外,还要验证断言的
颁发者(iss 字段)为 https://accounts.google.com,
(aud 字段)是分配给您的客户端 ID,并且令牌未过期
(exp 字段)。
使用 email、email_verified 和 hd 字段,您可以确定
Google 负责托管电子邮件地址,并对其具有权威性。如果 Google
权威性 - 用户当前被认定为合法账号所有者
您可以跳过密码或其他验证方法。否则,这些方法
可用于在关联之前验证账号。
Google 具有权威性的情形:
email的后缀为@gmail.com,这是一个 Gmail 账号。email_verified为 true 且hd已设置,这是 G Suite 账号。
用户无需使用 Gmail 或 G Suite 即可注册 Google 账号。时间
email 不包含 @gmail.com 后缀,且 hd 不存在 Google 不
建议使用权威凭据和密码或其他验证方法进行验证
用户。email_verified 可能为 true,因为 Google 最初验证了
创建 Google 账号后,该用户会获得第三方的所有权,
后,电子邮件账号可能已更改。
检查您的身份验证系统中是否已存在该 Google 账号
请检查以下任一条件是否成立:
- Google 账号 ID(可在断言的
sub字段中找到)位于您的用户中 数据库。 - 断言中的电子邮件地址与用户数据库中的用户匹配。
如果满足上述任一条件,则表明用户已注册。在这种情况下 返回如下所示的响应:
HTTP/1.1 200 Success
Content-Type: application/json;charset=UTF-8

{
  "account_found":"true",
}
如果 Google 账号 ID 和
断言与您的数据库中的用户匹配,该用户尚未注册。在
在这种情况下,您的令牌交换端点需要返回 HTTP 404 错误
指定 "account_found": "false",如以下示例所示:
HTTP/1.1 404 Not found
Content-Type: application/json;charset=UTF-8

{
  "account_found":"false",
}
处理自动链接(获取 intent)
在用户同意访问其 Google 个人资料后,Google 会发送 请求,其中包含 Google 用户身份的已签名断言。通过 断言包含的信息包括用户的 Google 账号 ID、 姓名和电子邮件地址为您的 Google Cloud 控制台配置的令牌交换端点 项目处理该请求。
如果您的身份验证中已有相应的 Google 账号
系统,您的令牌交换端点将为用户返回一个令牌。如果
Google 账号与现有用户不匹配,您的令牌交换端点
返回 linking_error 错误和可选的 login_hint。
请求的格式如下:
POST /token HTTP/1.1
Host: oauth2.example.com
Content-Type: application/x-www-form-urlencoded

grant_type=urn:ietf:params:oauth:grant-type:jwt-bearer&intent=get&assertion=JWT&scope=SCOPES&client_id=GOOGLE_CLIENT_ID&client_secret=GOOGLE_CLIENT_SECRET
您的令牌交换端点必须能够处理以下参数:
| 令牌端点参数 | |
|---|---|
intent |
对于这些请求,此参数的值为 get。 |
grant_type |
所交换的令牌的类型。对于这类请求
参数的值为 urn:ietf:params:oauth:grant-type:jwt-bearer。 |
assertion |
一个 JSON Web 令牌 (JWT),提供 Google 用户身份。JWT 包含的信息包括用户 Google 账号 ID、姓名和电子邮件地址。 |
scope |
可选:您已将 Google 配置为向其请求访问权限的任何范围 用户。 |
client_id |
您分配给 Google 的客户 ID。 |
client_secret |
您分配给 Google 的客户端密钥。 |
如需响应 get intent 请求,您的令牌交换端点必须执行以下步骤:
- 验证和解码 JWT 断言。
- 检查您的身份验证系统中是否已存在该 Google 账号。
验证和解码 JWT 断言
您可以使用 适用于您所用语言的 JWT 解码库。使用 Google 的公钥,在 JWK 或 PEM 格式,用于验证 令牌的签名。
解码后,JWT 断言如以下示例所示:
{
  "sub": "1234567890",      // The unique ID of the user's Google Account
  "iss": "https://accounts.google.com",        // The assertion's issuer
  "aud": "123-abc.apps.googleusercontent.com", // Your server's client ID
  "iat": 233366400,         // Unix timestamp of the assertion's creation time
  "exp": 233370000,         // Unix timestamp of the assertion's expiration time
  "name": "Jan Jansen",
  "given_name": "Jan",
  "family_name": "Jansen",
  "email": "jan@gmail.com", // If present, the user's email address
  "email_verified": true,   // true, if Google has verified the email address
  "hd": "example.com",      // If present, the host domain of the user's GSuite email address
                            // If present, a URL to user's profile picture
  "picture": "https://lh3.googleusercontent.com/a-/AOh14GjlTnZKHAeb94A-FmEbwZv7uJD986VOF1mJGb2YYQ",
  "locale": "en_US"         // User's locale, from browser or phone settings
}
除了验证令牌的签名之外,还要验证断言的
颁发者(iss 字段)为 https://accounts.google.com,
(aud 字段)是分配给您的客户端 ID,并且令牌未过期
(exp 字段)。
使用 email、email_verified 和 hd 字段,您可以确定
Google 负责托管电子邮件地址,并对其具有权威性。如果 Google
权威性 - 用户当前被认定为合法账号所有者
您可以跳过密码或其他验证方法。否则,这些方法
可用于在关联之前验证账号。
Google 具有权威性的情形:
email的后缀为@gmail.com,这是一个 Gmail 账号。email_verified为 true 且hd已设置,这是 G Suite 账号。
用户无需使用 Gmail 或 G Suite 即可注册 Google 账号。时间
email 不包含 @gmail.com 后缀,且 hd 不存在 Google 不
建议使用权威凭据和密码或其他验证方法进行验证
用户。email_verified 可能为 true,因为 Google 最初验证了
创建 Google 账号后,该用户会获得第三方的所有权,
后,电子邮件账号可能已更改。
检查您的身份验证系统中是否已存在该 Google 账号
请检查以下任一条件是否成立:
- Google 账号 ID(可在断言的
sub字段中找到)位于您的用户中 数据库。 - 断言中的电子邮件地址与用户数据库中的用户匹配。
如果找到了用户的账号,请发出访问令牌,并在 HTTPS 响应正文的 JSON 对象中返回相应值,如以下示例所示:
{
  "token_type": "Bearer",
  "access_token": "ACCESS_TOKEN",
  "refresh_token": "REFRESH_TOKEN",
  "expires_in": SECONDS_TO_EXPIRATION
}
在某些情况下,基于 ID 令牌的账号关联可能会失败。如果
因为任何原因,您的令牌交换端点都需要以 HTTP 响应
指定 error=linking_error 的 401 错误,如以下示例所示:
HTTP/1.1 401 Unauthorized
Content-Type: application/json;charset=UTF-8

{
  "error":"linking_error",
  "login_hint":"foo@bar.com"
}
当 Google 收到包含 linking_error 的 401 错误响应时,会发送
使用 login_hint 作为参数将用户发送到您的授权端点。通过
用户在浏览器中使用 OAuth 关联流程完成账号关联。
通过 Google 登录功能处理账号创建(创建 intent)
当用户需要在您的服务中创建账号时,Google 会发出请求
发送到指定 intent=create 的令牌交换端点。
请求的格式如下:
POST /token HTTP/1.1
Host: oauth2.example.com
Content-Type: application/x-www-form-urlencoded

response_type=token&grant_type=urn:ietf:params:oauth:grant-type:jwt-bearer&scope=SCOPES&intent=create&assertion=JWT&client_id=GOOGLE_CLIENT_ID&client_secret=GOOGLE_CLIENT_SECRET
您的令牌交换端点必须能够处理以下参数:
| 令牌端点参数 | |
|---|---|
intent |
对于这些请求,此参数的值为 create。 |
grant_type |
所交换的令牌的类型。对于这类请求
参数的值为 urn:ietf:params:oauth:grant-type:jwt-bearer。 |
assertion |
一个 JSON Web 令牌 (JWT),提供 Google 用户身份。JWT 包含的信息包括用户 Google 账号 ID、姓名和电子邮件地址。 |
client_id |
您分配给 Google 的客户 ID。 |
client_secret |
您分配给 Google 的客户端密钥。 |
assertion 参数中的 JWT 包含用户的 Google 账号 ID。
姓名和电子邮件地址,可用于在 Gmail 中创建新账号
服务。
如需响应 create intent 请求,您的令牌交换端点必须执行以下步骤:
- 验证和解码 JWT 断言。
- 验证用户信息并创建新账号。
验证和解码 JWT 断言
您可以使用 适用于您所用语言的 JWT 解码库。使用 Google 的公钥,在 JWK 或 PEM 格式,用于验证 令牌的签名。
解码后,JWT 断言如以下示例所示:
{
  "sub": "1234567890",      // The unique ID of the user's Google Account
  "iss": "https://accounts.google.com",        // The assertion's issuer
  "aud": "123-abc.apps.googleusercontent.com", // Your server's client ID
  "iat": 233366400,         // Unix timestamp of the assertion's creation time
  "exp": 233370000,         // Unix timestamp of the assertion's expiration time
  "name": "Jan Jansen",
  "given_name": "Jan",
  "family_name": "Jansen",
  "email": "jan@gmail.com", // If present, the user's email address
  "email_verified": true,   // true, if Google has verified the email address
  "hd": "example.com",      // If present, the host domain of the user's GSuite email address
                            // If present, a URL to user's profile picture
  "picture": "https://lh3.googleusercontent.com/a-/AOh14GjlTnZKHAeb94A-FmEbwZv7uJD986VOF1mJGb2YYQ",
  "locale": "en_US"         // User's locale, from browser or phone settings
}
除了验证令牌的签名之外,还要验证断言的
颁发者(iss 字段)为 https://accounts.google.com,
(aud 字段)是分配给您的客户端 ID,并且令牌未过期
(exp 字段)。
使用 email、email_verified 和 hd 字段,您可以确定
Google 负责托管电子邮件地址,并对其具有权威性。如果 Google
权威性 - 用户当前被认定为合法账号所有者
您可以跳过密码或其他验证方法。否则,这些方法
可用于在关联之前验证账号。
Google 具有权威性的情形:
email的后缀为@gmail.com,这是一个 Gmail 账号。email_verified为 true 且hd已设置,这是 G Suite 账号。
用户无需使用 Gmail 或 G Suite 即可注册 Google 账号。时间
email 不包含 @gmail.com 后缀,且 hd 不存在 Google 不
建议使用权威凭据和密码或其他验证方法进行验证
用户。email_verified 可能为 true,因为 Google 最初验证了
创建 Google 账号后,该用户会获得第三方的所有权,
后,电子邮件账号可能已更改。
验证用户信息并创建新账号
请检查以下任一条件是否成立:
- Google 账号 ID(可在断言的
sub字段中找到)位于您的用户中 数据库。 - 断言中的电子邮件地址与用户数据库中的用户匹配。
如果满足上述任一条件,请提示用户关联其现有账号
与其 Google 账号关联。为此,请使用 HTTP 401 错误响应请求
该参数指定 error=linking_error 并将用户的电子邮件地址作为
login_hint。以下是示例响应:
HTTP/1.1 401 Unauthorized
Content-Type: application/json;charset=UTF-8

{
  "error":"linking_error",
  "login_hint":"foo@bar.com"
}
当 Google 收到包含 linking_error 的 401 错误响应时,会发送
使用 login_hint 作为参数将用户发送到您的授权端点。通过
用户在浏览器中使用 OAuth 关联流程完成账号关联。
如果以上两个条件都不满足,请使用相应信息创建一个新的用户账号 。新账号通常不会设置密码。时间是 建议您将 Google 登录功能添加到其他平台,以便用户 使用 Google 账号登录。或者 可以通过电子邮件向用户发送链接,启动密码恢复流程,以允许 用户设置密码,以便在其他平台上登录。
创建完成后,发出一个访问令牌 和刷新令牌 并在 HTTPS 响应的正文,如以下示例所示:
{
  "token_type": "Bearer",
  "access_token": "ACCESS_TOKEN",
  "refresh_token": "REFRESH_TOKEN",
  "expires_in": SECONDS_TO_EXPIRATION
}
Google API クライアント ID を取得する
アカウント リンクの登録プロセスで、Google API クライアント ID を指定する必要があります。
OAuth のリンクの手順で作成したプロジェクトを使用して API クライアント ID を取得します。そのための手順は次のとおりです。
Google API プロジェクトを作成または選択します。
プロジェクトにウェブ アプリケーション タイプのクライアント ID がない場合は、[クライアントを作成] をクリックして作成します。[承認済みの JavaScript 生成元] ボックスに、サイトのドメインを含めてください。ローカルテストまたは開発を行う場合は、[Authorized JavaScript origins] フィールドに
http://localhostとhttp://localhost:<port_number>の両方を追加する必要があります。
実装の検証
実装を検証するには、OAuth 2.0 Playground ツールを使用します。
ツールで、次の操作を行います。
- [Configuration] をクリックして [OAuth 2.0 Configuration] ウィンドウを開きます。
- [OAuth flow] フィールドで、[Client-side] を選択します。
- [OAuth Endpoints](OAuth エンドポイント)で、[Custom](カスタム)を選択します。
- 対応するフィールドに、OAuth 2.0 エンドポイントと Google に割り当てたクライアント ID を指定します。
- [ステップ 1] セクションで、Google スコープは選択しないでください。代わりに、このフィールドを空白のままにするか、サーバーで有効なスコープを入力します(OAuth スコープを使用しない場合は任意の文字列を入力します)。完了したら、[API を承認] をクリックします。
- ステップ 2 とステップ 3 のセクションで OAuth 2.0 フローを実行し、各ステップが意図したとおりに機能することを確認します。
実装を検証するには、Google アカウント リンクのデモツールを使用します。
ツールで次の操作を行います。
- [Google でログイン] ボタンをクリックします。
- リンクするアカウントを選択します。
- サービス ID を入力します。
- 必要に応じて、アクセスをリクエストするスコープを 1 つ以上入力します。
- [デモを開始] をクリックします。
- リンク リクエストに同意できることを確認して、リクエストを拒否します。
- プラットフォームにリダイレクトされることを確認します。