Page Summary
-
The Sign in with Google button's user experience varies based on Google session status and whether the user is new or returning to your website.
-
A personalized button displays profile information for approved Google sessions with corresponding accounts on your website, indicating session status before clicking.
-
The Federated Credential Manager (FedCM) API allows the personalized button to be displayed even when third-party cookies are blocked, improving returning user experience and enabling auto-select for signed-in returning users.
-
User journeys are outlined for different scenarios, including new and returning users with or without active Google sessions, with variations depending on whether FedCM is enabled.
-
Family Link accounts have additional steps requiring parental approval during the sign-in process, though this is not currently supported with the FedCM button.
This page describes the user experience (UX) of the Sign in with Google button.
Button rendering
A personalized button displays profile information for the first Google session that approves your website. An approved Google session has a corresponding account on your website who has signed in using Sign In With Google before.
If a personalized button is displayed, the user knows the following:
- There's at least one active Google session.
- There's a corresponding account on your website.
A personalized button gives users a quick indication of the session status, both on Google's side and on your website, before they click the button. This is especially helpful to end users who visit your website only occasionally. They may forget whether an account has been created or not, and in which way. A personalized button reminds them that Sign In With Google has been used before. Thus, it helps to prevent unnecessary duplicate account creation on your website.
To indicate the session status, the personalized button is displayed in the following ways:
One session: There's only one session on Google's side. That session approves the client, and there's a corresponding account on your website.

Multiple sessions: There are multiple sessions on Google's side. Those sessions approve the client. The approval is indicated by the list arrow next to the displayed account. At least one session has a corresponding account on your website.

No session: There's no session on Google's side, or none of the sessions have approved the client yet.

The personalized button is automatically displayed when the session status is suitable, unless your button settings don't allow the personalized button to be displayed. The personalized button is not displayed if:
- The
data-typeattribute isicon. - The
data-sizeattribute is set tomediumorsmall. - The
data-widthattribute is set to a number smaller than 200px. - Third-party cookie is blocked, and FedCM version of button is not enabled.
The name or email address is ellipsized when they are too long to be displayed inside the button.

Federated Credential Manager (FedCM)
Privacy Sandbox for the Web introduces significant changes to Google Identity Services and user sign in. It impacts the Sign in with Google personalized button. While sign-in flow is unaffected with the button, with 3rd-party cookies blocked, your returning users wouldn't see the personalized button.
With Federated Credentials Management API (FedCM) button flow, users would be able to see the personalized Sign in with Google button on your site. By default, FedCM is disabled, but you can enable FedCM by changing one attribute (HTML/JavaScript). The benefits of the FedCM button include:
Improved Returning User Experience: The returning user sign-in process is streamlined because users can recognize their existing accounts. This improved recognition is proven to lead to a higher click-through rate (CTR). Furthermore, unlike the button flow without having FedCM enabled, the FedCM button flow supports the automatic select feature - returning users with an active Google session will be automatically signed in after clicking the button, bypassing the Account Chooser prompt.
Enhanced Feature Integration: We've integrated One Tap and Auto Sign-in functionalities, enabling all Federated Credential Management (FedCM) Sign-in with Google features from a single Relying Party (RP) to work in concert. The user gestures in the FedCM button flow will be recorded and honored by Chrome to fulfill the one-time reconfirmation for One Tap auto sign-in flow. This ensures a seamless experience across all features.
Key user journeys
The user journeys vary based on the following statuses.
Session status on Google websites. The following terms are used to indicate different Google session status when the user journey starts.
- Has-Google-session: There is at least one active session on Google websites.
- No-Google-session: There is no active session on Google websites.
Whether the selected Google Account has approved your website when the user journey starts. The following terms are used to indicate different approval status.
- New user: The selected account hasn't approved your website.
- Returning user: The selected account has approved your website before.
Has-Google-session new user journey
Button without FedCM
The Sign in with Google button.

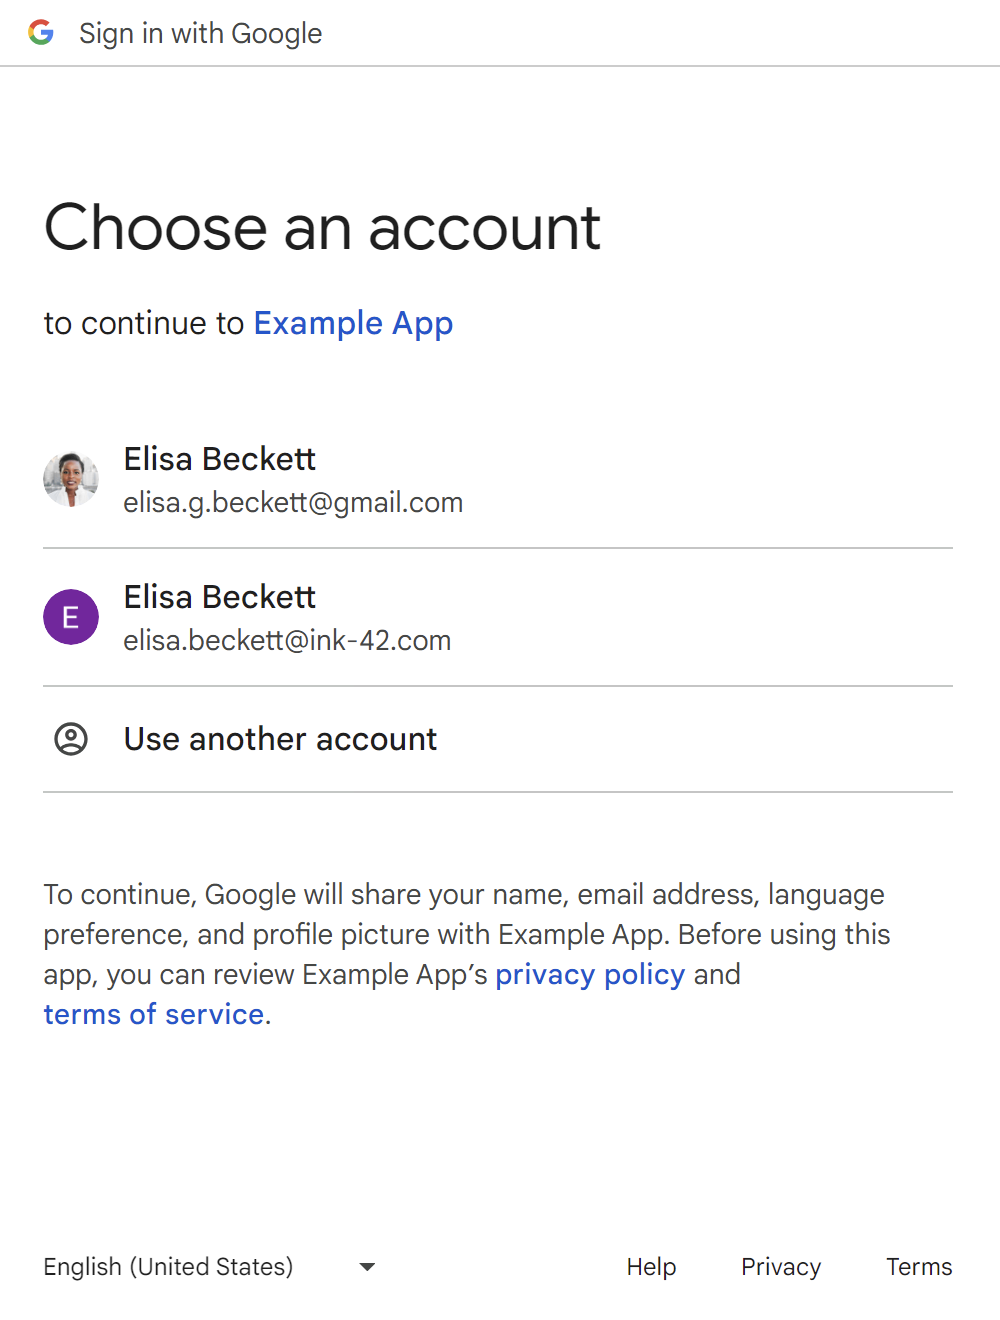
The account chooser page.
The new user consent page.
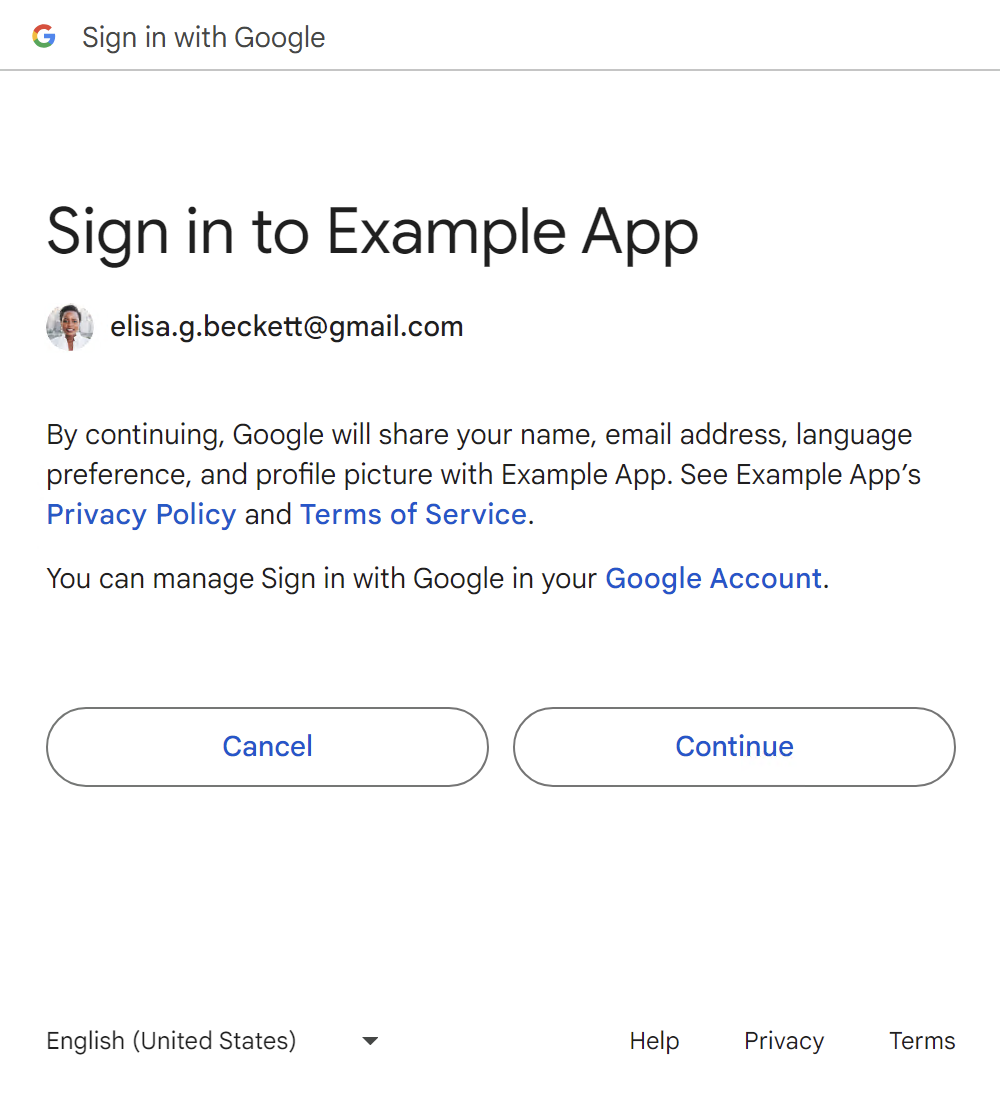
After the user confirms, an ID token is shared with your website.
Users can add a new Google session by clicking the Use another account button, refer to the No-Google-session user journeys section.
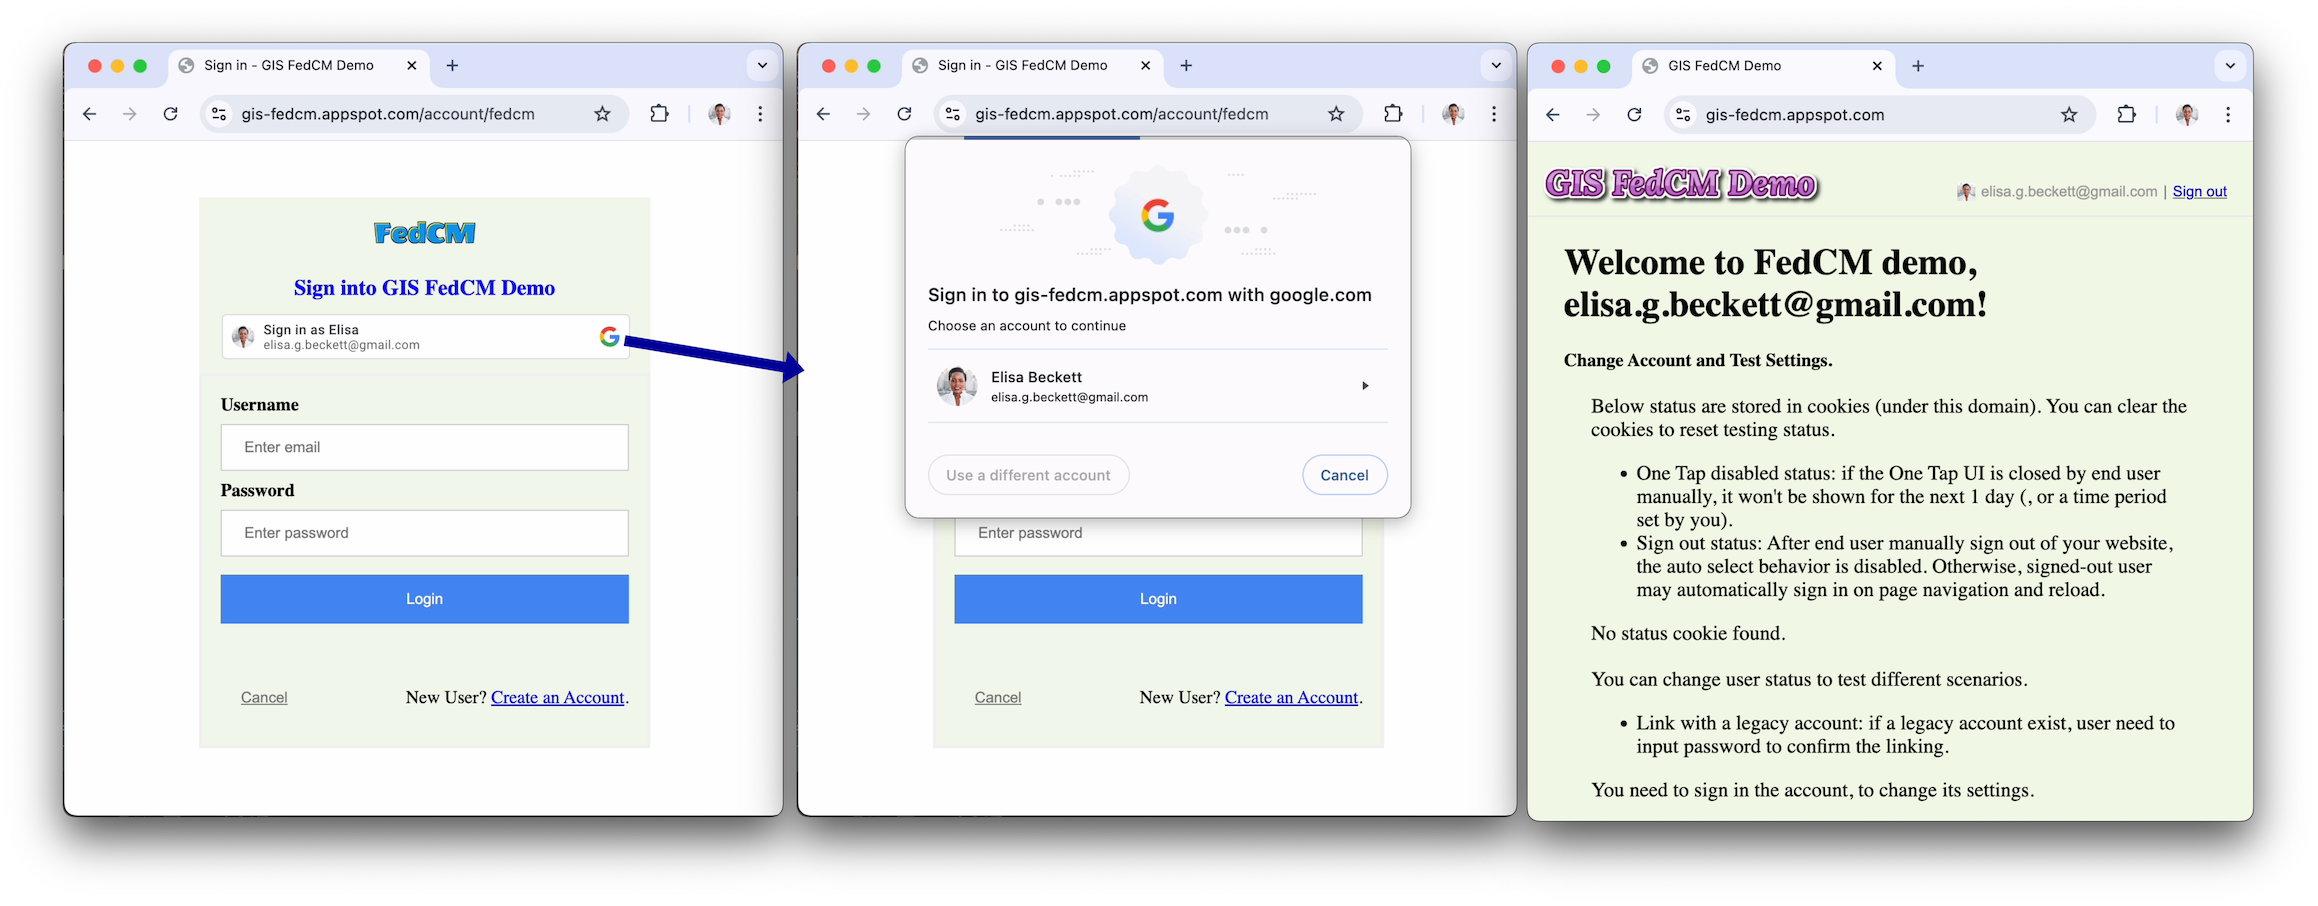
Button using FedCM
The second last screen in the flow is the loading screen, which automatically redirects users to your login endpoint without action from users.
Has-Google-session returning user journey
Button without FedCM
The Sign in with Google button.

The account chooser page.

After the user chooses a returning account, an ID token is shared with your website.
Users can add a new Google session by clicking the Use another account button, refer to the 'No-Google-session' user journeys section.
Button using FedCM
The second last screen in the flow is the loading screen, which automatically redirects users to your login endpoint without action from users.
Has-Google-session with auto select returning user journey
Button without FedCM
Sign in with Google button without FedCM doesn't have automatic select feature.
Button using FedCM
Returning users with an active Google session will be automatically selected
after clicking the button, bypassing the Account Chooser prompt. Set
the auto select attribute to true (HTML/JavaScript).
No-Google-session new user journey
Button without FedCM
The Sign in with Google button.

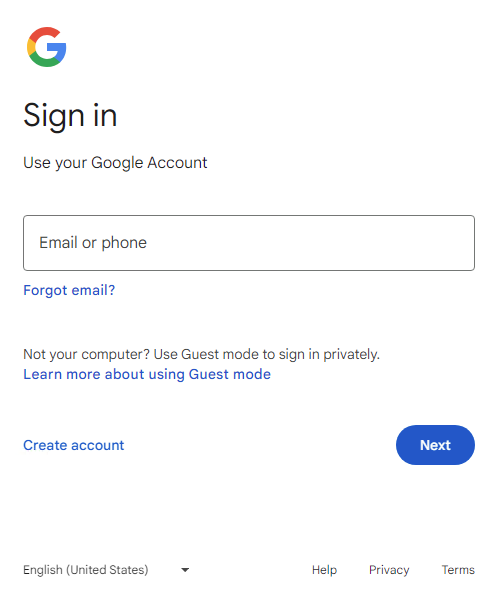
The first page to add a new Google session.
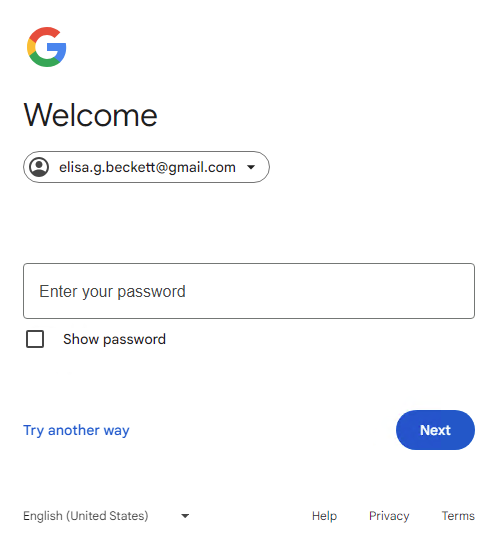
The second page to add a new Google session.
The new user consent page.

After the user confirms, an ID token is shared with your website.
Button using FedCM
The second last screen in the flow is the loading screen, which automatically redirects users to your login endpoint without action from users.
No-Google-session returning user journey
Button without FedCM
The Sign in with Google button.

The first page to add a new Google session.

The second page to add a new Google session.

After the user clicks the Next button, an ID token is shared with your website.
Button using FedCM
Family Link account key user journeys
The general key user journeys from the previous section still apply. The following shows the additional flow would be presented for child's Google Account when signing in.
Button without FedCM
No-Google-session
The Sign in with Google button.

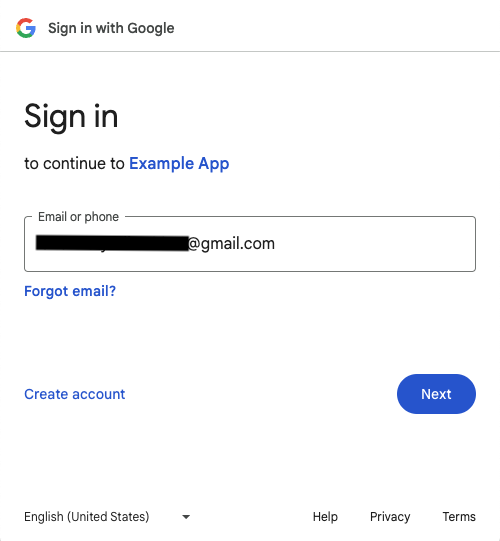
The first page to add a new child Google session (child Google Account email).
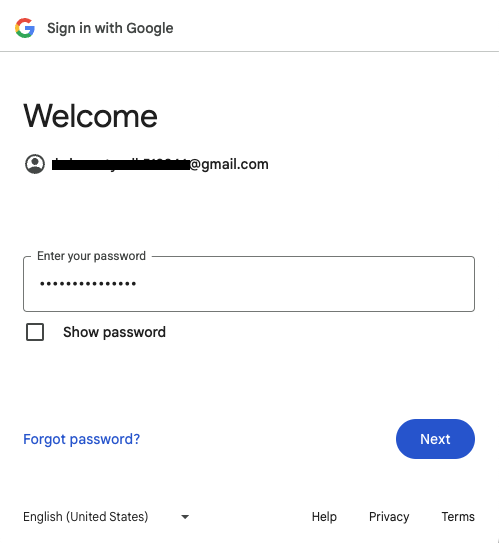
The second page to add a new child Google session (child Google Account password).
The first page to get approval from parent to add a new child Google session.
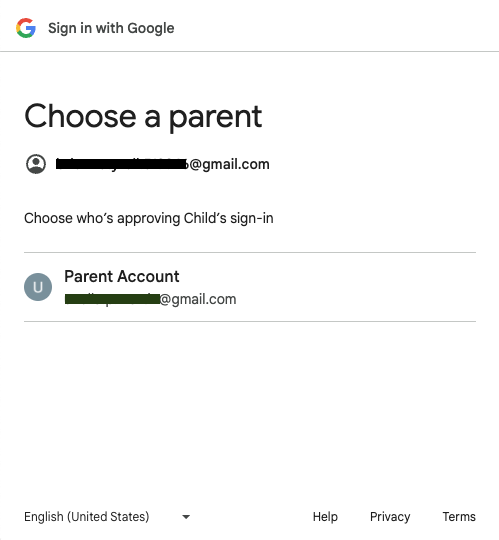
The second page to get approval from parent to add a new child Google session.
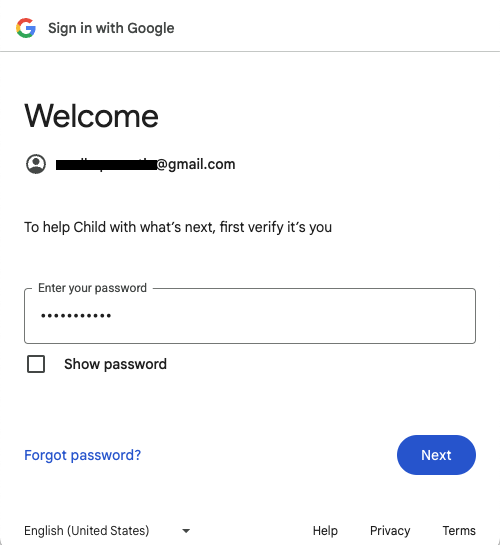
The third page to get approval from parent to add a new child Google session.
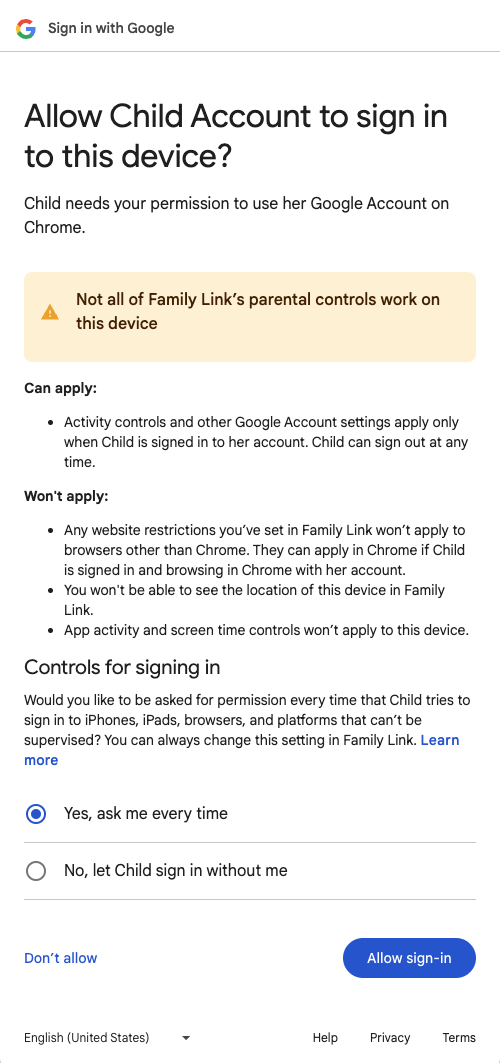
The first page to get approval from parent to sign in a child Google Account to the application.
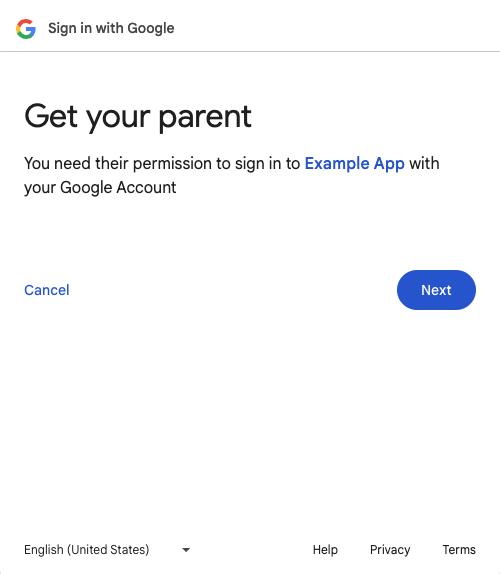
The second page to get approval from parent to sign in a child Google Account to the application.
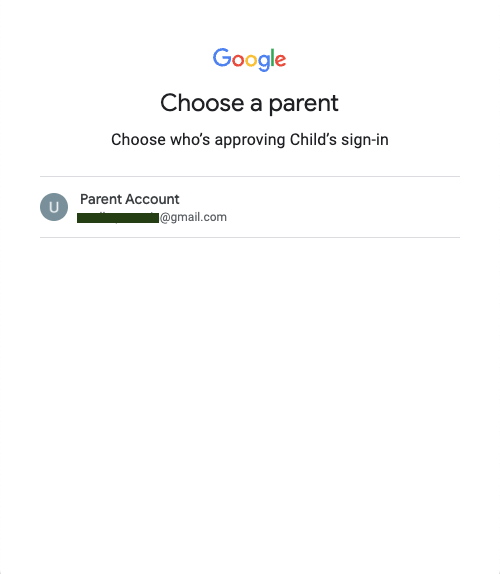
The third page to get approval from parent to sign in a child Google Account to the application.
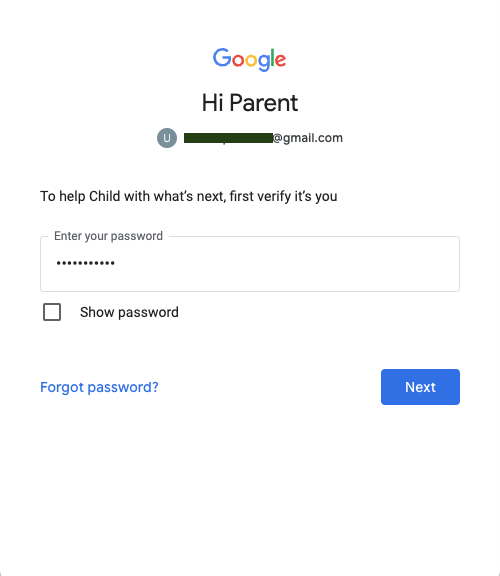
The final page to get approval from parent to sign in a child Google Account to the application.
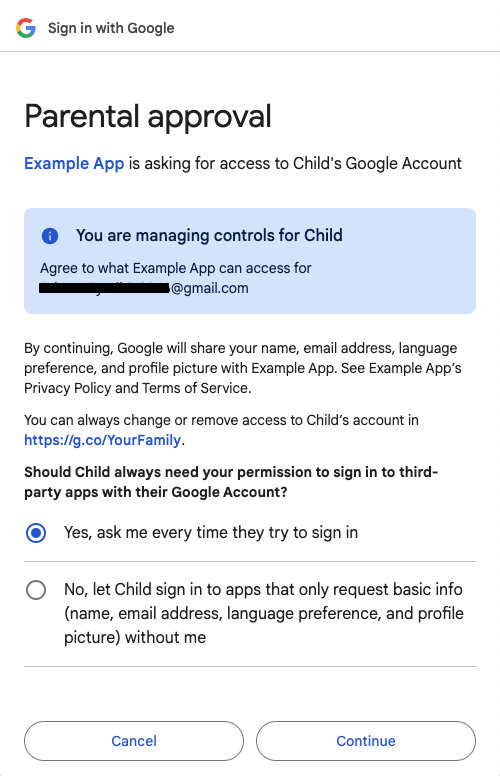
After the parent clicks the Continue button, an ID token is shared with your website.
Has-Google-session
The Sign in with Google button.

The account chooser page.
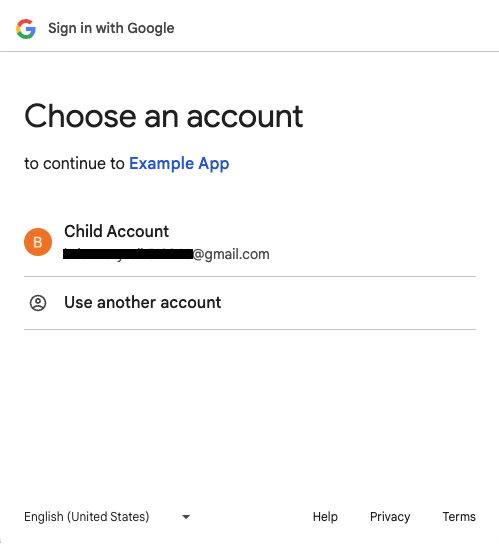
The first page to get approval from parent to sign in a child Google Account to the application.

The second page to get approval from parent to sign in a child Google Account to the application.

The third page to get approval from parent to sign in a child Google Account to the application.

The final page to get approval from parent to sign in a child Google Account to the application.

After the parent clicks the Continue button, an ID token is shared with your website.
Button using FedCM
Sign in with Google Button with FedCM enabled doesn't support Family Link accounts at the moment.
Additional information on FedCM button flow
Add
allow="identity-credentials-get"attribute to parent frame if your web app calls Button API from cross-origin iframes. See step 7 for more information.Properly set up the Content Security Policy (CSP) of your site. See step 8 for more information.
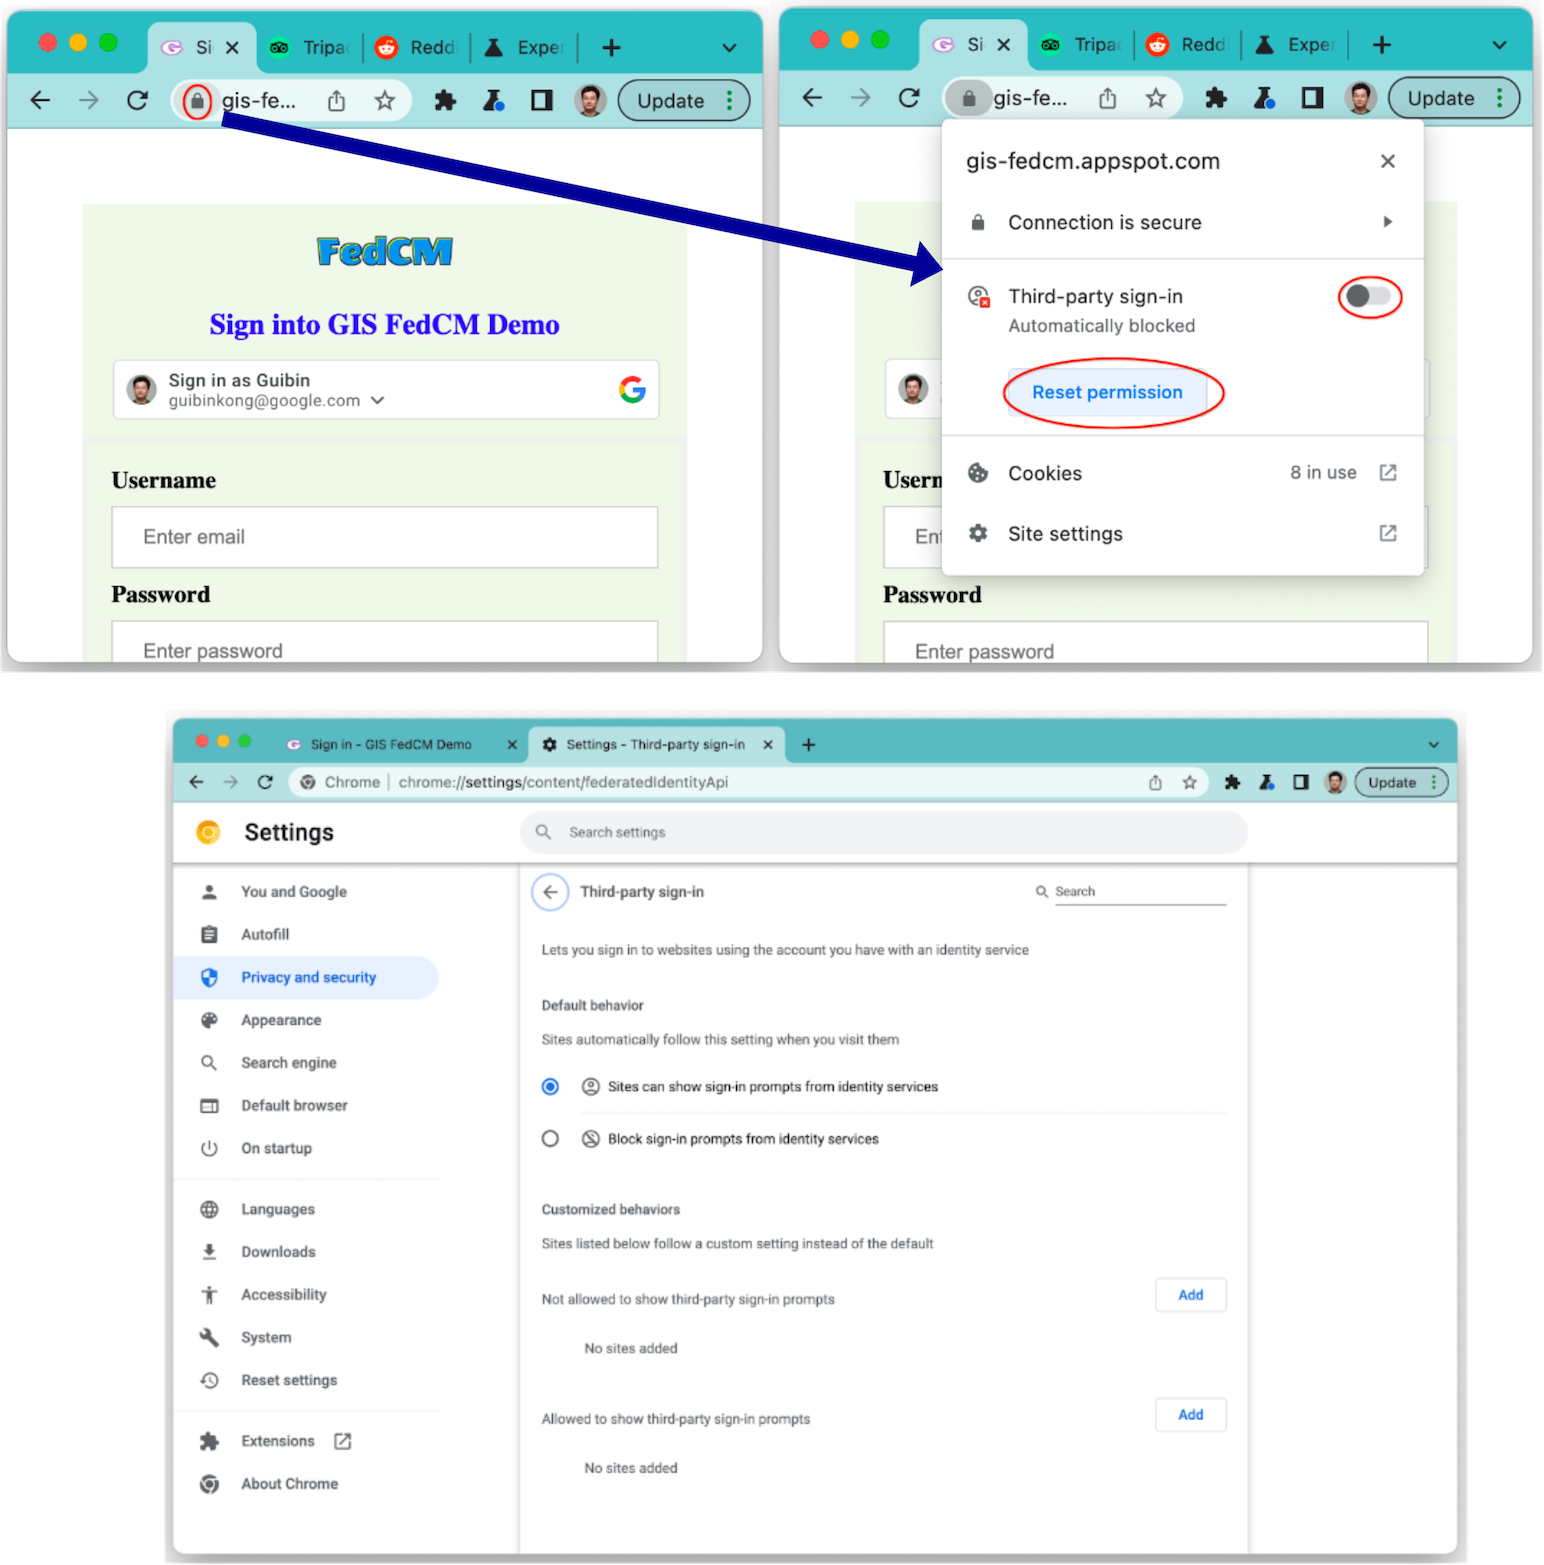
The cooldown status and Third-party sign-in settings in Chrome have no impact on the FedCM button flow. The status (as shown in the following screenshots) affects One Tap UX only.


