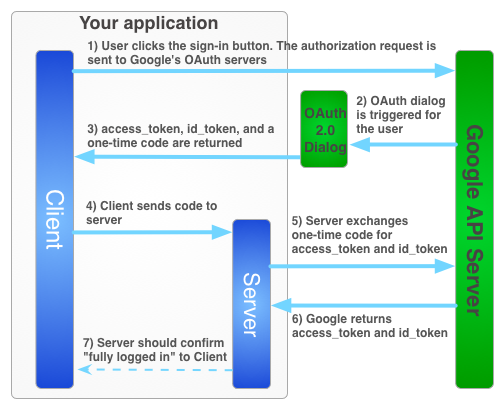
หากต้องการใช้บริการของ Google ในนามของผู้ใช้เมื่อผู้ใช้ออฟไลน์ คุณต้องใช้โฟลว์ฝั่งเซิร์ฟเวอร์แบบผสมที่ผู้ใช้ให้สิทธิ์แอปของคุณฝั่งไคลเอ็นต์โดยใช้ไคลเอ็นต์ JavaScript API และคุณส่งรหัสการให้สิทธิ์แบบครั้งเดียวพิเศษไปยังเซิร์ฟเวอร์ เซิร์ฟเวอร์จะแลกเปลี่ยนรหัสแบบใช้ครั้งเดียวนี้เพื่อรับโทเค็นการเข้าถึงและรีเฟรชของตนเองจาก Google เพื่อให้เซิร์ฟเวอร์สามารถเรียก API ของตนเองได้ ซึ่งทำได้ขณะที่ผู้ใช้ออฟไลน์ ขั้นตอนการรับรหัสแบบครั้งเดียวนี้มีข้อได้เปรียบด้านความปลอดภัยกว่าทั้งขั้นตอนการดำเนินการฝั่งเซิร์ฟเวอร์ล้วนๆ และการส่งโทเค็นการเข้าถึงไปยังเซิร์ฟเวอร์
ขั้นตอนการลงชื่อเข้าใช้เพื่อรับโทเค็นการเข้าถึงสําหรับแอปพลิเคชันฝั่งเซิร์ฟเวอร์แสดงอยู่ด้านล่าง
รหัสแบบใช้ครั้งเดียวมีข้อดีด้านความปลอดภัยหลายประการ เมื่อใช้รหัส Google จะส่งโทเค็นไปยังเซิร์ฟเวอร์ของคุณโดยตรงโดยไม่ต้องมีสื่อกลาง แม้ว่าเราจะไม่แนะนำให้เปิดเผยรหัส แต่รหัสเหล่านี้ก็ใช้ได้โดยยากหากไม่มีข้อมูลลับไคลเอ็นต์ เก็บรหัสลับไคลเอ็นต์ไว้เป็นความลับ
การใช้ขั้นตอนรหัสแบบใช้ครั้งเดียว
ปุ่มลงชื่อเข้าใช้ด้วย Google มีทั้งโทเค็นการเข้าถึงและรหัสการให้สิทธิ์ รหัสนี้เป็นรหัสแบบครั้งเดียวที่เซิร์ฟเวอร์ของคุณแลกเปลี่ยนกับเซิร์ฟเวอร์ของ Google เพื่อรับโทเค็นการเข้าถึงได้
โค้ดตัวอย่างต่อไปนี้แสดงวิธีทำตามขั้นตอนการใช้รหัสแบบครั้งเดียว
การตรวจสอบสิทธิ์ Google Sign-In ด้วยขั้นตอนการใช้รหัสแบบครั้งเดียวกำหนดให้คุณต้องดำเนินการต่อไปนี้
ขั้นตอนที่ 1: สร้างรหัสไคลเอ็นต์และรหัสลับไคลเอ็นต์
หากต้องการสร้างรหัสไคลเอ็นต์และข้อมูลลับของไคลเอ็นต์ ให้สร้างโปรเจ็กต์คอนโซล Google API, ตั้งค่ารหัสไคลเอ็นต์ OAuth และลงทะเบียนต้นทาง JavaScript โดยทำดังนี้
ไปที่คอนโซล Google API
จากเมนูแบบเลื่อนลงของโปรเจ็กต์ ให้เลือกโปรเจ็กต์ที่มีอยู่ หรือสร้างโปรเจ็กต์ใหม่โดยเลือกสร้างโปรเจ็กต์ใหม่
ในแถบด้านข้างในส่วน "API และบริการ" ให้เลือกข้อมูลเข้าสู่ระบบ แล้วคลิกกําหนดค่าหน้าจอขอความยินยอม
เลือกอีเมล ระบุชื่อผลิตภัณฑ์ แล้วกดบันทึก
ในแท็บข้อมูลเข้าสู่ระบบ ให้เลือกรายการแบบเลื่อนลงสร้างข้อมูลเข้าสู่ระบบ แล้วเลือกรหัสไคลเอ็นต์ OAuth
ในส่วนประเภทแอปพลิเคชัน ให้เลือกเว็บแอปพลิเคชัน
ลงทะเบียนต้นทางที่แอปได้รับอนุญาตให้เข้าถึง Google APIs ดังนี้ ต้นทางคือชุดค่าผสมที่ไม่ซ้ำกันของโปรโตคอล ชื่อโฮสต์ และพอร์ต
ในช่องต้นทางของ JavaScript ที่ได้รับอนุญาต ให้ป้อนต้นทางของแอป คุณสามารถป้อนต้นทางหลายรายการเพื่อให้แอปทำงานในโปรโตคอล โดเมน หรือโดเมนย่อยที่แตกต่างกันได้ คุณไม่สามารถใช้ไวลด์การ์ด ในตัวอย่างด้านล่าง URL รายการที่ 2 อาจเป็น URL เวอร์ชันที่ใช้งานจริง
http://localhost:8080
https://myproductionurl.example.com
ช่อง URI การเปลี่ยนเส้นทางที่ได้รับอนุญาตไม่จำเป็นต้องมีค่า ระบบจะไม่ใช้ URI การเปลี่ยนเส้นทางกับ JavaScript API
กดปุ่มสร้าง
จากกล่องโต้ตอบไคลเอ็นต์ OAuth ที่ปรากฏขึ้น ให้คัดลอกรหัสไคลเอ็นต์ รหัสไคลเอ็นต์ช่วยให้แอปเข้าถึง Google API ที่เปิดใช้ได้
ขั้นตอนที่ 2: ใส่คลังแพลตฟอร์ม Google ในหน้าเว็บ
ใส่สคริปต์ต่อไปนี้ซึ่งแสดงฟังก์ชันที่ไม่ระบุชื่อซึ่งแทรกสคริปต์ลงใน DOM ของหน้าเว็บ index.html นี้
<!-- The top of file index.html -->
<html itemscope itemtype="http://schema.org/Article">
<head>
  <!-- BEGIN Pre-requisites -->
  <script src="//ajax.googleapis.com/ajax/libs/jquery/1.8.2/jquery.min.js">
  </script>
  <script src="https://apis.google.com/js/client:platform.js?onload=start" async defer>
  </script>
  <!-- END Pre-requisites -->
ขั้นตอนที่ 3: เริ่มต้นออบเจ็กต์ GoogleAuth
โหลดไลบรารี auth2 และเรียกใช้ gapi.auth2.init() เพื่อเริ่มต้นการทำงานของออบเจ็กต์ GoogleAuth ระบุรหัสไคลเอ็นต์และขอบเขตที่ต้องการขอเมื่อเรียกใช้ init()
<!-- Continuing the <head> section -->
  <script>
    function start() {
      gapi.load('auth2', function() {
        auth2 = gapi.auth2.init({
          client_id: 'YOUR_CLIENT_ID.apps.googleusercontent.com',
          // Scopes to request in addition to 'profile' and 'email'
          //scope: 'additional_scope'
        });
      });
    }
  </script>
</head>
<body>
  <!-- ... -->
</body>
</html>
ขั้นตอนที่ 4: เพิ่มปุ่มลงชื่อเข้าใช้ลงในหน้าเว็บ
เพิ่มปุ่มลงชื่อเข้าใช้ลงในหน้าเว็บ แล้วแนบตัวแฮนเดิลการคลิกเพื่อเรียกใช้ grantOfflineAccess() เพื่อเริ่มขั้นตอนการรับรหัสผ่านแบบครั้งเดียว
<!-- Add where you want your sign-in button to render -->
<!-- Use an image that follows the branding guidelines in a real app -->
<button id="signinButton">Sign in with Google</button>
<script>
  $('#signinButton').click(function() {
    // signInCallback defined in step 6.
    auth2.grantOfflineAccess().then(signInCallback);
  });
</script>
ขั้นตอนที่ 5: ลงชื่อเข้าใช้ผู้ใช้
ผู้ใช้คลิกปุ่มลงชื่อเข้าใช้และอนุญาตให้แอปของคุณเข้าถึงสิทธิ์ที่คุณขอ จากนั้นระบบจะส่งออบเจ็กต์ JSON ที่มีรหัสการให้สิทธิ์ไปยังฟังก์ชัน Callback ที่คุณระบุไว้ในเมธอด grantOfflineAccess().then() เช่น
{"code":"4/yU4cQZTMnnMtetyFcIWNItG32eKxxxgXXX-Z4yyJJJo.4qHskT-UtugceFc0ZRONyF4z7U4UmAI"}
ขั้นตอนที่ 6: ส่งรหัสการให้สิทธิ์ไปยังเซิร์ฟเวอร์
code คือรหัสแบบครั้งเดียวที่เซิร์ฟเวอร์สามารถแลกเปลี่ยนเพื่อรับโทเค็นการเข้าถึงและโทเค็นสำหรับรีเฟรชของตนเอง คุณจะได้รับโทเค็นรีเฟรชก็ต่อเมื่อผู้ใช้เห็นกล่องโต้ตอบการให้สิทธิ์ที่ขอสิทธิ์เข้าถึงแบบออฟไลน์
หากคุณระบุ select-account prompt ใน OfflineAccessOptions ในขั้นตอนที่ 4 คุณต้องจัดเก็บโทเค็นรีเฟรชที่คุณดึงข้อมูลไว้เพื่อใช้ภายหลังเนื่องจากการเปลี่ยนโทเค็นครั้งต่อๆ ไปจะแสดงผล null สำหรับโทเค็นรีเฟรช ขั้นตอนนี้จะเพิ่มความปลอดภัยให้กับขั้นตอน OAuth 2.0 มาตรฐาน
ระบบจะแสดงโทเค็นการเข้าถึงเสมอเมื่อมีการแลกเปลี่ยนรหัสการให้สิทธิ์ที่ถูกต้อง
สคริปต์ต่อไปนี้จะกำหนดฟังก์ชันการเรียกกลับสำหรับปุ่มลงชื่อเข้าใช้ เมื่อลงชื่อเข้าใช้สำเร็จ ฟังก์ชันจะจัดเก็บโทเค็นการเข้าถึงไว้เพื่อใช้งานฝั่งไคลเอ็นต์และส่งรหัสแบบครั้งเดียวไปยังเซิร์ฟเวอร์ในโดเมนเดียวกัน
<!-- Last part of BODY element in file index.html -->
<script>
function signInCallback(authResult) {
  if (authResult['code']) {

    // Hide the sign-in button now that the user is authorized, for example:
    $('#signinButton').attr('style', 'display: none');

    // Send the code to the server
    $.ajax({
      type: 'POST',
      url: 'http://example.com/storeauthcode',
      // Always include an `X-Requested-With` header in every AJAX request,
      // to protect against CSRF attacks.
      headers: {
        'X-Requested-With': 'XMLHttpRequest'
      },
      contentType: 'application/octet-stream; charset=utf-8',
      success: function(result) {
        // Handle or verify the server response.
      },
      processData: false,
      data: authResult['code']
    });
  } else {
    // There was an error.
  }
}
</script>
ขั้นตอนที่ 7: เปลี่ยนรหัสการให้สิทธิ์เป็นโทเค็นการเข้าถึง
แลกเปลี่ยนรหัสการให้สิทธิ์เป็นโทเค็นการเข้าถึงและโทเค็นรีเฟรชในเซิร์ฟเวอร์ ใช้โทเค็นการเข้าถึงเพื่อเรียกใช้ Google API ในนามของผู้ใช้ และอาจจัดเก็บโทเค็นการรีเฟรชเพื่อรับโทเค็นการเข้าถึงใหม่เมื่อโทเค็นการเข้าถึงหมดอายุ
หากขอสิทธิ์เข้าถึงโปรไฟล์ คุณจะได้รับโทเค็นระบุตัวตนที่มีข้อมูลโปรไฟล์พื้นฐานของผู้ใช้ด้วย
เช่น
Java
// (Receive authCode via HTTPS POST)


if (request.getHeader("X-Requested-With") == null) {
  // Without the `X-Requested-With` header, this request could be forged. Aborts.
}

// Set path to the Web application client_secret_*.json file you downloaded from the
// Google API Console: https://console.cloud.google.com/apis/credentials
// You can also find your Web application client ID and client secret from the
// console and specify them directly when you create the GoogleAuthorizationCodeTokenRequest
// object.
String CLIENT_SECRET_FILE = "/path/to/client_secret.json";

// Exchange auth code for access token
GoogleClientSecrets clientSecrets =
    GoogleClientSecrets.load(
        JacksonFactory.getDefaultInstance(), new FileReader(CLIENT_SECRET_FILE));
GoogleTokenResponse tokenResponse =
          new GoogleAuthorizationCodeTokenRequest(
              new NetHttpTransport(),
              JacksonFactory.getDefaultInstance(),
              "https://oauth2.googleapis.com/token",
              clientSecrets.getDetails().getClientId(),
              clientSecrets.getDetails().getClientSecret(),
              authCode,
              REDIRECT_URI)  // Specify the same redirect URI that you use with your web
                             // app. If you don't have a web version of your app, you can
                             // specify an empty string.
              .execute();

String accessToken = tokenResponse.getAccessToken();

// Use access token to call API
GoogleCredential credential = new GoogleCredential().setAccessToken(accessToken);
Drive drive =
    new Drive.Builder(new NetHttpTransport(), JacksonFactory.getDefaultInstance(), credential)
        .setApplicationName("Auth Code Exchange Demo")
        .build();
File file = drive.files().get("appfolder").execute();

// Get profile info from ID token
GoogleIdToken idToken = tokenResponse.parseIdToken();
GoogleIdToken.Payload payload = idToken.getPayload();
String userId = payload.getSubject();  // Use this value as a key to identify a user.
String email = payload.getEmail();
boolean emailVerified = Boolean.valueOf(payload.getEmailVerified());
String name = (String) payload.get("name");
String pictureUrl = (String) payload.get("picture");
String locale = (String) payload.get("locale");
String familyName = (String) payload.get("family_name");
String givenName = (String) payload.get("given_name");
Python
from apiclient import discovery
import httplib2
from oauth2client import client

# (Receive auth_code by HTTPS POST)


# If this request does not have `X-Requested-With` header, this could be a CSRF
if not request.headers.get('X-Requested-With'):
    abort(403)

# Set path to the Web application client_secret_*.json file you downloaded from the
# Google API Console: https://console.cloud.google.com/apis/credentials
CLIENT_SECRET_FILE = '/path/to/client_secret.json'

# Exchange auth code for access token, refresh token, and ID token
credentials = client.credentials_from_clientsecrets_and_code(
    CLIENT_SECRET_FILE,
    ['https://www.googleapis.com/auth/drive.appdata', 'profile', 'email'],
    auth_code)

# Call Google API
http_auth = credentials.authorize(httplib2.Http())
drive_service = discovery.build('drive', 'v3', http=http_auth)
appfolder = drive_service.files().get(fileId='appfolder').execute()

# Get profile info from ID token
userid = credentials.id_token['sub']
email = credentials.id_token['email']

