向地图添加多边形
使用集合让一切井井有条
根据您的偏好保存内容并对其进行分类。
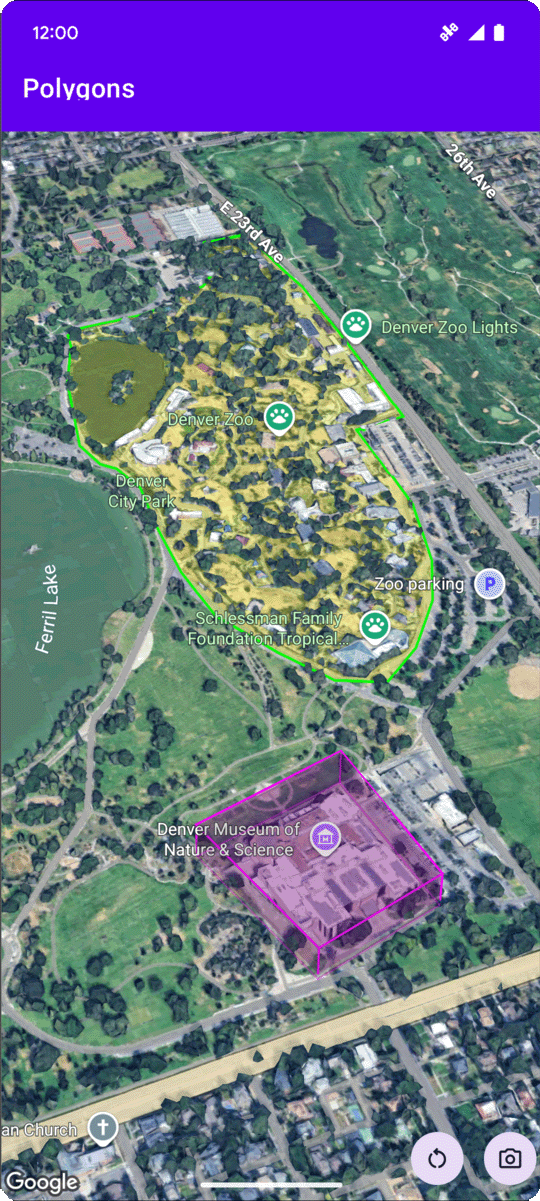
以下代码示例演示了如何通过调用 addPolygon
方法添加 3D 多边形并将其放置在 3D 空间中。如需使用此代码示例,请按照设置和向应用添加 3D 地图中的说明,使用基本 3D 地图设置 Android Studio 项目。然后,将以下代码添加到 MainActivity.kt
文件中:
// Add imports and define variables
import com.google.android.gms.maps3d.model.LatLngAltitude
import com.google.android.gms.maps3d.model.polygonOptions
val zooOutline = """
39.7508987, -104.9565381
39.7502883, -104.9565489
39.7501976, -104.9563557
39.7501481, -104.955594
39.7499171, -104.9553043
39.7495872, -104.9551648
39.7492407, -104.954961
39.7489685, -104.9548859
39.7484488, -104.9548966
39.7481189, -104.9548859
39.7479539, -104.9547679
39.7479209, -104.9544567
39.7476487, -104.9535341
39.7475085, -104.9525792
39.7474095, -104.9519247
39.747525, -104.9513776
39.7476734, -104.9511844
39.7478137, -104.9506265
39.7477559, -104.9496395
39.7477477, -104.9486203
39.7478467, -104.9475796
39.7482344, -104.9465818
39.7486138, -104.9457878
39.7491005, -104.9454874
39.7495789, -104.945938
39.7500491, -104.9466998
39.7503213, -104.9474615
39.7505358, -104.9486954
39.7505111, -104.950648
39.7511215, -104.9506587
39.7511173, -104.9527187
39.7511091, -104.9546445
39.7508987, -104.9565381""".trimIndent()
.split("\n")
.map { line -> line.split(",").map { it.trim().toDouble() } }
.map { coords ->
latLngAltitude {
latitude = coords[0]
longitude = coords[1]
altitude = 0.0
}
}
val zooPolygonOptions = polygonOptions {
outerCoordinates = zooOutline
fillColor = Color.argb(70, 255, 255, 0)
strokeColor = Color.GREEN
strokeWidth = 3.0
altitudeMode = AltitudeMode.CLAMP_TO_GROUND
}
val zooPolygon = googleMap3D.addPolygon(zooPolygonOptions)
...
// Add to the onMap3DViewReady method, after the googleMap3D object has been initialized
googleMap3D.setCamera(
camera {
center = latLngAltitude {
latitude = 39.748477
longitude = -104.947575
altitude = 1610.0
}
heading = 290.0
tilt = 47.0
range = 2251.0
}
)
如未另行说明,那么本页面中的内容已根据知识共享署名 4.0 许可获得了许可,并且代码示例已根据 Apache 2.0 许可获得了许可。有关详情,请参阅 Google 开发者网站政策。Java 是 Oracle 和/或其关联公司的注册商标。
最后更新时间 (UTC):2025-08-31。
[null,null,["最后更新时间 (UTC):2025-08-31。"],[],[],null,["# Add a polygon to a map\n\nSelect platform: [Android](/maps/documentation/maps-3d/android-sdk/add-polygons \"View this page for the Android platform docs.\") [iOS](/maps/documentation/maps-3d/ios-sdk/add-polygons \"View this page for the iOS platform docs.\")\n\n\u003cbr /\u003e\n\n| This product or feature is Experimental (pre-GA). Pre-GA products and features might have limited support, and changes to pre-GA products and features might not be compatible with other pre-GA versions. Pre-GA Offerings are covered by the [Google\n| Maps Platform Service Specific Terms](https://cloud.google.com/maps-platform/terms/maps-service-terms). For more information, see the [launch stage descriptions](/maps/launch-stages).\n\nThe following code sample demonstrates how to add a 3D polygon and position\nit in 3D space by calling the\n[`addPolygon`](/maps/documentation/maps-3d/android-sdk/reference/com/google/android/gms/maps3d/GoogleMap3D#addPolygon(com.google.android.gms.maps3d.model.PolygonOptions))\nmethod. To use this code sample, follow the instructions in\n[Setup](/maps/documentation/maps-3d/android-sdk/setup) and\n[Add a 3D map to your app](/maps/documentation/maps-3d/android-sdk/add-a-3d-map)\nto set up your Android Studio project with a basic 3D map. Then, add the following code to the\n**`MainActivity.kt`** file: \n\n```kotlin\n// Add imports and define variables\nimport com.google.android.gms.maps3d.model.LatLngAltitude\nimport com.google.android.gms.maps3d.model.polygonOptions\n\nval zooOutline = \"\"\"\n 39.7508987, -104.9565381\n 39.7502883, -104.9565489\n 39.7501976, -104.9563557\n 39.7501481, -104.955594\n 39.7499171, -104.9553043\n 39.7495872, -104.9551648\n 39.7492407, -104.954961\n 39.7489685, -104.9548859\n 39.7484488, -104.9548966\n 39.7481189, -104.9548859\n 39.7479539, -104.9547679\n 39.7479209, -104.9544567\n 39.7476487, -104.9535341\n 39.7475085, -104.9525792\n 39.7474095, -104.9519247\n 39.747525, -104.9513776\n 39.7476734, -104.9511844\n 39.7478137, -104.9506265\n 39.7477559, -104.9496395\n 39.7477477, -104.9486203\n 39.7478467, -104.9475796\n 39.7482344, -104.9465818\n 39.7486138, -104.9457878\n 39.7491005, -104.9454874\n 39.7495789, -104.945938\n 39.7500491, -104.9466998\n 39.7503213, -104.9474615\n 39.7505358, -104.9486954\n 39.7505111, -104.950648\n 39.7511215, -104.9506587\n 39.7511173, -104.9527187\n 39.7511091, -104.9546445\n 39.7508987, -104.9565381\"\"\".trimIndent()\n .split(\"\\n\")\n .map { line -\u003e line.split(\",\").map { it.trim().toDouble() } }\n .map { coords -\u003e\n latLngAltitude {\n latitude = coords[0]\n longitude = coords[1]\n altitude = 0.0\n }\n }\n\nval zooPolygonOptions = polygonOptions {\n outerCoordinates = zooOutline\n fillColor = Color.argb(70, 255, 255, 0)\n strokeColor = Color.GREEN\n strokeWidth = 3.0\n altitudeMode = AltitudeMode.CLAMP_TO_GROUND\n}\n\nval zooPolygon = googleMap3D.addPolygon(zooPolygonOptions)\n\n...\n\n// Add to the onMap3DViewReady method, after the googleMap3D object has been initialized\ngoogleMap3D.setCamera(\n camera {\n center = latLngAltitude {\n latitude = 39.748477\n longitude = -104.947575\n altitude = 1610.0\n }\n heading = 290.0\n tilt = 47.0\n range = 2251.0\n }\n)\n```"]]