
Vous pouvez utiliser le SDK grand public pour créer et exécuter une application grand public de base intégrée aux services de backend de la solution On-demand Rides and Deliveries. Vous pouvez créer une application de progression des trajets et des commandes capable d'afficher un trajet actif, de répondre aux mises à jour des trajets et de gérer les erreurs.
Comme le SDK Consumer possède une architecture modulaire, vous pouvez utiliser les parties de l'API que vous souhaitez utiliser pour votre application et les intégrer à vos propres API, services de backend fournis par Fleet Engine et API supplémentaires de Google Maps Platform.
Configuration système minimale requise
Configuration du projet
Gestionnaire de paquets Swift
Le SDK grand public peut être installé via Swift Package Manager. Pour ajouter le SDK, assurez-vous d'avoir supprimé toutes les dépendances existantes du SDK grand public.
Pour ajouter le SDK à un projet nouveau ou existant, procédez comme suit:
-
Ouvrez Xcode
projectouworkspace, puis accédez à File > Add Package Dependencies (Fichier > Ajouter des dépendances de packages). - Saisissez https://github.com/googlemaps/ios-consumer-sdk comme URL, appuyez sur Entrée pour extraire le package, puis cliquez sur "Ajouter le package".
-
Pour installer un
versionspécifique, définissez le champ Règle de dépendance sur l'une des options basées sur la version. Pour les nouveaux projets, nous vous recommandons de spécifier la dernière version et d'utiliser l'option "Version exacte". Une fois l'opération terminée, cliquez sur "Ajouter un package". -
Dans la fenêtre Choose Package Products (Sélectionner des produits de package), vérifiez que
GoogleRidesharingConsumersera ajouté à la ciblemaindésignée. Une fois l'opération terminée, cliquez sur "Ajouter un package". -
Pour vérifier votre installation, accédez au volet
Generalde votre cible. Les packages installés devraient s'afficher dans Cadres, bibliothèques et contenu intégré. Vous pouvez également afficher la section "Dépendances des packages" du "Navigateur de projets" pour vérifier le package et sa version.
Pour mettre à jour le package pour un projet existant, procédez comme suit:
Si vous effectuez une mise à niveau à partir d'une version antérieure à la version 9.0.0, vous devez supprimer les dépendances suivantes:
GoogleMapsBase,GoogleMapsCoreetGoogleMapsM4Baprès la mise à niveau. Ne supprimez pas la dépendance deGoogleMaps. Pour en savoir plus, consultez les notes de version de la version 9.0.0.Dans les paramètres de configuration de votre projet Xcode, recherchez Cadres, bibliothèques et contenu intégré. Utilisez le signe moins(-) pour supprimer le framework suivant:
GoogleMapsBase(uniquement pour les mises à niveau à partir de versions antérieures à la version 9.0.0)GoogleMapsCore(uniquement pour les mises à niveau à partir de versions antérieures à la version 9.0.0)GoogleMapsM4B(uniquement pour les mises à niveau à partir de versions antérieures à la version 9.0.0)
- Depuis Xcode, accédez à "File > Packages > Update To Latest Package Versions" (Fichier > Packages > Mettre à jour vers les dernières versions de packages).
- Pour vérifier votre installation, accédez à la section Dépendances des packages du Navigateur de projets pour vérifier le package et sa version.
Pour supprimer les dépendances existantes du SDK client ajoutées à l'aide de CocoaPods, procédez comme suit:
- Fermez votre espace de travail Xcode. Ouvrez le terminal et exécutez la commande suivante :
sudo gem install cocoapods-deintegrate cocoapods-clean
pod deintegrate
pod cache clean --all
-
Supprimez les éléments
Podfile,Podfile.resolvedet Xcodeworkspacesi vous ne les utilisez pas pour d'autres produits que CocoaPods.
Pour supprimer manuellement le SDK client existant, procédez comme suit:
Dans les paramètres de configuration de votre projet Xcode, recherchez Frameworks, Bibliothèques et Contenu intégré. Utilisez le signe moins
(-)pour supprimer le framework suivant:GoogleRidesharingConsumer.xcframework
Dans le répertoire de premier niveau de votre projet Xcode, supprimez le bundle
GoogleRidesharingConsumer.
CocoaPods
Pour configurer le SDK client à l'aide de CocoaPods, vous avez besoin des éléments suivants:
Outil CocoaPods: pour installer cet outil, ouvrez le terminal et exécutez la commande suivante.
sudo gem install cocoapods
Pour en savoir plus, consultez le guide de démarrage de CocoaPods.
Créez un fichier Podfile pour le SDK client et utilisez-le pour installer l'API et ses dépendances. Commencez par créer un fichier nommé Podfile dans le répertoire de votre projet. Ce fichier définit les dépendances de votre projet. Ensuite, modifiez le Podfile et ajoutez vos dépendances. Voici un exemple qui inclut les dépendances:
  source "https://github.com/CocoaPods/Specs.git"

  target 'YOUR_APPLICATION_TARGET_NAME_HERE' do
    pod 'GoogleRidesharingConsumer'
  end
Enregistrez le Podfile. Ouvrez un terminal et accédez au répertoire contenant le fichier Podfile:
cd <path-to-project>Exécutez la commande d'installation du pod. Cette action installera les API spécifiées dans le Podfile, ainsi que toutes les dépendances qu'elles peuvent avoir.
pod installFermez Xcode, puis ouvrez (double-cliquez) le fichier .xcworkspace de votre projet pour lancer Xcode. Pour ouvrir le projet ultérieurement, utilisez le fichier .xcworkspace.
Installation manuelle
Un XCFramework est un package binaire que vous utilisez pour installer le SDK Consumer. Vous pouvez utiliser ce package sur plusieurs plates-formes, y compris sur des machines utilisant le chipset M1. Ce guide explique comment ajouter manuellement le XCFramework contenant le SDK grand public à votre projet et comment configurer vos paramètres de compilation dans Xcode.
Téléchargez le binaire du SDK et ses ressources:
Décompressez les fichiers compressés pour accéder au XCFramework et aux ressources.
Démarrez Xcode, puis ouvrez un projet existant ou créez-en un. Si vous débutez avec iOS, créez un projet et sélectionnez le modèle d'application iOS.
Créez un groupe Frameworks sous votre groupe de projets s'il n'en existe pas déjà un.
Pour installer le SDK grand public, faites glisser le fichier
GoogleRidesharingConsumer.xcframeworkdans votre projet sous Cadres, bibliothèques et contenu intégré. Lorsque vous y êtes invité, sélectionnez "Copier les éléments si nécessaire".Faites glisser le fichier
GoogleRidesharingConsumer.bundletéléchargé dans le répertoire de premier niveau de votre projet Xcode. Lorsque vous y êtes invité, sélectionnezCopy items if needed.Sélectionnez votre projet dans le navigateur de projets, puis choisissez la cible de votre application.
Ouvrez l'onglet "Build Phases" (Phases de compilation) et, dans la section "Link Binary with libraries", ajoutez les frameworks et bibliothèques suivants s'ils ne sont pas déjà présents:
Accelerate.frameworkCoreData.frameworkCoreGraphics.frameworkCoreImage.frameworkCoreLocation.frameworkCoreTelephony.frameworkCoreText.frameworkGLKit.frameworkImageIO.frameworklibc++.tbdlibz.tbdMetal.frameworkOpenGLES.frameworkQuartzCore.frameworkSystemConfiguration.frameworkUIKit.framework
Choisissez votre projet plutôt qu'une cible spécifique, puis ouvrez l'onglet Build Settings (Paramètres de compilation). Dans la section Other Linker Flags (Autres indicateurs Linker), ajoutez
-ObjCpour le débogage et la version. Si ces paramètres ne sont pas visibles, modifiez le filtre de la barre des paramètres de compilation en remplaçant Standard par Tous.
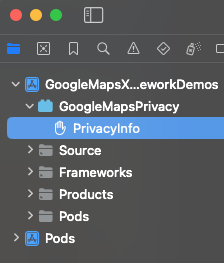
Ajouter un fichier manifeste de confidentialité Apple
Apple exige des informations sur la confidentialité des applications disponibles sur l'App Store. Pour obtenir des mises à jour et d'autres informations, consultez la page Informations sur la confidentialité sur l'App Store d'Apple.
- Téléchargez le fichier manifeste de confidentialité pour le SDK grand public pour iOS: GoogleRidesharingConsumerPrivacy.
- Extrayez le fichier pour accéder à
GoogleRidesharingConsumerPrivacy.bundle. - Ajoutez
GoogleRidesharingConsumerPrivacy.bundleau navigateur du projet Xcode en utilisant l'une de ces méthodes. Assurez-vous que la case "Ajouter aux cibles" est cochée pour la cible de votre application. Une fois ajouté, le fichier PrivacyInfo s'affiche dans le navigateur de projets, et vous pouvez inspecter les valeurs. - Pour vérifier que le fichier manifeste de confidentialité a bien été ajouté, créez une archive de votre application et générez un rapport sur la confidentialité à partir de cette archive.
Intégration d'applications
Fournir un jeton d'authentification
Lorsque votre application consommateur demande des mises à jour de trajet à Fleet Engine, les requêtes doivent inclure des jetons d'accès valides. Pour autoriser et authentifier ces requêtes, le SDK grand public appelle votre objet conformément au protocole GMTCAuthorization. L'objet est chargé de fournir le jeton d'accès requis.
En tant que développeur de l'application, vous choisissez la façon dont les jetons sont générés. Votre implémentation doit permettre d'effectuer les opérations suivantes:
- Extrayez un jeton d'accès, éventuellement au format JSON, à partir d'un serveur HTTPS.
- Analyser et mettre en cache le jeton.
- Actualisez le jeton lorsqu'il expire.
Pour en savoir plus sur les jetons attendus par le serveur Fleet Engine, consultez la section Créer un jeton Web JSON (JWT) pour l'autorisation.
L'ID du fournisseur est identique à l'ID du projet Google Cloud. Pour en savoir plus, consultez la page Premiers pas avec Fleet Engine.
L'exemple suivant met en œuvre un fournisseur de jetons d'accès:
Swift
/*

    *   SampleAccessTokenProvider.swift
 */
import GoogleRidesharingConsumer

private let providerURL = "INSERT_YOUR_TOKEN_PROVIDER_URL"

class SampleAccessTokenProvider: NSObject, GMTCAuthorization {
  private struct AuthToken {
    // The cached trip token.
    let token: String
    // Keep track of when the token expires for caching.
    let expiration: TimeInterval
    // Keep track of the trip ID the cached token is for.
    let tripID: String
  }

  enum AccessTokenError: Error {
    case missingAuthorizationContext
    case missingData
  }

  private var authToken: AuthToken?

  func fetchToken(
    with authorizationContext: GMTCAuthorizationContext?,
    completion: @escaping GMTCAuthTokenFetchCompletionHandler
  ) {
    // Get the trip ID from the authorizationContext. This is set by the Consumer SDK.
    guard let authorizationContext = authorizationContext else {
      completion(nil, AccessTokenError.missingAuthorizationContext)
      return
    }
    let tripID = authorizationContext.tripID

    // If appropriate, use the cached token.
    if let authToken = authToken,
      authToken.expiration > Date.now.timeIntervalSince1970 && authToken.tripID == tripID
    {
      completion(authToken.token, nil)
      return
    }

    // Otherwise, try to fetch a new token from your server.
    let request = URLRequest(url: URL(string: providerURL))
    let task = URLSession.shared.dataTask(with: request) { [weak self] data, _, error in
      guard let strongSelf = self else { return }
      guard error == nil else {
        completion(nil, error)
        return
      }

      // Replace the following key values with the appropriate keys based on your
      // server's expected response.
      let tripTokenKey = "TRIP_TOKEN_KEY"
      let tokenExpirationKey = "TOKEN_EXPIRATION"
      guard let data = data,
        let fetchData = try? JSONSerialization.jsonObject(with: data) as? [String: Any],
        let token = fetchData[tripTokenKey] as? String,
        let expiration = fetchData[tokenExpirationKey] as? Double
      else {
        completion(nil, AccessTokenError.missingData)
        return
      }

      strongSelf.authToken = AuthToken(token: token, expiration: expiration, tripID: tripID)
      completion(token, nil)
    }
    task.resume()
  }
}
Objective-C
/*

    *   SampleAccessTokenProvider.h
 */
#import <Foundation/Foundation.h>
#import <GoogleRidesharingConsumer/GoogleRidesharingConsumer.h>

NS_ASSUME_NONNULL_BEGIN

@interface SampleAccessTokenProvider : NSObject <GMTCAuthorization>

@end

NS_ASSUME_NONNULL_END

/*

    *   SampleAccessTokenProvider.m
 */
#import "SampleAccessTokenProvider.h"
#import "GoogleRidesharingConsumer/GoogleRidesharingConsumer.h"

static NSString *const PROVIDER_URL = @"INSERT_YOUR_TOKEN_PROVIDER_URL";

// SampleAccessTokenProvider.m
@implementation SampleAccessTokenProvider {
  // The cached token with claims to the current trip.
  NSString *_cachedTripToken;
  // Keep track of the Trip ID the cached token is for.
  NSString *_lastKnownTripID;
  // Keep track of when tokens expire for caching.
  NSTimeInterval _tokenExpiration;
}

-   (void)fetchTokenWithContext:(nullable GMTCAuthorizationContext *)authorizationContext
                   completion:(nonnull GMTCAuthTokenFetchCompletionHandler)completion {
  // Get the trip ID from the authorizationContext. This is set by the Consumer SDK.
  NSString *tripID = authorizationContext.tripID;

  // Clear cached trip token if trip ID has changed.
  if (![_lastKnownTripID isEqual:tripID]) {
    _tokenExpiration = 0.0;
    _cachedTripToken = nil;
  }
  _lastKnownTripID = tripID;

  // Clear cached tripToken if it has expired.
  if ([[NSDate date] timeIntervalSince1970] > _tokenExpiration) {
    _cachedTripToken = nil;
  }

  // If appropriate, use the cached token.
  if (_cachedTripToken) {
    completion(_cachedTripToken, nil);
    return;
  }
  // Otherwise, try to fetch a new token from your server.
  NSURL *requestURL = [NSURL URLWithString:PROVIDER_URL];
  NSMutableURLRequest *request =
      [[NSMutableURLRequest alloc] initWithURL:requestURL];
  request.HTTPMethod = @"GET";

  // Replace the following key values with the appropriate keys based on your
  // server's expected response.
  NSString *tripTokenKey = @"TRIP_TOKEN_KEY";
  NSString *tokenExpirationKey = @"TOKEN_EXPIRATION";

  __weak typeof(self) weakSelf = self;
  void (^handler)(NSData *_Nullable data, NSURLResponse *_Nullable response,
                  NSError *_Nullable error) =
      ^(NSData *_Nullable data, NSURLResponse *_Nullable response, NSError *_Nullable error) {
        typeof(self) strongSelf = weakSelf;
        if (error) {
          completion(nil, error);
          return;
        }

        NSError *JSONError;
        NSMutableDictionary *JSONResponse =
            [NSJSONSerialization JSONObjectWithData:data options:kNilOptions error:&JSONError];

        if (JSONError) {
          completion(nil, JSONError);
          return;
        } else {
          // Sample code only. No validation logic.
          id expirationData = JSONResponse[tokenExpirationKey];
          if ([expirationData isKindOfClass:[NSNumber class]]) {
            NSTimeInterval expirationTime = ((NSNumber *)expirationData).doubleValue;
            strongSelf->_tokenExpiration = [[NSDate date] timeIntervalSince1970] + expirationTime;
          }
          strongSelf->_cachedTripToken = JSONResponse[tripTokenKey];
          completion(JSONResponse[tripTokenKey], nil);
        }
      };
  NSURLSessionConfiguration *config = [NSURLSessionConfiguration defaultSessionConfiguration];
  NSURLSession *mainQueueURLSession =
      [NSURLSession sessionWithConfiguration:config delegate:nil
                               delegateQueue:[NSOperationQueue mainQueue]];
  NSURLSessionDataTask *task = [mainQueueURLSession dataTaskWithRequest:request completionHandler:handler];
  [task resume];
}

@end
Initialisation de l'application
Swift
/*

    *   AppDelegate.swift
 */
import GoogleRidesharingConsumer
import GoogleMaps

@UIApplicationMain
class AppDelegate: UIResponder, UIApplicationDelegate {

  func application(_ application: UIApplication,
      didFinishLaunchingWithOptions launchOptions: [UIApplication.LaunchOptionsKey: Any]?) -> Bool {
    // Register your API key for GMSServices.
    GMSServices.provideAPIKey(yourMapsAPIKey)

    // Set the instance of the SampleAccessTokenProvider.
    GMTCServices.setAccessTokenProvider(SampleAccessTokenProvider(), providerID: yourProviderID)

    // Other initialization code ...
    return true
  }
}
Objective-C
/*

    *   AppDelegate.m
 */
#import <GoogleMaps/GoogleMaps.h>
#import <GoogleRidesharingConsumer/GoogleRidesharingConsumer.h>

@implementation AppDelegate

-   (BOOL)application:(UIApplication *)application
    didFinishLaunchingWithOptions:(NSDictionary *)launchOptions {
  //Register your API key for GMSServices.
  [GMSServices provideAPIKey:yourMapsAPIKey];

  //Set the instance of the AccessTokenFactory.
  [GMTCServices setAccessTokenProvider:[[SampleAccessTokenProvider alloc] init]
                            providerID:yourProviderID];

  // Other initialization code ...
  return YES;
}

@end
Intégration de la vue plan
Initialiser la vue plan
L'exemple suivant montre comment initialiser GMTCMapView.
Swift
/*

    *   MapViewController.swift
 */
class ViewController: UIViewController, GMTCMapViewDelegate {
  private var rideSharingMap: GMTCMapView?

  override func viewDidLoad() {
    super.viewDidLoad()

    self.rideSharingMap = GMTCMapView(frame: UIScreen.main.bounds)
    self.rideSharingMap.delegate = self
    self.rideSharingMap?.settings.myLocationButton = true
    self.view.addSubview(self.rideSharingMap!)
    ...
  }
Objective-C
/*

    *   MapViewController.h
 */
@interface MapViewController : UIViewController<GMTCMapViewDelegate>
...
@end

/*

    *   MapViewController.m
 */
@implementation MapViewController

-   (void)viewDidLoad {
  [super viewDidLoad];
  ...
  self.mapView = [[GMTCMapView alloc] initWithFrame:CGRectZero];
  self.mapView.settings.myLocationButton = YES;
  self.mapView.delegate = self;
  ...
}

...

@end
Gérer les événements de vue plan
L'exemple suivant montre comment implémenter un délégué pour gérer les événements d'état client.
Swift
func mapViewDidInitialize(_ mapview: GMTCMapView) {
  // Handle the update to the state of the map view to browsing.
}

func mapView(_ mapView: GMSMapView, didTapConsumerMarker mapMarker: GMSMarker, markerType: GMTCMapViewMarkerType) -> Bool {
  // Handle the mapView marker was tapped.
}
Objective-C
/*

    *   MapViewController.m
 */
#pragma mark - GMTCMapViewDelegate implementation

// Handle state update of map view.

-   (void)mapViewDidInitializeCustomerState:(GMTCMapView *)mapview {
  // Handle the update to the state of the map view to browsing.
}

-   (void)mapView:(GMSMapView *)mapView
    didTapConsumerMarker:(nonnull GMSMarker *)mapMarker
              markerType:(GMTCMapViewMarkerType)markerType {
  // Handle the mapView marker was tapped.
}
Partage de parcours
Démarrer un nouveau trajet lorsque la vue s'est chargée
L'exemple suivant montre comment démarrer un partage de parcours immédiatement après le chargement de la vue. Vous pouvez rassembler toutes les entrées utilisateur, telles que les lieux de dépôt et de prise en charge, à partir d'un ViewController, puis créer un ViewController pour commencer directement le partage du parcours.
Swift
/*

    *   MapViewController.swift
 */
override func viewDidLoad() {
  super.viewDidLoad()
  ...
  self.mapView = GMTCMapView(frame: UIScreen.main.bounds)
  self.mapView.delegate = self
  self.view.addSubview(self.mapView)
}

func mapViewDidInitializeCustomerState(_: GMTCMapView) {
  self.mapView.pickupLocation = self.selectedPickupLocation
  self.mapView.dropoffLocation = self.selectedDropoffLocation

  self.startConsumerMatchWithLocations(
    pickupLocation: self.mapView.pickupLocation!,
    dropoffLocation: self.mapView.dropoffLocation!
  ) { [weak self] (tripName, error) in
    guard let strongSelf = self else { return }
    if error != nil {
      // print error message.
      return
    }
    let tripService = GMTCServices.shared().tripService
    // Create a tripModel instance for listening the update of the trip
    // specified by this trip name.
    let tripModel = tripService.tripModel(forTripName: tripName)
    // Create a journeySharingSession instance based on the tripModel
    let journeySharingSession = GMTCJourneySharingSession(tripModel: tripModel)
    // Add the journeySharingSession instance on the mapView for UI updating.
    strongSelf.mapView.show(journeySharingSession)
    // Register for the trip update events.
    tripModel.register(strongSelf)

    strongSelf.currentTripModel = tripModel
    strongSelf.currentJourneySharingSession = journeySharingSession
    strongSelf.hideLoadingView()
  }

  self.showLoadingView()
}
Objective-C
/*

    *   MapViewController.m
 */
-   (void)viewDidLoad {
  [super viewDidLoad];
  ...
  self.mapView = [[GMTCMapView alloc] initWithFrame:CGRectZero];
  self.mapView.delegate = self;
  [self.view addSubview:self.mapView];
}

// Handle the callback when the GMTCMapView did initialized.

-   (void)mapViewDidInitializeCustomerState:(GMTCMapView *)mapview {
  self.mapView.pickupLocation = self.selectedPickupLocation;
  self.mapView.dropoffLocation = self.selectedDropoffLocation;

  __weak __typeof(self) weakSelf = self;
  [self startTripBookingWithPickupLocation:self.selectedPickupLocation
                           dropoffLocation:self.selectedDropoffLocation
                                completion:^(NSString *tripName, NSError *error) {
                                  __typeof(self) strongSelf = weakSelf;
                                  GMTCTripService *tripService = [GMTCServices sharedServices].tripService;
                                  // Create a tripModel instance for listening to updates to the trip specified by this trip name.
                                  GMTCTripModel *tripModel = [tripService tripModelForTripName:tripName];
                                  // Create a journeySharingSession instance based on the tripModel.
                                  GMTCJourneySharingSession *journeySharingSession =
                                    [[GMTCJourneySharingSession alloc] initWithTripModel:tripModel];
                                  // Add the journeySharingSession instance on the mapView for updating the UI.
                                  [strongSelf.mapView showMapViewSession:journeySharingSession];
                                  // Register for trip update events.
                                  [tripModel registerSubscriber:self];

                                  strongSelf.currentTripModel = tripModel;
                                  strongSelf.currentJourneySharingSession = journeySharingSession;
                                  [strongSelf hideLoadingView];
                                }];
    [self showLoadingView];
}
Annuler le trajet en cours
L'exemple suivant montre comment réinitialiser le trajet actif en cours.
Swift
/*

    *   MapViewController.swift
 */
func cancelCurrentActiveTrip() {
  // Stop the tripModel
  self.currentTripModel.unregisterSubscriber(self)

  // Remove the journey sharing session from the mapView's UI stack.
  self.mapView.hide(journeySharingSession)
}
Objective-C
/*

    *   MapViewController.m
 */
-   (void)cancelCurrentActiveTrip {
  // Stop the tripModel
  [self.currentTripModel unregisterSubscriber:self];

  // Remove the journey sharing session from the mapView's UI stack.
  [self.mapView hideMapViewSession:journeySharingSession];
}
Écouter les informations sur le trajet
L'exemple suivant montre comment enregistrer le rappel tripModel.
Swift
/*

    *   MapViewController.swift
 */
override func viewDidLoad() {
  super.viewDidLoad()
  // Register for trip update events.
  self.currentTripModel.register(self)
}
Objective-C
/*

    *   MapViewController.m
 */
-   (void)viewDidLoad {
  [super viewDidLoad];
  // Register for trip update events.
  [self.currentTripModel registerSubscriber:self];
  ...
}
L'exemple suivant montre comment annuler l'enregistrement du rappel tripModel.
Swift
/*

    *   MapViewController.swift
 */
deinit {
  self.currentTripModel.unregisterSubscriber(self)
}
Objective-C
/*

    *   MapViewController.m
 */
-   (void)dealloc {
  [self.currentTripModel unregisterSubscriber:self];
  ...
}
L'exemple suivant montre comment implémenter le protocole GMTCTripModelSubscriber pour gérer les rappels lorsque l'état du trajet est mis à jour.
Swift
/*

    *   MapViewController.swift
 */
func tripModel(_: GMTCTripModel, didUpdate trip: GMTSTrip?, updatedPropertyFields: GMTSTripPropertyFields) {
  // Update the UI with the new `trip` data.
  self.updateUI(with: trip)
}

func tripModel(_: GMTCTripModel, didUpdate tripStatus: GMTSTripStatus) {
  // Handle trip status did change.
}

func tripModel(_: GMTCTripModel, didUpdateActiveRouteRemainingDistance activeRouteRemainingDistance: Int32) {
  // Handle remaining distance of active route did update.
}

func tripModel(_: GMTCTripModel, didUpdateActiveRoute activeRoute: [GMTSLatLng]?) {
  // Handle trip active route did update.
}

func tripModel(_: GMTCTripModel, didUpdate vehicleLocation: GMTSVehicleLocation?) {
  // Handle vehicle location did update.
}

func tripModel(_: GMTCTripModel, didUpdatePickupLocation pickupLocation: GMTSTerminalLocation?) {
  // Handle pickup location did update.
}

func tripModel(_: GMTCTripModel, didUpdateDropoffLocation dropoffLocation: GMTSTerminalLocation?) {
  // Handle drop off location did update.
}

func tripModel(_: GMTCTripModel, didUpdatePickupETA pickupETA: TimeInterval) {
  // Handle the pickup ETA did update.
}

func tripModel(_: GMTCTripModel, didUpdateDropoffETA dropoffETA: TimeInterval) {
  // Handle the drop off ETA did update.
}

func tripModel(_: GMTCTripModel, didUpdateRemaining remainingWaypoints: [GMTSTripWaypoint]?) {
  // Handle updates to the pickup, dropoff or intermediate destinations of the trip.
}

func tripModel(_: GMTCTripModel, didFailUpdateTripWithError error: Error?) {
  // Handle the error.
}

func tripModel(_: GMTCTripModel, didUpdateIntermediateDestinations intermediateDestinations: [GMTSTerminalLocation]?) {
  // Handle the intermediate destinations being updated.
}

func tripModel(_: GMTCTripModel, didUpdateActiveRouteTraffic activeRouteTraffic: GMTSTrafficData?) {
  // Handle trip active route traffic being updated.
}
Objective-C
/*

    *   MapViewController.m
 */
#pragma mark - GMTCTripModelSubscriber implementation

-   (void)tripModel:(GMTCTripModel *)tripModel
            didUpdateTrip:(nullable GMTSTrip *)trip
    updatedPropertyFields:(enum GMTSTripPropertyFields)updatedPropertyFields {
  // Update the UI with the new `trip` data.
  [self updateUIWithTrip:trip];
  ...
}

-   (void)tripModel:(GMTCTripModel *)tripModel didUpdateTripStatus:(enum GMTSTripStatus)tripStatus {
  // Handle trip status did change.
}

-   (void)tripModel:(GMTCTripModel *)tripModel
    didUpdateActiveRouteRemainingDistance:(int32_t)activeRouteRemainingDistance {
   // Handle remaining distance of active route did update.
}

-   (void)tripModel:(GMTCTripModel *)tripModel
    didUpdateActiveRoute:(nullable NSArray<GMTSLatLng *> *)activeRoute {
  // Handle trip active route did update.
}

-   (void)tripModel:(GMTCTripModel *)tripModel
    didUpdateVehicleLocation:(nullable GMTSVehicleLocation *)vehicleLocation {
  // Handle vehicle location did update.
}

-   (void)tripModel:(GMTCTripModel *)tripModel
    didUpdatePickupLocation:(nullable GMTSTerminalLocation *)pickupLocation {
  // Handle pickup location did update.
}

-   (void)tripModel:(GMTCTripModel *)tripModel
    didUpdateDropoffLocation:(nullable GMTSTerminalLocation *)dropoffLocation {
  // Handle drop off location did update.
}

-   (void)tripModel:(GMTCTripModel *)tripModel didUpdatePickupETA:(NSTimeInterval)pickupETA {
  // Handle the pickup ETA did update.
}

-   (void)tripModel:(GMTCTripModel *)tripModel
    didUpdateRemainingWaypoints:(nullable NSArray<GMTSTripWaypoint *> *)remainingWaypoints {
  // Handle updates to the pickup, dropoff or intermediate destinations of the trip.
}

-   (void)tripModel:(GMTCTripModel *)tripModel didUpdateDropoffETA:(NSTimeInterval)dropoffETA {
  // Handle the drop off ETA did update.
}

-   (void)tripModel:(GMTCTripModel *)tripModel didFailUpdateTripWithError:(nullable NSError *)error {
  // Handle the error.
}

-   (void)tripModel:(GMTCTripModel *)tripModel
    didUpdateIntermediateDestinations:
        (nullable NSArray<GMTSTerminalLocation *> *)intermediateDestinations {
  // Handle the intermediate destinations being updated.
}

-   (void)tripModel:(GMTCTripModel *)tripModel
    didUpdateActiveRouteTraffic:(nullable GMTSTrafficData *)activeRouteTraffic {
  // Handle trip active route traffic being updated.
}
Gestion des exceptions
Si vous vous êtes abonné au tripModel et qu'une erreur se produit, vous pouvez obtenir le rappel de tripModel en implémentant la méthode déléguée tripModel(_:didFailUpdateTripWithError:). Fleet Engine a généré le message d'erreur qui respecte la norme Google Cloud Error Standard. Pour en savoir plus sur la définition du message d'erreur et sur tous les codes d'erreur, consultez la documentation sur les erreurs Google Cloud.
Plus précisément, pour la surveillance des trajets, elle nécessite de fournir un jeton d'authentification valide. 401 UNAUTHENTICATED est déclenché s'il n'y a pas d'identifiants d'authentification valides, par exemple si le jeton a expiré.403 PERMISSION_DENIED est déclenché si l'appelant n'est pas autorisé à appeler une API spécifique (par exemple, si un utilisateur disposant du rôle consommateur tente d'appeler updateTrip), ou si la requête ne contient pas d'ID de véhicule (vehicle_id/trip_id) valide dans un jeton JWT.
Pour en savoir plus, consultez la page Gestion des erreurs du SDK consommateur.
Personnalisation de l'interface utilisateur
Obtenir et définir des options d'interface utilisateur de polyligne personnalisées
L'exemple suivant montre comment définir des options d'interface utilisateur personnalisées pour les polylignes.
Swift
/** MapViewController.swift */

func updatePolylineUIOptions() {
  // The polyline type that you would like to set custom UI options for.
  let customizablePolylineType = GMTCPolylineType.activeRoute

  let polylineStyleOptions = GMTCMutablePolylineStyleOptions()
  polylineStyleOptions.strokeWidth = 8.0
  polylineStyleOptions.strokeColor = .blue
  polylineStyleOptions.isVisible = true
  polylineStyleOptions.zIndex = 1000
  polylineStyleOptions.isGeodesic = true
  let coordinator = self.mapView.consumerMapStyleCoordinator
  coordinator.setPolylineStyleOptions(polylineStyleOptions, polylineType:customizablePolylineType)
}
Objective-C
/** MapViewController.m */

-   (void)updatePolylineUIOptions {
  // The polyline type that you would like to set custom UI options for.
  GMTCPolylineType customizablePolylineType = GMTCPolylineTypeActiveRoute;

  GMTCMutablePolylineStyleOptions *polylineStyleOptions =
      [[GMTCMutablePolylineStyleOptions alloc] init];
  polylineStyleOptions.strokeWidth = 8.0;
  polylineStyleOptions.strokeColor = [UIColor blueColor];
  polylineStyleOptions.isVisible = YES;
  polylineStyleOptions.zIndex = 1000;
  polylineStyleOptions.isGeodesic = YES;
  [[_mapView consumerMapStyleCoordinator] setPolylineStyleOptions:polylineStyleOptions
                                                polylineType:customizablePolylineType];
}
Obtenir et définir des options d'UI personnalisées pour les repères
L'exemple suivant montre comment définir des options d'interface utilisateur personnalisées pour les repères.
Swift
/** MapViewController.swift */

func updateMarkerUIOptions() {
  let customizableMarkerType = GMTCCustomizableMarkerType.tripVehicle
  let markerStyleOptions = GMTCMutableMarkerStyleOptions()
  markerStyleOptions.groundAnchor = groundAnchor
  markerStyleOptions.isVisible = true
  markerStyleOptions.icon = icon
  markerStyleOptions.zIndex = 100
  markerStyleOptions.isFlat = false
  let coordinator = self.mapView.consumerMapStyleCoordinator
  coordinator.setMarkerStyleOptions(markerStyleOptions, markerType: customizableMarkerType)
}
Objective-C
/** MapViewController.m */

-   (void)updateMarkerUIOptions {
  // The marker type that you would like to set custom UI options for.
  GMTCCustomizableMarkerType customizableMarkerType = GMTCCustomizableMarkerTypeTripVehicle;

  GMTCMutableMarkerStyleOptions *markerStyleOptions =
      [[GMTCMutableMarkerStyleOptions alloc] init];
  markerStyleOptions.groundAnchor = groundAnchor;
  markerStyleOptions.isVisible = YES;
  markerStyleOptions.icon = icon;
  markerStyleOptions.zIndex = 100;
  markerStyleOptions.isFlat = NO;

  [[_mapView consumerMapStyleCoordinator] setMarkerStyleOptions:markerStyleOptions markerType:customizableMarkerType];
}
Régler le zoom de la caméra
Le bouton Ma position du SDK Maps pour iOS centre l'appareil photo sur la position de l'appareil.
Si une session de partage de parcours est en cours, vous pouvez centrer la caméra pour vous concentrer sur le trajet plutôt que sur la position de l'appareil uniquement.
Le SDK grand public fournit une fonctionnalité d'appareil photo automatique activée par défaut. La caméra zoome pour se concentrer sur l'itinéraire de partage du trajet et le point de cheminement du trajet suivant.
Si vous avez besoin de mieux contrôler le comportement de la caméra, vous pouvez désactiver ou activer la fonctionnalité de caméra automatique à l'aide de la propriété isAllowCameraAutoUpdate.
Pour en savoir plus sur la personnalisation de l'appareil photo, consultez Déplacer la caméra avec le SDK Maps pour iOS.