Mantieni tutto organizzato con le raccolte
Salva e classifica i contenuti in base alle tue preferenze.
Passaggio 6. Campagna Google Ads
Introduzione e impatto aziendale
Per gli annunci di inventario locale, devi collegare il tuo account Google Ads. Da
Informazioni sull'attività e account per gli annunci di prodotti disponibili localmente, è presente un URL per
collegare il tuo account. Puoi recuperare il tuo account o crearne uno visitando
Google Ads. È elencato nell'angolo in alto a destra dello schermo, accanto a
il profilo del tuo account. Copia e incolla questo numero nel campo Collega un account Google Ads
finestra modale dell'account, quindi seleziona "Invia richiesta di collegamento".
Per le richieste API, devi aggiungere il seguente ambito:
https://www.googleapis.com/auth/adwords
Collega l'account Google Ads in Merchant Center
Puoi collegare o creare un account Google Ads tramite Merchant Center.
Ulteriori dettagli sono disponibili nella guida di assistenza di Merchant Center.
Collega il tuo account Google Ads
Accedi a Google Ads con l'account che contiene il tuo account Google Ads
Campagne.
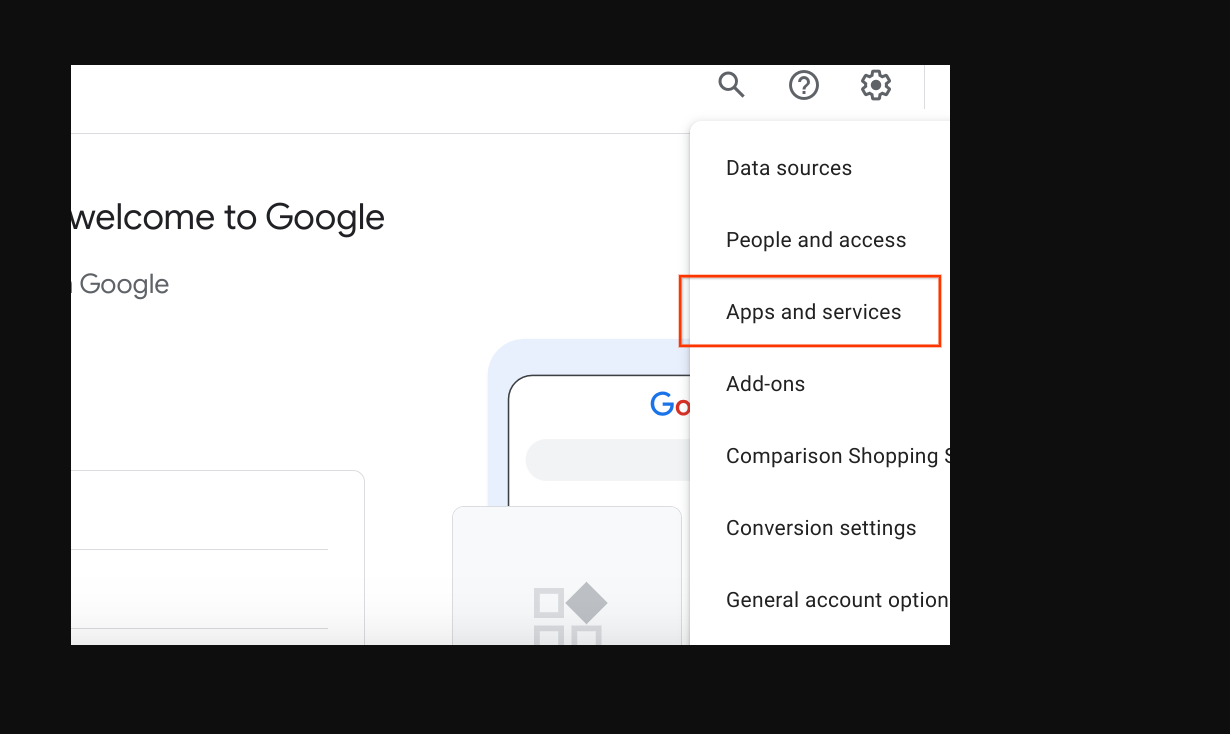
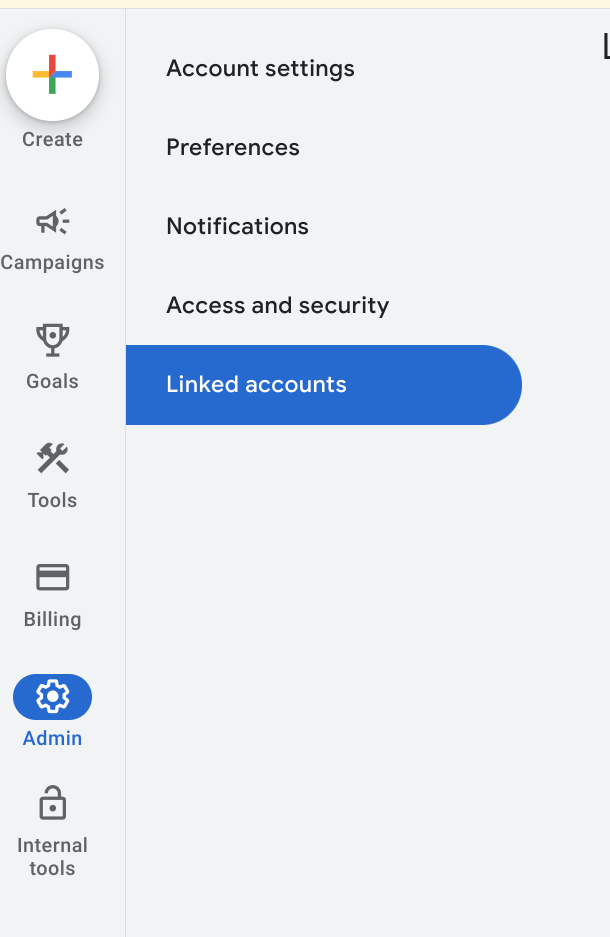
Fai clic sul pulsante "Amministratore" a forma di ingranaggio, quindi seleziona "Account collegati".
Viene visualizzato un elenco di applicazioni a cui puoi collegarti. Se hai collegato
identità dell'account e al momento dell'attivazione degli annunci di inventario locale, Google Merchant Center
dovrebbe essere in alto, con le opzioni Gestisci e Collega. Google Merchant Center è in
all'elenco generale, con "Dettagli" è possibile che tu abbia collegato
l'account sbagliato
ha eseguito l'accesso all'account Google Ads errato o non ha collegato l'account alla
tutti. Visita la sezione Attivare la scheda senza costi degli annunci di inventario locale per
completa questo passaggio. Seleziona "Gestisci e Link".
Collegata
Scollegato
Nella finestra Richieste di collegamento, seleziona "Visualizza richiesta".
Viene visualizzata una finestra modale che fornisce informazioni sull'account
richiedendo il link. Seleziona "Approva".
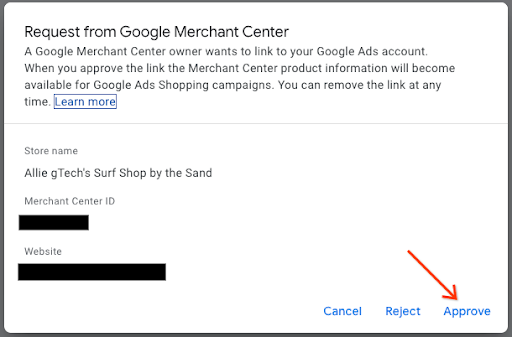
Una volta collegata, la nuova vista mostra l'account collegato con lo stato di
"Collegato".
Visualizzazione google ads
Vista Merchant Center
Crea una campagna di annunci Shopping e attiva i prodotti locali
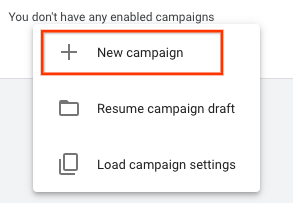
Sul lato sinistro dello schermo, seleziona "Campagne" e poi nella
Nelle finestre delle campagne, seleziona "Crea". Se viene visualizzata una finestra, seleziona
"+ Nuova campagna".
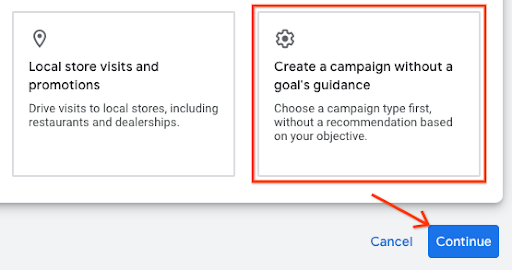
Quando viene visualizzata la schermata di selezione della campagna, seleziona
"Crea una campagna senza un obiettivo". Poi seleziona "Continua".
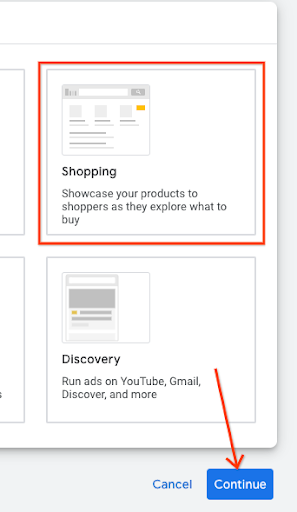
Nella serie di opzioni successiva, seleziona "Shopping" riquadro,
poi seleziona "Continua".
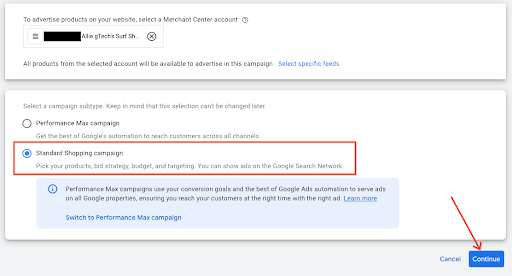
Subito sotto, vengono visualizzate diverse nuove opzioni. Innanzitutto, assicurati che il tuo commerciante
è quello elencato nel campo di testo. Poi seleziona
"Campagna Shopping standard" anziché la campagna Performance Max,
seleziona "Continua".
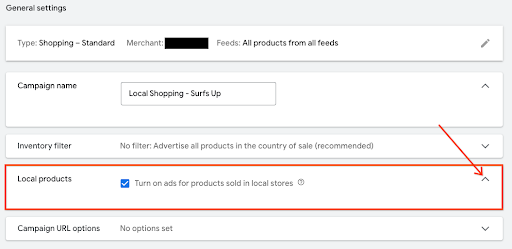
Il menu successivo viene visualizzato sotto Impostazioni generali. Inserisci il nome della campagna,
Quindi, sotto Prodotti locali, fai clic sulla freccia di espansione per espandere il menu. Seleziona la casella
"Attiva gli annunci per prodotti venduti nei negozi locali."
Vai in fondo e seleziona "Crea campagna". Una volta salvate,
la campagna appena creata viene visualizzata
nella schermata della campagna.
Indicazioni per l'esperienza utente
Puoi contribuire a collegare la campagna in anticipo collegandola come parte del commerciante
procedura di raccolta dei dati.
Consulenza tecnica
Per Google Ads, se vuoi utilizzare l'API, assicurati di aver aggiunto
nel seguente ambito:
https://www.googleapis.com/auth/adwords.
Per il collegamento dell'account, utilizzi la seguente richiesta:
ServizioLinkClienteCliente. In questo modo
MutateCustomerClientLinkRequest, che accetta un customer_id.
Puoi creare una nuova campagna in modo programmatico utilizzando
CampaignService.
Per saperne di più su come utilizzare l'API Google Ads, consulta le seguenti pagine
Pagina Librerie client ed esempio.
[null,null,["Ultimo aggiornamento 2025-07-25 UTC."],[[["\u003cp\u003eTo run local inventory ads, link your Google Ads account to your Merchant Center account, ensuring the correct account is selected for a seamless connection.\u003c/p\u003e\n"],["\u003cp\u003eCreate a Standard Shopping campaign in Google Ads and enable local products to display ads for items sold in your physical stores.\u003c/p\u003e\n"],["\u003cp\u003eFor API access, include the \u003ccode\u003ehttps://www.googleapis.com/auth/adwords\u003c/code\u003e scope to manage your Google Ads campaigns programmatically.\u003c/p\u003e\n"],["\u003cp\u003eMerchants can link an advertising account managed by a third party if they don't directly handle their own Google Ads campaigns.\u003c/p\u003e\n"]]],["To utilize local inventory ads, link your Google Ads account in Merchant Center by finding your account number on Google Ads and sending a link request. In Google Ads, navigate to \"Linked Accounts\" under the \"Admin\" settings and \"Approve\" the Merchant Center link request. To create a Shopping Ads campaign, select \"Campaigns\" then \"+New Campaign,\" choose \"Shopping,\" and \"Standard Shopping Campaign\". Finally, enable \"Turn on ads for products sold in local stores\" and create your campaign. For API access, add the `https://www.googleapis.com/auth/adwords` scope.\n"],null,["Step 6: Google Ads Campaign\n---------------------------\n\n### Introduction and Business Impact\n\n*** ** * ** ***\n\nFor local inventory ads, you need to link your Google Ads Account. From the\nBusiness Information and Accounts menu for Local Inventory Ads, there's a URL to\nlink your account. You can retrieve your account or create one by going to\n[Google Ads](https://ads.google.com). It's listed in the top-right corner of the screen next to\nyour account profile. Copy and paste this number in the Link a Google Ads\nAccount modal, then select, \"**Send Link Request**\".\n\nFor API requests, you need to add the following scope: \n\n https://www.googleapis.com/auth/adwords\n\n### Link the Ads Account in Merchant Center\n\nYou can link or create a Google Ads account through Merchant Center.\nMore details are available in the [Merchant Center Help guide](https://support.google.com/google-ads/answer/12499498).\n\n#### Link your Google Ads Account\n\n1. Login to [Google Ads](https://ads.google.com) with the account that contains your Google Ads\n Campaigns.\n\n2. Click the \"Admin\" settings wheel, then select \"**Linked Accounts**\".\n\n3. A list of applications appears that you can link to. If you linked the\n account identity while enabling Local Inventory Ads, Google Merchant Center\n should be at the top, with Manage \\& Link. Google Merchant Center is in the\n general list, with \"Details\" you may have either linked the wrong account,\n logged into the incorrect Google Ads account, or have not linked the account at\n all. Visit the [*Enabling Free Local Inventory Ads Listing*](https://developers.google.com/merchant/storebuilder/local/sections/4_0_enabling_and_configure_lia_pos#enabling_free_local_product_listings) section to\n complete this step. Select \"**Manage \\& Link**\".\n\n *Linked*\n\n *Unlinked*\n\n4. In the Link Requests window, select \"**View Request**\"\n\n5. A modal appears providing you information about the account that is\n requesting the link. Select \"**Approve**\"\n\n6. When linked, the new view shows the account that is linked with the status of\n \"**Linked**\".\n\n *Google Ads View*\n\n *Merchant Center View*\n\n#### Create Shopping Ads Campaign and Enable Local Products\n\n1. Login to [Google Ads](https://ads.google.com)\n\n2. Along the left hand side of the screen, select \"**Campaigns** \", then in the\n Campaigns windows, select \"**Create** .\" If a window appears, select\n \"+ **New Campaign**.\"\n\n3. When the campaign selection screen appears, select\n \"**Create a campaign without a goal's guidance** .\" Then, select \"**Continue**\".\n\n4. On the next set of options, select the \"**Shopping** \" tile,\n then select \"**Continue**.\"\n\n5. Just below, several new options appears. First, make sure your merchant\n account is the one that is listed in the text field. Then, select\n \"**Standard Shopping Campaign** \" instead of the Performance Max Campaign,\n select \"**Continue**.\"\n\n6. The next menu appears under General Settings. Provide a Campaign name,\n then under local products, click the chevron to expand the menu. Check the box,\n \"**Turn on ads for products sold in local stores**.\"\n\n7. Go to the bottom, and select \"**Create Campaign**.\" When saved,\n the newly created campaign appears on the campaign screen.\n\n### UX Guidance\n\n*** ** * ** ***\n\nYou can help link the campaign earlier by linking it as part of the merchant\ncollection process.\n\n### Tech Guidance\n\n*** ** * ** ***\n\n- For Google Ads, if you want to use the API, ensure that you've added the following scope:\n\n https://www.googleapis.com/auth/adwords.\n\n- For account linking, you consume the following request:\n CustomerClientLinkService. This takes the\n [MutateCustomerClientLinkRequest](https://developers.google.com/google-ads/api/reference/rpc/v13/MutateCustomerClientLinkRequest), which accepts a *customer_id*.\n\n- You can create a new campaign programmatically by consuming\n the [CampaignService](https://developers.google.com/google-ads/api/reference/rpc/v13/CampaignService).\n\n- For more information about how to use the Google Ads API, visit the following\n [Client Libraries and Example](https://developers.google.com/google-ads/api/docs/client-libs) page.\n\n| **Tip:** The merchant doesn't need to use their own Ads account. If the merchant's ad business is managed by a different account other than their own, they can use the same link method to link their account."]]