Sceneform 的 Augmented Faces 开发者指南
使用集合让一切井井有条
根据您的偏好保存内容并对其进行分类。
了解如何在您自己的应用中使用“增强型人脸”功能。
构建和运行示例应用
如需构建并运行 AugmentedFaces Java 应用,请执行以下操作:
打开 Android Studio 3.1 或更高版本。建议使用实体设备(而不是 Android 模拟器)来处理增强人脸。设备应通过 USB 连接到开发机器。如需了解详细步骤,请参阅 Android 快速入门。
将 AugmentedFaces Java 示例导入您的项目。
在 Android Studio 中,点击 Run 图标
。然后,选择您的设备作为部署目标,并点击确定以在设备上启动示例应用。
点击批准以授予相机使用示例应用的权限。
应用应打开前置摄像头,并在摄像头画面中立即跟踪您的面部。应该将狐耳朵图像放在额头两侧,并将狐鼻子放在鼻子上方。
将资源导入 Sceneform
配置 ARCore 会话
获取检测到的人脸的访问权限
在检测到的人脸上呈现效果
将素材资源导入 Sceneform
确保用于增强人脸的素材资源已正确缩放和定位。如需了解相关提示和做法,请参阅为增强型人脸创建素材资源。
如需将纹理和 3D 模型等资源应用于 Sceneform 中的增强人脸网格,请先导入资源。
在运行时,使用 ModelRenderable.Builder
加载 *.sfb
模型,并使用 Texture.Builder
加载人脸的纹理。
// To ensure that the asset doesn't cast or receive shadows in the scene,
// ensure that setShadowCaster and setShadowReceiver are both set to false.
ModelRenderable.builder()
.setSource(this, R.raw.fox_face)
.build()
.thenAccept(
modelRenderable -> {
faceRegionsRenderable = modelRenderable;
modelRenderable.setShadowCaster(false);
modelRenderable.setShadowReceiver(false);
});
// Load the face mesh texture.
Texture.builder()
.setSource(this, R.drawable.fox_face_mesh_texture)
.build()
.thenAccept(texture -> faceMeshTexture = texture);
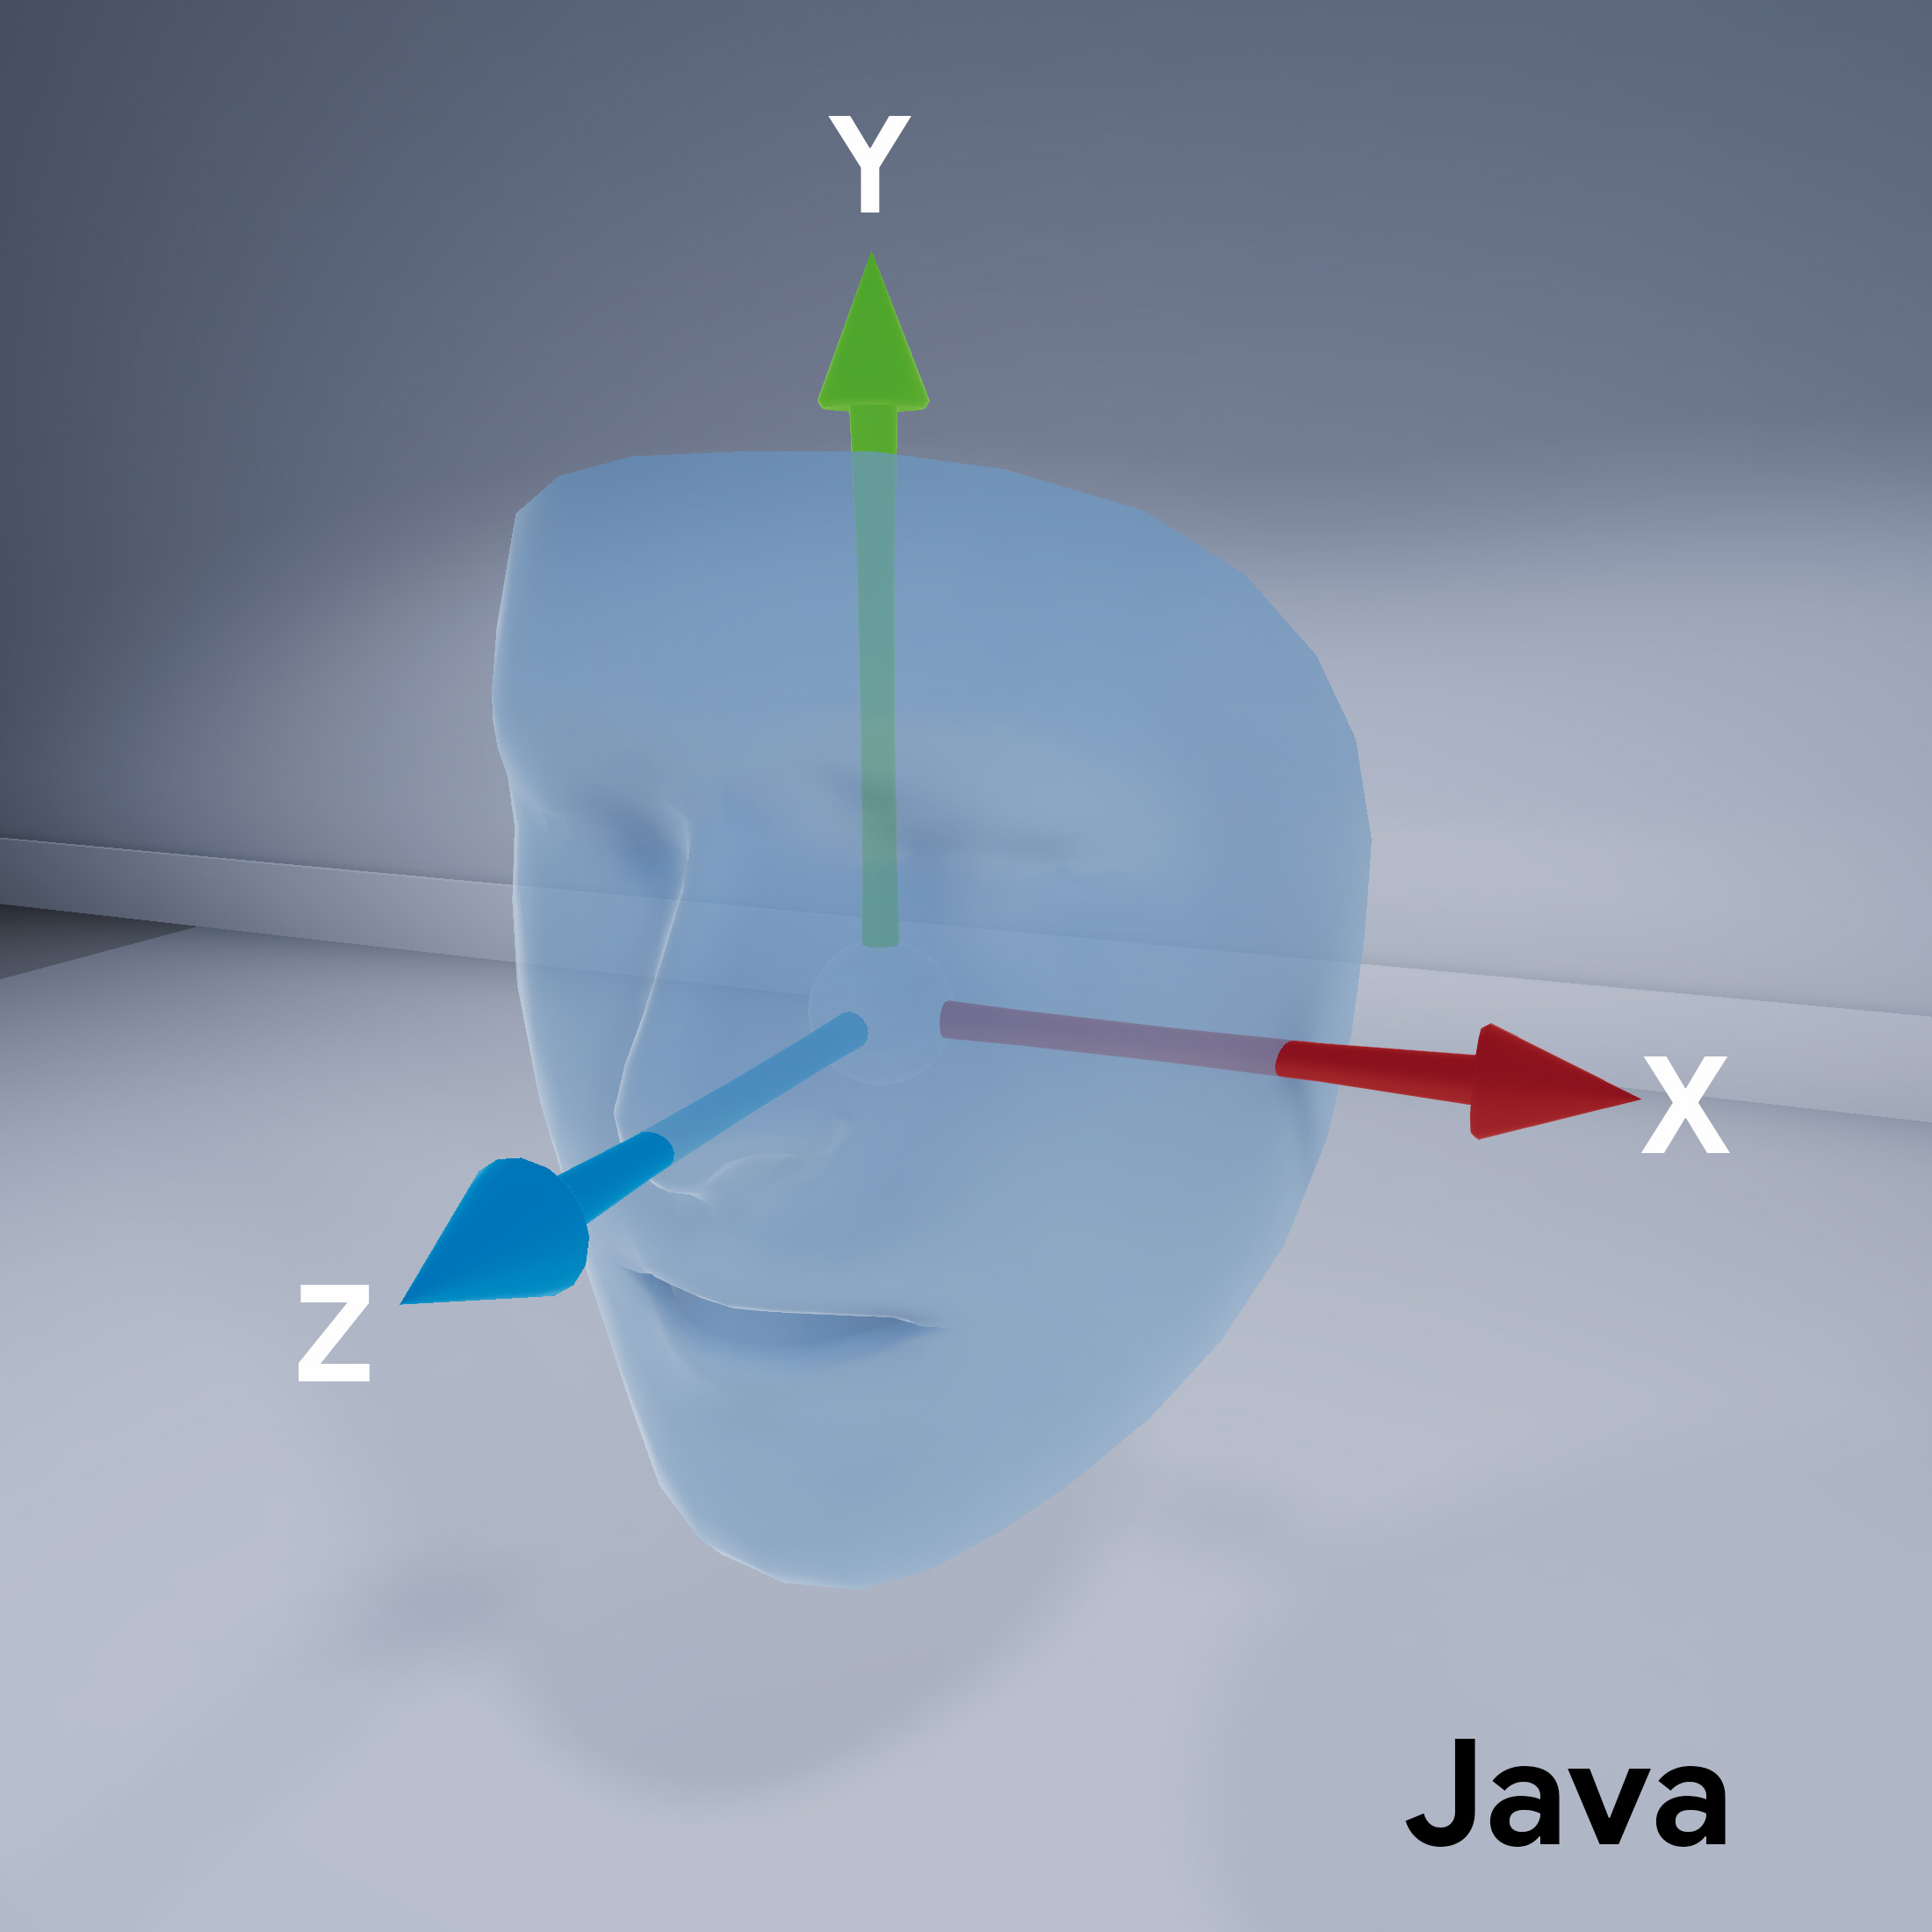
脸部网格方向
请注意 Sceneform 的人脸网格的方向:
![]()
增强型人脸需要将 ARCore 现场录像配置为使用前置(自拍)摄像头,并启用人脸网格支持。如需在 Sceneform 中执行此操作,请扩展 ARfragment 类,并替换配置:
@Override
protected Set<Session.Feature> getSessionFeatures() {
return EnumSet.of(Session.Feature.FRONT_CAMERA);
}
@Override
protected Config getSessionConfiguration(Session session) {
Config config = new Config(session);
config.setAugmentedFaceMode(AugmentedFaceMode.MESH3D);
return config;
}
请在 activity 布局中引用此子类化的 ArFragment
类。
获取检测到的人脸的访问权限
AugmentedFace
类扩展了 Trackable
类。在您应用的 Activity 中,使用 AugmentedFace
从addOnUpdateListener()
方法调用获取检测到的人脸。
// Get list of detected faces.
Collection<AugmentedFace> faceList = session.getAllTrackables(AugmentedFace.class);
渲染人脸效果
渲染效果包括以下步骤:
for (AugmentedFace face : faceList) {
// Create a face node and add it to the scene.
AugmentedFaceNode faceNode = new AugmentedFaceNode(face);
faceNode.setParent(scene);
// Overlay the 3D assets on the face.
faceNode.setFaceRegionsRenderable(faceRegionsRenderable);
// Overlay a texture on the face.
faceNode.setFaceMeshTexture(faceMeshTexture);
…
}
如未另行说明,那么本页面中的内容已根据知识共享署名 4.0 许可获得了许可,并且代码示例已根据 Apache 2.0 许可获得了许可。有关详情,请参阅 Google 开发者网站政策。Java 是 Oracle 和/或其关联公司的注册商标。
最后更新时间 (UTC):2022-09-26。
[null,null,["最后更新时间 (UTC):2022-09-26。"],[[["\u003cp\u003eThis guide explains how to utilize the Augmented Faces feature in your Android applications to overlay assets and textures onto detected faces in real-time using Sceneform and ARCore.\u003c/p\u003e\n"],["\u003cp\u003eIt involves importing relevant assets, configuring the ARCore session for front-facing camera and face mesh support, accessing the detected face data, and rendering the desired effects by attaching nodes to the face.\u003c/p\u003e\n"],["\u003cp\u003eThe guide provides code samples for key steps like asset loading, session configuration, and rendering, emphasizing correct asset scaling and positioning for optimal results.\u003c/p\u003e\n"],["\u003cp\u003eIt highlights the importance of understanding the face mesh orientation within Sceneform and using the \u003ccode\u003eAugmentedFace\u003c/code\u003e class to access and manipulate the detected face data.\u003c/p\u003e\n"],["\u003cp\u003eDevelopers can build and run a provided sample app showcasing the Augmented Faces functionality with a fox-themed overlay before integrating the feature into their own projects.\u003c/p\u003e\n"]]],["To use Augmented Faces, first, build and run the sample app by importing it into Android Studio, running it on a physical device, and granting camera access. Then, import assets, ensuring they are correctly scaled and positioned. Configure the ARCore session to use the front camera and enable 3D face mesh support. Access detected faces using the `AugmentedFace` class within the `addOnUpdateListener` method. Finally, render the effect by creating an `AugmentedFaceNode`, setting its parent to the scene, overlaying 3D assets and a texture onto the face.\n"],null,["# Augmented Faces developer guide for Sceneform\n\nLearn how to use the Augmented Faces feature in your own apps.\n\nBuild and run the sample app\n----------------------------\n\nTo build and run the **AugmentedFaces Java** app:\n\n1. Open Android Studio version 3.1 or greater. It is recommended to use a\n physical device (and not the Android Emulator) to work with Augmented Faces.\n The device should be connected to the development machine via USB. See the\n [Android quickstart](/sceneform/develop/android-quickstart) for detailed steps.\n\n2. Import the [AugmentedFaces Java sample](//github.com/google-ar/sceneform-android-sdk/tree/v1.15.0/samples/augmentedfaces)\n into your project.\n\n3. In Android Studio, click **Run** . Then,\n choose your device as the deployment target and click **OK** to launch the\n sample app on your device.\n\n4. Click **Approve** to give the camera access to the sample app.\n\n The app should open the front camera and immediately track your face in the\n camera feed. It should place images of fox ears over both sides of your\n forehead, and place a fox nose over your own nose.\n\nUsing Augmented Faces in Sceneform\n----------------------------------\n\n1. [Import assets into Sceneform](#import-assets)\n\n2. [Configure the ARCore session](#configure-session)\n\n3. [Get access to the detected face](#get-access)\n\n4. [Render the effect on the detected face](#render-effect)\n\n### Import assets into Sceneform\n\nMake sure that assets you use for Augmented Faces are scaled and positioned\ncorrectly. For tips and practices, refer to [Creating Assets for Augmented Faces](/sceneform/develop/augmented-faces/creating-assets).\n\nTo apply assets such as textures and 3D models to an augmented face mesh in Sceneform,\nfirst import the assets.\n\nAt runtime, use [`ModelRenderable.Builder`](/sceneform/reference/com/google/ar/sceneform/rendering/ModelRenderable.Builder)\nto load the `*.sfb` models, and use the [`Texture.Builder`](/sceneform/reference/com/google/ar/sceneform/rendering/Texture.Builder)\nto load a texture for the face. \n\n // To ensure that the asset doesn't cast or receive shadows in the scene,\n // ensure that setShadowCaster and setShadowReceiver are both set to false.\n ModelRenderable.builder()\n .setSource(this, R.raw.fox_face)\n .build()\n .thenAccept(\n modelRenderable -\u003e {\n faceRegionsRenderable = modelRenderable;\n modelRenderable.setShadowCaster(false);\n modelRenderable.setShadowReceiver(false);\n });\n\n // Load the face mesh texture.\n Texture.builder()\n .setSource(this, R.drawable.fox_face_mesh_texture)\n .build()\n .thenAccept(texture -\u003e faceMeshTexture = texture);\n\n### Face mesh orientation\n\nNote the orientation of the face mesh for Sceneform:\n\n### Configure the ARCore session\n\nAugmented Faces requires the ARCore session to be configured to use the\nfront-facing (selfie) camera and enable face mesh support. To do this in\nSceneform, extend the [ARfragment](/sceneform/reference/com/google/ar/sceneform/ux/ArFragment)\nclass, and override the configuration: \n\n @Override\n protected Set\u003cSession.Feature\u003e getSessionFeatures() {\n return EnumSet.of(Session.Feature.FRONT_CAMERA);\n }\n\n @Override\n protected Config getSessionConfiguration(Session session) {\n Config config = new Config(session);\n config.setAugmentedFaceMode(AugmentedFaceMode.MESH3D);\n return config;\n }\n\nRefer to this subclassed `ArFragment` class in your activity layout.\n\n### Get access to the detected face\n\nThe `AugmentedFace` class extends the `Trackable` class. In your app's activity,\nuse `AugmentedFace` to get access to the detected face by calling it from the [`addOnUpdateListener()`](/sceneform/reference/com/google/ar/sceneform/Scene#public-void-addonupdatelistener-scene.onupdatelistener-onupdatelistener)\nmethod. \n\n // Get list of detected faces.\n Collection\u003cAugmentedFace\u003e faceList = session.getAllTrackables(AugmentedFace.class);\n\n### Render the effect for the face\n\nRendering the effect involves these steps: \n\n for (AugmentedFace face : faceList) {\n // Create a face node and add it to the scene.\n AugmentedFaceNode faceNode = new AugmentedFaceNode(face);\n faceNode.setParent(scene);\n\n // Overlay the 3D assets on the face.\n faceNode.setFaceRegionsRenderable(faceRegionsRenderable);\n\n // Overlay a texture on the face.\n faceNode.setFaceMeshTexture(faceMeshTexture);\n\n ...\n }"]]