الاستجابة للحوادث باستخدام Google Chat وVertex AI وبرمجة تطبيقات Google

يوضّح لك هذا البرنامج التعليمي كيفية إنشاء تطبيق Google Chat يستجيب للحوادث في الوقت الفعلي. عند الاستجابة لحادث، ينشئ التطبيق مساحة في Chat ويملأها، ويسهّل حل الحادث من خلال الرسائل وأوامر التطبيق ومربّعات الحوار، ويستخدم الذكاء الاصطناعي لتلخيص الاستجابة للحادث في مستند Google.

يستخدم هذا البرنامج التعليمي نطاقات أذونات تبدأ بـ https://www.googleapis.com/auth/chat.app.*. لكي يستخدم تطبيق Chat هذه النطاقات، يجب الحصول على موافقة المشرف لمرة واحدة.

الحادث هو حدث يتطلّب اهتمامًا فوريًا من فريق من الأشخاص لحلّه. تشمل الأمثلة على الحوادث ما يلي:

  • يتم إنشاء طلب دعم حسّاس للوقت في منصة إدارة علاقات العملاء (CRM)، ما يتطلّب من فريق الخدمة التعاون في إيجاد حلّ.
  • يتوقف أحد الأنظمة عن العمل، فيتم تنبيه مجموعة من مهندسي موثوقية المواقع (SRE) ليعملوا معًا على إعادة تشغيله.
  • يحدث زلزال قوي، ويحتاج عمّال الطوارئ إلى تنسيق جهودهم.

لأغراض هذا الدليل التعليمي، يبدأ تنبيه الحادث عندما يبلّغ أحد المستخدمين عن الحادث من خلال النقر على زر في صفحة ويب. تحاكي صفحة الويب حادثًا من خلال مطالبة المستخدمين بإدخال معلومات أساسية عن الحادث، مثل العنوان والوصف وعناوين البريد الإلكتروني للمستجيبين.

إليك طريقة عمل تطبيق Chat لإدارة الحوادث:

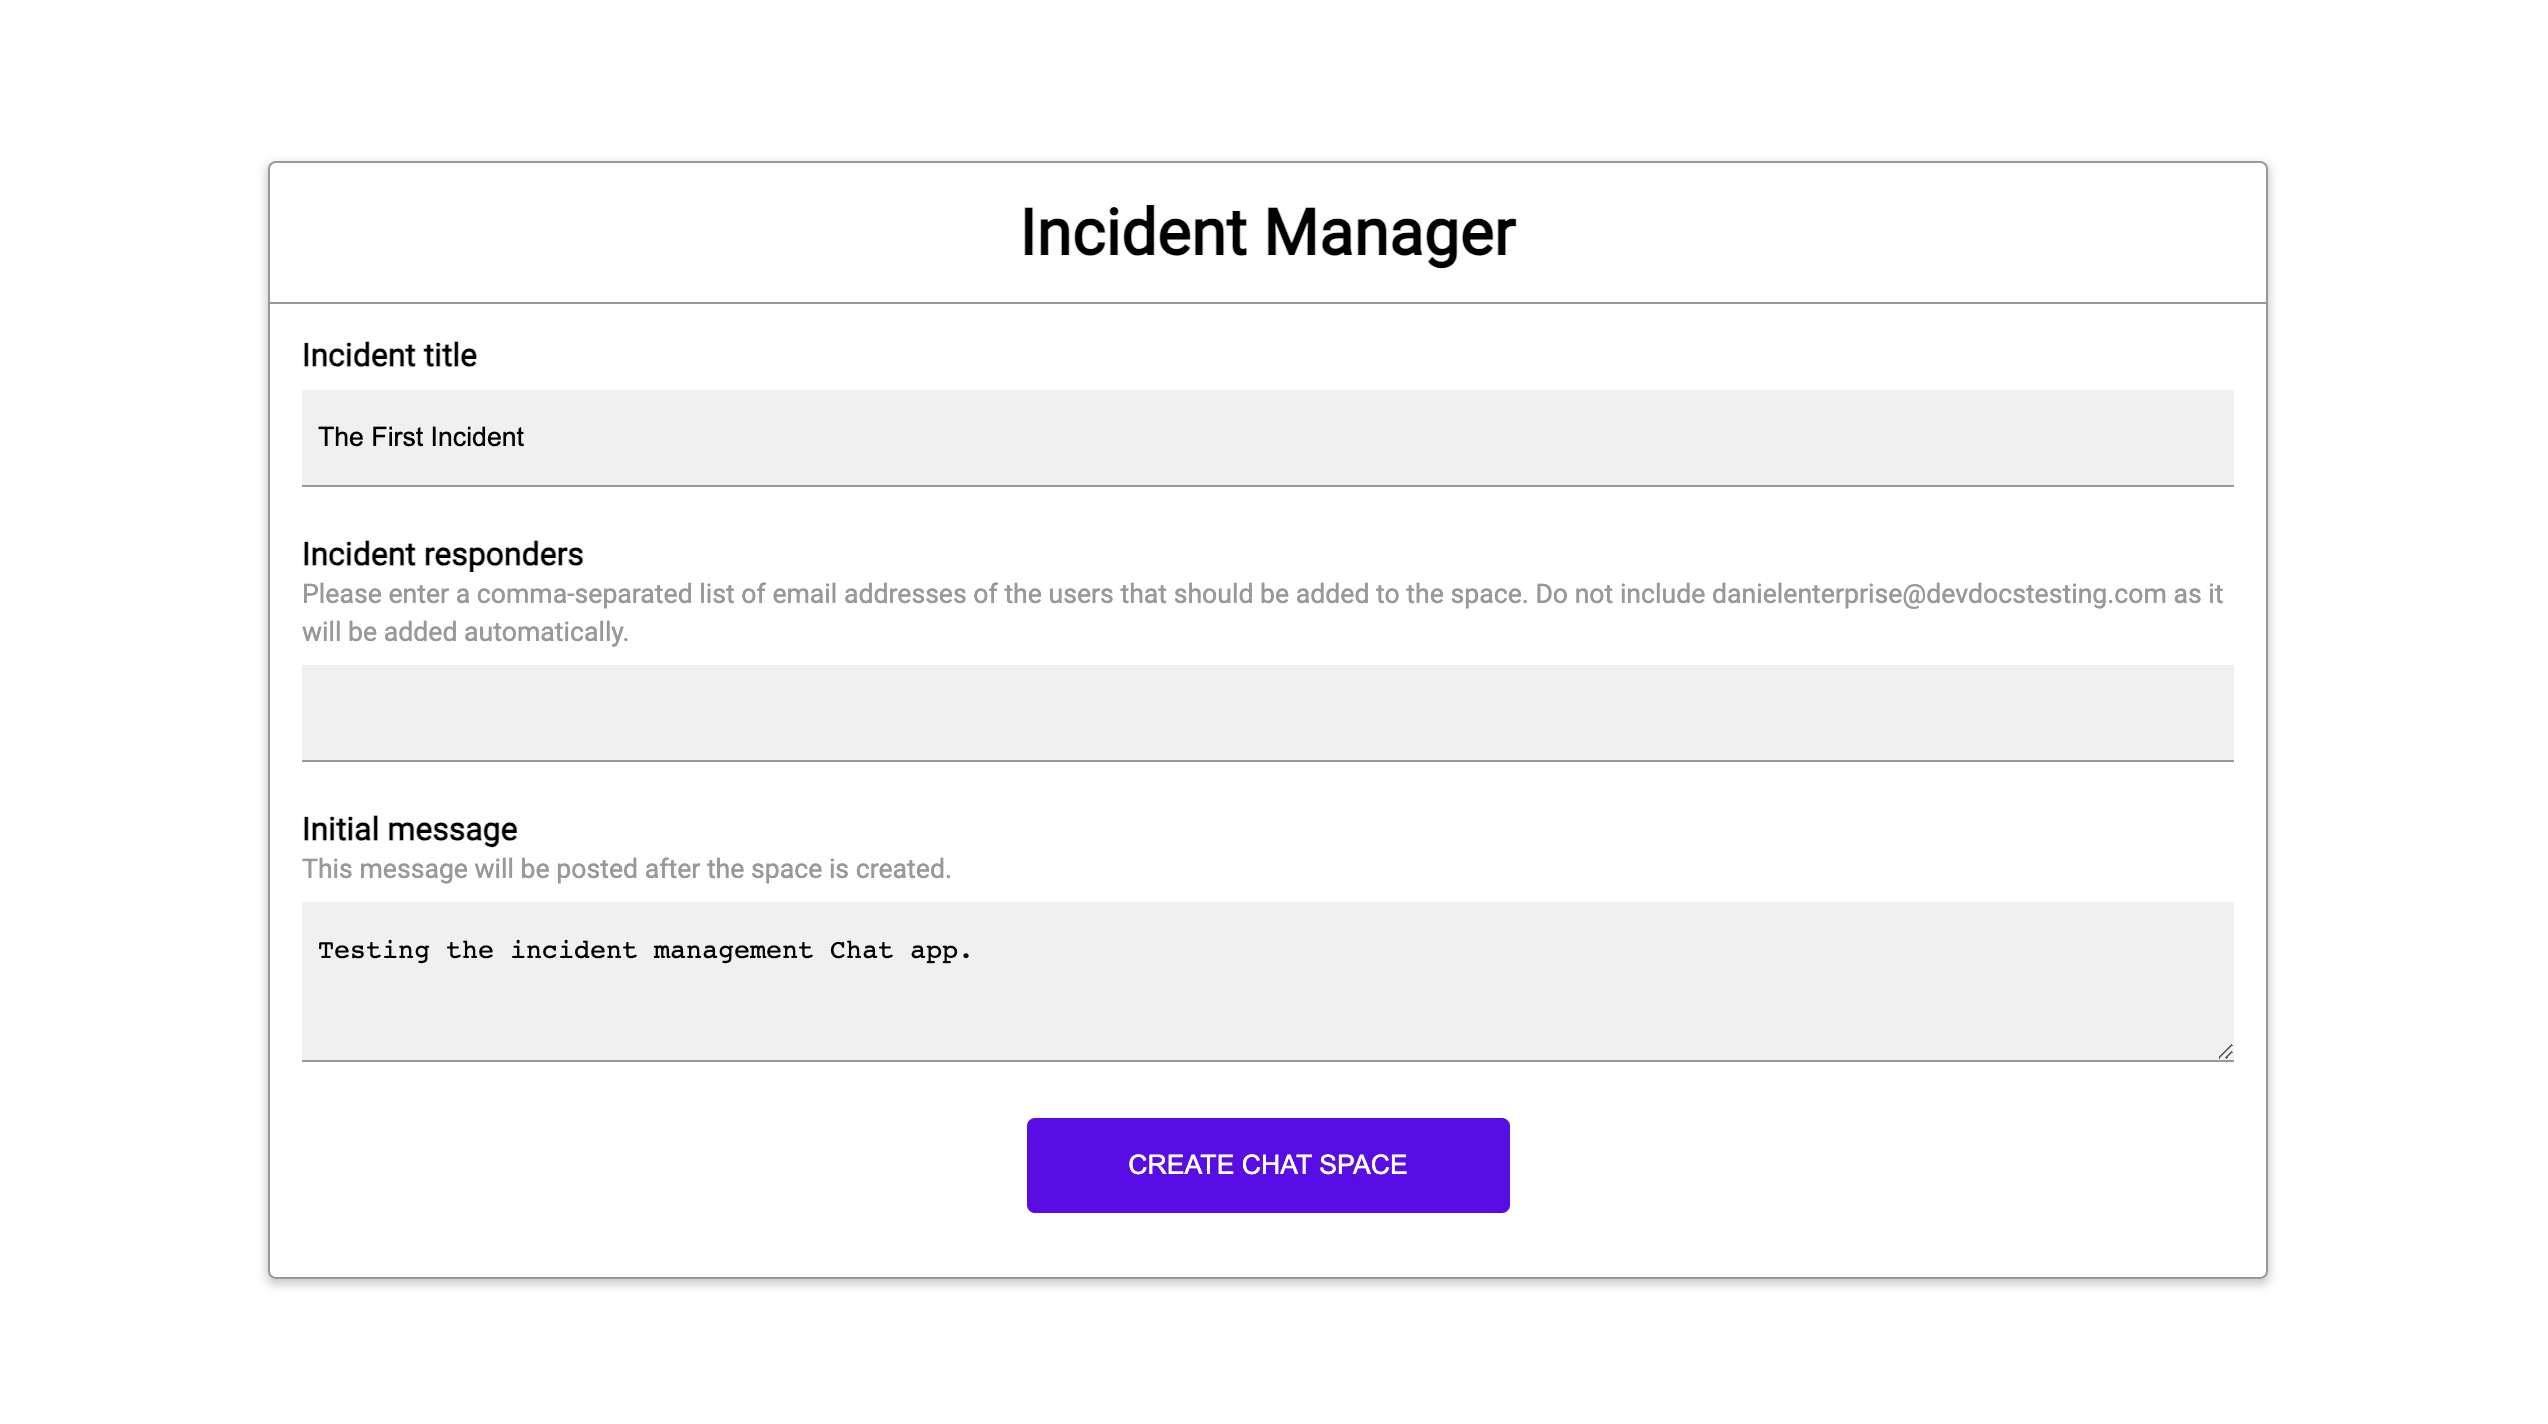
  • موقع الويب الذي يبدأ حادثة.
    الشكل 1. الموقع الإلكتروني الذي يمكن للمستخدم الإبلاغ فيه عن حادثة
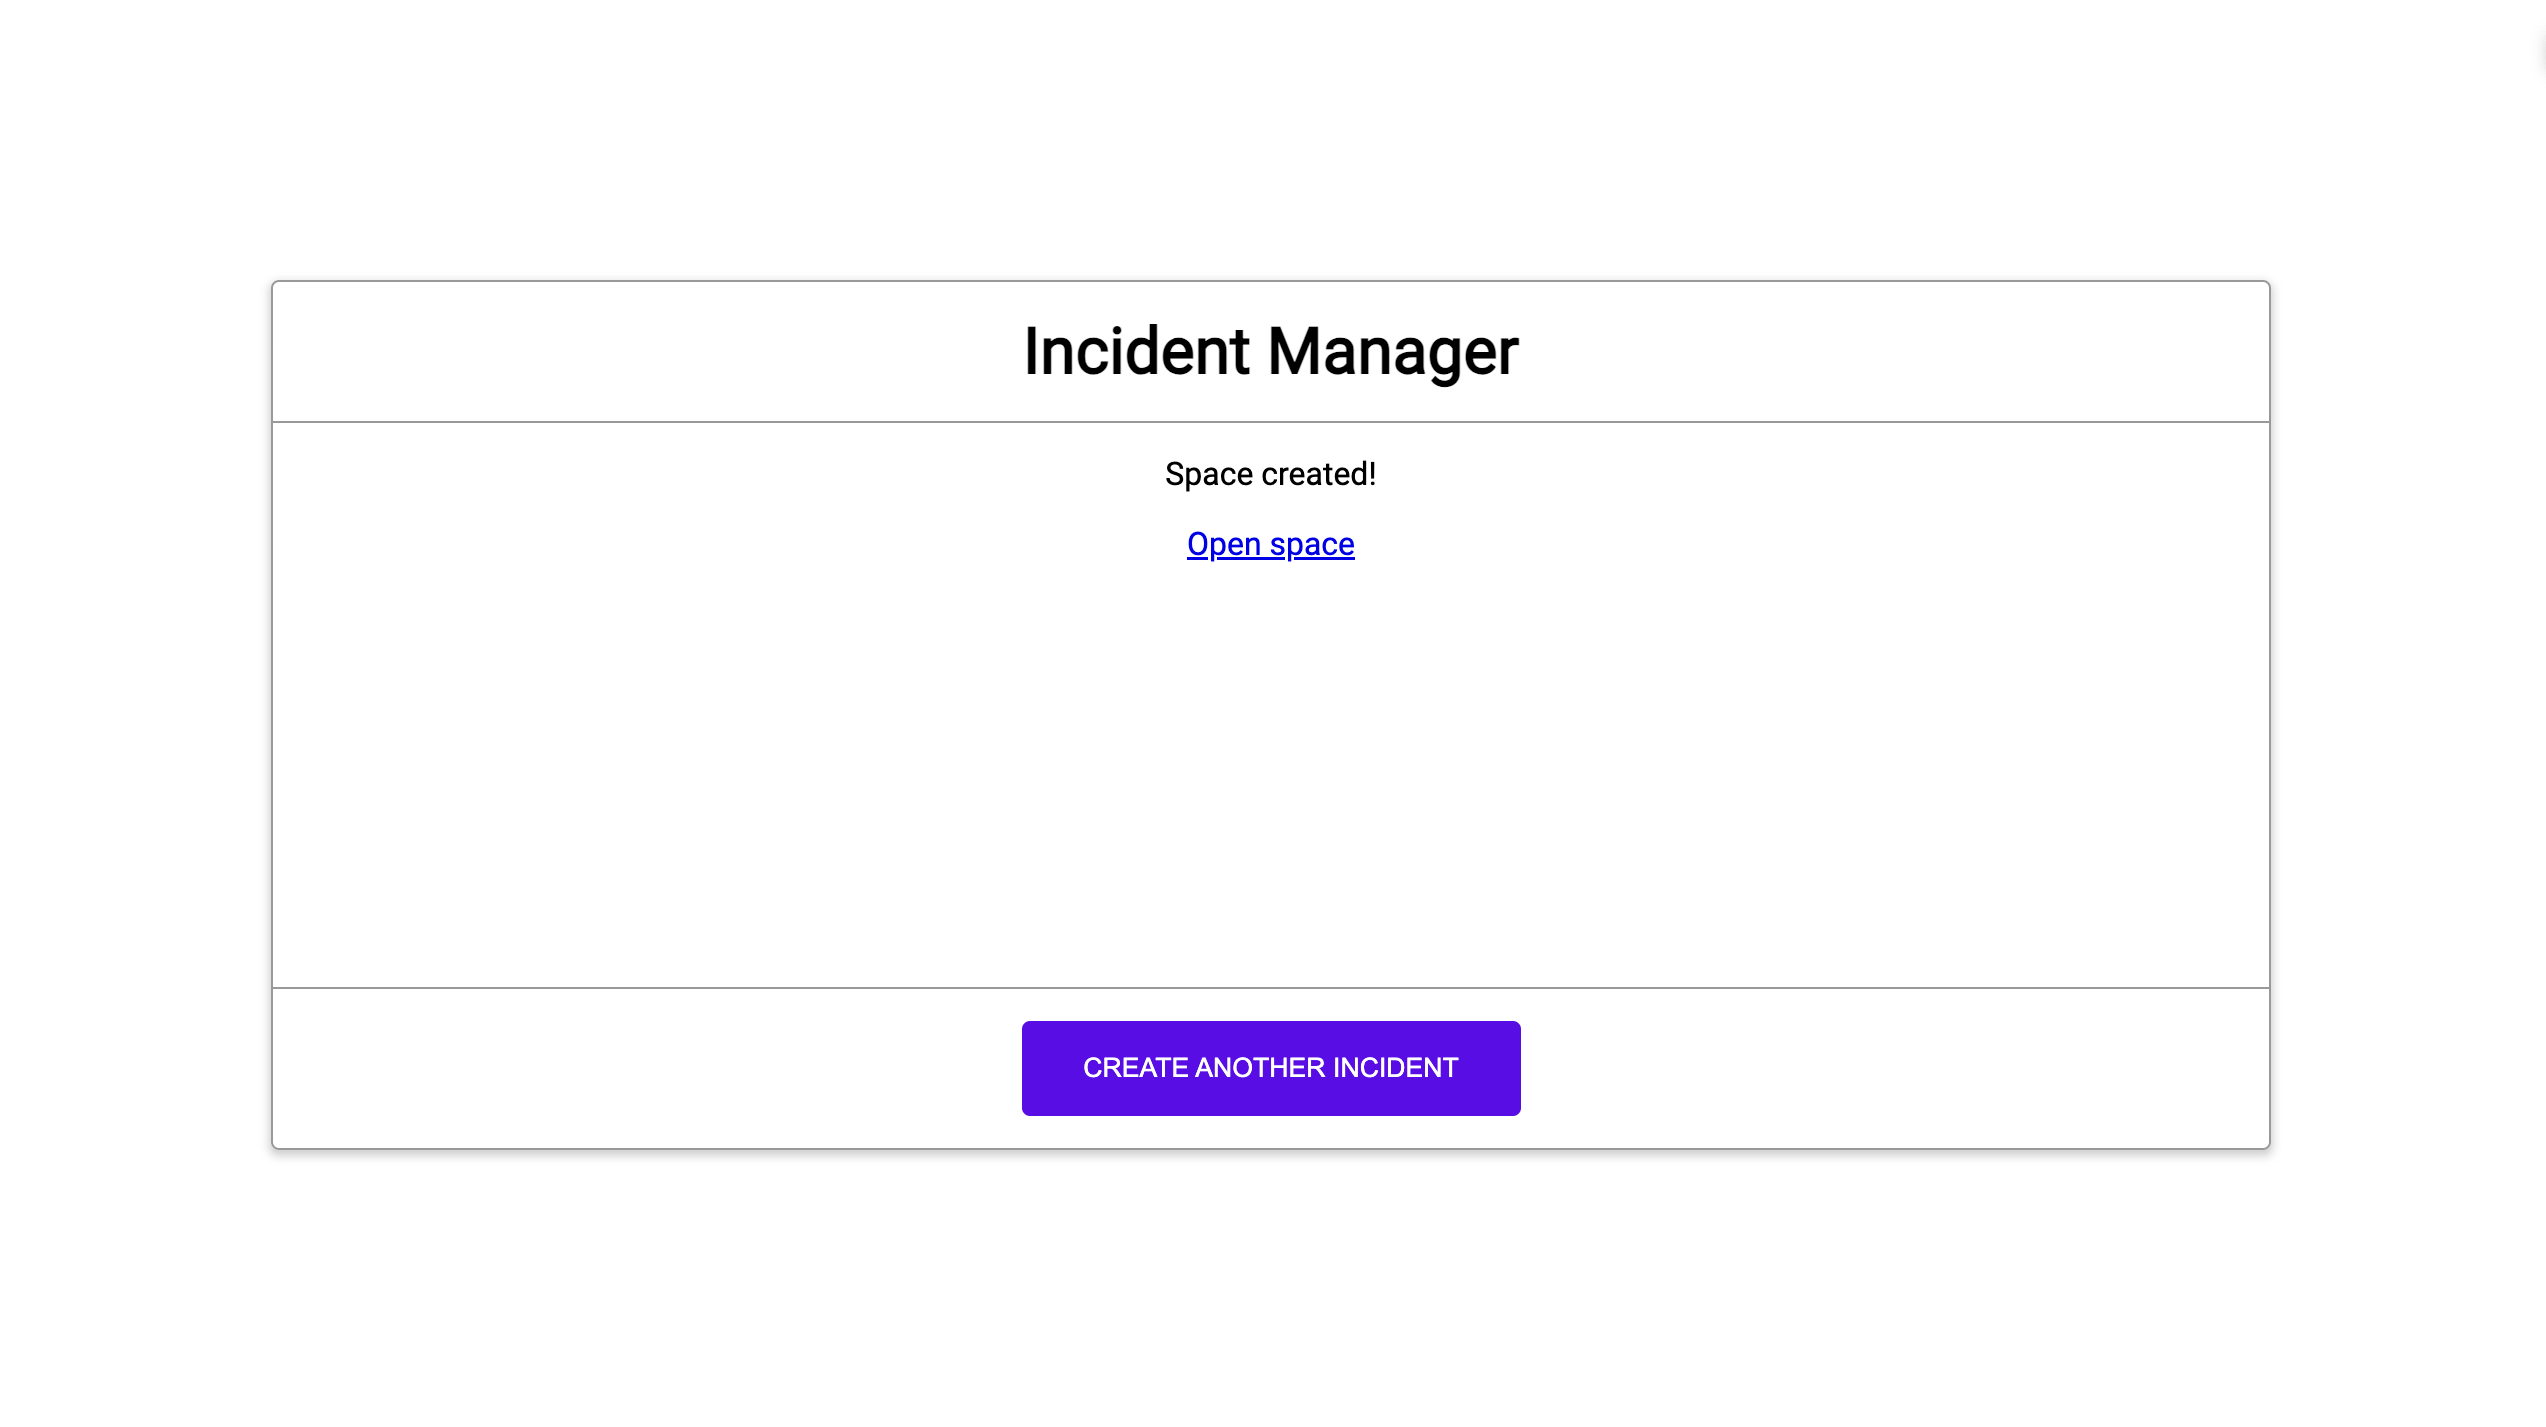
  • إشعار بأنّه تم إنشاء مساحة Chat للحادثة
    الشكل 2. إشعار بأنّه تم إنشاء مساحة Chat للحادثة
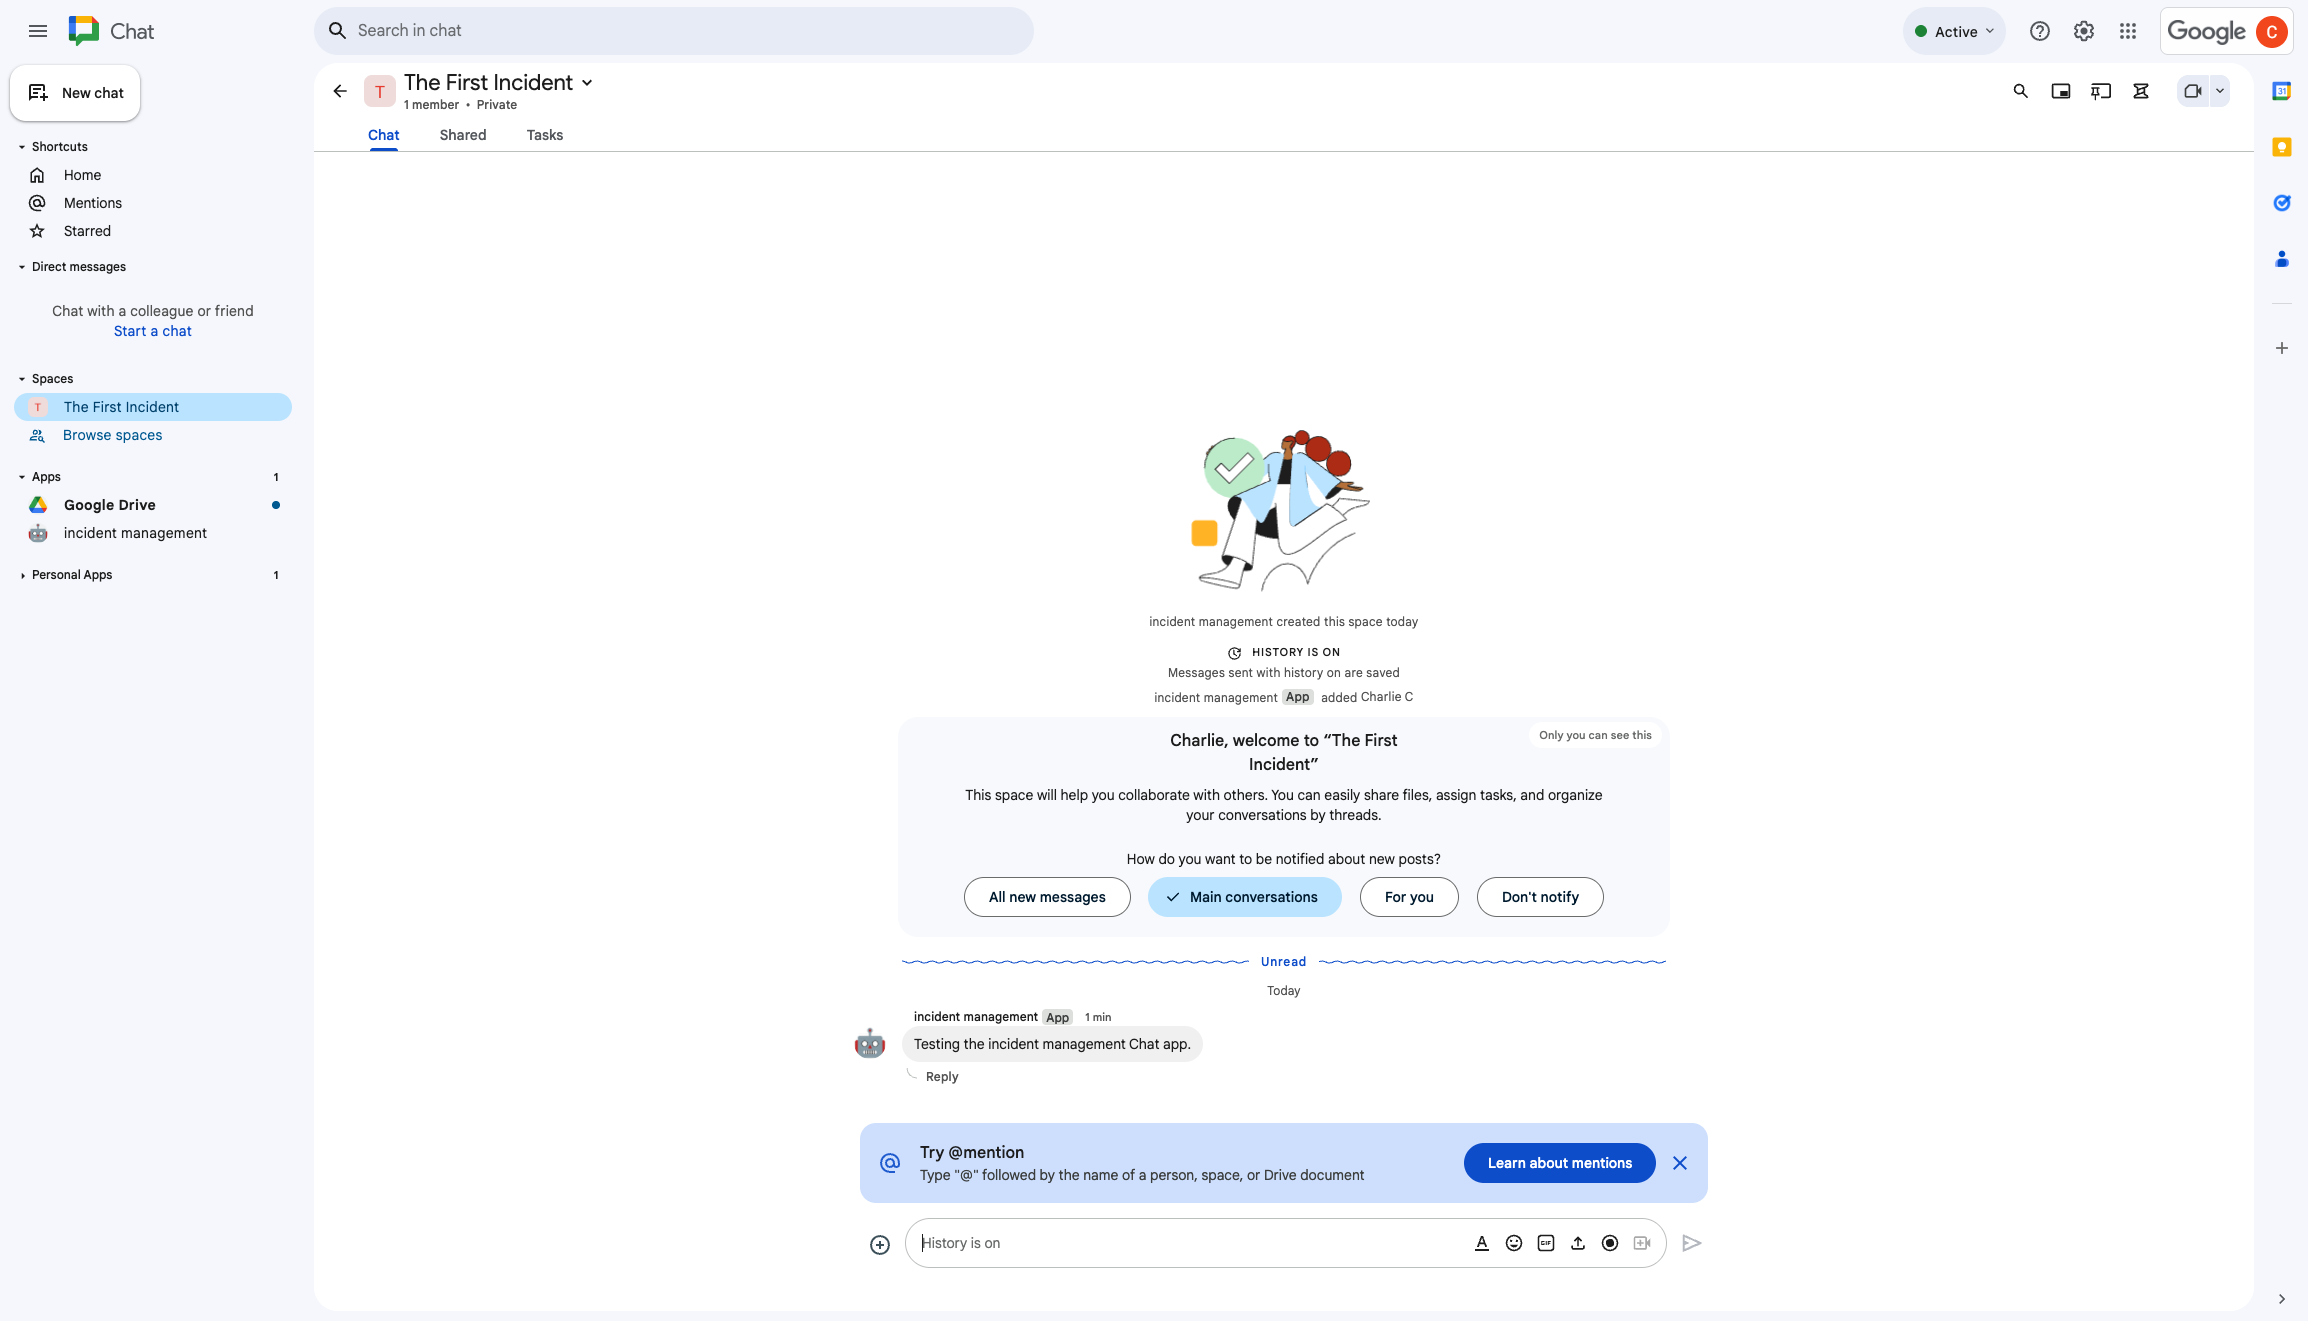
  • مساحة Chat للاستجابة للحوادث
    الشكل 3. مساحة Chat للاستجابة لمحاولات الاختراق الأمني
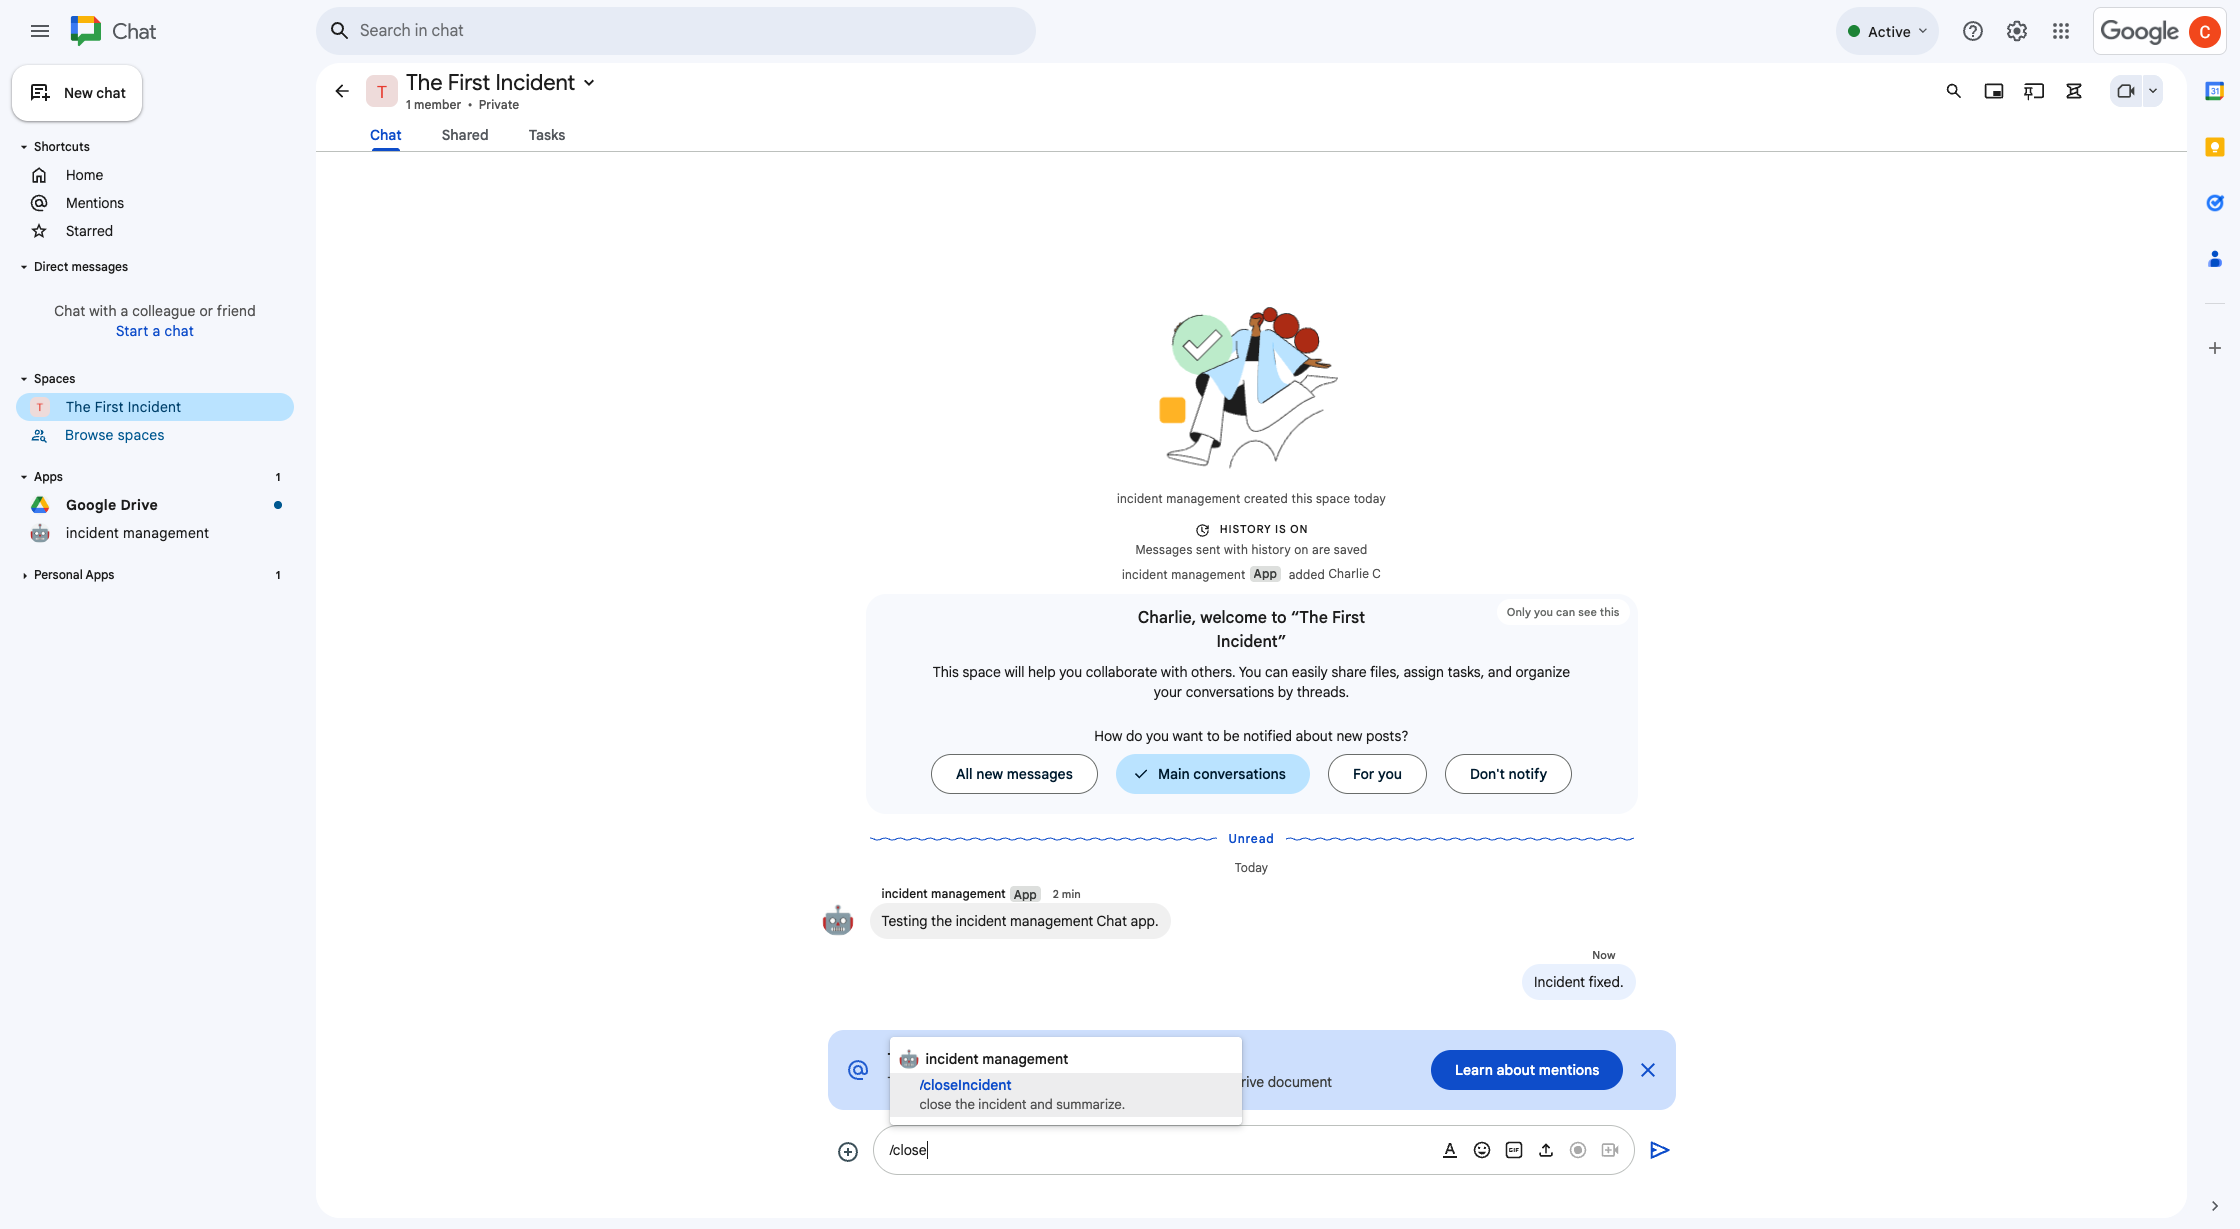
  • حلّ المشكلة باستخدام أمر يبدأ بشرطة مائلة
    الشكل 4. حلّ المشكلة باستخدام أمر يبدأ بشرطة مائلة
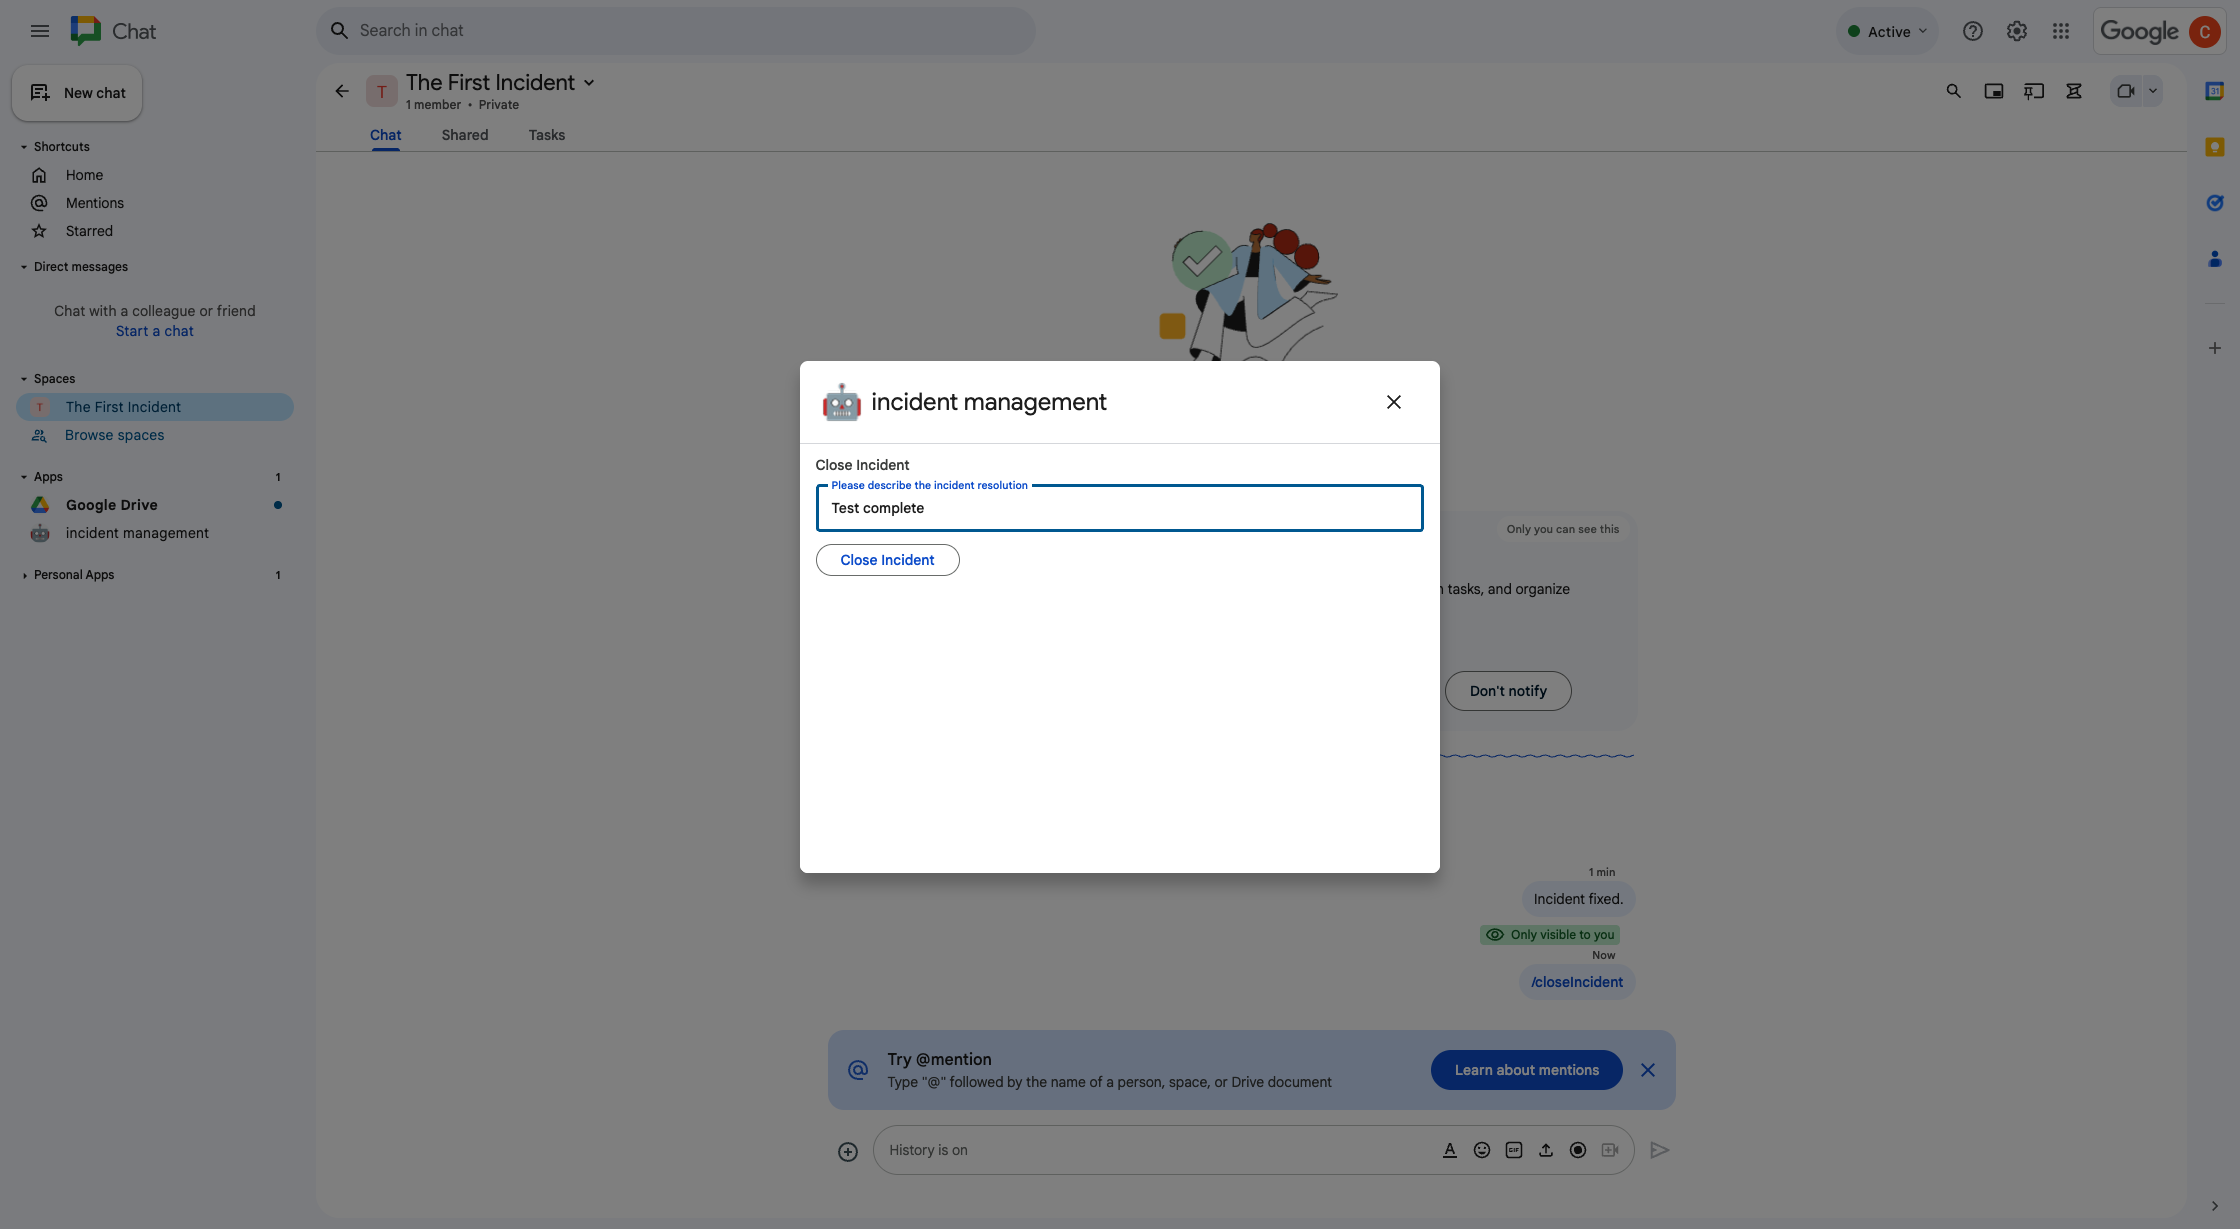
  • مربّع حوار حلّ المشكلة
    الشكل 5. مربّع حوار حلّ المشكلة
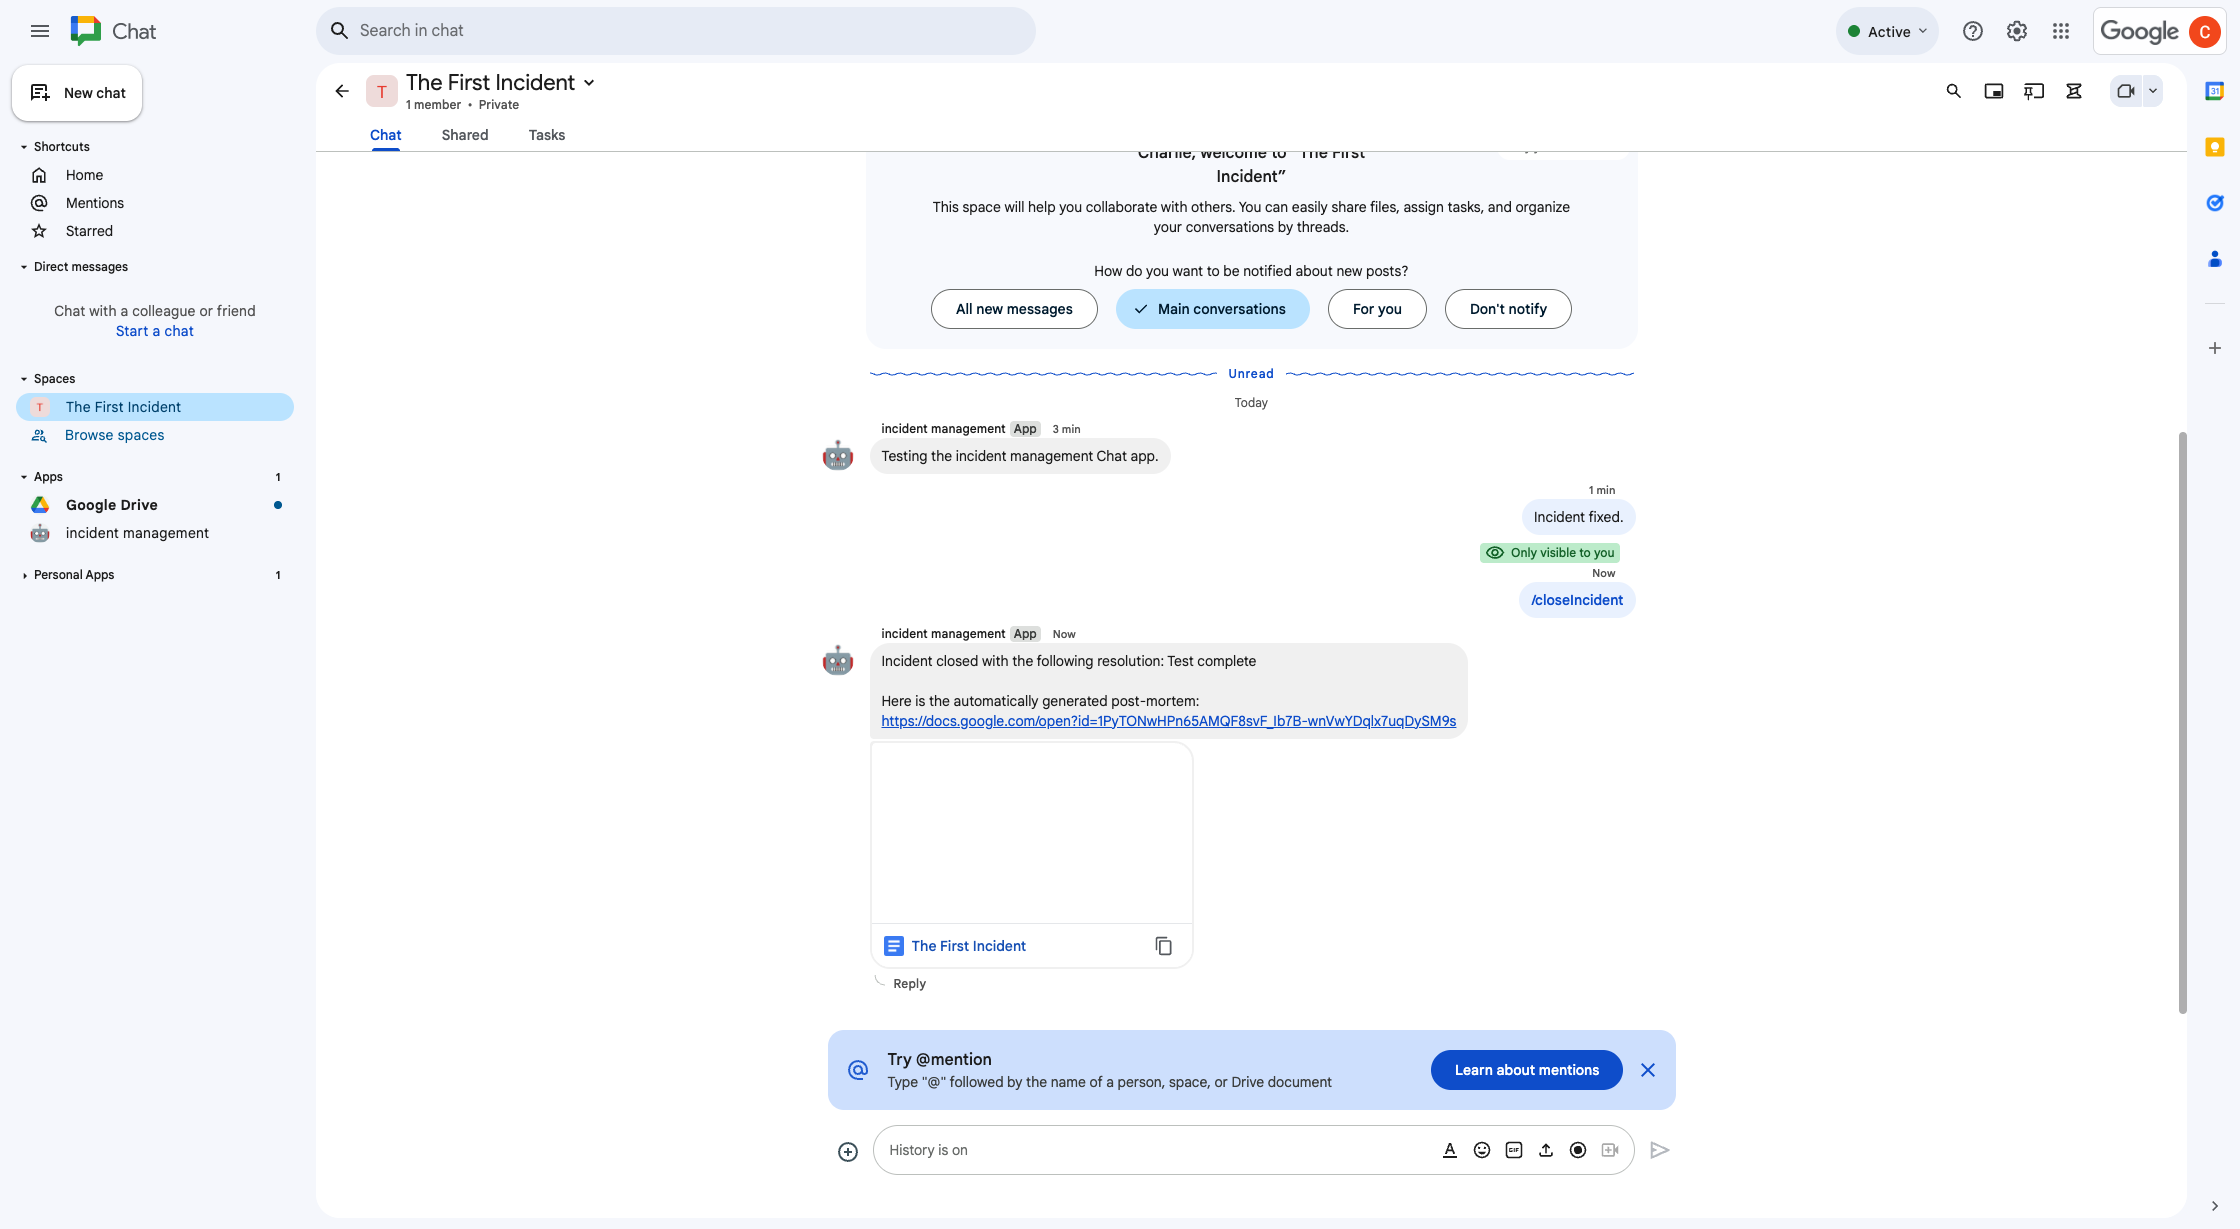
  • تمت مشاركة مستند Google Docs لحلّ المشكلة في المساحة.
    الشكل 6. تمت مشاركة مستند "مستندات Google" الخاص بحلّ المشاكل في المساحة.
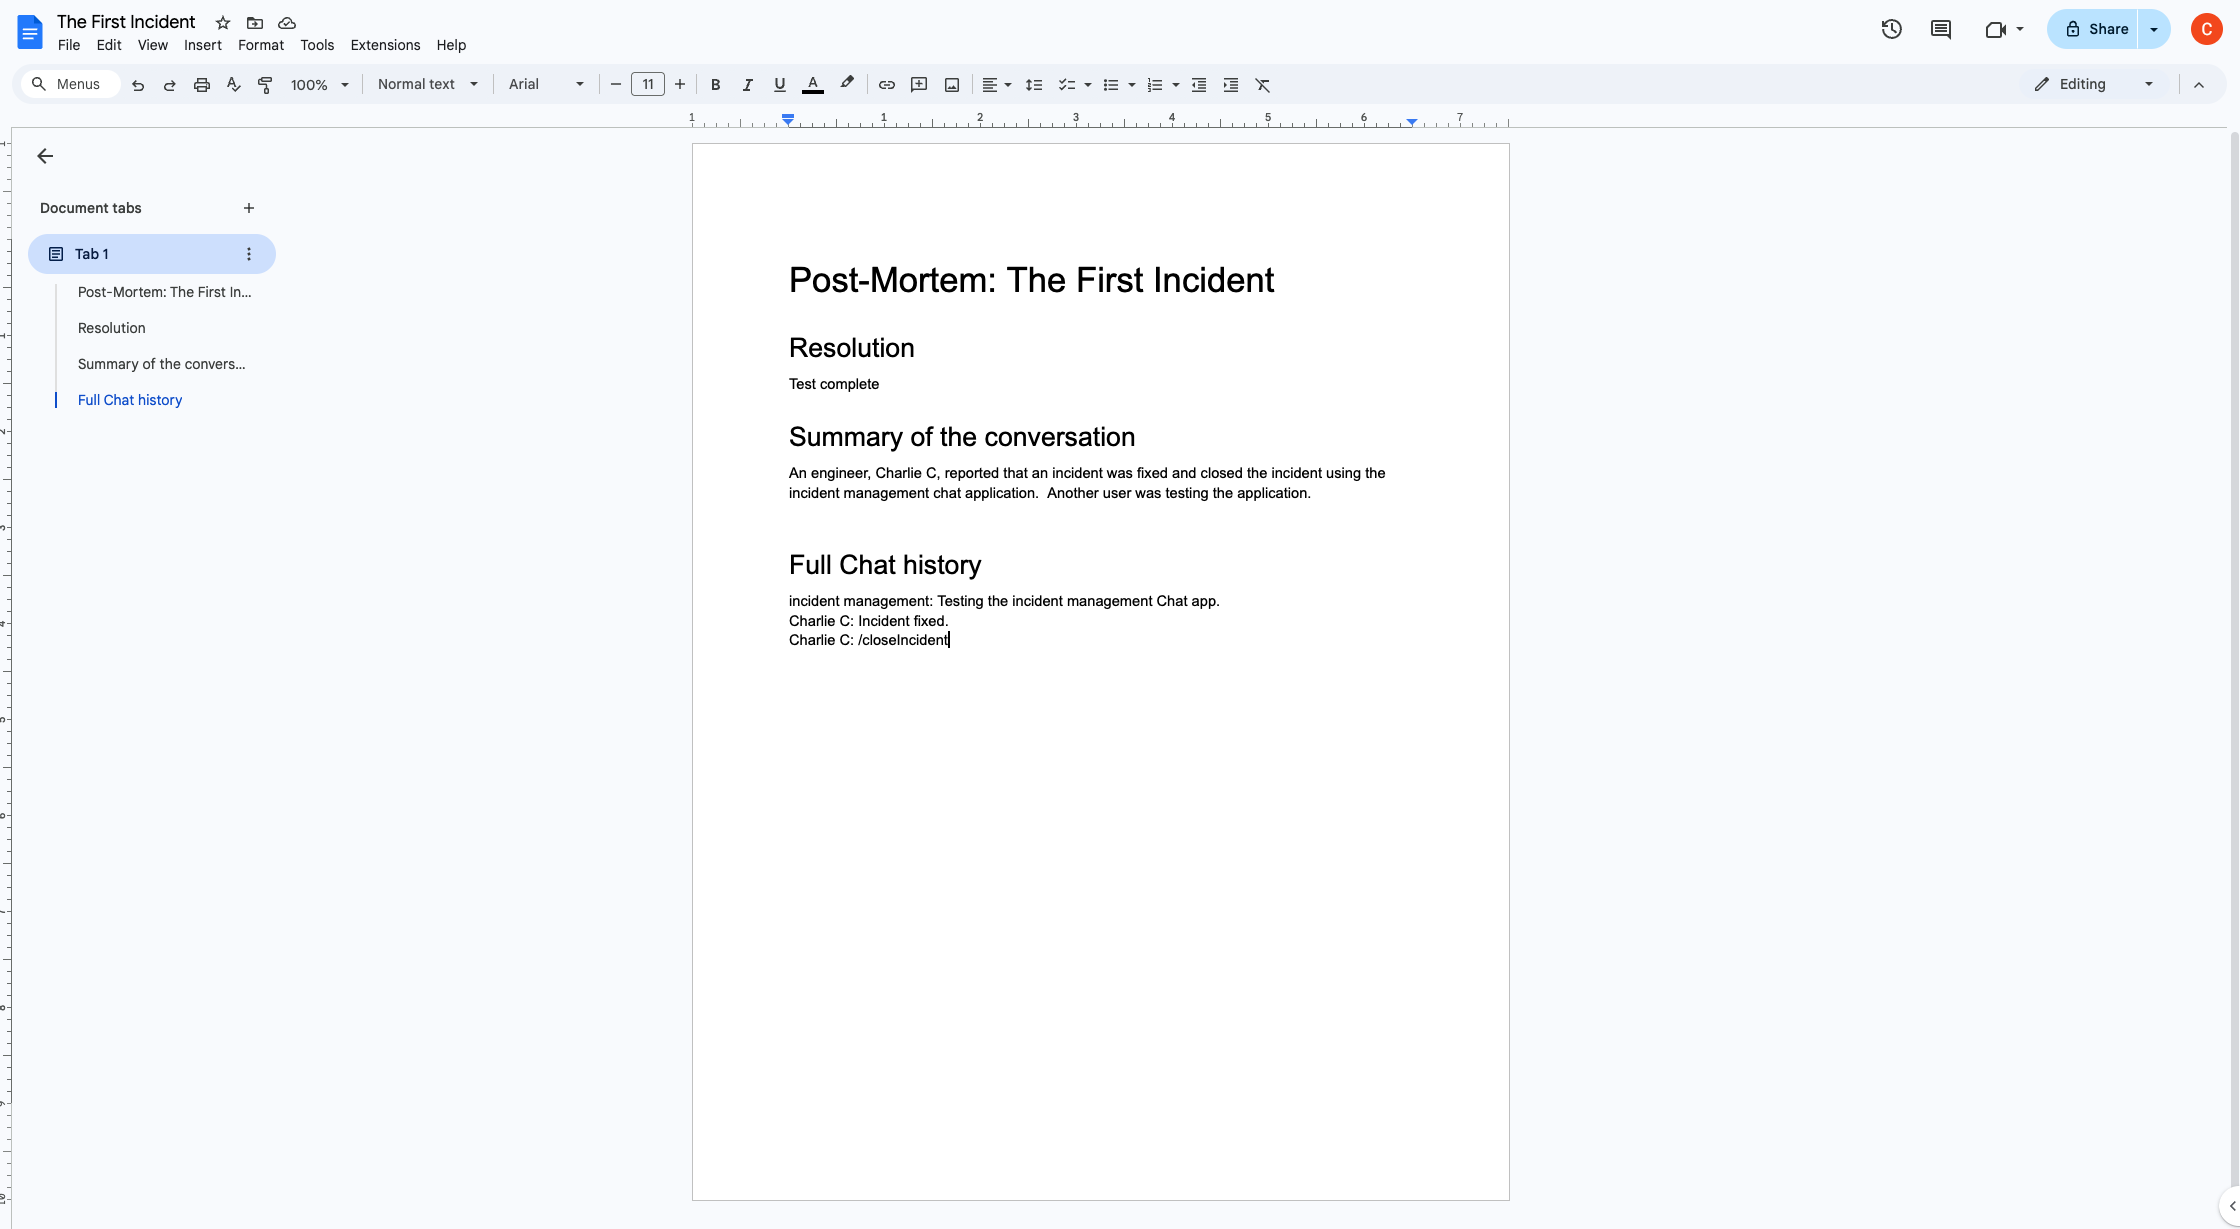
  • مستند Google الخاص بحلّ المشاكل المتعلّقة بالملخّصات المستنِدة إلى الذكاء الاصطناعي
    الشكل 7. مستند Google Docs الخاص بحلّ المشاكل باستخدام ملخّص من إنشاء الذكاء الاصطناعي

المتطلبات الأساسية

إذا كنت بحاجة إلى تفعيل أي من المتطلبات الأساسية التالية لمؤسستك، اطلب من مشرف Google Workspace تفعيلها:

  • حساب Google Workspace تابع لـ Business أو Enterprise مع إمكانية الوصول إلى Google Chat
  • يجب تفعيل الدليل (مشاركة جهات الاتصال) في Google Workspace. يستخدم تطبيق الحوادث الدليل للبحث عن معلومات الاتصال الخاصة بالجهات المستجيبة للحوادث، مثل الاسم وعنوان البريد الإلكتروني. يجب أن يكون المستجيبون للحوادث مستخدمين لديهم حساب على Chat في مؤسستك على Google Workspace.

الأهداف

  • إنشاء تطبيق Chat يستجيب للحوادث
  • يمكنك مساعدة المستخدمين في الرد على الحوادث من خلال اتّخاذ الإجراءات التالية:
    • إنشاء مساحات للاستجابة للحوادث
    • نشر رسائل تلخّص الحوادث والردود
    • تتيح هذه الميزة التعاون مع الآخرين باستخدام ميزات تطبيق الدردشة التفاعلية.
  • تلخيص المحادثات والحلول باستخدام Vertex AI

الهندسة المعمارية

يوضّح المخطّط التالي بنية موارد Google Workspace وGoogle Cloud التي يستخدمها تطبيق Chat للاستجابة للحوادث.

بنية تطبيق Chat للاستجابة للحوادث

توضّح البنية الأساسية كيف يعالج تطبيق Chat المخصّص للاستجابة للحوادث حادثًا ما وحلّه.

  1. يبدأ المستخدم بلاغًا من موقع إلكتروني خارجي مستضاف على برمجة تطبيقات.

  2. يرسل الموقع الإلكتروني طلب HTTP غير متزامن إلى تطبيق Chat، الذي تتم استضافته أيضًا على برمجة تطبيقات.

  3. يعالج تطبيق Chat للاستجابة للحوادث الطلب باتّباع الخطوات التالية:

    1. تحصل خدمة مدير SDK في برمجة تطبيقات على معلومات أعضاء الفريق، مثل رقم تعريف المستخدم وعنوان البريد الإلكتروني.

    2. باستخدام مجموعة من طلبات HTTP إلى Chat API من خلال خدمة Apps Script المتقدّمة في Chat، ينشئ تطبيق Chat للاستجابة للحوادث مساحة في Chat مخصّصة للحوادث، ويضيف إليها أعضاء الفريق، ويرسل رسالة إلى المساحة.

  4. يناقش أعضاء الفريق الحادث في مساحة Chat.

  5. يستخدم أحد أعضاء الفريق أمرًا سريعًا للإشارة إلى حلّ المشكلة.

    1. يؤدي طلب HTTP إلى Chat API باستخدام خدمة Advanced Chat في برمجة تطبيقات إلى إدراج جميع رسائل مساحة Chat.

    2. تتلقّى Vertex AI الرسائل المُدرَجة وتنشئ ملخّصًا.

    3. تنشئ خدمة DocumentApp في برمجة تطبيقات مستندًا على "مستندات Google" وتضيف ملخّص Vertex AI إلى المستند.

    4. تتصل مكالمات تطبيق Chat الخاصة بالاستجابة للحوادث بواجهة برمجة التطبيقات Chat API لإرسال رسالة تتضمّن رابطًا إلى مستند ملخّص في "مستندات Google".

تجهيز البيئة

يوضّح هذا القسم كيفية إنشاء مشروع على Google Cloud وإعداده لتطبيق Chat.

إنشاء مشروع على Google Cloud

وحدة تحكّم Google API

  1. في Google API Console، انتقِل إلى "القائمة" > إدارة الهوية وإمكانية الوصول (IAM) والمشرف > إنشاء مشروع.

    الانتقال إلى صفحة "إنشاء مشروع"

  2. في حقل اسم المشروع، أدخِل اسمًا وصفيًا لمشروعك.

    اختياري: لتعديل رقم تعريف المشروع، انقر على تعديل. لا يمكن تغيير رقم تعريف المشروع بعد إنشائه، لذا اختَر رقم تعريف يلبي احتياجاتك طوال مدة المشروع.

  3. في حقل الموقع الجغرافي، انقر على تصفّح لعرض المواقع الجغرافية المحتملة لمشروعك. بعد ذلك، انقر على اختيار.
  4. انقر على إنشاء. ستنتقل وحدة تحكّم Google API إلى صفحة "لوحة البيانات"، وسيتم إنشاء مشروعك في غضون بضع دقائق.

gcloud CLI

في إحدى بيئات التطوير التالية، يمكنك الوصول إلى واجهة سطر الأوامر (CLI) في Google Cloud (gcloud):

  • Cloud Shell: لتفعيل Cloud Shell واستخدام وحدة طرفية على الإنترنت مع إعداد واجهة سطر الأوامر gcloud مسبقًا
    تفعيل Cloud Shell
  • Local Shell: لاستخدام بيئة تطوير على الجهاز، عليك تثبيت وإعداد gcloud CLI.
    لإنشاء مشروع على السحابة الإلكترونية، استخدِم الأمر gcloud projects create:
    gcloud projects create PROJECT_ID
    استبدِل PROJECT_ID بضبط رقم تعريف المشروع الذي تريد إنشاءه.

تفعيل الفوترة لمشروع على السحابة الإلكترونية

وحدة تحكّم Google API

  1. في Google API Console، انتقِل إلى الفوترة. انقر على القائمة > الفوترة > مشاريعي.

    الانتقال إلى "الفوترة لمشاريعي"

  2. في اختيار مؤسسة، اختَر المؤسسة المرتبطة بمشروعك على Google Cloud.
  3. في صف المشروع، افتح قائمة الإجراءات ()، ثم انقر على تغيير الفوترة واختَر حساب Cloud Billing.
  4. انقر على ضبط الحساب.

gcloud CLI

  1. لعرض قائمة بحسابات الفوترة المتاحة، نفِّذ الأمر التالي:
    gcloud billing accounts list
  2. ربط حساب فوترة بمشروع على Google Cloud:
    gcloud billing projects link PROJECT_ID --billing-account=BILLING_ACCOUNT_ID

    غيِّر القيم في السلسلة على الشكل التالي:

    • PROJECT_ID هو رقم تعريف المشروع لمشروع على السحابة الإلكترونية الذي تريد تفعيل الفوترة فيه.
    • BILLING_ACCOUNT_ID هو رقم تعريف حساب الفوترة الذي سيتم ربطه بمشروع Google Cloud.

تفعيل واجهات برمجة التطبيقات

وحدة تحكّم Google API

  1. في Google API Console، فعِّل Google Chat API وGoogle Docs API وAdmin SDK API وGoogle Workspace Marketplace SDK وVertex AI API.

    تفعيل واجهات برمجة التطبيقات

  2. تأكَّد من أنّك بصدد تفعيل واجهات برمجة التطبيقات في مشروع على السحابة الإلكترونية الصحيح، ثم انقر على التالي.

  3. تأكَّد من تفعيل واجهات برمجة التطبيقات الصحيحة، ثم انقر على تفعيل.

gcloud CLI

  1. إذا لزم الأمر، اضبط مشروع على السحابة الإلكترونية الحالي على المشروع الذي أنشأته باستخدام الأمر gcloud config set project:

    gcloud config set project PROJECT_ID

    استبدِل PROJECT_ID برقم تعريف المشروع لمشروع على السحابة الإلكترونية الذي أنشأته.

  2. فعِّل واجهة Google Chat API وواجهة مستندات Google API وواجهة مدير SDK وواجهة Google Workspace Marketplace SDK وواجهة Vertex AI API باستخدام الأمر gcloud services enable:

    gcloud services enable chat.googleapis.com docs.googleapis.com admin.googleapis.com aiplatform.googleapis.com appsmarket-component.googleapis.com

إعداد المصادقة والتفويض

يصل تطبيق Chat إلى واجهة برمجة تطبيقات Google Chat باستخدام بيانات اعتماد تطبيق Chat. يصل التطبيق إلى واجهة Admin SDK API وواجهة Google Docs API باستخدام بيانات اعتماد المستخدم.

إعداد مصادقة المستخدم وتفويضه

تتيح المصادقة ومنح الإذن لتطبيق Chat الوصول إلى الموارد في Google Workspace وGoogle Cloud لمعالجة الاستجابة لحادث أمني. على وجه التحديد، يتم استخدام مصادقة المستخدم لاستدعاء واجهة برمجة التطبيقات Docs API وواجهة برمجة التطبيقات Admin SDK API.

في هذا البرنامج التعليمي، ستنشر التطبيق داخليًا في نطاق Workspace، لذا يمكنك استخدام معلومات العنصر النائب. قبل نشر التطبيق خارجيًا، استبدِل المعلومات النائبة بمعلومات حقيقية في شاشة طلب الموافقة.

  1. في Google API Console، انتقِل إلى "القائمة" > منصة Google Auth > العلامة التجارية.

    الانتقال إلى "هوية العلامة التجارية"

  2. إذا سبق لك ضبط منصة Google Auth، يمكنك ضبط إعدادات شاشة طلب الموافقة المتعلّقة ببروتوكول OAuth التالية في العلامة التجارية والجمهور والوصول إلى البيانات. إذا ظهرت لك الرسالة لم يتم إعداد منصة Google Auth بعد، انقر على البدء:

    1. ضمن معلومات التطبيق، في اسم التطبيق، اكتب Incident Management.
    2. في حقل البريد الإلكتروني لدعم المستخدمين، اختَر عنوان بريدك الإلكتروني أو مجموعة Google مناسبة.
    3. انقر على التالي.
    4. ضمن الجمهور، اختَر داخلي. إذا لم تتمكّن من اختيار داخلي، اختَر خارجي.
    5. انقر على التالي.
    6. ضمن معلومات الاتصال، أدخِل عنوان بريد إلكتروني يمكنك تلقّي إشعارات عليه بشأن أي تغييرات تطرأ على مشروعك.
    7. انقر على التالي.
    8. ضمن إنهاء، راجِع سياسة بيانات المستخدمين في خدمات Google API، ثم ضَع علامة في المربّع أوافق على "سياسة بيانات المستخدمين في خدمات Google API" إذا كنت موافقًا.
    9. انقر على متابعة.
    10. انقر على إنشاء.
    11. إذا اخترت خارجي لنوع المستخدم، أضِف مستخدمين اختباريين:
      1. انقر على الجمهور.
      2. ضمن المستخدمون التجريبيون، انقر على إضافة مستخدمين.
      3. أدخِل عنوان بريدك الإلكتروني وأي مستخدمين آخرين معتمَدين للاختبار، ثم انقر على حفظ.
  3. انقر على الوصول إلى البيانات > إضافة نطاقات أو إزالتها. ستظهر لوحة تتضمّن قائمة بنطاقات كل واجهة برمجة تطبيقات فعّلتها في مشروعك على Google Cloud.

    1. ضمن إضافة النطاقات يدويًا، الصِق النطاقات التالية:

      • https://www.googleapis.com/auth/documents
      • https://www.googleapis.com/auth/admin.directory.user.readonly
      • https://www.googleapis.com/auth/script.external_request
      • https://www.googleapis.com/auth/userinfo.email
      • https://www.googleapis.com/auth/cloud-platform
    2. انقر على إضافة إلى الجدول.

    3. انقر على تعديل.

    4. بعد اختيار النطاقات التي يتطلّبها تطبيقك، انقر على حفظ في صفحة الوصول إلى البيانات.

إعداد مصادقة التطبيق ومنحه الأذونات

يتم استخدام مصادقة التطبيق لطلب بيانات من Chat API.

إنشاء حساب خدمة في Google Cloud Console

لإنشاء حساب خدمة، اتّبِع الخطوات التالية:

Google Cloud Console

  1. في Google Cloud Console، انتقِل إلى "القائمة" > المشرف وإدارة الهوية وإمكانية الوصول > حسابات الخدمة.

    الانتقال إلى "حسابات الخدمة"

    تظهر الخطوات المتبقية في Google Cloud Console.

  2. اختَر مشروعًا على Google Cloud.
  3. انقر على إنشاء حساب خدمة.
  4. أدخِل اسم حساب خدمة ليتم عرضه في Google Cloud Console.
  5. إذا كنت لا تريد ضبط عناصر التحكّم في الوصول الآن، انقر على تم لإنهاء عملية إنشاء حساب الخدمة. لضبط عناصر التحكّم في الوصول الآن، انقر على إنشاء ومتابعة وانتقِل إلى الخطوة التالية.
  6. اختياري: يمكنك منح أدوار لحساب الخدمة من أجل السماح بالوصول إلى موارد مشروع على السحابة الإلكترونية على Google Cloud بالإضافة إلى موارد Google Workspace. لمزيد من التفاصيل، يُرجى الاطّلاع على إدارة الوصول إلى المشاريع والمجلدات والمؤسسات.
  7. انقر على متابعة.
  8. اختياري: أدخِل المستخدمين أو المجموعات التي يمكنها إدارة حساب الخدمة هذا وتنفيذ إجراءات فيه. لمزيد من التفاصيل، يُرجى الاطّلاع على انتحال هوية حساب الخدمة.
  9. انقر على تم للانتهاء من إنشاء حساب الخدمة.

    دوِّن عنوان البريد الإلكتروني لحساب الخدمة.

gcloud CLI

  1. أنشئ حساب الخدمة:
    gcloud iam service-accounts create SERVICE_ACCOUNT_NAME \
      --display-name="SERVICE_ACCOUNT_NAME"
  2. اختياري: يمكنك منح أدوار لحساب الخدمة من أجل السماح بالوصول إلى موارد مشروع على السحابة الإلكترونية على Google Cloud بالإضافة إلى موارد Google Workspace. لمزيد من التفاصيل، يُرجى الاطّلاع على إدارة الوصول إلى المشاريع والمجلدات والمؤسسات.

يظهر حساب الخدمة في صفحة حساب الخدمة. بعد ذلك، أنشئ مفتاحًا خاصًا لحساب الخدمة.

إنشاء مفتاح خاص

لإنشاء مفتاح خاص لحساب الخدمة وتنزيله، اتّبِع الخطوات التالية:

  1. في Google Cloud Console، انتقِل إلى "القائمة" > المشرف وإدارة الهوية وإمكانية الوصول > حسابات الخدمة.

    الانتقال إلى "حسابات الخدمة"

    تظهر الخطوات المتبقية في Google Cloud Console.

  2. اختَر مشروعًا على Google Cloud.
  3. انقر على عنوان البريد الإلكتروني لحساب الخدمة الذي تريد إنشاء مفتاح له.
  4. انقر على علامة التبويب المفاتيح.
  5. انقر على القائمة المنسدلة إضافة مفتاح، ثمّ اختَر إنشاء مفتاح جديد.
  6. اختَر JSON كـ نوع المفتاح وانقر على إنشاء.

    يتم إنشاء زوج المفتاح العام/الخاص وتنزيله على جهازك كملف مفتاح لحساب الخدمة. احفظ ملف JSON الذي تم تنزيله باسم credentials.json في دليل العمل. هذا الملف هو النسخة الوحيدة من هذا المفتاح. بعد تنزيل ملف المفتاح، لا يمكنك تنزيله مرة أخرى. للحصول على معلومات حول كيفية تخزين المفتاح بشكل آمن، يُرجى الاطّلاع على أفضل الممارسات لإدارة مفاتيح حسابات الخدمة.

لمزيد من المعلومات حول حسابات الخدمة، يُرجى الاطّلاع على حسابات الخدمة في مستندات Google Cloud IAM.

إنشاء عميل OAuth متوافق مع Google Workspace Marketplace

لإنشاء عميل OAuth متوافق مع Google Workspace Marketplace، اتّبِع الخطوات التالية:

  1. في Google API Console، انتقِل إلى القائمة > المشرف وإدارة الهوية وإمكانية الوصول > حسابات الخدمة.

    الانتقال إلى "حسابات الخدمة"

  2. انقر على حساب الخدمة الذي أنشأته لتطبيق Chat.

  3. انقر على الإعدادات المتقدمة.

  4. انقر على إنشاء عميل OAuth متوافق مع Google Workspace Marketplace.

  5. انقر على متابعة.

ستظهر رسالة تأكيد تفيد بأنّه تم إنشاء عميل OAuth متوافق مع Google Workspace Marketplace.

إنشاء تطبيق Chat ونشره

في القسم التالي، عليك نسخ مشروع كامل من "برمجة تطبيقات Google" وتعديله، وهو مشروع يحتوي على جميع رموز التطبيق المطلوبة لتطبيق Chat، لذا لن تحتاج إلى نسخ كل ملف ولصقه.

تتضمّن بعض الدوال شرطات سفلية في نهاية أسمائها، مثل concatenateAllSpaceMessages_() من ChatApp.gs. يخفي الشرطة السفلية الدالة من صفحة الويب الخاصة ببدء الحدث عند فتحها في المتصفّح. لمزيد من المعلومات، يُرجى الاطّلاع على الدوال الخاصة.

تتيح "برمجة التطبيقات" نوعَين من الملفات، وهما نصوص .gs وملفات .html. للامتثال لهذا الدعم، يتم تضمين JavaScript من جهة العميل في التطبيق داخل علامات <script />، ويتم تضمين CSS داخل علامات <style /> داخل ملف HTML.

يمكنك اختياريًا الاطّلاع على المشروع بأكمله على GitHub.

عرض على GitHub

في ما يلي نظرة عامة على كل ملف:

Consts.gs

تحدّد هذه السمة الثوابت التي تشير إليها ملفات الرموز البرمجية الأخرى، بما في ذلك رقم تعريف مشروعك على السحابة الإلكترونية، ورقم تعريف موقع Vertex AI، وبيانات اعتماد التطبيق لحساب الخدمة، ورقم تعريف الأمر السريع لإغلاق بلاغ.

عرض رمز واحد (Consts.gs)

apps-script/chat/incident-response-app-auth/Consts.gs
const PROJECT_ID = 'replace-with-your-project-id';
const APP_CREDENTIALS = 'replace-with-your-app-credentials';
const APP_CREDENTIALS_SCOPES = 'https://www.googleapis.com/auth/chat.bot https://www.googleapis.com/auth/chat.app.memberships https://www.googleapis.com/auth/chat.app.spaces.create';
const VERTEX_AI_LOCATION_ID = 'us-central1';
const CLOSE_INCIDENT_COMMAND_ID = 1;
const MODEL_ID = 'gemini-2.5-flash-lite';
ChatApp.gs

يتعامل هذا النوع مع أحداث التفاعل في Chat، بما في ذلك الرسائل والنقر على الأزرار وأوامر التطبيقات (onAppCommand) ومربّعات الحوار. يستجيب للأمر السريع Close incident من خلال فتح مربّع حوار لجمع تفاصيل حلّ المشكلة. يقرأ الرسائل في المساحة من خلال استدعاء الطريقة spaces.messages.list في Chat API. الحصول على أرقام تعريف المستخدمين باستخدام خدمة الدليل في مدير SDK ضمن برمجة تطبيقات

عرض رمز واحد (ChatApp.gs)

apps-script/chat/incident-response-app-auth/ChatApp.gs
/**
 * Responds to a MESSAGE event in Google Chat.
 * 
 * It always responds with a simple "Hello" text message.
 *
 * @param {Object} event the event object from Google Chat
 */
function onMessage(event) {
  return { hostAppDataAction: { chatDataAction: { createMessageAction: { message: {
    text: "Hello from Incident Response app!"
  }}}}};
}

/**
 * Responds to an APP_COMMAND event in Google Chat.
 *
 * @param {Object} event the event object from Google Chat
 */
function onAppCommand(event) {
  if (event.chat.appCommandPayload.appCommandMetadata.appCommandId != CLOSE_INCIDENT_COMMAND_ID) {
    return { hostAppDataAction: { chatDataAction: { createMessageAction: { message: {
      text: "Command not recognized. Use the quick command `Close incident` to close the incident managed by this space."
    }}}}};
  }
  return { action: { navigations: [{ pushCard: { sections: [{
    header: "Close Incident",
    widgets: [{
      textInput: {
        label: "Please describe the incident resolution",
        type: "MULTIPLE_LINE",
        name: "description"
      }
    }, {
      buttonList: { buttons: [{
        text: "Close Incident",
        onClick: { action: { function: "closeIncident" }}
      }]}
    }]
  }]}}]}};
}

/**
 * Responds to a BUTTON_CLICKED event in Google Chat from Close Incident dialog.
 *
 * @param {Object} event the event object from Google Chat
 */
function closeIncident(event) {
  if (event.chat.buttonClickedPayload.isDialogEvent) {
    if (event.chat.buttonClickedPayload.dialogEventType == 'SUBMIT_DIALOG') {
      return processSubmitDialog_(event);
    }
    return { action: { navigations: [{ endNavigation: {
      action: "CLOSE_DIALOG" }
    }]}};
  }
}

/**
 * Responds to a BUTTON_CLICKED event in Google Chat from Close Incident dialog submission.
 *
 * It creates a Doc with a summary of the incident information and posts a message
 * to the space with a link to the Doc.
 *
 * @param {Object} event the event object from Google Chat
 */
function processSubmitDialog_(event) {
  const resolution = event.commonEventObject.formInputs.description.stringInputs.value[0];
  const space = event.chat.buttonClickedPayload.space;
  const chatHistory = concatenateAllSpaceMessages_(space.name);
  const chatSummary = summarizeChatHistory_(chatHistory);
  const docUrl = createDoc_(space.displayName, resolution, chatHistory, chatSummary);
  return { hostAppDataAction: { chatDataAction: { createMessageAction: { message: {
    text: `Incident closed with the following resolution: ${resolution}\n\nHere is the automatically generated post-mortem:\n${docUrl}`
  }}}}};
}

/**
 * Lists all the messages in the Chat space, then concatenate all of them into
 * a single text containing the full Chat history.
 *
 * For simplicity for this demo, it only fetches the first 100 messages.
 *
 * @return {string} a text containing all the messages in the space in the format:
 *          Sender's name: Message
 */
function concatenateAllSpaceMessages_(spaceName) {
  // Call Chat API method spaces.messages.list
  const response = Chat.Spaces.Messages.list(spaceName, { 'pageSize': 100 });
  const messages = response.messages;
  // Fetch the display names of the message senders and returns a text
  // concatenating all the messages.
  let userMap = new Map();
  return messages
    .map(message => `${getUserDisplayName_(userMap, message.sender.name)}: ${message.text}`)
    .join('\n');
}

/**
 * Obtains the display name of a user by using the Admin Directory API.
 *
 * The fetched display name is cached in the provided map, so we only call the API
 * once per user.
 *
 * If the user does not have a display name, then the full name is used.
 *
 * @param {Map} userMap a map containing the display names previously fetched
 * @param {string} userName the resource name of the user
 * @return {string} the user's display name
 */
function getUserDisplayName_(userMap, userName) {
  if (userMap.has(userName)) {
    return userMap.get(userName);
  }
  let displayName = 'Unknown User';
  try {
    const user = AdminDirectory.Users.get(
      userName.replace("users/", ""),
      { projection: 'BASIC', viewType: 'domain_public' });
    displayName = user.name.displayName ? user.name.displayName : user.name.fullName;
  } catch (e) {
    // Ignore error if the API call fails (for example, because it's an
    // out-of-domain user or Chat app) and just use 'Unknown User'.
  }
  userMap.set(userName, displayName);
  return displayName;
}
ChatSpaceCreator.gs

يتلقّى بيانات النموذج التي يدخلها المستخدمون في صفحة الويب الخاصة ببدء الحادث، ويستخدمها لإعداد مساحة في Chat من خلال إنشائها وملؤها، ثم ينشر رسالة حول الحادث.

عرض رمز واحد (ChatSpaceCreator.gs)

apps-script/chat/incident-response-app-auth/ChatSpaceCreator.gs
/**
 * Handles an incident by creating a chat space with the provided title and members, and posting a message.
 * All the actions are done using application credentials.
 *
 * @param {Object} formData - The data submitted by the user. It should contain the fields:
 *                           - title: The display name of the chat space.
 *                           - description: The description of the incident.
 *                           - users: A comma-separated string of user emails to be added to the space.
 * @return {string} The resource name of the new space.
 */
function handleIncident(formData) {
  const users = formData.users.trim().length > 0 ? formData.users.split(',') : [];
  const service = getService_();
  if (!service.hasAccess()) {
    console.error(service.getLastError());
    return;
   }
  const spaceName = createChatSpace_(formData.title, service);
  createHumanMembership_(spaceName, getUserEmail(), service);
  for (const user of users ){
    createHumanMembership_(spaceName, user, service);
  }
  createMessage_(spaceName, formData.description, service);
  return spaceName;
}

/**
 * Creates a chat space.
 *
 * @param {string} displayName - The name of the chat space.
 * @param {object} service - The credentials of the service account.
 * @returns {string} The resource name of the new space.
*/
function createChatSpace_(displayName, service) {
  try {
    // For private apps, the alias can be used
    const my_customer_alias = "customers/my_customer";
    // Specify the space to create.
    const space = {
        displayName: displayName,
        spaceType: 'SPACE',                
        customer: my_customer_alias
    };
    // Call Chat API with a service account to create a message.
    const createdSpace = Chat.Spaces.create(
        space,
        {},
        // Authenticate with the service account token.
        {'Authorization': 'Bearer ' + service.getAccessToken()});
    return createdSpace.name;
  } catch (err) {
    // TODO (developer) - Handle exception.
    console.log('Failed to create space with error %s', err.message);
  }
}


/**
 * Creates a human membership in a chat space.
 *
 * @param {string} spaceName - The resource name of the space.
 * @param {string} email - The email of the user to be added.
 * @param {object} service - The credentials of the service account.
 */
function createHumanMembership_(spaceName, email, service){
  try{
    const membership = {
      member: {
        name: 'users/'+email,
        // User type for the membership
        type: 'HUMAN'
      }
    };
    const result = Chat.Spaces.Members.create(
      membership,
      spaceName,
      {},
      {'Authorization': 'Bearer ' + service.getAccessToken()}
    );
  } catch (err){
    console.log('Failed to create membership with error %s', err.message)
  }

}

/**
 * Creates a chat message.
 *
 * @param {string} spaceName - The resource name of the space.
 * @param {string} message - The text to be posted.
 * @param {object} service - The credentials of the service account.
 * @return {string} the resource name of the new message.
 */
function createMessage_(spaceName, message, service) {
  try {
    const request = {
      text: message
    };
    // Call Chat API with a service account to create a message.
    const result = Chat.Spaces.Messages.create(
        request,
        spaceName,
        {},
        // Authenticate with the service account token.
        {'Authorization': 'Bearer ' + service.getAccessToken()});
    return result.name;
  } catch (err) {
    // TODO (developer) - Handle exception.
    console.log('Failed to create message with error %s', err.message);
  }
}

/**
 * Creates a service for the service account.
 * @return {object}  - The credentials of the service account.
 */
function getService_() {
  return OAuth2.createService(APP_CREDENTIALS.client_email)
      .setTokenUrl('https://oauth2.googleapis.com/token')
      .setPrivateKey(APP_CREDENTIALS.private_key)
      .setIssuer(APP_CREDENTIALS.client_email)
      .setSubject(APP_CREDENTIALS.client_email)
      .setScope(APP_CREDENTIALS_SCOPES)
      .setPropertyStore(PropertiesService.getScriptProperties());
}
DocsApi.gs

يطلب من Docs API إنشاء مستند في "مستندات Google" ضمن حساب المستخدم على Google Drive، ويكتب ملخّصًا لمعلومات الحادثة التي تم إنشاؤها في VertexAiApi.gs.

عرض رمز واحد (DocsApi.gs)

apps-script/chat/incident-response-app-auth/DocsApi.gs
/**
 * Creates a Doc in the user's Google Drive and writes a summary of the incident information to it.
 *
 * @param {string} title The title of the incident
 * @param {string} resolution Incident resolution described by the user
 * @param {string} chatHistory The whole Chat history be included in the document
 * @param {string} chatSummary A summary of the Chat conversation to be included in the document
 * @return {string} the URL of the created Doc
 */
function createDoc_(title, resolution, chatHistory, chatSummary) {
  let doc = DocumentApp.create(title);
  let body = doc.getBody();
  body.appendParagraph(`Post-Mortem: ${title}`).setHeading(DocumentApp.ParagraphHeading.TITLE);
  body.appendParagraph("Resolution").setHeading(DocumentApp.ParagraphHeading.HEADING1);
  body.appendParagraph(resolution);
  body.appendParagraph("Summary of the conversation").setHeading(DocumentApp.ParagraphHeading.HEADING1);
  body.appendParagraph(chatSummary);
  body.appendParagraph("Full Chat history").setHeading(DocumentApp.ParagraphHeading.HEADING1);
  body.appendParagraph(chatHistory);
  return doc.getUrl();
}
VertexAiApi.gs

تلخّص هذه الدالة المحادثة في مساحة Chat باستخدام Vertex AI API. يتم نشر هذا الملخّص في مستند تم إنشاؤه خصيصًا في DocsAPI.gs.

عرض رمز واحد (VertexAiApi.gs)

apps-script/chat/incident-response-app-auth/VertexAiApi.gs
/**
 * Summarizes a Chat conversation using the Vertex AI text prediction API.
 *
 * @param {string} chatHistory The Chat history that will be summarized.
 * @return {string} The content from the text prediction response.
 */
function summarizeChatHistory_(chatHistory) {
  const API_ENDPOINT = `https://${VERTEX_AI_LOCATION_ID}-aiplatform.googleapis.com/v1/projects/${PROJECT_ID}/locations/${VERTEX_AI_LOCATION_ID}/publishers/google/models/${MODEL_ID}:generateContent`;
  const prompt =
    "Summarize the following conversation between Engineers resolving an incident"
      + " in a few sentences. Use only the information from the conversation.\n\n"
      + chatHistory;
  // Get the access token.
  const accessToken = ScriptApp.getOAuthToken();

  const headers = {
    'Authorization': 'Bearer ' + accessToken,
    'Content-Type': 'application/json',
  };
  const payload = {
    'contents': {
      'role': 'user',
      'parts' : [
        {
          'text': prompt
        }
      ]
    }
  }
  const options = {
    'method': 'post',
    'headers': headers,
    'payload': JSON.stringify(payload),
    'muteHttpExceptions': true,
  };
  try {
    const response = UrlFetchApp.fetch(API_ENDPOINT, options);
    const responseCode = response.getResponseCode();
    const responseText = response.getContentText();

    if (responseCode === 200) {
      const jsonResponse = JSON.parse(responseText);
      console.log(jsonResponse)
      if (jsonResponse.candidates && jsonResponse.candidates.length > 0) {
        return jsonResponse.candidates[0].content.parts[0].text; // Access the summarized text
      } else {
        return "No summary found in response.";
      }

    } else {
      console.error("Vertex AI API Error:", responseCode, responseText);
      return `Error: ${responseCode} - ${responseText}`;
    }
  } catch (e) {
    console.error("UrlFetchApp Error:", e);
    return "Error: " + e.toString();
  }
}
WebController.gs

تعرض هذه السمة الموقع الإلكتروني الخاص بتهيئة الحوادث.

عرض رمز واحد (WebController.gs)

apps-script/chat/incident-response-app-auth/WebController.gs
/**
 * Serves the web page from Index.html.
 */
function doGet() {
  return HtmlService
    .createTemplateFromFile('Index')
    .evaluate();
}

/**
 * Serves the web content from the specified filename.
 */
function include(filename) {
  return HtmlService
    .createHtmlOutputFromFile(filename)
    .getContent();
}

/**
 * Returns the email address of the user running the script.
 */
function getUserEmail() {
  return Session.getActiveUser().getEmail();
}
Index.html

تمثّل هذه السمة رمز HTML الذي يتضمّن الموقع الإلكتروني الذي تمّت فيه عملية إعداد الحدث.

عرض رمز واحد (Index.html)

apps-script/chat/incident-response-app-auth/Index.html
<!DOCTYPE html>
<html>
  <head>
    <base target="_top">
    <link href='https://fonts.googleapis.com/css?family=Roboto' rel='stylesheet'>
    <?!= include('Stylesheet'); ?>
  </head>
  <body>
    <div class="container">
      <div class="content">
        <h1>Incident Manager</h1>
        <form id="incident-form" onsubmit="handleFormSubmit(this)">
          <div id="form">
            <p>
              <label for="title">Incident title</label><br/>
              <input type="text" name="title" id="title" />
            </p>
            <p>
              <label for="users">Incident responders</label><br/>
              <small>
                Please enter a comma-separated list of email addresses of the users
                that should be added to the space.
                Do not include <?= getUserEmail() ?> as it will be added automatically.
              </small><br/>
              <input type="text" name="users" id="users" />
            </p>
            <p>
              <label for="description">Initial message</label></br>
              <small>This message will be posted after the space is created.</small><br/>
              <textarea name="description" id="description"></textarea>
            </p>
            <p class="text-center">
              <input type="submit" value="CREATE CHAT SPACE" />
            </p>
          </div>
          <div id="output" class="hidden"></div>
          <div id="clear" class="hidden">
            <input type="reset" value="CREATE ANOTHER INCIDENT" onclick="onReset()" />
          </div>
        </form>
      </div>
    </div>
    <?!= include('JavaScript'); ?>
  </body>
</html>
JavaScript.html

تعالج هذه السمة سلوك النموذج، بما في ذلك عمليات الإرسال والأخطاء والمحو، وذلك لموقع الويب الذي يتم فيه بدء الحادث. يتم تضمينها في Index.html من خلال الدالة المخصّصة include في WebController.gs.

عرض رمز واحد (JavaScript.html)

apps-script/chat/incident-response-app-auth/JavaScript.html
<script>
  var formDiv = document.getElementById('form');
  var outputDiv = document.getElementById('output');
  var clearDiv = document.getElementById('clear');

  function handleFormSubmit(formObject) {
    event.preventDefault();
    outputDiv.innerHTML = 'Please wait while we create the space...';
    hide(formDiv);
    show(outputDiv);
    google.script.run
      .withSuccessHandler(updateOutput)
      .withFailureHandler(onFailure)
      .handleIncident(formObject);
  }

  function updateOutput(response) {
    var spaceId = response.replace('spaces/', '');
    outputDiv.innerHTML =
      '<p>Space created!</p><p><a href="https://mail.google.com/chat/#chat/space/'
        + spaceId
        + '" target="_blank">Open space</a></p>';
    show(outputDiv);
    show(clearDiv);
  }

  function onFailure(error) {
    outputDiv.innerHTML = 'ERROR: ' + error.message;
    outputDiv.classList.add('error');
    show(outputDiv);
    show(clearDiv);
  }

  function onReset() {
    outputDiv.innerHTML = '';
    outputDiv.classList.remove('error');
    show(formDiv);
    hide(outputDiv);
    hide(clearDiv);
  }

  function hide(element) {
    element.classList.add('hidden');
  }

  function show(element) {
    element.classList.remove('hidden');
  }
</script>
Stylesheet.html

تمثّل هذه السمة ملف CSS الخاص بموقع الويب الذي يتم فيه بدء الحادث. يتم تضمينها في Index.html من خلال الدالة المخصّصة include في WebController.gs.

عرض رمز واحد (Stylesheet.html)

apps-script/chat/incident-response-app-auth/Stylesheet.html
<style>
  * {
    box-sizing: border-box;
  }
  body {
    font-family: Roboto, Arial, Helvetica, sans-serif;
  }
  div.container {
    display: flex;
    justify-content: center;
    align-items: center;
    position: absolute;
    top: 0; bottom: 0; left: 0; right: 0;
  }
  div.content {
    width: 80%;
    max-width: 1000px;
    padding: 1rem;
    border: 1px solid #999;
    border-radius: 0.25rem;
    box-shadow: 0 2px 2px 0 rgba(66, 66, 66, 0.08), 0 2px 4px 2px rgba(66, 66, 66, 0.16);
  }
  h1 {
    text-align: center;
    padding-bottom: 1rem;
    margin: 0 -1rem 1rem -1rem;
    border-bottom: 1px solid #999;
  }
 #output {
    text-align: center;
    min-height: 250px;
  }
  div#clear {
    text-align: center;
    padding-top: 1rem;
    margin: 1rem -1rem 0 -1rem;
    border-top: 1px solid #999;
  }
  input[type=text], textarea {
    width: 100%;
    padding: 1rem 0.5rem;
    margin: 0.5rem 0;
    border: 0;
    border-bottom: 1px solid #999;
    background-color: #f0f0f0;
  }
  textarea {
    height: 5rem;
  }
  small {
    color: #999;
  }
  input[type=submit], input[type=reset] {
    padding: 1rem;
    border: none;
    background-color: #6200ee;
    color: #fff;
    border-radius: 0.25rem;
    width: 25%;
  }
  .hidden {
    display: none;
  }
  .text-center {
    text-align: center;
  }
  .error {
    color: red;
  }
</style>

العثور على رقم تعريف مشروعك على السحابة الإلكترونية ورقم تعريفه

  1. في Google API Console، انتقِل إلى مشروعك على السحابة الإلكترونية.

    الانتقال إلى "وحدة تحكّم Google API"

  2. انقر على "الإعدادات والأدوات" > إعدادات المشروع.

  3. دوِّن القيم في حقلَي رقم المشروع ورقم تعريف المشروع. يمكنك استخدامها في الأقسام التالية.

إنشاء مشروع "برمجة تطبيقات Google"

لإنشاء مشروع في &quot;برمجة تطبيقات Google&quot; وربطه بمشروعك على السحابة الإلكترونية، اتّبِع الخطوات التالية:

  1. انقر على الزر التالي لفتح مشروع الردّ على الحوادث باستخدام Google Chat في برمجة تطبيقات.
    افتح المشروع
  2. انقر على نظرة عامة.
  3. في صفحة النظرة العامة، انقر على رمز إنشاء نسخة إنشاء نسخة.
  4. أدخِل اسمًا لنسخة مشروع "برمجة تطبيقات Google":

    1. انقر على نسخة من الاستجابة للحوادث باستخدام Google Chat.

    2. في عنوان المشروع، اكتب Incident Management Chat app.

    3. انقر على إعادة تسمية.

  5. في نسختك من مشروع برمجة تطبيقات، انتقِل إلى الملف Consts.gs واستبدِل YOUR_PROJECT_ID بمعرّف مشروعك على السحابة الإلكترونية.

ضبط مشروع على السحابة الإلكترونية لمشروع برمجة تطبيقات

  1. في مشروعك على "برمجة تطبيقات Google"، انقر على رمز إعدادات المشروع إعدادات المشروع.
  2. ضمن مشروع Google Cloud Platform (GCP)، انقر على تغيير المشروع.
  3. في رقم مشروع Google Cloud Platform، الصِق رقم مشروع على السحابة الإلكترونية.
  4. انقر على ضبط المشروع. تم ربط مشروع على السحابة الإلكترونية بمشروع "برمجة التطبيقات".

إنشاء عملية تفعيل في "برمجة تطبيقات Google"

بعد الانتهاء من إعداد الرمز البرمجي، يمكنك نشر مشروع &quot;برمجة تطبيقات Google&quot;. يتم استخدام معرّف النشر عند ضبط تطبيق Chat في Google Cloud.

  1. في برمجة تطبيقات، افتح مشروع تطبيق الاستجابة للحوادث.

    الانتقال إلى برمجة تطبيقات

  2. انقر على نشر > عملية نشر جديدة.

  3. إذا لم يتم تحديد الإضافة وتطبيق الويب من قبل، انقر على أنواع النشر رمز إعدادات المشروع بجانب اختيار النوع، ثم اختَر الإضافة وتطبيق الويب.

  4. في الوصف، أدخِل وصفًا لهذا الإصدار، مثل Complete version of incident management app.

  5. في التنفيذ بصفتك، اختَر المستخدم الذي يصل إلى تطبيق الويب.

  6. في مَن يمكنه الوصول، اختَر أي مستخدم ضمن مؤسستك على Workspace، حيث "مؤسستك على Workspace" هو اسم مؤسستك على Google Workspace.

  7. انقر على نشر. تُبلغ برمجة تطبيقات عن نجاح عملية التفعيل، وتوفّر معرّفًا لعملية التفعيل وعنوان URL لصفحة الويب الخاصة بإعداد الحادثة.

  8. دوِّن عنوان URL لتطبيق الويب الذي ستنتقل إليه لاحقًا عند بدء حادثة. انسخ رقم تعريف عملية النشر. يتم استخدام هذا المعرّف أثناء ضبط تطبيق Chat في Google API Console.

  9. انقر على تم.

ضبط تطبيق Chat في "وحدة تحكّم Google API"

يوضّح هذا القسم كيفية ضبط Google Chat API في &quot;وحدة تحكّم Google API&quot; باستخدام معلومات عن تطبيق Chat، بما في ذلك معرّف عملية النشر التي أنشأتها للتو من مشروع برمجة تطبيقات.

  1. في Google API Console، انقر على القائمة > واجهات برمجة التطبيقات والخدمات > واجهات برمجة التطبيقات والخدمات المفعَّلة > Google Chat API > الإعدادات.

    الانتقال إلى إعدادات Chat API

  2. في حقل اسم التطبيق، اكتب Incident Management.

  3. في عنوان URL الخاص بالأفاتار، اكتب https://developers.google.com/chat/images/quickstart-app-avatar.png.

  4. في حقل الوصف، اكتب Responds to incidents..

  5. انقر على مفتاح التبديل تفعيل الميزات التفاعلية لتفعيل هذا الإعداد.

  6. ضمن الوظائف، اختَر الانضمام إلى المساحات والمحادثات الجماعية.

  7. ضِمن إعدادات الربط، اختَر Apps Script.

  8. في حقل رقم تعريف النشر، الصِق رقم تعريف نشر برمجة تطبيقات الذي نسخته سابقًا من عملية نشر مشروع برمجة تطبيقات.

  9. ضمن المشغّلات، اضبط onAppCommand للمشغّل أمر التطبيق.

  10. سجِّل طلبًا سريعًا يستخدمه تطبيق Chat الذي تم تنفيذه بالكامل:

    1. ضمن الأوامر، انقر على إضافة أمر.

    2. في معرّف الأمر، اكتب 1.

    3. في حقل الوصف، اكتب Closes the incident being discussed in the space.

    4. ضمن نوع الأمر، اختَر أمر سريع.

    5. في اسم الأمر السريع، اكتب Close incident.

    6. اختَر يفتح مربّع حوار (أو مربّع حوار).

    7. انقر على تم. يتم تسجيل الأمر وإدراجه.

  11. ضمن إمكانية الوصول، اختَر إتاحة تطبيق Chat هذا لمستخدمين ومجموعات محدّدين في نطاق Workspace وأدخِل عنوان بريدك الإلكتروني.

  12. ضمن السجلات، اختَر تسجيل الأخطاء في خدمة "التسجيل".

  13. انقر على حفظ. ستظهر رسالة تفيد بأنّه تم حفظ الإعدادات، ما يعني أنّ التطبيق جاهز للاختبار.

الحصول على موافقة المشرف

للحصول على موافقة المشرف، عليك ضبط تطبيق Chat في حزمة تطوير البرامج (SDK) في Google Workspace Marketplace.

ضبط تطبيق Chat في حزمة تطوير البرامج (SDK) في Google Workspace Marketplace

لضبط تطبيق Chat في حزمة تطوير البرامج (SDK) في Google Workspace Marketplace، اتّبِع الخطوات التالية:

  1. في Google API Console، انتقِل إلى القائمة > واجهات برمجة التطبيقات والخدمات > واجهات برمجة التطبيقات والخدمات المفعَّلة > Google Workspace Marketplace SDK > إعدادات التطبيق.

    الانتقال إلى "إعدادات التطبيق"

  2. أكمِل صفحة "إعدادات التطبيق". تعتمد طريقة إعداد تطبيق الدردشة على الجمهور المستهدَف وعوامل أخرى. للحصول على مساعدة في إكمال صفحة إعدادات التطبيق، يُرجى الاطّلاع على ضبط تطبيقك في حزمة تطوير البرامج (SDK). لأغراض هذا الدليل، أدخِل المعلومات التالية:

    1. ضمن ظهور التطبيقات، اختَر خاص.
    2. ضمن إعدادات التثبيت، اختَر تثبيت المشرف.
    3. ضمن عمليات تكامل التطبيقات، اختَر تطبيق Chat.
    4. ضِمن نطاقات OAuth، أدخِل النطاقات التالية:
      • https://www.googleapis.com/auth/chat.app.spaces
      • https://www.googleapis.com/auth/chat.app.memberships
    5. ضمن معلومات المطوِّر، أدخِل اسم المطوِّر وعنوان URL لموقع إلكتروني للمطوِّر والبريد الإلكتروني للمطوِّر.
    6. انقر على حفظ المسودة.

بعد إعداد التطبيق، عدِّل بطاقة بيانات المتجر باتّباع الخطوات التالية:

  1. في Google Cloud Console، انتقِل إلى القائمة > واجهات برمجة التطبيقات والخدمات > واجهات برمجة التطبيقات والخدمات المفعّلة > Google Workspace Marketplace SDK > بطاقة بيانات المتجر.
  2. في تفاصيل التطبيق، اختَر "تطوير الويب" كفئة.
  3. في أصول الرسومات، حمِّل رموز التطبيقات بالتنسيقات المطلوبة.
  4. في لقطات الشاشة، حمِّل لقطة شاشة للتطبيق.
  5. في روابط الدعم، املأ عنوان URL لبنود الخدمة وعنوان URL لسياسة الخصوصية وعنوان URL للدعم.
  6. في التوزيع، اختَر المناطق التي سيتوفّر فيها هذا التطبيق.
  7. انقر على نشر.

الحصول على موافقة المشرف

بعد إعداد حساب الخدمة لتلقّي موافقة المشرف، احصل على الموافقة من مشرف Google Workspace يمكنه منحها باتّباع الخطوات الواردة في إعداد إذن الوصول إلى تطبيقات Chat.

اختبار تطبيق Chat

لاختبار تطبيق Chat لإدارة الحوادث، ابدأ حادثًا من صفحة الويب وتأكَّد من أنّ تطبيق Chat يعمل على النحو المتوقّع:

  1. انتقِل إلى عنوان URL لتطبيق الويب الذي تم تفعيله في Apps Script.

  2. عندما يطلب برمجة تطبيقات الإذن بالوصول إلى بياناتك، انقر على مراجعة الأذونات، وسجِّل الدخول باستخدام حساب Google مناسب في نطاق Google Workspace، ثم انقر على السماح.

  3. سيتم فتح صفحة ويب لبدء معالجة الحدث. أدخِل معلومات الاختبار:

    1. في عنوان الحادث، اكتب The First Incident.
    2. اختياريًا، في المستجيبون للحوادث، أدخِل عناوين البريد الإلكتروني الخاصة بالمستجيبين الآخرين للحوادث. يجب أن يكونوا مستخدمين لديهم حساب على Google Chat في مؤسسة Google Workspace أو ستتعذّر عملية إنشاء المساحة. لا تُدخِل عنوان بريدك الإلكتروني لأنّه يتم تضمينه تلقائيًا.
    3. في الرسالة الأولية، اكتب Testing the incident management Chat app.
  4. انقر على إنشاء مساحة Chat. تظهر الرسالة creating space.

  5. بعد إنشاء المساحة، ستظهر رسالة Space created!. انقر على فتح المساحة، ما يؤدي إلى فتح المساحة في Chat في علامة تبويب جديدة.

  6. يمكنك أنت والمستجيبون الآخرون للحوادث إرسال رسائل في المساحة، إذا أردت. يلخّص التطبيق هذه الرسائل باستخدام Vertex AI ويشارك مستندًا استرجعيًا.

  7. لإنهاء الاستجابة للحوادث وبدء عملية الحل، شغِّل الأمر السريع Close incident في مساحة الدردشة. سيتم فتح مربّع حوار لإدارة الحوادث.

  8. في إغلاق الحادثة، أدخِل وصفًا لحلّ الحادثة، مثل Test complete.

  9. انقر على إغلاق الحادثة.

يسرد تطبيق "إدارة الحوادث" الرسائل في المساحة، ويلخّصها باستخدام Vertex AI، ويلصق الملخّص في مستند Google Docs، ويشارك المستند في المساحة.

تَنظيم

لتجنُّب تحمّل رسوم في حسابك على Google Cloud مقابل الموارد المستخدَمة في هذا البرنامج التعليمي، ننصحك بحذف مشروع على السحابة الإلكترونية.

  1. في Google API Console، انتقِل إلى صفحة إدارة الموارد. انقر على القائمة > إدارة الهوية وإمكانية الوصول والمشرف > إدارة الموارد.

    الانتقال إلى "إدارة الموارد"

  2. في قائمة المشاريع، اختَر المشروع الذي تريد حذفه، ثم انقر على حذف .
  3. في مربّع الحوار، اكتب رقم تعريف المشروع، ثم انقر على إيقاف لحذف المشروع.
  • يصادق تطبيق الاستجابة للحوادث باستخدام بيانات اعتماد المستخدم لاستدعاء واجهات برمجة التطبيقات واستخدام خدمات Google Cloud، مثل Chat API وVertex AI API. وهذا يعني أنّه يجب أن يكون لدى المستخدم الذي يبدأ إنشاء حدث إذن بالوصول إلى هذه الخدمات. لتعزيز أداء التطبيق، ننصحك باستخدام حساب خدمة عند طلب واجهة برمجة التطبيقات Vertex AI بدلاً من بيانات اعتماد المستخدم الذي يستدعي Close incident الأمر السريع. للحصول على مساعدة بشأن إعداد حساب خدمة لواجهة Vertex AI API، يُرجى الاطّلاع على استخدام حساب خدمة مخصّص.

تطبيقات المحادثات التي ليست إضافات: الردّ على الحوادث باستخدام Google Chat وVertex AI و"برمجة تطبيقات Google" (مصادقة التطبيقات)

تنطبق التعليمات وعيّنات التعليمات البرمجية التالية على تطبيق Chat ليس إضافة Google Workspace (عرض على GitHub).

إنشاء مشروع برمجة تطبيقات وإعداده

  1. افتح مشروع الردّ على الحوادث باستخدام Google Chat في "برمجة تطبيقات Google" لتطبيق Chat ليس إضافة، وأنشئ نسخة منه.
  2. عند ضبط إعدادات Chat API في Google API Console، ألغِ تحديد إنشاء تطبيق Chat هذا كإضافة في Google Workspace. سيظهر مربّع حوار يطلب منك التأكيد. في مربّع الحوار، انقر على إيقاف.
  3. سجِّل أمر يبدأ بشرطة مائلة /closeIncident (معرّف الأمر 1، اختَر يفتح مربع حوار) واكتب /closeIncident في المساحة لحلّ مشكلة.

رمز مصدر

Consts.gs
apps-script/incident-response-app-auth/Consts.gs
const PROJECT_ID = 'replace-with-your-project-id';
const CLOSE_INCIDENT_COMMAND_ID = 1;
const APP_CREDENTIALS = 'replace-with-your-app-credentials';
const APP_CREDENTIALS_SCOPES = 'https://www.googleapis.com/auth/chat.bot https://www.googleapis.com/auth/chat.app.memberships https://www.googleapis.com/auth/chat.app.spaces.create';
const VERTEX_AI_LOCATION_ID = 'us-central1';
const MODEL_ID = 'gemini-1.5-flash-002';
ChatApp.gs
apps-script/incident-response-app-auth/ChatApp.gs
/**
 * Responds to a MESSAGE event in Google Chat.
 *
 * This app only responds to a slash command with the ID 1 ("/closeIncident").
 * It will respond to any other message with a simple "Hello" text message.
 *
 * @param {Object} event the event object from Google Chat
 */
function onMessage(event) {
  if (event.message.slashCommand) {
    return processSlashCommand_(event);
  }
  return { "text": "Hello from Incident Response app!" };
}

/**
 * Responds to a CARD_CLICKED event in Google Chat.
 *
 * This app only responds to one kind of dialog (Close Incident).
 *
 * @param {Object} event the event object from Google Chat
 */
function onCardClick(event) {
  if (event.isDialogEvent) {
    if (event.dialogEventType == 'SUBMIT_DIALOG') {
      return processSubmitDialog_(event);
    }
    return {
      actionResponse: {
        type: "DIALOG",
        dialogAction: {
          actionStatus: "OK"
        }
      }
    };
  }
}

/**
 * Responds to a MESSAGE event with a Slash command in Google Chat.
 *
 * This app only responds to a slash command with the ID 1 ("/closeIncident")
 * by returning a Dialog.
 *
 * @param {Object} event the event object from Google Chat
 */
function processSlashCommand_(event) {
  if (event.message.slashCommand.commandId != CLOSE_INCIDENT_COMMAND_ID) {
    return {
      "text": "Command not recognized. Use the command `/closeIncident` to close the incident managed by this space."
    };
  }
  const sections = [
    {
      header: "Close Incident",
      widgets: [
        {
          textInput: {
            label: "Please describe the incident resolution",
            type: "MULTIPLE_LINE",
            name: "description"
          }
        },
        {
          buttonList: {
            buttons: [
              {
                text: "Close Incident",
                onClick: {
                  action: {
                    function: "closeIncident"
                  }
                }
              }
            ]
          }
        }
      ]
    }
  ];
  return {
    actionResponse: {
      type: "DIALOG",
      dialogAction: {
        dialog: {
          body: {
            sections,
          }
        }
      }
    }
  };
}

/**
 * Responds to a CARD_CLICKED event with a Dialog submission in Google Chat.
 *
 * This app only responds to one kind of dialog (Close Incident).
 * It creates a Doc with a summary of the incident information and posts a message
 * to the space with a link to the Doc.
 *
 * @param {Object} event the event object from Google Chat
 */
function processSubmitDialog_(event) {
  const resolution = event.common.formInputs.description[""].stringInputs.value[0];
  const chatHistory = concatenateAllSpaceMessages_(event.space.name);
  const chatSummary = summarizeChatHistory_(chatHistory);
  const docUrl = createDoc_(event.space.displayName, resolution, chatHistory, chatSummary);
  return {
    actionResponse: {
      type: "NEW_MESSAGE",
    },
    text: `Incident closed with the following resolution: ${resolution}\n\nHere is the automatically generated post-mortem:\n${docUrl}`
  };
}

/**
 * Lists all the messages in the Chat space, then concatenate all of them into
 * a single text containing the full Chat history.
 *
 * For simplicity for this demo, it only fetches the first 100 messages.
 *
 * Messages with slash commands are filtered out, so the returned history will
 * contain only the conversations between users and not app command invocations.
 *
 * @return {string} a text containing all the messages in the space in the format:
 *          Sender's name: Message
 */
function concatenateAllSpaceMessages_(spaceName) {
  // Call Chat API method spaces.messages.list
  const response = Chat.Spaces.Messages.list(spaceName, { 'pageSize': 100 });
  const messages = response.messages;
  // Fetch the display names of the message senders and returns a text
  // concatenating all the messages.
  let userMap = new Map();
  return messages
    .filter(message => message.slashCommand === undefined)
    .map(message => `${getUserDisplayName_(userMap, message.sender.name)}: ${message.text}`)
    .join('\n');
}

/**
 * Obtains the display name of a user by using the Admin Directory API.
 *
 * The fetched display name is cached in the provided map, so we only call the API
 * once per user.
 *
 * If the user does not have a display name, then the full name is used.
 *
 * @param {Map} userMap a map containing the display names previously fetched
 * @param {string} userName the resource name of the user
 * @return {string} the user's display name
 */
function getUserDisplayName_(userMap, userName) {
  if (userMap.has(userName)) {
    return userMap.get(userName);
  }
  let displayName = 'Unknown User';
  try {
    const user = AdminDirectory.Users.get(
      userName.replace("users/", ""),
      { projection: 'BASIC', viewType: 'domain_public' });
    displayName = user.name.displayName ? user.name.displayName : user.name.fullName;
  } catch (e) {
    // Ignore error if the API call fails (for example, because it's an
    // out-of-domain user or Chat app)) and just use 'Unknown User'.
  }
  userMap.set(userName, displayName);
  return displayName;
}
ChatSpaceCreator.gs
apps-script/incident-response-app-auth/ChatSpaceCreator.gs
/**
 * Handles an incident by creating a chat space, adding members, and posting a message.
 * All the actions are done using application credentials.
 *
 * @param {Object} formData - The data submitted by the user. It should contain the fields:
 *                           - title: The display name of the chat space.
 *                           - description: The description of the incident.
 *                           - users: A comma-separated string of user emails to be added to the space.
 * @return {string} The resource name of the new space.
 */
function handleIncident(formData) {
  const users = formData.users.trim().length > 0 ? formData.users.split(',') : [];
  const service = getService_();
  if (!service.hasAccess()) {
    console.error(service.getLastError());
    return;
   }
  const spaceName = createChatSpace_(formData.title, service);
  createHumanMembership_(spaceName, getUserEmail(), service);
  for (const user of users ){
    createHumanMembership_(spaceName, user, service);
  }
  createMessage_(spaceName, formData.description, service);
  return spaceName;
}
/**
 * Creates a chat space with application credentials.
 *
 * @param {string} displayName - The name of the chat space.
 * @param {object} service - The credentials of the service account.
 * @returns {string} The resource name of the new space.
*/
function createChatSpace_(displayName, service) {
  try {
    // For private apps, the alias can be used
    const my_customer_alias = "customers/my_customer";
    // Specify the space to create.
    const space = {
        displayName: displayName,
        spaceType: 'SPACE',                
        customer: my_customer_alias
    };
    // Call Chat API with a service account to create a message.
    const createdSpace = Chat.Spaces.create(
        space,
        {},
        // Authenticate with the service account token.
        {'Authorization': 'Bearer ' + service.getAccessToken()});
    return createdSpace.name;
  } catch (err) {
    // TODO (developer) - Handle exception.
    console.log('Failed to create space with error %s', err.message);
  }
}
/*
 * Creates a chat message with application credentials.
 *
 * @param {string} spaceName - The resource name of the space.
 * @param {string} message - The text to be posted.
 * @param {object} service - The credentials of the service account.
 * @return {string} the resource name of the new space.
 */
function createMessage_(spaceName, message, service) {
  try {
    // Call Chat API with a service account to create a message.
    const result = Chat.Spaces.Messages.create(
        {'text': message},
        spaceName,
        {},
        // Authenticate with the service account token.
        {'Authorization': 'Bearer ' + service.getAccessToken()});

  } catch (err) {
    // TODO (developer) - Handle exception.
    console.log('Failed to create message with error %s', err.message);
  }
}
/**
 * Creates a human membership in a chat space with application credentials.
 *
 * @param {string} spaceName - The resource name of the space.
 * @param {string} email - The email of the user to be added.
 * @param {object} service - The credentials of the service account.
 */
function createHumanMembership_(spaceName, email, service){
  try{
    const membership = {
      member: {
        name: 'users/'+email,
        // User type for the membership
        type: 'HUMAN'
      }
    };
    const result = Chat.Spaces.Members.create(
      membership,
      spaceName,
      {},
      {'Authorization': 'Bearer ' + service.getAccessToken()}
    );
  } catch (err){
    console.log('Failed to create membership with error %s', err.message)
  }

}

 /*
 * Creates a service for the service account.
 * @return {object}  - The credentials of the service account.
 */
function getService_() {
  return OAuth2.createService(APP_CREDENTIALS.client_email)
      .setTokenUrl('https://oauth2.googleapis.com/token')
      .setPrivateKey(APP_CREDENTIALS.private_key)
      .setIssuer(APP_CREDENTIALS.client_email)
      .setSubject(APP_CREDENTIALS.client_email)
      .setScope(APP_CREDENTIALS_SCOPES)
      .setPropertyStore(PropertiesService.getScriptProperties());
}
DocsApi.gs
apps-script/incident-response-app-auth/DocsApi.gs
/**
 * Creates a Doc in the user's Google Drive and writes a summary of the incident information to it.
 *
 * @param {string} title The title of the incident
 * @param {string} resolution Incident resolution described by the user
 * @param {string} chatHistory The whole Chat history be included in the document
 * @param {string} chatSummary A summary of the Chat conversation to be included in the document
 * @return {string} the URL of the created Doc
 */
function createDoc_(title, resolution, chatHistory, chatSummary) {
  let doc = DocumentApp.create(title);
  let body = doc.getBody();
  body.appendParagraph(`Post-Mortem: ${title}`).setHeading(DocumentApp.ParagraphHeading.TITLE);
  body.appendParagraph("Resolution").setHeading(DocumentApp.ParagraphHeading.HEADING1);
  body.appendParagraph(resolution);
  body.appendParagraph("Summary of the conversation").setHeading(DocumentApp.ParagraphHeading.HEADING1);
  body.appendParagraph(chatSummary);
  body.appendParagraph("Full Chat history").setHeading(DocumentApp.ParagraphHeading.HEADING1);
  body.appendParagraph(chatHistory);
  return doc.getUrl();
}
VertexAiApi.gs
apps-script/incident-response-app-auth/VertexAiApi.gs
/**
 * Summarizes a Chat conversation using the Vertex AI text prediction API.
 *
 * @param {string} chatHistory The Chat history that will be summarized.
 * @return {string} The content from the text prediction response.
 */


function summarizeChatHistory_(chatHistory) {

  const API_ENDPOINT = `https://${VERTEX_AI_LOCATION_ID}-aiplatform.googleapis.com/v1/projects/${PROJECT_ID}/locations/${VERTEX_AI_LOCATION_ID}/publishers/google/models/${MODEL_ID}:generateContent`;
  const prompt = "Summarize the following conversation between Engineers resolving an incident"
      + " in a few sentences. Use only the information from the conversation.\n\n" + chatHistory;
  // Get the access token.
  const accessToken = ScriptApp.getOAuthToken();

  const headers = {
    'Authorization': 'Bearer ' + accessToken,
    'Content-Type': 'application/json',
  };
  const payload = {
    'contents': {
      'role': 'user',
      'parts' : [
        {
          'text': prompt
        }
      ]
    }
  }
  const options = {
    'method': 'post',
    'headers': headers,
    'payload': JSON.stringify(payload),
    'muteHttpExceptions': true,
  };
  try {
    const response = UrlFetchApp.fetch(API_ENDPOINT, options);
    const responseCode = response.getResponseCode();
    const responseText = response.getContentText();

    if (responseCode === 200) {
      const jsonResponse = JSON.parse(responseText);
      console.log(jsonResponse)
      if (jsonResponse.candidates && jsonResponse.candidates.length > 0) {
        return jsonResponse.candidates[0].content.parts[0].text; // Access the summarized text
      } else {
        return "No summary found in response.";
      }

    } else {
      console.error("Vertex AI API Error:", responseCode, responseText);
      return `Error: ${responseCode} - ${responseText}`;
    }
  } catch (e) {
    console.error("UrlFetchApp Error:", e);
    return "Error: " + e.toString();
  }
}
WebController.gs
apps-script/incident-response-app-auth/WebController.gs
/**
 * Serves the web page from Index.html.
 */
function doGet() {
  return HtmlService
    .createTemplateFromFile('Index')
    .evaluate();
}

/**
 * Serves the web content from the specified filename.
 */
function include(filename) {
  return HtmlService
    .createHtmlOutputFromFile(filename)
    .getContent();
}

/**
 * Returns the email address of the user running the script.
 */
function getUserEmail() {
  return Session.getActiveUser().getEmail();
}
Index.html
apps-script/incident-response-app-auth/Index.html
<!DOCTYPE html>
<html>
  <head>
    <base target="_top">
    <link href='https://fonts.googleapis.com/css?family=Roboto' rel='stylesheet'>
    <?!= include('Stylesheet'); ?>
  </head>
  <body>
    <div class="container">
      <div class="content">
        <h1>Incident Manager</h1>
        <form id="incident-form" onsubmit="handleFormSubmit(this)">
          <div id="form">
            <p>
              <label for="title">Incident title</label><br/>
              <input type="text" name="title" id="title" />
            </p>
            <p>
              <label for="users">Incident responders</label><br/>
              <small>
                Please enter a comma-separated list of email addresses of the users
                that should be added to the space.
                Do not include <?= getUserEmail() ?> as it will be added automatically.
              </small><br/>
              <input type="text" name="users" id="users" />
            </p>
            <p>
              <label for="description">Initial message</label></br>
              <small>This message will be posted after the space is created.</small><br/>
              <textarea name="description" id="description"></textarea>
            </p>
            <p class="text-center">
              <input type="submit" value="CREATE CHAT SPACE" />
            </p>
          </div>
          <div id="output" class="hidden"></div>
          <div id="clear" class="hidden">
            <input type="reset" value="CREATE ANOTHER INCIDENT" onclick="onReset()" />
          </div>
        </form>
      </div>
    </div>
    <?!= include('JavaScript'); ?>
  </body>
</html>
JavaScript.html
apps-script/incident-response-app-auth/JavaScript.html
<script>
  var formDiv = document.getElementById('form');
  var outputDiv = document.getElementById('output');
  var clearDiv = document.getElementById('clear');

  function handleFormSubmit(formObject) {
    event.preventDefault();
    outputDiv.innerHTML = 'Please wait while we create the space...';
    hide(formDiv);
    show(outputDiv);
    google.script.run
      .withSuccessHandler(updateOutput)
      .withFailureHandler(onFailure)
      .handleIncident(formObject);
  }

  function updateOutput(response) {
    var spaceId = response.replace('spaces/', '');
    outputDiv.innerHTML =
      '<p>Space created!</p><p><a href="https://mail.google.com/chat/#chat/space/'
        + spaceId
        + '" target="_blank">Open space</a></p>';
    show(outputDiv);
    show(clearDiv);
  }

  function onFailure(error) {
    outputDiv.innerHTML = 'ERROR: ' + error.message;
    outputDiv.classList.add('error');
    show(outputDiv);
    show(clearDiv);
  }

  function onReset() {
    outputDiv.innerHTML = '';
    outputDiv.classList.remove('error');
    show(formDiv);
    hide(outputDiv);
    hide(clearDiv);
  }

  function hide(element) {
    element.classList.add('hidden');
  }

  function show(element) {
    element.classList.remove('hidden');
  }
</script>
Stylesheet.html
apps-script/incident-response-app-auth/Stylesheet.html
<style>
  * {
    box-sizing: border-box;
  }
  body {
    font-family: Roboto, Arial, Helvetica, sans-serif;
  }
  div.container {
    display: flex;
    justify-content: center;
    align-items: center;
    position: absolute;
    top: 0; bottom: 0; left: 0; right: 0;
  }
  div.content {
    width: 80%;
    max-width: 1000px;
    padding: 1rem;
    border: 1px solid #999;
    border-radius: 0.25rem;
    box-shadow: 0 2px 2px 0 rgba(66, 66, 66, 0.08), 0 2px 4px 2px rgba(66, 66, 66, 0.16);
  }
  h1 {
    text-align: center;
    padding-bottom: 1rem;
    margin: 0 -1rem 1rem -1rem;
    border-bottom: 1px solid #999;
  }
 #output {
    text-align: center;
    min-height: 250px;
  }
  div#clear {
    text-align: center;
    padding-top: 1rem;
    margin: 1rem -1rem 0 -1rem;
    border-top: 1px solid #999;
  }
  input[type=text], textarea {
    width: 100%;
    padding: 1rem 0.5rem;
    margin: 0.5rem 0;
    border: 0;
    border-bottom: 1px solid #999;
    background-color: #f0f0f0;
  }
  textarea {
    height: 5rem;
  }
  small {
    color: #999;
  }
  input[type=submit], input[type=reset] {
    padding: 1rem;
    border: none;
    background-color: #6200ee;
    color: #fff;
    border-radius: 0.25rem;
    width: 25%;
  }
  .hidden {
    display: none;
  }
  .text-center {
    text-align: center;
  }
  .error {
    color: red;
  }
</style>