
פרויקטים של Google Apps Script שמשויכים ל-Google Docs, Google Sheets או Google Forms יכולים להציג רכיבי ממשק משתמש, כמו התראות מוכנות מראש, הנחיות, הודעות קצרות, תיבות דו-שיח וסרגלי צד. האלמנטים האלה מכילים בדרך כלל תוכן מותאם אישית של שירות HTML, ולרוב הם נפתחים מפריטי תפריט. ב-Forms, רכיבים של ממשק המשתמש גלויים רק לעורך שפותח את הטופס כדי לשנות אותו, ולא למשיב.
תיבות דו-שיח של התראות

התראה היא תיבת דו-שיח מוכנה מראש שנפתחת בתוך כלי העריכה של Docs, Sheets, Slides או Forms. מוצגת הודעה ולחצן אישור. כותרת ולחצנים חלופיים הם אופציונליים. זה דומה לקריאה ל-window.alert ב-JavaScript בצד הלקוח בדפדפן אינטרנט.
ההתראות משעות את הסקריפט בצד השרת בזמן שתיבת הדו-שיח פתוחה. הסקריפט ממשיך לפעול אחרי שהמשתמש סוגר את תיבת הדו-שיח, אבל חיבורי JDBC לא נשמרים במהלך ההשעיה.
כפי שמוצג בדוגמה הבאה, האפליקציות Docs, Forms, Slides ו-Sheets משתמשות בשיטה Ui.alert, שזמינה בשלושה סוגים. כדי לשנות את ברירת המחדל של הכפתור אישור, מעבירים ערך מה-enum Ui.ButtonSet כארגומנט buttons. כדי להעריך על איזה לחצן המשתמש לחץ, משווים את ערך ההחזרה של alert עם ה-enum Ui.Button.
function onOpen() {
  SpreadsheetApp.getUi() // Or DocumentApp or SlidesApp or FormApp.
    .createMenu("Custom Menu")
    .addItem("Show alert", "showAlert")
    .addToUi();
}

function showAlert() {
  const ui = SpreadsheetApp.getUi(); // Same variations.

  const result = ui.alert(
    "Please confirm",
    "Are you sure you want to continue?",
    ui.ButtonSet.YES_NO,
  );

  // Process the user's response.
  if (result === ui.Button.YES) {
    // User clicked "Yes".
    ui.alert("Confirmation received.");
  } else {
    // User clicked "No" or X in the title bar.
    ui.alert("Permission denied.");
  }
}
הצגת תיבות דו-שיח
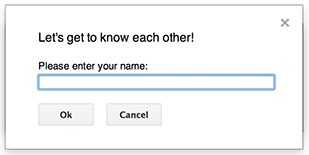
הנחיה היא תיבת דו-שיח מוכנה מראש שנפתחת בתוך כלי העריכה של Docs, Sheets, Slides או Forms. הוא מציג הודעה, שדה להזנת טקסט ולחצן אישור. כותרת ולחצנים חלופיים הם אופציונליים. זה דומה לקריאה ל-window.prompt ב-JavaScript בצד הלקוח בדפדפן אינטרנט.
ההנחיות משעות את הסקריפט בצד השרת בזמן שתיבת הדו-שיח פתוחה. הסקריפט ממשיך לפעול אחרי שהמשתמש סוגר את תיבת הדו-שיח, אבל חיבורי JDBC לא נשמרים במהלך ההשעיה.
כפי שמוצג בדוגמה הבאה, Docs, Forms, Slides ו-Sheets משתמשים בשיטה Ui.prompt, שזמינה בשלושה סוגים. כדי לשנות את כפתור ברירת המחדל אישור, מעבירים ערך מה-enum Ui.ButtonSet כארגומנט buttons. כדי להעריך את התגובה של המשתמש, צריך לתעד את ערך ההחזרה של prompt, ואז לקרוא ל-PromptResponse.getResponseText כדי לאחזר את הקלט של המשתמש ולהשוות את ערך ההחזרה של PromptResponse.getSelectedButton עם ה-enum Ui.Button.
function onOpen() {
  SpreadsheetApp.getUi() // Or DocumentApp or SlidesApp or FormApp.
    .createMenu("Custom Menu")
    .addItem("Show prompt", "showPrompt")
    .addToUi();
}

function showPrompt() {
  const ui = SpreadsheetApp.getUi(); // Same variations.

  const result = ui.prompt(
    "Let's get to know each other!",
    "Please enter your name:",
    ui.ButtonSet.OK_CANCEL,
  );

  // Process the user's response.
  const button = result.getSelectedButton();
  const text = result.getResponseText();
  if (button === ui.Button.OK) {
    // User clicked "OK".
    ui.alert("Your name is " + text + ".");
  } else if (button === ui.Button.CANCEL) {
    // User clicked "Cancel".
    ui.alert("I didn't get your name.");
  } else if (button === ui.Button.CLOSE) {
    // User clicked X in the title bar.
    ui.alert("You closed the dialog.");
  }
}
הודעות קצרות בגיליון אלקטרוני
הודעה קצרה היא חלון קטן של תיבת דו-שיח שמופיע בפינה השמאלית התחתונה של עורך Sheets ומציג הודעה, אבל לא משעה את הסקריפט. זו דרך טובה להציג הודעות סטטוס או עדכונים שלא דורשים אינטראקציה מצד המשתמש.
כפי שמוצג בדוגמה הבאה, Sheets משתמש בשיטה Spreadsheet.toast.
הודעות קצרות זמינות רק ב-Sheets.
function showToast() {
  SpreadsheetApp.getActiveSpreadsheet().toast("Task completed successfully.");
}
תיבות דו-שיח בהתאמה אישית
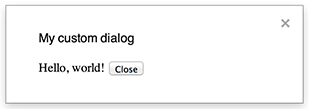
בתיבת דו-שיח מותאמת אישית אפשר להציג ממשק משתמש של שירות HTML בתוך כלי העריכה של Docs, Sheets, Slides או Forms.
תיבות דו-שיח מותאמות אישית לא משעות את הסקריפט בצד השרת בזמן שתיבת הדו-שיח פתוחה.
מכיוון שהן אסינכרוניות, הפונקציה בצד השרת שפותחת את תיבת הדו-שיח מסתיימת באופן מיידי. כדי להעביר נתונים מהתיבת הדו-שיח המותאמת אישית בחזרה לשרת, צריך להשתמש ב-API google.script בקוד בצד הלקוח.
תיבת הדו-שיח יכולה להיסגר בעצמה על ידי קריאה ל-google.script.host.close בצד הלקוח של ממשק שירות HTML. אי אפשר לסגור את תיבת הדו-שיח באמצעות ממשקים אחרים, אלא רק באמצעות המשתמש או באופן אוטומטי.
כפי שמוצג בדוגמה הבאה, ב-Docs, ב-Forms, ב-Slides וב-Sheets נעשה שימוש בשיטה Ui.showModalDialog כדי לפתוח את תיבת הדו-שיח.
Code.gs
function onOpen() {
  SpreadsheetApp.getUi() // Or DocumentApp or SlidesApp or FormApp.
      .createMenu('Custom Menu')
      .addItem('Show dialog', 'showDialog')
      .addToUi();
}

function showDialog() {
  const html = HtmlService.createHtmlOutputFromFile('Page')
      .setWidth(400)
      .setHeight(300);
  SpreadsheetApp.getUi() // Or DocumentApp or SlidesApp or FormApp.
      .showModalDialog(html, 'My custom dialog');
}
Page.html
Hello, world! <input type="button" value="Close" onclick="google.script.host.close()" />
סרגלי צד בהתאמה אישית

בסרגל צד אפשר להציג ממשק משתמש של שירות HTML בתוך כלי העריכה של Docs, Forms, Slides ו-Sheets.
סרגלי הצד לא משעים את הסקריפט בצד השרת בזמן שתיבת הדו-שיח פתוחה. הרכיב בצד הלקוח יכול לבצע קריאות אסינכרוניות לסקריפט בצד השרת באמצעות google.script API לממשקי שירות HTML.
אפשר לסגור את סרגל הצד על ידי קריאה ל-google.script.host.close בצד הלקוח של ממשק שירות HTML. אי אפשר לסגור את סרגל הצד דרך ממשקים אחרים, אלא רק דרך המשתמש או דרך עצמו.
כפי שמוצג בדוגמה הבאה, ב-Docs, ב-Forms, ב-Slides וב-Sheets נעשה שימוש בשיטה Ui.showSidebar כדי לפתוח את סרגל הצד.
Code.gs
function onOpen() {
  SpreadsheetApp.getUi() // Or DocumentApp or SlidesApp or FormApp.
      .createMenu('Custom Menu')
      .addItem('Show sidebar', 'showSidebar')
      .addToUi();
}

function showSidebar() {
  const html = HtmlService.createHtmlOutputFromFile('Page')
      .setTitle('My custom sidebar');
  SpreadsheetApp.getUi() // Or DocumentApp or SlidesApp or FormApp.
      .showSidebar(html);
}
Page.html
Hello, world! <input type="button" value="Close" onclick="google.script.host.close()" />
תיבות דו-שיח לפתיחת קובץ
Google Picker הוא JavaScript API שמאפשר למשתמשים לבחור או להעלות קבצים ב-Google Drive. אפשר להשתמש בספריית Google Picker ב-HTML service כדי ליצור תיבת דו-שיח בהתאמה אישית שמאפשרת למשתמשים לבחור קבצים קיימים או להעלות קבצים חדשים, ואז להעביר את הבחירה בחזרה לסקריפט.
דרישות
יש כמה דרישות לשימוש בכלי לבחירת קבצים עם Google Apps Script:
הגדרת הסביבה לבוחר הקבצים של Google.
בפרויקט הסקריפט צריך להשתמש בפרויקט Google Cloud רגיל.
אם משתמשים בהיקף
drive.file, מעבירים את אותו מספר פרויקט בענן אלPickerBuilder.setAppId.במניפסט של פרויקט Apps Script צריך לציין את היקפי ההרשאות שנדרשים ל-Google Picker API, כדי שהפונקציה
ScriptApp.getOAuthTokenתחזיר את הטוקן הנכון עבורPickerBuilder.setOauthtoken.הגבלת מפתח ה-API שמוגדר ב-
PickerBuilder.setDeveloperKeyל-Apps Script. בקטע הגבלות על אפליקציות, פועלים לפי השלבים הבאים:- בוחרים באפשרות HTTP referrers (web sites).
- בקטע Website restrictions (הגבלות גישה לאתרים), לוחצים על Add an item (הוספת פריט).
- לוחצים על מפנה ומזינים
*.google.com. - מוסיפים עוד פריט ומזינים את
*.googleusercontent.comככתובת האתר המפנה. - לוחצים על סיום.
מתקשרים אל
PickerBuilder.setOrigin.
דוגמה
בדוגמה הבאה מוצג כלי בחירת הקבצים של Google ב-Apps Script.