Trang này hướng dẫn cách tạo vấn đề trong Google Issue Tracker.
Để tạo vấn đề, bạn phải đăng nhập vào một Tài khoản Google. Bạn cũng phải có quyền Tạo vấn đề hoặc Quản trị thành phần đối với thành phần mà vấn đề sẽ được tạo. Nếu có quyền Nhận xét về vấn đề, bạn chỉ có thể đặt tiêu đề và nội dung mô tả vấn đề. Nếu có quyền Chỉnh sửa vấn đề, bạn có thể đặt các trường khác.
Mẫu
Các mẫu trong Google Issue Tracker chỉ định giá trị mặc định cho các trường trong vấn đề mới của một thành phần. Mỗi thành phần đều có một mẫu mặc định nhưng có thể có các mẫu bổ sung do nhân viên Google chịu trách nhiệm quản lý thành phần đó định cấu hình. Người dùng công khai và người dùng đối tác không thể tạo hoặc sửa đổi các mẫu được liên kết với một thành phần.
Chọn một bản mẫu
Khi bạn tạo một vấn đề trong Trình theo dõi vấn đề, mẫu mặc định cho thành phần sẽ được tự động chọn. Nếu có thêm các mẫu khác, bạn có thể chọn các mẫu đó trong danh sách thả xuống Mẫu trên trang Tạo vấn đề.

Khi bạn chọn một mẫu, các trường trên trang sẽ tự động được điền sẵn các giá trị mặc định đã xác định.
Tạo vấn đề
Cách tạo vấn đề:
Mở Trình theo dõi lỗi trong trình duyệt web.
Nhấp vào Tạo vấn đề.
Issue Tracker sẽ mở trang Tạo vấn đề và chọn trường Thành phần. Trường này cho thấy một danh sách thả xuống gồm các thành phần.
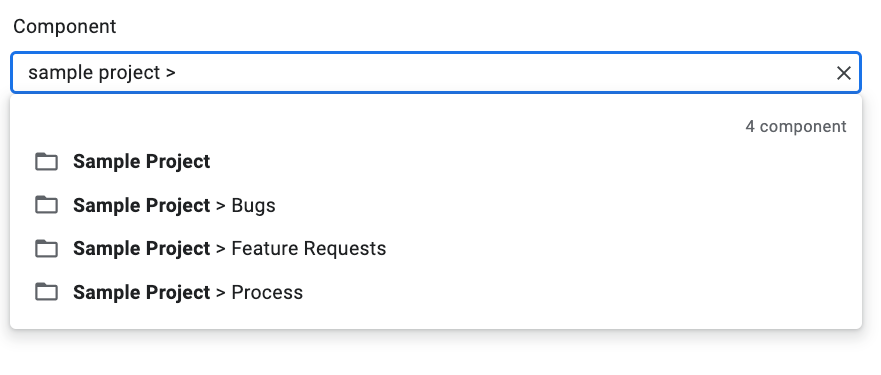
Sử dụng danh sách thả xuống để tìm thành phần mà bạn muốn tạo vấn đề. Bạn chỉ có thể tìm thấy những thành phần mà bạn có quyền Tạo vấn đề hoặc Quản trị thành phần.
(Không bắt buộc) Chọn một mẫu phù hợp nhất với vấn đề mà bạn đang báo cáo. Một số thành phần chỉ có mẫu mặc định.
Nhập tiêu đề vào trường Tiêu đề. Tiêu đề này sẽ xuất hiện khi bạn xem thông tin chi tiết về vấn đề, cũng như trong kết quả tìm kiếm, danh sách nổi bật và những nơi khác mà bạn đang xem danh sách vấn đề.
Chọn một mức độ ưu tiên trong danh sách thả xuống Mức độ ưu tiên. Bạn chỉ thấy trường Mức độ ưu tiên nếu có quyền Chỉnh sửa vấn đề.
Chọn loại vấn đề trong danh sách thả xuống Loại. Trường Loại chỉ xuất hiện nếu bạn có quyền Chỉnh sửa vấn đề.

(Không bắt buộc) Chỉ định người được giao hoặc thêm địa chỉ email (bao gồm cả địa chỉ danh sách gửi thư) vào danh sách Cộng tác viên và CC. Bạn chỉ thấy các trường này nếu có quyền Chỉnh sửa vấn đề.
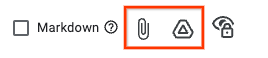
(Nên làm) Nhập nội dung mô tả cho vấn đề trong trường Nội dung mô tả. Trường này có thể đã được điền một phần cho bạn nếu mẫu đã chọn cung cấp văn bản mô tả. Bạn cũng có thể đánh dấu vào lựa chọn Markdown để viết nội dung mô tả dưới dạng văn bản markdown.
(Không bắt buộc) Thêm tệp đính kèm trên máy tính hoặc từ một vị trí trên Drive.
(Không bắt buộc) Điền vào các trường nâng cao cho vấn đề.
Bạn có thể xem các trường này bằng cách bật/tắt bảng điều khiển Trường nâng cao. Bảng điều khiển Trường nâng cao chỉ xuất hiện nếu bạn có quyền Chỉnh sửa vấn đề. Trong hầu hết các trường hợp, bạn có thể bỏ qua các trường nâng cao khi tạo một vấn đề. Tuy nhiên, một số thành phần yêu cầu bạn nhập giá trị cho chúng. Nếu trường hợp này xảy ra, phần Trường nâng cao sẽ tự động xuất hiện và các trường bắt buộc sẽ được đánh dấu bằng dấu hoa thị (*).

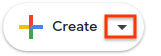
Nhấp vào nút Tạo để gửi vấn đề hoặc nhấp vào Tạo và bắt đầu một vấn đề khác để gửi vấn đề và mở trang Tạo vấn đề mới được điền sẵn các giá trị dùng cho vấn đề bạn vừa tạo.

Tạo vấn đề dựa trên một vấn đề hiện có
Bạn cũng có thể tạo một vấn đề dựa trên một vấn đề hiện có. Phương thức này có thể giúp bạn tiết kiệm thời gian bằng cách sử dụng vấn đề hiện có để điền sẵn một số trường.
Cách tạo vấn đề dựa trên một vấn đề hiện có:
Mở vấn đề hiện có.
Nhấp vào nút bên cạnh lựa chọn Tạo.
Chọn cách bạn muốn tạo số báo mới trong danh sách thả xuống. Các lựa chọn trong danh sách thả xuống sẽ khác nhau, tuỳ thuộc vào trang mà bạn đang xem. Nút này chỉ xuất hiện nếu có ít nhất một lựa chọn.
Có 7 lựa chọn có thể xuất hiện.
| Phương thức | Mô tả | Xuất hiện khi |
|---|---|---|
| Trong cùng một thành phần | Bắt đầu một vấn đề mới với thành phần được đặt thành thành phần hiện tại. | (1) Quản lý một thành phần, (2) Xem các vấn đề trong một thành phần, (3) Xem một vấn đề |
| Tương tự như vấn đề hiện tại | Bắt đầu một vấn đề mới với các trường của vấn đề hiện tại được sao chép vào vấn đề mới. | Xem vấn đề |
| Bị chặn do vấn đề hiện tại | Bắt đầu một vấn đề mới với vấn đề hiện tại là vấn đề chặn. | Xem vấn đề |
| Chặn vấn đề hiện tại | Bắt đầu một vấn đề mới với vấn đề hiện tại là vấn đề bị chặn. | Xem vấn đề |
| Parent Of Current Issue | Bắt đầu một vấn đề mới với vấn đề hiện tại làm vấn đề con. | Xem vấn đề |
| Child Of Current Issue | Bắt đầu một vấn đề mới với vấn đề hiện tại làm vấn đề mẹ. | Xem vấn đề |
| Trong cùng danh sách yêu thích | Bắt đầu một vấn đề mới với danh sách truy cập nhanh hiện tại được thêm vào. | (1) Quản lý danh sách quan tâm, (2) Xem các vấn đề trong danh sách quan tâm |