
Questo tutorial mostra come aggiungere una mappa Google alla tua app per Android e utilizzare polilinee e poligoni per rappresentare percorsi e aree su una mappa.
Segui il tutorial per creare un'app per Android utilizzando Maps SDK for Android. L'ambiente di sviluppo consigliato è Android Studio.
Ottieni il codice
Clona o scarica il repository di esempi dell'API Google Maps Android v2 da GitHub.
Visualizza la versione Java dell'attività:
    // Copyright 2020 Google LLC
//
// Licensed under the Apache License, Version 2.0 (the "License");
// you may not use this file except in compliance with the License.
// You may obtain a copy of the License at
//
//      http://www.apache.org/licenses/LICENSE-2.0
//
// Unless required by applicable law or agreed to in writing, software
// distributed under the License is distributed on an "AS IS" BASIS,
// WITHOUT WARRANTIES OR CONDITIONS OF ANY KIND, either express or implied.
// See the License for the specific language governing permissions and
// limitations under the License.

package com.example.polygons;

import android.os.Bundle;
import android.widget.Toast;
import androidx.appcompat.app.AppCompatActivity;
import com.google.android.gms.maps.CameraUpdateFactory;
import com.google.android.gms.maps.GoogleMap;
import com.google.android.gms.maps.OnMapReadyCallback;
import com.google.android.gms.maps.SupportMapFragment;
import com.google.android.gms.maps.model.BitmapDescriptorFactory;
import com.google.android.gms.maps.model.CustomCap;
import com.google.android.gms.maps.model.Dash;
import com.google.android.gms.maps.model.Dot;
import com.google.android.gms.maps.model.Gap;
import com.google.android.gms.maps.model.JointType;
import com.google.android.gms.maps.model.LatLng;
import com.google.android.gms.maps.model.PatternItem;
import com.google.android.gms.maps.model.Polygon;
import com.google.android.gms.maps.model.PolygonOptions;
import com.google.android.gms.maps.model.Polyline;
import com.google.android.gms.maps.model.PolylineOptions;
import com.google.android.gms.maps.model.RoundCap;
import java.util.Arrays;
import java.util.List;


/**
 * An activity that displays a Google map with polylines to represent paths or routes,
 * and polygons to represent areas.
 */
public class PolyActivity extends AppCompatActivity
        implements
                OnMapReadyCallback,
                GoogleMap.OnPolylineClickListener,
                GoogleMap.OnPolygonClickListener {

    @Override
    protected void onCreate(Bundle savedInstanceState) {
        super.onCreate(savedInstanceState);

        // Retrieve the content view that renders the map.
        setContentView(R.layout.activity_maps);

        // Get the SupportMapFragment and request notification when the map is ready to be used.
        SupportMapFragment mapFragment = (SupportMapFragment) getSupportFragmentManager()
                .findFragmentById(R.id.map);
        mapFragment.getMapAsync(this);
    }

    /**
     * Manipulates the map when it's available.
     * The API invokes this callback when the map is ready to be used.
     * This is where we can add markers or lines, add listeners or move the camera.
     * In this tutorial, we add polylines and polygons to represent routes and areas on the map.
     */
    @Override
    public void onMapReady(GoogleMap googleMap) {

        // Add polylines to the map.
        // Polylines are useful to show a route or some other connection between points.
        Polyline polyline1 = googleMap.addPolyline(new PolylineOptions()
                .clickable(true)
                .add(
                        new LatLng(-35.016, 143.321),
                        new LatLng(-34.747, 145.592),
                        new LatLng(-34.364, 147.891),
                        new LatLng(-33.501, 150.217),
                        new LatLng(-32.306, 149.248),
                        new LatLng(-32.491, 147.309)));
        // Store a data object with the polyline, used here to indicate an arbitrary type.
        polyline1.setTag("A");
        // Style the polyline.
        stylePolyline(polyline1);

        Polyline polyline2 = googleMap.addPolyline(new PolylineOptions()
                .clickable(true)
                .add(
                        new LatLng(-29.501, 119.700),
                        new LatLng(-27.456, 119.672),
                        new LatLng(-25.971, 124.187),
                        new LatLng(-28.081, 126.555),
                        new LatLng(-28.848, 124.229),
                        new LatLng(-28.215, 123.938)));
        polyline2.setTag("B");
        stylePolyline(polyline2);

        // Add polygons to indicate areas on the map.
        Polygon polygon1 = googleMap.addPolygon(new PolygonOptions()
                .clickable(true)
                .add(
                        new LatLng(-27.457, 153.040),
                        new LatLng(-33.852, 151.211),
                        new LatLng(-37.813, 144.962),
                        new LatLng(-34.928, 138.599)));
        // Store a data object with the polygon, used here to indicate an arbitrary type.
        polygon1.setTag("alpha");
        // Style the polygon.
        stylePolygon(polygon1);

        Polygon polygon2 = googleMap.addPolygon(new PolygonOptions()
                .clickable(true)
                .add(
                        new LatLng(-31.673, 128.892),
                        new LatLng(-31.952, 115.857),
                        new LatLng(-17.785, 122.258),
                        new LatLng(-12.4258, 130.7932)));
        polygon2.setTag("beta");
        stylePolygon(polygon2);

        // Position the map's camera near Alice Springs in the center of Australia,
        // and set the zoom factor so most of Australia shows on the screen.
        googleMap.moveCamera(CameraUpdateFactory.newLatLngZoom(new LatLng(-23.684, 133.903), 4));

        // Set listeners for click events.
        googleMap.setOnPolylineClickListener(this);
        googleMap.setOnPolygonClickListener(this);
    }

    private static final int COLOR_BLACK_ARGB = 0xff000000;
    private static final int POLYLINE_STROKE_WIDTH_PX = 12;

    /**
     * Styles the polyline, based on type.
     * @param polyline The polyline object that needs styling.
     */
    private void stylePolyline(Polyline polyline) {
        String type = "";
        // Get the data object stored with the polyline.
        if (polyline.getTag() != null) {
            type = polyline.getTag().toString();
        }

        switch (type) {
            // If no type is given, allow the API to use the default.
            case "A":
                // Use a custom bitmap as the cap at the start of the line.
                polyline.setStartCap(
                        new CustomCap(
                                BitmapDescriptorFactory.fromResource(R.drawable.ic_arrow), 10));
                break;
            case "B":
                // Use a round cap at the start of the line.
                polyline.setStartCap(new RoundCap());
                break;
        }

        polyline.setEndCap(new RoundCap());
        polyline.setWidth(POLYLINE_STROKE_WIDTH_PX);
        polyline.setColor(COLOR_BLACK_ARGB);
        polyline.setJointType(JointType.ROUND);
    }

    private static final int PATTERN_GAP_LENGTH_PX = 20;
    private static final PatternItem DOT = new Dot();
    private static final PatternItem GAP = new Gap(PATTERN_GAP_LENGTH_PX);

    // Create a stroke pattern of a gap followed by a dot.
    private static final List<PatternItem> PATTERN_POLYLINE_DOTTED = Arrays.asList(GAP, DOT);

    /**
     * Listens for clicks on a polyline.
     * @param polyline The polyline object that the user has clicked.
     */
    @Override
    public void onPolylineClick(Polyline polyline) {
        // Flip from solid stroke to dotted stroke pattern.
        if ((polyline.getPattern() == null) || (!polyline.getPattern().contains(DOT))) {
            polyline.setPattern(PATTERN_POLYLINE_DOTTED);
        } else {
            // The default pattern is a solid stroke.
            polyline.setPattern(null);
        }

        Toast.makeText(this, "Route type " + polyline.getTag().toString(),
                Toast.LENGTH_SHORT).show();
    }

    /**
     * Listens for clicks on a polygon.
     * @param polygon The polygon object that the user has clicked.
     */
    @Override
    public void onPolygonClick(Polygon polygon) {
        // Flip the values of the red, green, and blue components of the polygon's color.
        int color = polygon.getStrokeColor() ^ 0x00ffffff;
        polygon.setStrokeColor(color);
        color = polygon.getFillColor() ^ 0x00ffffff;
        polygon.setFillColor(color);

        Toast.makeText(this, "Area type " + polygon.getTag().toString(), Toast.LENGTH_SHORT).show();
    }

    private static final int COLOR_WHITE_ARGB = 0xffffffff;
    private static final int COLOR_DARK_GREEN_ARGB = 0xff388E3C;
    private static final int COLOR_LIGHT_GREEN_ARGB = 0xff81C784;
    private static final int COLOR_DARK_ORANGE_ARGB = 0xffF57F17;
    private static final int COLOR_LIGHT_ORANGE_ARGB = 0xffF9A825;

    private static final int POLYGON_STROKE_WIDTH_PX = 8;
    private static final int PATTERN_DASH_LENGTH_PX = 20;
    private static final PatternItem DASH = new Dash(PATTERN_DASH_LENGTH_PX);

    // Create a stroke pattern of a gap followed by a dash.
    private static final List<PatternItem> PATTERN_POLYGON_ALPHA = Arrays.asList(GAP, DASH);

    // Create a stroke pattern of a dot followed by a gap, a dash, and another gap.
    private static final List<PatternItem> PATTERN_POLYGON_BETA =
        Arrays.asList(DOT, GAP, DASH, GAP);

    /**
     * Styles the polygon, based on type.
     * @param polygon The polygon object that needs styling.
     */
    private void stylePolygon(Polygon polygon) {
        String type = "";
        // Get the data object stored with the polygon.
        if (polygon.getTag() != null) {
            type = polygon.getTag().toString();
        }

        List<PatternItem> pattern = null;
        int strokeColor = COLOR_BLACK_ARGB;
        int fillColor = COLOR_WHITE_ARGB;

        switch (type) {
            // If no type is given, allow the API to use the default.
            case "alpha":
                // Apply a stroke pattern to render a dashed line, and define colors.
                pattern = PATTERN_POLYGON_ALPHA;
                strokeColor = COLOR_DARK_GREEN_ARGB;
                fillColor = COLOR_LIGHT_GREEN_ARGB;
                break;
            case "beta":
                // Apply a stroke pattern to render a line of dots and dashes, and define colors.
                pattern = PATTERN_POLYGON_BETA;
                strokeColor = COLOR_DARK_ORANGE_ARGB;
                fillColor = COLOR_LIGHT_ORANGE_ARGB;
                break;
        }

        polygon.setStrokePattern(pattern);
        polygon.setStrokeWidth(POLYGON_STROKE_WIDTH_PX);
        polygon.setStrokeColor(strokeColor);
        polygon.setFillColor(fillColor);
    }
}
Visualizza la versione Kotlin dell'attività:
    // Copyright 2020 Google LLC
//
// Licensed under the Apache License, Version 2.0 (the "License");
// you may not use this file except in compliance with the License.
// You may obtain a copy of the License at
//
//      http://www.apache.org/licenses/LICENSE-2.0
//
// Unless required by applicable law or agreed to in writing, software
// distributed under the License is distributed on an "AS IS" BASIS,
// WITHOUT WARRANTIES OR CONDITIONS OF ANY KIND, either express or implied.
// See the License for the specific language governing permissions and
// limitations under the License.
package com.example.polygons

import android.os.Bundle
import android.widget.Toast
import androidx.appcompat.app.AppCompatActivity
import com.google.android.gms.maps.CameraUpdateFactory
import com.google.android.gms.maps.GoogleMap
import com.google.android.gms.maps.GoogleMap.OnPolygonClickListener
import com.google.android.gms.maps.GoogleMap.OnPolylineClickListener
import com.google.android.gms.maps.OnMapReadyCallback
import com.google.android.gms.maps.SupportMapFragment
import com.google.android.gms.maps.model.BitmapDescriptorFactory
import com.google.android.gms.maps.model.CustomCap
import com.google.android.gms.maps.model.Dash
import com.google.android.gms.maps.model.Dot
import com.google.android.gms.maps.model.Gap
import com.google.android.gms.maps.model.JointType
import com.google.android.gms.maps.model.LatLng
import com.google.android.gms.maps.model.PatternItem
import com.google.android.gms.maps.model.Polygon
import com.google.android.gms.maps.model.PolygonOptions
import com.google.android.gms.maps.model.Polyline
import com.google.android.gms.maps.model.PolylineOptions
import com.google.android.gms.maps.model.RoundCap

/**
 * An activity that displays a Google map with polylines to represent paths or routes,
 * and polygons to represent areas.
 */
class PolyActivity : AppCompatActivity(), OnMapReadyCallback, OnPolylineClickListener, OnPolygonClickListener {

    override fun onCreate(savedInstanceState: Bundle?) {
        super.onCreate(savedInstanceState)

        // Retrieve the content view that renders the map.
        setContentView(R.layout.activity_maps)

        // Get the SupportMapFragment and request notification when the map is ready to be used.
        val mapFragment = supportFragmentManager
            .findFragmentById(R.id.map) as SupportMapFragment?
        mapFragment?.getMapAsync(this)
    }

    /**
     * Manipulates the map when it's available.
     * The API invokes this callback when the map is ready to be used.
     * This is where we can add markers or lines, add listeners or move the camera.
     * In this tutorial, we add polylines and polygons to represent routes and areas on the map.
     */
    override fun onMapReady(googleMap: GoogleMap) {

        // Add polylines to the map.
        // Polylines are useful to show a route or some other connection between points.
        val polyline1 = googleMap.addPolyline(PolylineOptions()
            .clickable(true)
            .add(
                LatLng(-35.016, 143.321),
                LatLng(-34.747, 145.592),
                LatLng(-34.364, 147.891),
                LatLng(-33.501, 150.217),
                LatLng(-32.306, 149.248),
                LatLng(-32.491, 147.309)))
        // Store a data object with the polyline, used here to indicate an arbitrary type.
        polyline1.tag = "A"
        // Style the polyline.
        stylePolyline(polyline1)

        val polyline2 = googleMap.addPolyline(PolylineOptions()
            .clickable(true)
            .add(
                LatLng(-29.501, 119.700),
                LatLng(-27.456, 119.672),
                LatLng(-25.971, 124.187),
                LatLng(-28.081, 126.555),
                LatLng(-28.848, 124.229),
                LatLng(-28.215, 123.938)))
        polyline2.tag = "B"
        stylePolyline(polyline2)

        // Add polygons to indicate areas on the map.
        val polygon1 = googleMap.addPolygon(PolygonOptions()
            .clickable(true)
            .add(
                LatLng(-27.457, 153.040),
                LatLng(-33.852, 151.211),
                LatLng(-37.813, 144.962),
                LatLng(-34.928, 138.599)))
        // Store a data object with the polygon, used here to indicate an arbitrary type.
        polygon1.tag = "alpha"
        // Style the polygon.
        stylePolygon(polygon1)

        val polygon2 = googleMap.addPolygon(PolygonOptions()
            .clickable(true)
            .add(
                LatLng(-31.673, 128.892),
                LatLng(-31.952, 115.857),
                LatLng(-17.785, 122.258),
                LatLng(-12.4258, 130.7932)))
        polygon2.tag = "beta"
        stylePolygon(polygon2)

        // Position the map's camera near Alice Springs in the center of Australia,
        // and set the zoom factor so most of Australia shows on the screen.
        googleMap.moveCamera(CameraUpdateFactory.newLatLngZoom(LatLng(-23.684, 133.903), 4f))

        // Set listeners for click events.
        googleMap.setOnPolylineClickListener(this)
        googleMap.setOnPolygonClickListener(this)
    }

    private val COLOR_BLACK_ARGB = -0x1000000
    private val POLYLINE_STROKE_WIDTH_PX = 12

    /**
     * Styles the polyline, based on type.
     * @param polyline The polyline object that needs styling.
     */
    private fun stylePolyline(polyline: Polyline) {
        // Get the data object stored with the polyline.
        val type = polyline.tag?.toString() ?: ""
        when (type) {
            "A" -> {
                // Use a custom bitmap as the cap at the start of the line.
                polyline.startCap = CustomCap(
                    BitmapDescriptorFactory.fromResource(R.drawable.ic_arrow), 10f)
            }
            "B" -> {
               // Use a round cap at the start of the line.
                polyline.startCap = RoundCap()
            }
        }
        polyline.endCap = RoundCap()
        polyline.width = POLYLINE_STROKE_WIDTH_PX.toFloat()
        polyline.color = COLOR_BLACK_ARGB
        polyline.jointType = JointType.ROUND
    }

    private val PATTERN_GAP_LENGTH_PX = 20
    private val DOT: PatternItem = Dot()
    private val GAP: PatternItem = Gap(PATTERN_GAP_LENGTH_PX.toFloat())

    // Create a stroke pattern of a gap followed by a dot.
    private val PATTERN_POLYLINE_DOTTED = listOf(GAP, DOT)

    /**
     * Listens for clicks on a polyline.
     * @param polyline The polyline object that the user has clicked.
     */
    override fun onPolylineClick(polyline: Polyline) {
        // Flip from solid stroke to dotted stroke pattern.
        if (polyline.pattern == null || !polyline.pattern!!.contains(DOT)) {
            polyline.pattern = PATTERN_POLYLINE_DOTTED
        } else {
            // The default pattern is a solid stroke.
            polyline.pattern = null
        }
        Toast.makeText(this, "Route type " + polyline.tag.toString(),
            Toast.LENGTH_SHORT).show()
    }

    /**
     * Listens for clicks on a polygon.
     * @param polygon The polygon object that the user has clicked.
     */
    override fun onPolygonClick(polygon: Polygon) {
        // Flip the values of the red, green, and blue components of the polygon's color.
        var color = polygon.strokeColor xor 0x00ffffff
        polygon.strokeColor = color
        color = polygon.fillColor xor 0x00ffffff
        polygon.fillColor = color
        Toast.makeText(this, "Area type ${polygon.tag?.toString()}", Toast.LENGTH_SHORT).show()
    }

    private val COLOR_WHITE_ARGB = -0x1
    private val COLOR_DARK_GREEN_ARGB = -0xc771c4
    private val COLOR_LIGHT_GREEN_ARGB = -0x7e387c
    private val COLOR_DARK_ORANGE_ARGB = -0xa80e9
    private val COLOR_LIGHT_ORANGE_ARGB = -0x657db
    private val POLYGON_STROKE_WIDTH_PX = 8
    private val PATTERN_DASH_LENGTH_PX = 20

    private val DASH: PatternItem = Dash(PATTERN_DASH_LENGTH_PX.toFloat())

    // Create a stroke pattern of a gap followed by a dash.
    private val PATTERN_POLYGON_ALPHA = listOf(GAP, DASH)

    // Create a stroke pattern of a dot followed by a gap, a dash, and another gap.
    private val PATTERN_POLYGON_BETA = listOf(DOT, GAP, DASH, GAP)

    /**
     * Styles the polygon, based on type.
     * @param polygon The polygon object that needs styling.
     */
    private fun stylePolygon(polygon: Polygon) {
        // Get the data object stored with the polygon.
        val type = polygon.tag?.toString() ?: ""
        var pattern: List<PatternItem>? = null
        var strokeColor = COLOR_BLACK_ARGB
        var fillColor = COLOR_WHITE_ARGB
        when (type) {
            "alpha" -> {
                // Apply a stroke pattern to render a dashed line, and define colors.
                pattern = PATTERN_POLYGON_ALPHA
                strokeColor = COLOR_DARK_GREEN_ARGB
                fillColor = COLOR_LIGHT_GREEN_ARGB
            }
            "beta" -> {
                // Apply a stroke pattern to render a line of dots and dashes, and define colors.
                pattern = PATTERN_POLYGON_BETA
                strokeColor = COLOR_DARK_ORANGE_ARGB
                fillColor = COLOR_LIGHT_ORANGE_ARGB
            }
        }
        polygon.strokePattern = pattern
        polygon.strokeWidth = POLYGON_STROKE_WIDTH_PX.toFloat()
        polygon.strokeColor = strokeColor
        polygon.fillColor = fillColor
    }
}
Configura il progetto di sviluppo
Segui questi passaggi per creare il progetto del tutorial in Android Studio.
- Scarica e installa Android Studio.
- Aggiungi il pacchetto Google Play Services ad Android Studio.
- Clona o scarica il repository di esempi dell'API Google Maps Android v2 se non l'hai fatto quando hai iniziato a leggere questo tutorial.
Importa il progetto del tutorial:
- In Android Studio, seleziona File > Nuovo > Importa progetto.
- Vai alla posizione in cui hai salvato il repository di esempi dell'API Google Maps Android v2 dopo averlo scaricato.
- Trova il progetto Poligoni in questa posizione:
PATH-TO-SAVED-REPO/android-samples/tutorials/java/Polygons(Java) o
PATH-TO-SAVED-REPO/android-samples/tutorials/kotlin/Polygons(Kotlin) - Seleziona la directory del progetto, quindi fai clic su Apri. Android Studio ora crea il progetto utilizzando lo strumento di build Gradle.
Abilita le API necessarie e ottieni una chiave API
Per completare questo tutorial, hai bisogno di un progetto Google Cloud con le API necessarie abilitate e una chiave API autorizzata a utilizzare Maps SDK for Android. Per maggiori dettagli, consulta:
Aggiungi la chiave API alla tua app
- Apri il file
local.propertiesdel progetto. Aggiungi la seguente stringa, quindi sostituisci
YOUR_API_KEYcon il valore della tua chiave API:MAPS_API_KEY=YOUR_API_KEYQuando crei l'app, il plug-in Secrets Gradle per Android copierà la chiave API e la renderà disponibile come variabile di build nel manifest Android, come spiegato di seguito.
Crea ed esegui la tua app
Per creare ed eseguire l'app:
Collega un dispositivo Android al computer. Segui le istruzioni per attivare le opzioni sviluppatore sul tuo dispositivo Android e configurare il sistema in modo che rilevi il dispositivo.
In alternativa, puoi utilizzare Gestione AVD per configurare un dispositivo virtuale. Quando scegli un emulatore, assicurati di selezionare un'immagine che includa le API di Google. Per maggiori dettagli, consulta Configurare un progetto Android Studio .
In Android Studio, fai clic sull'opzione di menu Esegui (o sull'icona del pulsante Riproduci). Scegli un dispositivo quando richiesto.
Android Studio richiama Gradle per creare l'app, quindi la esegue sul dispositivo o sull'emulatore.
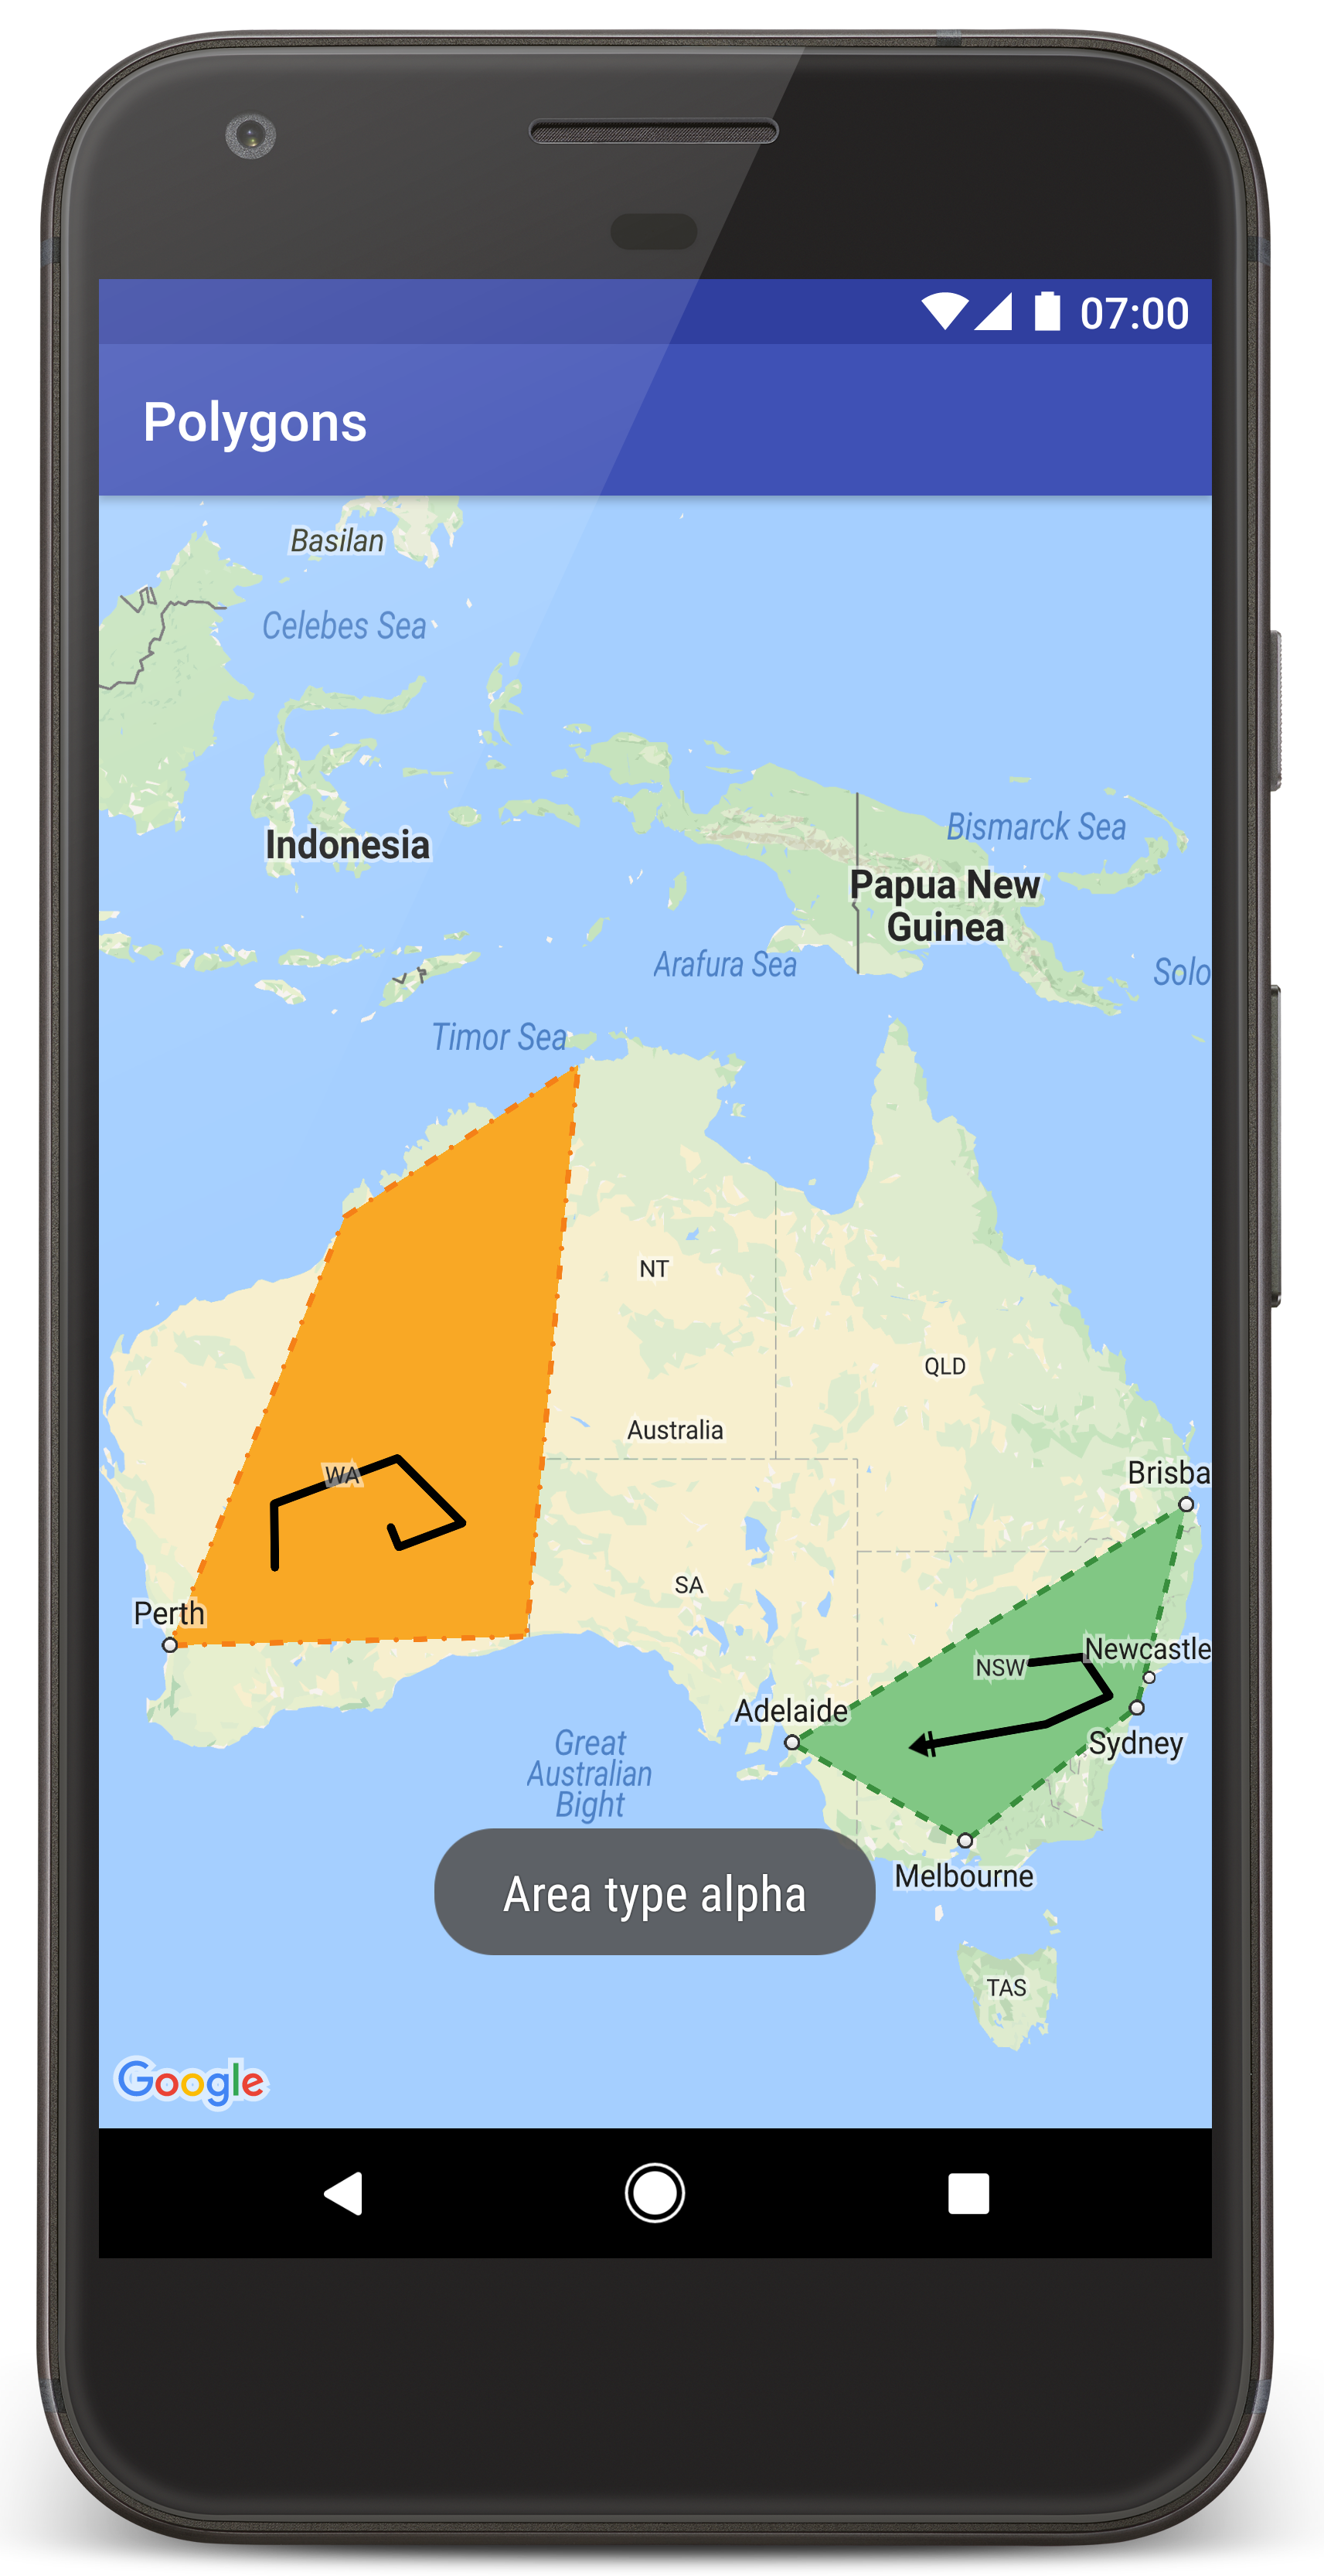
Dovresti vedere una mappa con due poligoni sovrapposti all'Australia, simile all'immagine in questa pagina.
Risoluzione dei problemi:
- Se non vedi una mappa, controlla di aver ottenuto una chiave API e di averla aggiunta a l'app, come descritto sopra. Controlla il log in Android Studio's Monitoraggio Android per i messaggi di errore relativi alla chiave API.
- Utilizza gli strumenti di debug di Android Studio per visualizzare i log ed eseguire il debug dell'app.
comprendi il codice
Questa parte del tutorial spiega le parti più importanti dell'app Poligoni per aiutarti a capire come creare un'app simile.
Controlla il manifest Android
Prendi nota dei seguenti elementi nel file AndroidManifest.xml dell'app:
Aggiungi un elemento
meta-dataper incorporare la versione di Google Play Services con cui è stata compilata l'app.<meta-data android:name="com.google.android.gms.version" android:value="@integer/google_play_services_version" />Aggiungi un elemento
meta-datache specifica la tua chiave API. L'esempio che accompagna questo tutorial mappa il valore della chiave API a una variabile di build che corrisponde al nome della chiave definita in precedenza,MAPS_API_KEY. Quando crei l'app, il plug-in Secrets Gradle per Android renderà disponibili le chiavi nel filelocal.propertiescome variabili di build del manifest.<meta-data android:name="com.google.android.geo.API_KEY" android:value="${MAPS_API_KEY}" />Nel file
build.gradle, la seguente riga passa la chiave API al manifest Android.id 'com.google.android.libraries.mapsplatform.secrets-gradle-plugin'
Di seguito è riportato un esempio completo di un manifest:
  <?xml version="1.0" encoding="utf-8"?>
<!--
 Copyright 2020 Google LLC

 Licensed under the Apache License, Version 2.0 (the "License");
 you may not use this file except in compliance with the License.
 You may obtain a copy of the License at

      http://www.apache.org/licenses/LICENSE-2.0

 Unless required by applicable law or agreed to in writing, software
 distributed under the License is distributed on an "AS IS" BASIS,
 WITHOUT WARRANTIES OR CONDITIONS OF ANY KIND, either express or implied.
 See the License for the specific language governing permissions and
 limitations under the License.
-->

<manifest xmlns:android="http://schemas.android.com/apk/res/android">

    <application
        android:allowBackup="true"
        android:icon="@mipmap/ic_launcher"
        android:label="@string/app_name"
        android:supportsRtl="true"
        android:theme="@style/AppTheme">

        <meta-data
            android:name="com.google.android.gms.version"
            android:value="@integer/google_play_services_version" />

        <!--
             The API key for Google Maps-based APIs.
        -->
        <meta-data
            android:name="com.google.android.geo.API_KEY"
            android:value="${MAPS_API_KEY}" />

        <activity
            android:name="com.example.polygons.PolyActivity"
            android:exported="true"
            android:label="@string/title_activity_maps">
            <intent-filter>
                <action android:name="android.intent.action.MAIN" />
                <category android:name="android.intent.category.LAUNCHER" />
            </intent-filter>
        </activity>
    </application>
</manifest>
Aggiungi una mappa
Visualizza una mappa utilizzando Maps SDK for Android.
Aggiungi un elemento
<fragment>al file di layout dell'attività,activity_maps.xml. Questo elemento definisce unSupportMapFragmentche funge da container per la mappa e fornisce l'accesso all'oggettoGoogleMap. Il tutorial utilizza la versione della libreria di supporto Android del fragment della mappa per garantire la compatibilità con le versioni precedenti del framework Android.<!-- Copyright 2020 Google LLC Licensed under the Apache License, Version 2.0 (the "License"); you may not use this file except in compliance with the License. You may obtain a copy of the License at http://www.apache.org/licenses/LICENSE-2.0 Unless required by applicable law or agreed to in writing, software distributed under the License is distributed on an "AS IS" BASIS, WITHOUT WARRANTIES OR CONDITIONS OF ANY KIND, either express or implied. See the License for the specific language governing permissions and limitations under the License. --> <fragment xmlns:android="http://schemas.android.com/apk/res/android" xmlns:tools="http://schemas.android.com/tools" android:id="@+id/map" android:name="com.google.android.gms.maps.SupportMapFragment" android:layout_width="match_parent" android:layout_height="match_parent" tools:context="com.example.polygons.PolyActivity" />
Nel metodo
onCreate()dell'attività, imposta il file di layout come visualizzazione dei contenuti. Ottieni un handle per il fragment della mappa chiamandoFragmentManager.findFragmentById(). Poi utilizzagetMapAsync()per registrarti al callback della mappa:Java
@Override protected void onCreate(Bundle savedInstanceState) { super.onCreate(savedInstanceState); // Retrieve the content view that renders the map. setContentView(R.layout.activity_maps); // Get the SupportMapFragment and request notification when the map is ready to be used. SupportMapFragment mapFragment = (SupportMapFragment) getSupportFragmentManager() .findFragmentById(R.id.map); mapFragment.getMapAsync(this); }
Kotlin
override fun onCreate(savedInstanceState: Bundle?) { super.onCreate(savedInstanceState) // Retrieve the content view that renders the map. setContentView(R.layout.activity_maps) // Get the SupportMapFragment and request notification when the map is ready to be used. val mapFragment = supportFragmentManager .findFragmentById(R.id.map) as SupportMapFragment? mapFragment?.getMapAsync(this) }
Implementa l'interfaccia
OnMapReadyCallbacke sostituisci il metodoonMapReady(). L'API richiama questo callback quando l'oggettoGoogleMapè disponibile, in modo che tu possa aggiungere oggetti alla mappa e personalizzarla ulteriormente per la tua app:Java
public class PolyActivity extends AppCompatActivity implements OnMapReadyCallback, GoogleMap.OnPolylineClickListener, GoogleMap.OnPolygonClickListener { @Override protected void onCreate(Bundle savedInstanceState) { super.onCreate(savedInstanceState); // Retrieve the content view that renders the map. setContentView(R.layout.activity_maps); // Get the SupportMapFragment and request notification when the map is ready to be used. SupportMapFragment mapFragment = (SupportMapFragment) getSupportFragmentManager() .findFragmentById(R.id.map); mapFragment.getMapAsync(this); } /** * Manipulates the map when it's available. * The API invokes this callback when the map is ready to be used. * This is where we can add markers or lines, add listeners or move the camera. * In this tutorial, we add polylines and polygons to represent routes and areas on the map. */ @Override public void onMapReady(GoogleMap googleMap) { // Add polylines to the map. // Polylines are useful to show a route or some other connection between points. Polyline polyline1 = googleMap.addPolyline(new PolylineOptions() .clickable(true) .add( new LatLng(-35.016, 143.321), new LatLng(-34.747, 145.592), new LatLng(-34.364, 147.891), new LatLng(-33.501, 150.217), new LatLng(-32.306, 149.248), new LatLng(-32.491, 147.309))); // Position the map's camera near Alice Springs in the center of Australia, // and set the zoom factor so most of Australia shows on the screen. googleMap.moveCamera(CameraUpdateFactory.newLatLngZoom(new LatLng(-23.684, 133.903), 4)); // Set listeners for click events. googleMap.setOnPolylineClickListener(this); googleMap.setOnPolygonClickListener(this); }
Kotlin
class PolyActivity : AppCompatActivity(), OnMapReadyCallback, OnPolylineClickListener, OnPolygonClickListener { override fun onCreate(savedInstanceState: Bundle?) { super.onCreate(savedInstanceState) // Retrieve the content view that renders the map. setContentView(R.layout.activity_maps) // Get the SupportMapFragment and request notification when the map is ready to be used. val mapFragment = supportFragmentManager .findFragmentById(R.id.map) as SupportMapFragment? mapFragment?.getMapAsync(this) } /** * Manipulates the map when it's available. * The API invokes this callback when the map is ready to be used. * This is where we can add markers or lines, add listeners or move the camera. * In this tutorial, we add polylines and polygons to represent routes and areas on the map. */ override fun onMapReady(googleMap: GoogleMap) { // Add polylines to the map. // Polylines are useful to show a route or some other connection between points. val polyline1 = googleMap.addPolyline(PolylineOptions() .clickable(true) .add( LatLng(-35.016, 143.321), LatLng(-34.747, 145.592), LatLng(-34.364, 147.891), LatLng(-33.501, 150.217), LatLng(-32.306, 149.248), LatLng(-32.491, 147.309))) // Position the map's camera near Alice Springs in the center of Australia, // and set the zoom factor so most of Australia shows on the screen. googleMap.moveCamera(CameraUpdateFactory.newLatLngZoom(LatLng(-23.684, 133.903), 4f)) // Set listeners for click events. googleMap.setOnPolylineClickListener(this) googleMap.setOnPolygonClickListener(this) }
Aggiungi una polilinea per tracciare una linea sulla mappa
Un Polyline è una serie di segmenti di linea collegati. Le polilinee sono utili per rappresentare percorsi, sentieri o altre connessioni tra località sulla mappa.
Crea un oggetto
PolylineOptionse aggiungici dei punti. Ogni punto rappresenta una località sulla mappa, che definisci con unLatLngoggetto contenente i valori di latitudine e longitudine. L'esempio di codice riportato di seguito crea una polilinea con 6 punti.Chiama
GoogleMap.addPolyline()per aggiungere la polilinea alla mappa.Java
Polyline polyline1 = googleMap.addPolyline(new PolylineOptions() .clickable(true) .add( new LatLng(-35.016, 143.321), new LatLng(-34.747, 145.592), new LatLng(-34.364, 147.891), new LatLng(-33.501, 150.217), new LatLng(-32.306, 149.248), new LatLng(-32.491, 147.309)));
Kotlin
val polyline1 = googleMap.addPolyline(PolylineOptions() .clickable(true) .add( LatLng(-35.016, 143.321), LatLng(-34.747, 145.592), LatLng(-34.364, 147.891), LatLng(-33.501, 150.217), LatLng(-32.306, 149.248), LatLng(-32.491, 147.309)))
Imposta l'opzione clickable della polilinea su true se vuoi gestire gli eventi di clic sulla polilinea. Ulteriori informazioni sulla gestione degli eventi sono disponibili più avanti in questo tutorial.
Archivia dati arbitrari con una polilinea
Puoi archiviare oggetti di dati arbitrari con polilinee e altri oggetti geometrici.
Chiama
Polyline.setTag()per archiviare un oggetto di dati con la polilinea. Il codice riportato di seguito definisce un tag arbitrario (A) che indica un tipo di polilinea.Java
Polyline polyline1 = googleMap.addPolyline(new PolylineOptions()
    .clickable(true)
    .add(
            new LatLng(-35.016, 143.321),
            new LatLng(-34.747, 145.592),
            new LatLng(-34.364, 147.891),
            new LatLng(-33.501, 150.217),
            new LatLng(-32.306, 149.248),
            new LatLng(-32.491, 147.309)));
// Store a data object with the polyline, used here to indicate an arbitrary type.
polyline1.setTag("A");
Kotlin
val polyline1 = googleMap.addPolyline(PolylineOptions()
.clickable(true)
.add(
    LatLng(-35.016, 143.321),
    LatLng(-34.747, 145.592),
    LatLng(-34.364, 147.891),
    LatLng(-33.501, 150.217),
    LatLng(-32.306, 149.248),
    LatLng(-32.491, 147.309)))
// Store a data object with the polyline, used here to indicate an arbitrary type.
polyline1.tag = "A
Recupera i dati utilizzando
Polyline.getTag(), come mostrato nella sezione successiva.
Aggiungi stili personalizzati alla polilinea
Puoi specificare varie proprietà di stile nell'
PolylineOptions oggetto. Le opzioni di stile includono il colore del tratto, la larghezza del tratto, il pattern del tratto, i tipi di giunzione e le estremità di inizio e fine. Se non specifichi una proprietà particolare, l'API utilizza un valore predefinito per quella proprietà.
Il seguente codice applica un'estremità arrotondata alla fine della linea e un'estremità di inizio diversa a seconda del tipo della polilinea, dove il tipo è una proprietà arbitraria archiviata nell'oggetto di dati per la polilinea. L'esempio specifica anche una larghezza del tratto, un colore del tratto e un tipo di giunzione:
Java
private static final int COLOR_BLACK_ARGB = 0xff000000; private static final int POLYLINE_STROKE_WIDTH_PX = 12; /** * Styles the polyline, based on type. * @param polyline The polyline object that needs styling. */ private void stylePolyline(Polyline polyline) { String type = ""; // Get the data object stored with the polyline. if (polyline.getTag() != null) { type = polyline.getTag().toString(); } switch (type) { // If no type is given, allow the API to use the default. case "A": // Use a custom bitmap as the cap at the start of the line. polyline.setStartCap( new CustomCap( BitmapDescriptorFactory.fromResource(R.drawable.ic_arrow), 10)); break; case "B": // Use a round cap at the start of the line. polyline.setStartCap(new RoundCap()); break; } polyline.setEndCap(new RoundCap()); polyline.setWidth(POLYLINE_STROKE_WIDTH_PX); polyline.setColor(COLOR_BLACK_ARGB); polyline.setJointType(JointType.ROUND); }
Kotlin
private val COLOR_BLACK_ARGB = -0x1000000 private val POLYLINE_STROKE_WIDTH_PX = 12 /** * Styles the polyline, based on type. * @param polyline The polyline object that needs styling. */ private fun stylePolyline(polyline: Polyline) { // Get the data object stored with the polyline. val type = polyline.tag?.toString() ?: "" when (type) { "A" -> { // Use a custom bitmap as the cap at the start of the line. polyline.startCap = CustomCap( BitmapDescriptorFactory.fromResource(R.drawable.ic_arrow), 10f) } "B" -> { // Use a round cap at the start of the line. polyline.startCap = RoundCap() } } polyline.endCap = RoundCap() polyline.width = POLYLINE_STROKE_WIDTH_PX.toFloat() polyline.color = COLOR_BLACK_ARGB polyline.jointType = JointType.ROUND }
Il codice riportato sopra specifica una bitmap personalizzata per l'estremità di inizio della polilinea di tipo A e una larghezza del tratto di riferimento di 10 pixel. L'API ridimensiona la bitmap in base alla larghezza del tratto di riferimento. Quando specifichi la larghezza del tratto di riferimento, fornisci la larghezza che hai utilizzato durante la progettazione dell'immagine bitmap, nella dimensione originale dell'immagine. Suggerimento: apri l'immagine bitmap con uno zoom del 100% in un editor di immagini e traccia la larghezza del tratto di linea desiderata rispetto all'immagine.
Scopri di più sulle estremità delle linee e su altre opzioni per personalizzare le forme.
Gestisci gli eventi di clic sulla polilinea
Rendi cliccabile la polilinea chiamando
Polyline.setClickable(). (Per impostazione predefinita, le polilinee non sono cliccabili e la tua app non riceverà una notifica quando l'utente tocca una polilinea.)Implementa l'interfaccia
OnPolylineClickListenere chiamaGoogleMap.setOnPolylineClickListener()per impostare il listener sulla mappa:Java
public class PolyActivity extends AppCompatActivity implements OnMapReadyCallback, GoogleMap.OnPolylineClickListener, GoogleMap.OnPolygonClickListener { @Override protected void onCreate(Bundle savedInstanceState) { super.onCreate(savedInstanceState); // Retrieve the content view that renders the map. setContentView(R.layout.activity_maps); // Get the SupportMapFragment and request notification when the map is ready to be used. SupportMapFragment mapFragment = (SupportMapFragment) getSupportFragmentManager() .findFragmentById(R.id.map); mapFragment.getMapAsync(this); } /** * Manipulates the map when it's available. * The API invokes this callback when the map is ready to be used. * This is where we can add markers or lines, add listeners or move the camera. * In this tutorial, we add polylines and polygons to represent routes and areas on the map. */ @Override public void onMapReady(GoogleMap googleMap) { // Add polylines to the map. // Polylines are useful to show a route or some other connection between points. Polyline polyline1 = googleMap.addPolyline(new PolylineOptions() .clickable(true) .add( new LatLng(-35.016, 143.321), new LatLng(-34.747, 145.592), new LatLng(-34.364, 147.891), new LatLng(-33.501, 150.217), new LatLng(-32.306, 149.248), new LatLng(-32.491, 147.309))); // Position the map's camera near Alice Springs in the center of Australia, // and set the zoom factor so most of Australia shows on the screen. googleMap.moveCamera(CameraUpdateFactory.newLatLngZoom(new LatLng(-23.684, 133.903), 4)); // Set listeners for click events. googleMap.setOnPolylineClickListener(this); googleMap.setOnPolygonClickListener(this); }
Kotlin
class PolyActivity : AppCompatActivity(), OnMapReadyCallback, OnPolylineClickListener, OnPolygonClickListener { override fun onCreate(savedInstanceState: Bundle?) { super.onCreate(savedInstanceState) // Retrieve the content view that renders the map. setContentView(R.layout.activity_maps) // Get the SupportMapFragment and request notification when the map is ready to be used. val mapFragment = supportFragmentManager .findFragmentById(R.id.map) as SupportMapFragment? mapFragment?.getMapAsync(this) } /** * Manipulates the map when it's available. * The API invokes this callback when the map is ready to be used. * This is where we can add markers or lines, add listeners or move the camera. * In this tutorial, we add polylines and polygons to represent routes and areas on the map. */ override fun onMapReady(googleMap: GoogleMap) { // Add polylines to the map. // Polylines are useful to show a route or some other connection between points. val polyline1 = googleMap.addPolyline(PolylineOptions() .clickable(true) .add( LatLng(-35.016, 143.321), LatLng(-34.747, 145.592), LatLng(-34.364, 147.891), LatLng(-33.501, 150.217), LatLng(-32.306, 149.248), LatLng(-32.491, 147.309))) // Position the map's camera near Alice Springs in the center of Australia, // and set the zoom factor so most of Australia shows on the screen. googleMap.moveCamera(CameraUpdateFactory.newLatLngZoom(LatLng(-23.684, 133.903), 4f)) // Set listeners for click events. googleMap.setOnPolylineClickListener(this) googleMap.setOnPolygonClickListener(this) }
Sostituisci il metodo di callback
onPolylineClick(). L'esempio seguente alterna il pattern del tratto della linea tra continuo e tratteggiato ogni volta che l'utente fa clic sulla polilinea:Java
private static final int PATTERN_GAP_LENGTH_PX = 20; private static final PatternItem DOT = new Dot(); private static final PatternItem GAP = new Gap(PATTERN_GAP_LENGTH_PX); // Create a stroke pattern of a gap followed by a dot. private static final List<PatternItem> PATTERN_POLYLINE_DOTTED = Arrays.asList(GAP, DOT); /** * Listens for clicks on a polyline. * @param polyline The polyline object that the user has clicked. */ @Override public void onPolylineClick(Polyline polyline) { // Flip from solid stroke to dotted stroke pattern. if ((polyline.getPattern() == null) || (!polyline.getPattern().contains(DOT))) { polyline.setPattern(PATTERN_POLYLINE_DOTTED); } else { // The default pattern is a solid stroke. polyline.setPattern(null); } Toast.makeText(this, "Route type " + polyline.getTag().toString(), Toast.LENGTH_SHORT).show(); }
Kotlin
private val PATTERN_GAP_LENGTH_PX = 20 private val DOT: PatternItem = Dot() private val GAP: PatternItem = Gap(PATTERN_GAP_LENGTH_PX.toFloat()) // Create a stroke pattern of a gap followed by a dot. private val PATTERN_POLYLINE_DOTTED = listOf(GAP, DOT) /** * Listens for clicks on a polyline. * @param polyline The polyline object that the user has clicked. */ override fun onPolylineClick(polyline: Polyline) { // Flip from solid stroke to dotted stroke pattern. if (polyline.pattern == null || !polyline.pattern!!.contains(DOT)) { polyline.pattern = PATTERN_POLYLINE_DOTTED } else { // The default pattern is a solid stroke. polyline.pattern = null } Toast.makeText(this, "Route type " + polyline.tag.toString(), Toast.LENGTH_SHORT).show() }
Aggiungi poligoni per rappresentare le aree sulla mappa
Un Polygon è una forma costituita da una serie di coordinate in una
sequenza ordinata, simile a un Polyline. La differenza è che il poligono definisce un'area chiusa con un interno riempibile, mentre una polilinea è aperta.
Crea un oggetto
PolygonOptionse aggiungici dei punti. Ogni punto rappresenta una località sulla mappa, che definisci con unLatLngoggetto contenente i valori di latitudine e longitudine. L'esempio di codice riportato di seguito crea un poligono con 4 punti.Rendi cliccabile il poligono chiamando
Polygon.setClickable(). (Per impostazione predefinita, i poligoni non sono cliccabili e la tua app non riceverà una notifica quando l'utente tocca un poligono.) La gestione degli eventi di clic sui poligoni è simile alla gestione degli eventi sulle polilinee, descritta in precedenza in questo tutorial.Chiama
GoogleMap.addPolygon()per aggiungere il poligono alla mappa.Chiama
Polygon.setTag()per archiviare un oggetto di dati con il poligono. Il codice riportato di seguito definisce un tipo arbitrario (alpha) per il poligono.Java
// Add polygons to indicate areas on the map. Polygon polygon1 = googleMap.addPolygon(new PolygonOptions() .clickable(true) .add( new LatLng(-27.457, 153.040), new LatLng(-33.852, 151.211), new LatLng(-37.813, 144.962), new LatLng(-34.928, 138.599))); // Store a data object with the polygon, used here to indicate an arbitrary type. polygon1.setTag("alpha");
Kotlin
// Add polygons to indicate areas on the map. val polygon1 = googleMap.addPolygon(PolygonOptions() .clickable(true) .add( LatLng(-27.457, 153.040), LatLng(-33.852, 151.211), LatLng(-37.813, 144.962), LatLng(-34.928, 138.599))) // Store a data object with the polygon, used here to indicate an arbitrary type. polygon1.tag = "alpha" // Style the polygon.
Aggiungi stili personalizzati al poligono
Puoi specificare una serie di proprietà di stile nell'
PolygonOptions oggetto. Le opzioni di stile includono il colore del tratto, la larghezza del tratto, il pattern del tratto, i tipi di giunzione del tratto e il colore di riempimento. Se non specifichi una proprietà particolare, l'API utilizza un valore predefinito per quella proprietà.
Il seguente codice applica colori e pattern del tratto specifici a seconda del tipo del poligono, dove il tipo è una proprietà arbitraria archiviata nell'oggetto di dati per il poligono:
Java
private static final int COLOR_WHITE_ARGB = 0xffffffff; private static final int COLOR_DARK_GREEN_ARGB = 0xff388E3C; private static final int COLOR_LIGHT_GREEN_ARGB = 0xff81C784; private static final int COLOR_DARK_ORANGE_ARGB = 0xffF57F17; private static final int COLOR_LIGHT_ORANGE_ARGB = 0xffF9A825; private static final int POLYGON_STROKE_WIDTH_PX = 8; private static final int PATTERN_DASH_LENGTH_PX = 20; private static final PatternItem DASH = new Dash(PATTERN_DASH_LENGTH_PX); // Create a stroke pattern of a gap followed by a dash. private static final List<PatternItem> PATTERN_POLYGON_ALPHA = Arrays.asList(GAP, DASH); // Create a stroke pattern of a dot followed by a gap, a dash, and another gap. private static final List<PatternItem> PATTERN_POLYGON_BETA = Arrays.asList(DOT, GAP, DASH, GAP); /** * Styles the polygon, based on type. * @param polygon The polygon object that needs styling. */ private void stylePolygon(Polygon polygon) { String type = ""; // Get the data object stored with the polygon. if (polygon.getTag() != null) { type = polygon.getTag().toString(); } List<PatternItem> pattern = null; int strokeColor = COLOR_BLACK_ARGB; int fillColor = COLOR_WHITE_ARGB; switch (type) { // If no type is given, allow the API to use the default. case "alpha": // Apply a stroke pattern to render a dashed line, and define colors. pattern = PATTERN_POLYGON_ALPHA; strokeColor = COLOR_DARK_GREEN_ARGB; fillColor = COLOR_LIGHT_GREEN_ARGB; break; case "beta": // Apply a stroke pattern to render a line of dots and dashes, and define colors. pattern = PATTERN_POLYGON_BETA; strokeColor = COLOR_DARK_ORANGE_ARGB; fillColor = COLOR_LIGHT_ORANGE_ARGB; break; } polygon.setStrokePattern(pattern); polygon.setStrokeWidth(POLYGON_STROKE_WIDTH_PX); polygon.setStrokeColor(strokeColor); polygon.setFillColor(fillColor); }
Kotlin
private val COLOR_WHITE_ARGB = -0x1 private val COLOR_DARK_GREEN_ARGB = -0xc771c4 private val COLOR_LIGHT_GREEN_ARGB = -0x7e387c private val COLOR_DARK_ORANGE_ARGB = -0xa80e9 private val COLOR_LIGHT_ORANGE_ARGB = -0x657db private val POLYGON_STROKE_WIDTH_PX = 8 private val PATTERN_DASH_LENGTH_PX = 20 private val DASH: PatternItem = Dash(PATTERN_DASH_LENGTH_PX.toFloat()) // Create a stroke pattern of a gap followed by a dash. private val PATTERN_POLYGON_ALPHA = listOf(GAP, DASH) // Create a stroke pattern of a dot followed by a gap, a dash, and another gap. private val PATTERN_POLYGON_BETA = listOf(DOT, GAP, DASH, GAP) /** * Styles the polygon, based on type. * @param polygon The polygon object that needs styling. */ private fun stylePolygon(polygon: Polygon) { // Get the data object stored with the polygon. val type = polygon.tag?.toString() ?: "" var pattern: List<PatternItem>? = null var strokeColor = COLOR_BLACK_ARGB var fillColor = COLOR_WHITE_ARGB when (type) { "alpha" -> { // Apply a stroke pattern to render a dashed line, and define colors. pattern = PATTERN_POLYGON_ALPHA strokeColor = COLOR_DARK_GREEN_ARGB fillColor = COLOR_LIGHT_GREEN_ARGB } "beta" -> { // Apply a stroke pattern to render a line of dots and dashes, and define colors. pattern = PATTERN_POLYGON_BETA strokeColor = COLOR_DARK_ORANGE_ARGB fillColor = COLOR_LIGHT_ORANGE_ARGB } } polygon.strokePattern = pattern polygon.strokeWidth = POLYGON_STROKE_WIDTH_PX.toFloat() polygon.strokeColor = strokeColor polygon.fillColor = fillColor }
Scopri di più sui pattern del tratto e su altre opzioni per personalizzare le forme.
Passaggi successivi
Scopri l'oggetto Circle. I cerchi sono simili ai poligoni, ma hanno proprietà che riflettono la forma di un cerchio.