이 페이지에서는 마커 클러스터링 유틸리티에 대해 유틸리티 라이브러리 (iOS용 Maps SDK)에 대해 자세히 알아보세요.
마커를 클러스터링하면 지도의 가독성을 해치지 않으면서도 지도에 많은 마커를 넣을 수 있습니다. 마커 클러스터링 유틸리티는 다양한 확대/축소 수준에서 여러 개의 마커를 관리할 수 있습니다.
사용자가 지도 화면을 확대하면 개별 마커가 지도에 나타납니다. 사용자가 지도 화면을 축소하면 마커가 클러스터로 모여서 지도를 보기 쉽게 해줍니다.
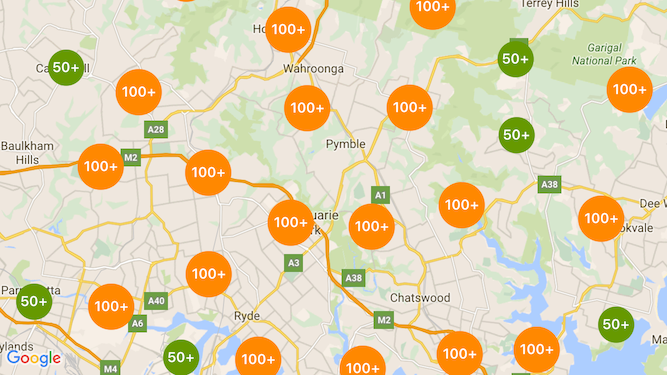
다음 스크린샷은 마커 클러스터의 기본 스타일을 보여줍니다.

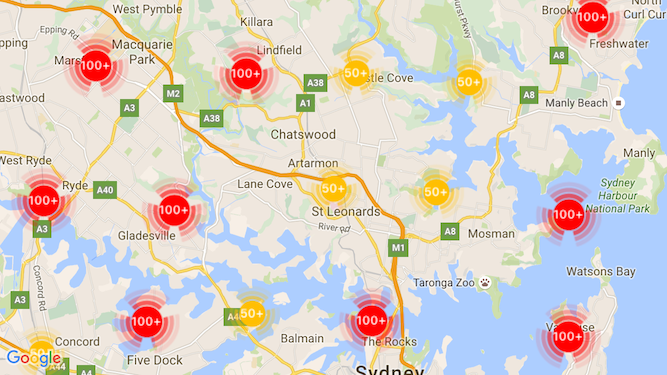
다음은 사용자 지정 마커 클러스터의 예시입니다.

사전 요구사항 및 참고 사항
iOS용 Maps SDK 유틸리티 라이브러리
마커 클러스터링 유틸리티는 iOS용 Maps SDK 유틸리티 라이브러리. 아직 라이브러리를 설정하지 않았다면 이 페이지의 나머지 부분을 읽기 전에 설정 가이드를 따르세요.
최상의 성능을 보장하는 권장 최대 마커 수는 10,000입니다.
위치 정보 액세스 권한
이 예에서는 기기의 GPS를 사용하여 사용자의 좌표에서 사용자와 지도를 찾습니다. 사용 설정
이 경우 NSLocationWhenInUseUsageDescription 권한에 설명을 추가해야 합니다.
(프로젝트의 Info.plist 파일)
이를 추가하려면 다음 단계를 따르세요.
- Xcode의 Project Navigator에서
Info.plist파일을 클릭하여 속성 목록 편집기 - 오른쪽 상단에 있는 '+' 아이콘 새 속성을 추가합니다
- '키' 필드에 'NSLocationWhenInUseUsageDescription'을 입력합니다. Xcode는 자동으로 긴 이름인 'Privacy - Location When In Use Usage Description'으로 번역합니다. 사용할 수 있는 위치 정보 액세스 권한 속성의 전체 목록은 <ph type="x-smartling-placeholder"></ph> 위치 서비스 승인 요청 참조하세요.
- '유형'을 그대로 둡니다. 필드가 'String'으로 설정되어 있습니다.
- 'Value' 필드에 사용자의 위치 예: '주변 업체 목록을 제공할 사용자를 찾습니다.'
마커 클러스터링 구현
마커 클러스터링을 구현하려면 다음 세 단계를 거쳐야 합니다.
를 통해 개인정보처리방침을 정의할 수 있습니다. 마커 클러스터링을 구현하는 방법에 대한 전체 예를 보려면 GitHub의 Objective-C 및 Swift 예시 앱을 확인하세요.클러스터 관리자 만들기
클러스터 관리자를 사용하려면 다음 단계를 따르세요.
- 지도가 렌더링되는
ViewController를GMSMapViewDelegate프로토콜 GMUClusterManager의 인스턴스를 생성하세요.- 마커 클러스터링을 구현하려는
GMSMapView의 인스턴스를 전달합니다.GMUClusterManager인스턴스에 다음 프로토콜의 구현을 포함합니다. <ph type="x-smartling-placeholder">- </ph>
GMUClusterIconGenerator: 클러스터 아이콘을 여러 확대/축소 수준에서 사용할 수 있습니다.GMUClusterAlgorithm: 동작을 결정하는 알고리즘을 지정합니다. 마커 클러스터링 방식을 지정합니다(예: 동일한 클러스터에 포함할 마커 사이의 거리).GMUClusterRenderer: 실제 처리 이벤트를 처리하는 애플리케이션 로직을 제공합니다. 지도에 클러스터 아이콘을 렌더링합니다
GMUClusterManager인스턴스에 지도 대리자를 설정합니다.
유틸리티 라이브러리에는 아이콘 생성기 (GMUDefaultClusterIconGenerator)의 기본 구현이 포함되어 있습니다.
알고리즘 (GMUNonHierarchicalDistanceBasedAlgorithm)과 렌더기 (GMUDefaultClusterRenderer)를 모두 사용합니다.
원하는 경우 나만의 맞춤 클러스터링 아이콘 생성자, 알고리즘 및 렌더기를 만들 수도 있습니다.
다음 코드는 viewDidLoad에서 이러한 기본값을 사용하여 클러스터 관리자를 만듭니다.
ViewController의 콜백입니다.
Swift
import GoogleMaps
import GoogleMapsUtils

class MarkerClustering: UIViewController, GMSMapViewDelegate {
  private var mapView: GMSMapView!
  private var clusterManager: GMUClusterManager!

  override func viewDidLoad() {
    super.viewDidLoad()

    // Set up the cluster manager with the supplied icon generator and
    // renderer.
    let iconGenerator = GMUDefaultClusterIconGenerator()
    let algorithm = GMUNonHierarchicalDistanceBasedAlgorithm()
    let renderer = GMUDefaultClusterRenderer(mapView: mapView,
                                clusterIconGenerator: iconGenerator)
    clusterManager = GMUClusterManager(map: mapView, algorithm: algorithm,
                                                      renderer: renderer)

    // Register self to listen to GMSMapViewDelegate events.
    clusterManager.setMapDelegate(self)
    // ...
  }
  // ...
}
Objective-C
@import GoogleMaps;
@import GoogleMapsUtils;

@interface MarkerClustering () <GMSMapViewDelegate>

@end

@implementation MarkerClustering {
  GMSMapView *_mapView;
  GMUClusterManager *_clusterManager;
}

- (void)viewDidLoad {
  [super viewDidLoad];

  // Set up the cluster manager with a supplied icon generator and renderer.
  id<GMUClusterAlgorithm> algorithm =
      [[GMUNonHierarchicalDistanceBasedAlgorithm alloc] init];
  id<GMUClusterIconGenerator> iconGenerator =
      [[GMUDefaultClusterIconGenerator alloc] init];
  id<GMUClusterRenderer> renderer =
      [[GMUDefaultClusterRenderer alloc] initWithMapView:_mapView
                                    clusterIconGenerator:iconGenerator];
  _clusterManager =
      [[GMUClusterManager alloc] initWithMap:_mapView
                                   algorithm:algorithm
                                    renderer:renderer];

  // Register self to listen to GMSMapViewDelegate events.
  [_clusterManager setMapDelegate:self];
  // ...
}
// ...
@end
마커 추가하기
마커 클러스터러에 마커를 추가하는 방법에는 개별적으로 또는 배열의 두 가지 방법이 있습니다.
개별 마커
Swift
let position = CLLocationCoordinate2D(latitude: 47.60, longitude: -122.33)
let marker = GMSMarker(position: position)
clusterManager.add(marker)
Objective-C
CLLocationCoordinate2D position = CLLocationCoordinate2DMake(47.60, -122.33);
GMSMarker *marker = [GMSMarker markerWithPosition:position];
[_clusterManager addItem:marker];
마커 배열
Swift
let position1 = CLLocationCoordinate2D(latitude: 47.60, longitude: -122.33)
let marker1 = GMSMarker(position: position1)

let position2 = CLLocationCoordinate2D(latitude: 47.60, longitude: -122.46)
let marker2 = GMSMarker(position: position2)

let position3 = CLLocationCoordinate2D(latitude: 47.30, longitude: -122.46)
let marker3 = GMSMarker(position: position3)

let position4 = CLLocationCoordinate2D(latitude: 47.20, longitude: -122.23)
let marker4 = GMSMarker(position: position4)

let markerArray = [marker1, marker2, marker3, marker4]
clusterManager.add(markerArray)
Objective-C
CLLocationCoordinate2D position1 = CLLocationCoordinate2DMake(47.60, -122.33);
GMSMarker *marker1 = [GMSMarker markerWithPosition:position1];

CLLocationCoordinate2D position2 = CLLocationCoordinate2DMake(47.60, -122.46);
GMSMarker *marker2 = [GMSMarker markerWithPosition:position2];

CLLocationCoordinate2D position3 = CLLocationCoordinate2DMake(47.30, -122.46);
GMSMarker *marker3 = [GMSMarker markerWithPosition:position3];

CLLocationCoordinate2D position4 = CLLocationCoordinate2DMake(47.20, -122.23);
GMSMarker *marker4 = [GMSMarker markerWithPosition:position4];

NSArray<GMSMarker *> *markerArray = @[marker1, marker2, marker3, marker4];
[_clusterManager addItems:markerArray];
마커 클러스터러 호출
마커 클러스터러를 만들고 클러스터링하려는 마커에 전달하면
마커 클러스터러 인스턴스에서 cluster 메서드를 호출해야 합니다.
Swift
clusterManager.cluster()
Objective-C
[_clusterManager cluster];
마커 및 클러스터의 이벤트 처리
일반적으로 iOS용 Maps SDK를 사용할 때 지도의 이벤트를 수신 대기하려면 구현해야 합니다.
GMSMapViewDelegate
사용할 수 있습니다 들을 수 있는 음악
이벤트를 매핑할 수 있지만
유형 안전 클러스터 관리자 이벤트를 수신 대기합니다 사용자가 마커를 탭하면
개별 클러스터 항목 또는 클러스터가
mapView:didTapMarker:하고 추가 클러스터 데이터를
marker.userData 속성 그런 다음 userData가 다음을 준수하는지 확인할 수 있습니다.
클러스터 아이콘 또는 마커를 탭했는지 확인하기 위한 GMUCluster 프로토콜
Swift
func mapView(_ mapView: GMSMapView, didTap marker: GMSMarker) -> Bool {
  // center the map on tapped marker
  mapView.animate(toLocation: marker.position)
  // check if a cluster icon was tapped
  if marker.userData is GMUCluster {
    // zoom in on tapped cluster
    mapView.animate(toZoom: mapView.camera.zoom + 1)
    NSLog("Did tap cluster")
    return true
  }

  NSLog("Did tap a normal marker")
  return false
}
Objective-C
- (BOOL)mapView:(GMSMapView *)mapView didTapMarker:(GMSMarker *)marker {
  // center the map on tapped marker
    [_mapView animateToLocation:marker.position];
    // check if a cluster icon was tapped
    if ([marker.userData conformsToProtocol:@protocol(GMUCluster)]) {
      // zoom in on tapped cluster
      [_mapView animateToZoom:_mapView.camera.zoom + 1];
      NSLog(@"Did tap cluster");
      return YES;
    }

    NSLog(@"Did tap marker in cluster");
    return NO;
}
이제 클러스터 관리자는 Google Cloud 콘솔에서 구현한
clusterManager 나머지 이벤트를 지도에 전달합니다.
델리게이트(제공된 경우) 표준 마커의 이벤트는
(즉, 클러스터 렌더러에서 생성하지 않은 마커)가 항상 전달됩니다.
지도 대리자에게 전달됩니다.
마커 클러스터링 맞춤설정
이때
GMUClusterRenderer, GMUClusterIconGenerator 또는
GMUClusterAlgorithm입니다. 맞춤 구현의 기반이 되는
이 프로토콜의 샘플 구현에 대한 자세한 내용은
전체 맞춤 구현을 코딩할 수도 있지만,
사용할 수 있습니다

