
Availability: This feature is visible on Android, iOS, JavaScript, and Maps Static.
Better tailor your map to the needs of your users by highlighting features at the zoom level that the map is viewed at. For example, you can highlight POIs or roads once viewers have zoomed into a particular location of interest.
You can style map feature elements to appear the same at all zoom levels on a map, or for some elements, you can create different styles for different zoom levels.
Not all features allow you to customize zoom levels. Map feature elements that you can set zoom-level styling on have a diamond icon to the right.

Understand zoom-level styling
Zoom levels go from 0, the most zoomed out, showing the world, to 22, the most zoomed in, showing a small detailed part of the map. A keyzoom is a zoom level where you want to start a new style.
When you style map features at different zoom levels, that style applies to all higher zoom levels (more zoomed in) until another zoom level style is reached. Zoom level 0 is always added with the current style.
For example, if you set styles at zoom levels 5 and 10:
- The zoom level 5 style applies to zoom levels 5-9.
- The zoom level 10 style applies to zoom levels 10-22.
- Zoom levels 0-4 keep the current style.
When you customize a zoom-level style for a map feature, it overrides any custom styles on the overall map feature.
Understand zoom-level transitions on 2D vector maps
When you set different colors at two keyzooms on a 2D vector map, the map blends those colors across the zoom levels in between. Icon colors don't blend.
For example, suppose you set the following zoom-level styles for water:
- For zoom level 10, water fill color = black.
- For zoom level 11, water fill color = white.
As you zoom between levels 10 and 11, the water fill color appears gray, as shown in the following figure:

Understand zoom levels on 3D maps
When you use cloud-based maps styling with 3D roadmap and 3D hybrid
maps, your zoom-level styles look different than they do on 2D maps, because a
3D map doesn't have a single zoom level across the view.
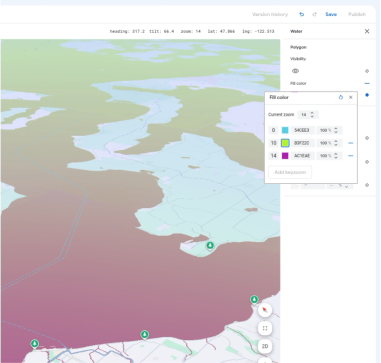
On a 2D map, the entire view renders at one zoom level at a time—even when tilted—so color blending produces one uniform color across the map. On a tilted 3D map, the foreground renders at a higher zoom level than the area near the horizon. Because one view spans several zoom levels at once, nearby keyzoom styles blend into a color gradient from the foreground to the horizon, rather than switching the whole map at once.
For example, suppose you set the following zoom-level styles for water on a
3D roadmap map:
- For zoom level 10, water fill color = green.
- For zoom level 14, water fill color = purple.
When you tilt the 3D map at zoom level 14, both styles and the blended shades between them appear in the same view—purple in the foreground, blended shades in the middle distance, and green near the horizon, as shown in the following figure:
When you preview your style on the 3D roadmap or 3D hybrid map type in the
style editor, Current Zoom shows the zoom level at the center of the map.
When you change Current Zoom, the style editor adjusts the camera's range
(its distance from the center) while keeping the same center, tilt, and heading.
Best practices for zoom-level styles on 3D maps
To make your zoom-level styles work well on 3D maps, follow these guidelines:
- Use harmonious colors at nearby keyzooms. If you want a smooth, natural gradient across a tilted view, choose colors that blend well together and avoid clashing colors that mix into muddy bands.
- Preview your style at several tilts and zoom levels. Before you publish,
switch the map type to
3D roadmapor3D hybridin the style editor, tilt the map, and check how your zoom-level styles blend.
Customize different zoom levels
In the Cloud console, go to Map Styles, and select a project, if needed.
Create or open a map style, and select Customize. For details, see Create a map style.
From the Map Features panel, select a map feature to customize. The style panel opens showing the elements you can customize.
Next to the element to which you want to add zoom-level styling, select the zoom diamond to the right to open the keyzoom panel.
Next to Current Zoom, select the zoom level you want to customize. The preview map adjusts to that zoom level.

Select Add Keyzoom to add a new keyzoom at the selected zoom level and shows the respective default basemap value.

Style this zoom level and any other zoom levels as needed.

To set another zoom level, change the Current Zoom and select Add Keyzoom again to add another zoom level to the list. Continue adding and setting zoom level styles until you are done.
When you're finished, close the keyzoom panel.
Overwrite the default basemap color values for an element
To overwrite all default basemap color values for an element across zoom levels, first style the element. When you add keyzooms, the keyzoom uses the color you set for the element instead of the default basemap color.
Save and publish zoom-level styling
To save your map styling changes, select Save.
To make your changes live for the map IDs associated with your map style, select Publish.
Remove a zoom level style
From the Map Features panel, select a customized map feature.
Next to a style element, select the diamond on the right. Elements with custom zoom-level styling show a solid blue diamond.

In the keyzoom panel, select the minus icon to delete a zoom level.

Remove all zoom level styles
If you want to remove all custom styling from a map feature element, you can do one of the following:
- In the style panel, select the minus icon next to the element name.
- In the keyzoom panel, select the reset icon next to the element name.
Preview road level details
You can preview enhanced road level details at zoom levels 17+ on your existing styles such as realistic road widths, sidewalks, lane markings and other features in select cities. You must enable the preview for each style editor session. These road detail map features are only visible on the SDKs or APIs that support road level details. To apply them in your app, you must update the associated SDK or API to the version that supports road level details. For more information about the API and SDK versions, see Road level details for Google Maps Platform.
To enable the road detail preview, do the following:
In the Google Cloud console, go to Map Styles.
Select an existing style or Create a style.
Click Customize.
In the style editor, click Road detail preview.
In the preview dialog, toggle Road detail to on.
For details on which road level details you can style, see What you can style on the map.
Add zoom level styles to soften style transition for zoom levels 17+
At zoom levels 17+ with road level details enabled, Road map features disappear and become the Surface map feature instead. As you zoom in, any styled elements that apply to the Surface map feature appear and replace the Road map features and styles.
To make the transition between the map feature styles smoother, you can add zoom level styles to lock in your style colors between specific zoom levels. You can use zoom level styles to also control when to smoothly transition to a new style color.
For example, at zoom level 16, the listed map features are styled as follows:
- Arterial is red.
- Highway is blue.
- Local is yellow.
- Surface is beige.

When you zoom in to zoom level 17, the arterials, highways, and local roads change to the Surface map feature, which is styled as beige.

To create a smoother transition between the Road map features and the Surface map feature, add the following keyzooms and zoom-level styling:
| Map feature | Zoom level 0 | Zoom level 12 | Zoom level 17 |
|---|---|---|---|
| Arterial | red | red | beige |
| Highway | blue | blue | beige |
| Local | yellow | yellow | beige |
After adding zoom-level styling, when you zoom in, the following occurs:
- The arterials, highways, and local roads display the custom styled color from zoom levels 0 to 12.
- After zoom level 12, the styled color begins to fade into the beige color until fully transitioning to the beige color from the Surface map feature style at zoom level 17.
