iOS için Places SDK'daki otomatik tamamlama hizmeti, kullanıcı arama sorgularına yanıt olarak yer tahminleri döndürür. Kullanıcı yazarken otomatik tamamlama hizmeti, işletmeler, adresler, artı kodları ve ilgi çekici yerler gibi yerlerle ilgili öneriler döndürür.
Uygulamanıza otomatik tamamlama özelliğini aşağıdaki yöntemlerle ekleyebilirsiniz:
- Geliştirme süresini kısaltmak ve tutarlı bir kullanıcı deneyimi sağlamak için otomatik tamamlama kullanıcı arayüzü kontrolü ekleyin.
- Özelleştirilmiş bir kullanıcı deneyimi oluşturmak için yer tahminlerini programatik olarak alın.
Otomatik tamamlama kullanıcı arayüzü kontrolü ekleme
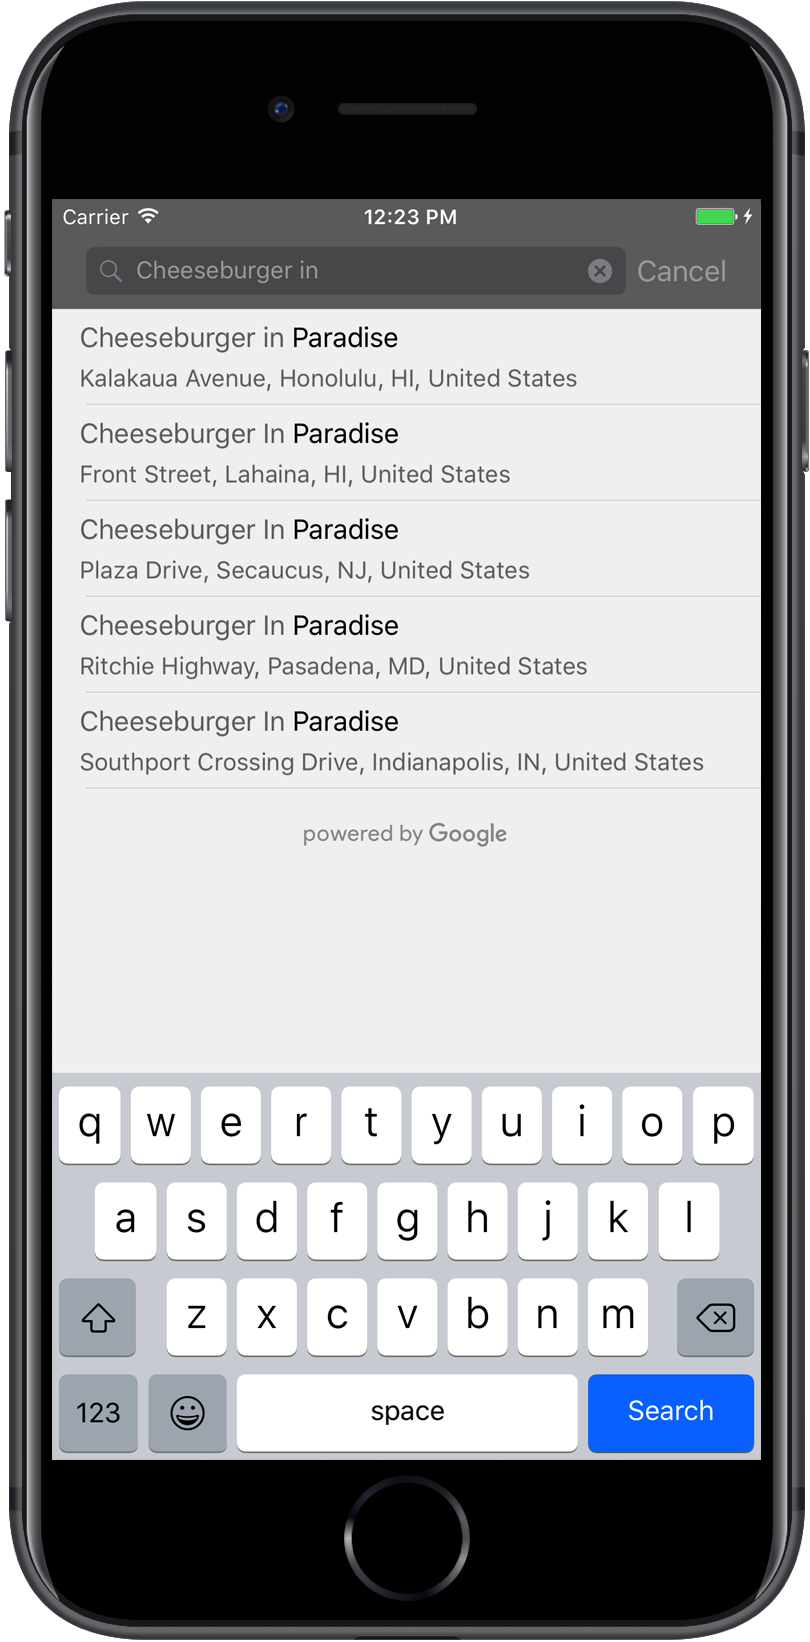
Otomatik tamamlama kullanıcı arayüzü denetimi, yerleşik otomatik tamamlama işlevine sahip bir arama iletişim kutusudur. Kullanıcı arama terimlerini girerken kontrol, seçilebilecek tahmini yerlerin listesini gösterir. Kullanıcı seçim yaptığında GMSPlace örneği döndürülür. Uygulamanız daha sonra bu örneği kullanarak seçilen yerle ilgili ayrıntıları alabilir.
Otomatik tamamlama kullanıcı arayüzü denetimini uygulamanıza aşağıdaki şekillerde ekleyebilirsiniz:
Tam ekran kontrolü ekleme
Kullanıcı seçimini yapana kadar otomatik tamamlama kullanıcı arayüzünün uygulamanızın kullanıcı arayüzünün yerini geçici olarak aldığı modal bir bağlam istediğinizde tam ekran kontrolünü kullanın. Bu işlev, GMSAutocompleteViewController sınıfı tarafından sağlanır. Kullanıcı bir yer seçtiğinde uygulamanız geri çağırma alır.
Uygulamanıza tam ekran kontrolü eklemek için:
- Ana uygulamanızda otomatik tamamlama kullanıcı arayüzü kontrolünü başlatmak için bir kullanıcı arayüzü öğesi oluşturun. Örneğin,
UIButtonüzerinde bir dokunma işleyicisi. - Üst görünüm denetleyicisinde
GMSAutocompleteViewControllerDelegateprotokolünü uygulayın. GMSAutocompleteViewControllerörneği oluşturun ve üst görünüm denetleyicisini temsilci özelliği olarak atayın.- Döndürülecek yer veri türlerini tanımlamak için
GMSPlaceFieldoluşturun. - Sorguyu belirli bir yer türüyle sınırlamak için
GMSAutocompleteFilterekleyin. [self presentViewController...]kullanarakGMSAutocompleteViewControllersunun.- Kullanıcının
didAutocompleteWithPlaceyetkilendirme yöntemindeki seçimini işleyin. didAutocompleteWithPlace,didFailAutocompleteWithErrorvewasCancelledtemsilci yöntemlerinde denetleyiciyi kapatın.
Aşağıdaki örnekte, kullanıcının bir düğmeye dokunması üzerine GMSAutocompleteViewController başlatmanın olası bir yolu gösterilmektedir.
Swift
import UIKit
import GooglePlaces

class ViewController: UIViewController {

  override func viewDidLoad() {
    makeButton()
  }

  // Present the Autocomplete view controller when the button is pressed.
  @objc func autocompleteClicked(_ sender: UIButton) {
    let autocompleteController = GMSAutocompleteViewController()
    autocompleteController.delegate = self

    // Specify the place data types to return.
    let fields: GMSPlaceField = GMSPlaceField(rawValue: UInt(GMSPlaceField.name.rawValue) |
      UInt(GMSPlaceField.placeID.rawValue))!
    autocompleteController.placeFields = fields

    // Specify a filter.
    let filter = GMSAutocompleteFilter()
    filter.types = [.address]
    autocompleteController.autocompleteFilter = filter

    // Display the autocomplete view controller.
    present(autocompleteController, animated: true, completion: nil)
  }

  // Add a button to the view.
  func makeButton() {
    let btnLaunchAc = UIButton(frame: CGRect(x: 5, y: 150, width: 300, height: 35))
    btnLaunchAc.backgroundColor = .blue
    btnLaunchAc.setTitle("Launch autocomplete", for: .normal)
    btnLaunchAc.addTarget(self, action: #selector(autocompleteClicked), for: .touchUpInside)
    self.view.addSubview(btnLaunchAc)
  }

}

extension ViewController: GMSAutocompleteViewControllerDelegate {

  // Handle the user's selection.
  func viewController(_ viewController: GMSAutocompleteViewController, didAutocompleteWith place: GMSPlace) {
    print("Place name: \(place.name)")
    print("Place ID: \(place.placeID)")
    print("Place attributions: \(place.attributions)")
    dismiss(animated: true, completion: nil)
  }

  func viewController(_ viewController: GMSAutocompleteViewController, didFailAutocompleteWithError error: Error) {
    // TODO: handle the error.
    print("Error: ", error.localizedDescription)
  }

  // User canceled the operation.
  func wasCancelled(_ viewController: GMSAutocompleteViewController) {
    dismiss(animated: true, completion: nil)
  }

  // Turn the network activity indicator on and off again.
  func didRequestAutocompletePredictions(_ viewController: GMSAutocompleteViewController) {
    UIApplication.shared.isNetworkActivityIndicatorVisible = true
  }

  func didUpdateAutocompletePredictions(_ viewController: GMSAutocompleteViewController) {
    UIApplication.shared.isNetworkActivityIndicatorVisible = false
  }

}
Objective-C
#import "ViewController.h"
@import GooglePlaces;

@interface ViewController () <GMSAutocompleteViewControllerDelegate>

@end

@implementation ViewController {
  GMSAutocompleteFilter *_filter;
}

-   (void)viewDidLoad {
  [super viewDidLoad];
  [self makeButton];
}

  // Present the autocomplete view controller when the button is pressed.
-   (void)autocompleteClicked {
  GMSAutocompleteViewController *acController = [[GMSAutocompleteViewController alloc] init];
  acController.delegate = self;

  // Specify the place data types to return.
  GMSPlaceField fields = (GMSPlaceFieldName | GMSPlaceFieldPlaceID);
  acController.placeFields = fields;

  // Specify a filter.
  _filter = [[GMSAutocompleteFilter alloc] init];
  _filter.types = @[ kGMSPlaceTypeBank ];
  acController.autocompleteFilter = _filter;

  // Display the autocomplete view controller.
  [self presentViewController:acController animated:YES completion:nil];
}

  // Add a button to the view.
-   (void)makeButton{
  UIButton *btnLaunchAc = [UIButton buttonWithType:UIButtonTypeCustom];
  [btnLaunchAc addTarget:self
             action:@selector(autocompleteClicked) forControlEvents:UIControlEventTouchUpInside];
  [btnLaunchAc setTitle:@"Launch autocomplete" forState:UIControlStateNormal];
  btnLaunchAc.frame = CGRectMake(5.0, 150.0, 300.0, 35.0);
  btnLaunchAc.backgroundColor = [UIColor blueColor];
  [self.view addSubview:btnLaunchAc];
}

  // Handle the user's selection.
-   (void)viewController:(GMSAutocompleteViewController *)viewController
didAutocompleteWithPlace:(GMSPlace *)place {
  [self dismissViewControllerAnimated:YES completion:nil];
  // Do something with the selected place.
  NSLog(@"Place name %@", place.name);
  NSLog(@"Place ID %@", place.placeID);
  NSLog(@"Place attributions %@", place.attributions.string);
}

-   (void)viewController:(GMSAutocompleteViewController *)viewController
didFailAutocompleteWithError:(NSError *)error {
  [self dismissViewControllerAnimated:YES completion:nil];
  // TODO: handle the error.
  NSLog(@"Error: %@", [error description]);
}

  // User canceled the operation.
-   (void)wasCancelled:(GMSAutocompleteViewController *)viewController {
  [self dismissViewControllerAnimated:YES completion:nil];
}

  // Turn the network activity indicator on and off again.
-   (void)didRequestAutocompletePredictions:(GMSAutocompleteViewController *)viewController {
  [UIApplication sharedApplication].networkActivityIndicatorVisible = YES;
}

-   (void)didUpdateAutocompletePredictions:(GMSAutocompleteViewController *)viewController {
  [UIApplication sharedApplication].networkActivityIndicatorVisible = NO;
}

@end
Sonuç denetleyici ekleme
Metin girişi kullanıcı arayüzü üzerinde daha fazla kontrol sahibi olmak istediğinizde sonuç denetleyicisi kullanın. Sonuç denetleyicisi, giriş kullanıcı arayüzü odağına göre sonuç listesinin görünürlüğünü dinamik olarak değiştirir.
Uygulamanıza sonuç denetleyicisi eklemek için:
GMSAutocompleteResultsViewControlleroluşturun.- Üst görünüm denetleyicisinde
GMSAutocompleteResultsViewControllerDelegateprotokolünü uygulayın ve üst görünüm denetleyicisini temsilci özelliği olarak atayın.
- Üst görünüm denetleyicisinde
- Sonuç denetleyici bağımsız değişkeni olarak
GMSAutocompleteResultsViewControllerdeğerini ileterek birUISearchControllernesnesi oluşturun. GMSAutocompleteResultsViewControlleröğesiniUISearchControlleröğesininsearchResultsUpdaterözelliği olarak ayarlayın.UISearchControlleriçinsearchBaröğesini uygulamanızın kullanıcı arayüzüne ekleyin.- Kullanıcının
didAutocompleteWithPlaceyetkilendirme yöntemindeki seçimini işleyin.
UISearchController arama çubuğunu uygulamanızın kullanıcı arayüzüne yerleştirmenin birkaç yolu vardır:
- Gezinme çubuğuna arama çubuğu ekleme
- Görünümün üst kısmına arama çubuğu ekleme
- Popover sonuçlarını kullanarak arama çubuğu ekleme
Gezinme çubuğuna arama çubuğu ekleme
Aşağıdaki kod örneğinde, sonuç denetleyicisi ekleme, gezinme çubuğuna searchBar ekleme ve kullanıcının seçimini işleme gösterilmektedir:
Swift
class ViewController: UIViewController {

  var resultsViewController: GMSAutocompleteResultsViewController?
  var searchController: UISearchController?
  var resultView: UITextView?

  override func viewDidLoad() {
    super.viewDidLoad()

    resultsViewController = GMSAutocompleteResultsViewController()
    resultsViewController?.delegate = self

    searchController = UISearchController(searchResultsController: resultsViewController)
    searchController?.searchResultsUpdater = resultsViewController

    // Put the search bar in the navigation bar.
    searchController?.searchBar.sizeToFit()
    navigationItem.titleView = searchController?.searchBar

    // When UISearchController presents the results view, present it in
    // this view controller, not one further up the chain.
    definesPresentationContext = true

    // Prevent the navigation bar from being hidden when searching.
    searchController?.hidesNavigationBarDuringPresentation = false
  }
}

// Handle the user's selection.
extension ViewController: GMSAutocompleteResultsViewControllerDelegate {
  func resultsController(_ resultsController: GMSAutocompleteResultsViewController,
                         didAutocompleteWith place: GMSPlace) {
    searchController?.isActive = false
    // Do something with the selected place.
    print("Place name: \(place.name)")
    print("Place address: \(place.formattedAddress)")
    print("Place attributions: \(place.attributions)")
  }

  func resultsController(_ resultsController: GMSAutocompleteResultsViewController,
                         didFailAutocompleteWithError error: Error){
    // TODO: handle the error.
    print("Error: ", error.localizedDescription)
  }

  // Turn the network activity indicator on and off again.
  func didRequestAutocompletePredictions(_ viewController: GMSAutocompleteViewController) {
    UIApplication.shared.isNetworkActivityIndicatorVisible = true
  }

  func didUpdateAutocompletePredictions(_ viewController: GMSAutocompleteViewController) {
    UIApplication.shared.isNetworkActivityIndicatorVisible = false
  }
}
Objective-C
-   (void)viewDidLoad {
  _resultsViewController = [[GMSAutocompleteResultsViewController alloc] init];
  _resultsViewController.delegate = self;

  _searchController = [[UISearchController alloc]
                       initWithSearchResultsController:_resultsViewController];
  _searchController.searchResultsUpdater = _resultsViewController;

  // Put the search bar in the navigation bar.
  [_searchController.searchBar sizeToFit];
  self.navigationItem.titleView = _searchController.searchBar;

  // When UISearchController presents the results view, present it in
  // this view controller, not one further up the chain.
  self.definesPresentationContext = YES;

  // Prevent the navigation bar from being hidden when searching.
  _searchController.hidesNavigationBarDuringPresentation = NO;
}

// Handle the user's selection.
-   (void)resultsController:(GMSAutocompleteResultsViewController *)resultsController
  didAutocompleteWithPlace:(GMSPlace *)place {
    _searchController.active = NO;
    // Do something with the selected place.
    NSLog(@"Place name %@", place.name);
    NSLog(@"Place address %@", place.formattedAddress);
    NSLog(@"Place attributions %@", place.attributions.string);
}

-   (void)resultsController:(GMSAutocompleteResultsViewController *)resultsController
didFailAutocompleteWithError:(NSError *)error {
  [self dismissViewControllerAnimated:YES completion:nil];
  // TODO: handle the error.
  NSLog(@"Error: %@", [error description]);
}

// Turn the network activity indicator on and off again.
-   (void)didRequestAutocompletePredictionsForResultsController:
    (GMSAutocompleteResultsViewController *)resultsController {
  [UIApplication sharedApplication].networkActivityIndicatorVisible = YES;
}

-   (void)didUpdateAutocompletePredictionsForResultsController:
    (GMSAutocompleteResultsViewController *)resultsController {
  [UIApplication sharedApplication].networkActivityIndicatorVisible = NO;
}
Görünümün üst kısmına arama çubuğu ekleme
Aşağıdaki kod örneğinde, searchBar öğesinin görünümün en üstüne nasıl ekleneceği gösterilmektedir.
Swift
import UIKit
import GooglePlaces

class ViewController: UIViewController {

  var resultsViewController: GMSAutocompleteResultsViewController?
  var searchController: UISearchController?
  var resultView: UITextView?

  override func viewDidLoad() {
    super.viewDidLoad()

    resultsViewController = GMSAutocompleteResultsViewController()
    resultsViewController?.delegate = self

    searchController = UISearchController(searchResultsController: resultsViewController)
    searchController?.searchResultsUpdater = resultsViewController

    let subView = UIView(frame: CGRect(x: 0, y: 65.0, width: 350.0, height: 45.0))

    subView.addSubview((searchController?.searchBar)!)
    view.addSubview(subView)
    searchController?.searchBar.sizeToFit()
    searchController?.hidesNavigationBarDuringPresentation = false

    // When UISearchController presents the results view, present it in
    // this view controller, not one further up the chain.
    definesPresentationContext = true
  }
}

// Handle the user's selection.
extension ViewController: GMSAutocompleteResultsViewControllerDelegate {
  func resultsController(_ resultsController: GMSAutocompleteResultsViewController,
                         didAutocompleteWith place: GMSPlace) {
    searchController?.isActive = false
    // Do something with the selected place.
    print("Place name: \(place.name)")
    print("Place address: \(place.formattedAddress)")
    print("Place attributions: \(place.attributions)")
  }

  func resultsController(_ resultsController: GMSAutocompleteResultsViewController,
                         didFailAutocompleteWithError error: Error){
    // TODO: handle the error.
    print("Error: ", error.localizedDescription)
  }

  // Turn the network activity indicator on and off again.
  func didRequestAutocompletePredictions(forResultsController resultsController: GMSAutocompleteResultsViewController) {
    UIApplication.shared.isNetworkActivityIndicatorVisible = true
  }

  func didUpdateAutocompletePredictions(forResultsController resultsController: GMSAutocompleteResultsViewController) {
    UIApplication.shared.isNetworkActivityIndicatorVisible = false
  }
}
Objective-C
-   (void)viewDidLoad {
    [super viewDidLoad];

    _resultsViewController = [[GMSAutocompleteResultsViewController alloc] init];
    _resultsViewController.delegate = self;

    _searchController = [[UISearchController alloc]
                             initWithSearchResultsController:_resultsViewController];
    _searchController.searchResultsUpdater = _resultsViewController;

    UIView *subView = [[UIView alloc] initWithFrame:CGRectMake(0, 65.0, 250, 50)];

    [subView addSubview:_searchController.searchBar];
    [_searchController.searchBar sizeToFit];
    [self.view addSubview:subView];

    // When UISearchController presents the results view, present it in
    // this view controller, not one further up the chain.
    self.definesPresentationContext = YES;
}

// Handle the user's selection.
-   (void)resultsController:(GMSAutocompleteResultsViewController *)resultsController
didAutocompleteWithPlace:(GMSPlace *)place {
  [self dismissViewControllerAnimated:YES completion:nil];
  // Do something with the selected place.
  NSLog(@"Place name %@", place.name);
  NSLog(@"Place address %@", place.formattedAddress);
  NSLog(@"Place attributions %@", place.attributions.string);
}

-   (void)resultsController:(GMSAutocompleteResultsViewController *)resultsController
didFailAutocompleteWithError:(NSError *)error {
  [self dismissViewControllerAnimated:YES completion:nil];
  // TODO: handle the error.
  NSLog(@"Error: %@", [error description]);
}

// Turn the network activity indicator on and off again.
-   (void)didRequestAutocompletePredictionsForResultsController:
    (GMSAutocompleteResultsViewController *)resultsController {
  [UIApplication sharedApplication].networkActivityIndicatorVisible = YES;
}

-   (void)didUpdateAutocompletePredictionsForResultsController:
    (GMSAutocompleteResultsViewController *)resultsController {
  [UIApplication sharedApplication].networkActivityIndicatorVisible = NO;
}
Varsayılan olarak,
UISearchController
sunum yaparken gezinme çubuğunu gizler (bu özellik devre dışı bırakılabilir). Gezinme çubuğunun görünür ve opak olduğu durumlarda UISearchController yerleşimi doğru şekilde ayarlamıyor.
Geçici çözüm olarak aşağıdaki kodu kullanın:
Swift
navigationController?.navigationBar.translucent = false
searchController?.hidesNavigationBarDuringPresentation = false

// This makes the view area include the nav bar even though it is opaque.
// Adjust the view placement down.
self.extendedLayoutIncludesOpaqueBars = true
self.edgesForExtendedLayout = .top
Objective-C
self.navigationController.navigationBar.translucent = NO;
_searchController.hidesNavigationBarDuringPresentation = NO;

// This makes the view area include the nav bar even though it is opaque.
// Adjust the view placement down.
self.extendedLayoutIncludesOpaqueBars = YES;
self.edgesForExtendedLayout = UIRectEdgeTop;
Popover sonuçlarını kullanarak arama çubuğu ekleme
Aşağıdaki kod örneğinde, gezinme çubuğunun sağ tarafına bir arama çubuğu yerleştirme ve sonuçları bir popover'da gösterme işlemi gösterilmektedir.
Swift
import UIKit
import GooglePlaces

class ViewController: UIViewController {

  var resultsViewController: GMSAutocompleteResultsViewController?
  var searchController: UISearchController?
  var resultView: UITextView?

  override func viewDidLoad() {
    super.viewDidLoad()

    resultsViewController = GMSAutocompleteResultsViewController()
    resultsViewController?.delegate = self

    searchController = UISearchController(searchResultsController: resultsViewController)
    searchController?.searchResultsUpdater = resultsViewController

    // Add the search bar to the right of the nav bar,
    // use a popover to display the results.
    // Set an explicit size as we don't want to use the entire nav bar.
    searchController?.searchBar.frame = (CGRect(x: 0, y: 0, width: 250.0, height: 44.0))
    navigationItem.rightBarButtonItem = UIBarButtonItem(customView: (searchController?.searchBar)!)

    // When UISearchController presents the results view, present it in
    // this view controller, not one further up the chain.
    definesPresentationContext = true

    // Keep the navigation bar visible.
    searchController?.hidesNavigationBarDuringPresentation = false
    searchController?.modalPresentationStyle = .popover
  }
}
// Handle the user's selection.
extension ViewController: GMSAutocompleteResultsViewControllerDelegate {
  func resultsController(_ resultsController: GMSAutocompleteResultsViewController,
                         didAutocompleteWith place: GMSPlace) {
    searchController?.isActive = false
    // Do something with the selected place.
    print("Place name: \(place.name)")
    print("Place address: \(place.formattedAddress)")
    print("Place attributions: \(place.attributions)")
  }

  func resultsController(_ resultsController: GMSAutocompleteResultsViewController,
                         didFailAutocompleteWithError error: Error){
    // TODO: handle the error.
    print("Error: ", error.localizedDescription)
  }

  // Turn the network activity indicator on and off again.
  func didRequestAutocompletePredictions(forResultsController resultsController: GMSAutocompleteResultsViewController) {
    UIApplication.shared.isNetworkActivityIndicatorVisible = true
  }

  func didUpdateAutocompletePredictions(forResultsController resultsController: GMSAutocompleteResultsViewController) {
    UIApplication.shared.isNetworkActivityIndicatorVisible = false
  }
}
Objective-C
-   (void)viewDidLoad {
  [super viewDidLoad];

  _resultsViewController = [[GMSAutocompleteResultsViewController alloc] init];
  _resultsViewController.delegate = self;

  _searchController = [[UISearchController alloc]
                           initWithSearchResultsController:_resultsViewController];
  _searchController.searchResultsUpdater = _resultsViewController;

  // Add the search bar to the right of the nav bar,
  // use a popover to display the results.
  // Set an explicit size as we don't want to use the entire nav bar.
  _searchController.searchBar.frame = CGRectMake(0, 0, 250.0f, 44.0f);
  self.navigationItem.rightBarButtonItem =
  [[UIBarButtonItem alloc] initWithCustomView:_searchController.searchBar];

  // When UISearchController presents the results view, present it in
  // this view controller, not one further up the chain.
  self.definesPresentationContext = YES;

  // Keep the navigation bar visible.
  _searchController.hidesNavigationBarDuringPresentation = NO;

  _searchController.modalPresentationStyle = UIModalPresentationPopover;
}

// Handle the user's selection.
-   (void)resultsController:(GMSAutocompleteResultsViewController *)resultsController
didAutocompleteWithPlace:(GMSPlace *)place {
  [self dismissViewControllerAnimated:YES completion:nil];
  NSLog(@"Place name %@", place.name);
  NSLog(@"Place address %@", place.formattedAddress);
  NSLog(@"Place attributions %@", place.attributions.string);
}

-   (void)resultsController:(GMSAutocompleteResultsViewController *)resultsController
didFailAutocompleteWithError:(NSError *)error {
  [self dismissViewControllerAnimated:YES completion:nil];
  // TODO: handle the error.
  NSLog(@"Error: %@", [error description]);
}

// Turn the network activity indicator on and off again.
-   (void)didRequestAutocompletePredictionsForResultsController:
    (GMSAutocompleteResultsViewController *)resultsController {
  [UIApplication sharedApplication].networkActivityIndicatorVisible = YES;
}

-   (void)didUpdateAutocompletePredictionsForResultsController:
    (GMSAutocompleteResultsViewController *)resultsController {
  [UIApplication sharedApplication].networkActivityIndicatorVisible = NO;
}
Tablo veri kaynağını kullanma
Uygulamanızda özel bir arama metni kullanıcı arayüzü varsa sonuçları görünüm denetleyicide görüntüleyen tablo görünümünü yönlendirmek için
GMSAutocompleteTableDataSource
sınıfını kullanabilirsiniz.
Görünüm denetleyicisinde
GMSAutocompleteTableDataSource
veri kaynağı ve
UITableView temsilcisi olarak kullanmak için:
- Görünüm denetleyicisinde
GMSAutocompleteTableDataSourceDelegateveUISearchBarDelegateprotokollerini uygulayın. GMSAutocompleteTableDataSourceörneği oluşturun ve görünüm denetleyicisini temsilci özelliği olarak atayın.GMSAutocompleteTableDataSourceöğesini veri kaynağı olarak ayarlayın ve görünüm denetleyicisindekiUITableViewörneğinin özelliklerini temsilci olarak atayın.- Arama metni girişi işleyicisinde,
GMSAutocompleteTableDataSourceüzerindesourceTextHasChangedişlevini çağırın.- Kullanıcının
didAutocompleteWithPlaceyetkilendirme yöntemindeki seçimini işleyin.
- Kullanıcının
didAutocompleteWithPlace,didFailAutocompleteWithError,wasCancelledyetki verilmiş kullanıcı yöntemlerinde denetleyiciyi kapatın.
Aşağıdaki kod örneğinde, UISearchBar ayrı olarak eklendiğinde UIViewController öğesinin tablo görünümünü yönlendirmek için GMSAutocompleteTableDataSource sınıfının kullanımı gösterilmektedir.
Swift
// Copyright 2020 Google LLC
//
// Licensed under the Apache License, Version 2.0 (the "License");
// you may not use this file except in compliance with the License.
// You may obtain a copy of the License at
//
//      http://www.apache.org/licenses/LICENSE-2.0
//
// Unless required by applicable law or agreed to in writing, software
// distributed under the License is distributed on an "AS IS" BASIS,
// WITHOUT WARRANTIES OR CONDITIONS OF ANY KIND, either express or implied.
// See the License for the specific language governing permissions and
// limitations under the License.

import GooglePlaces
import UIKit

class PlaceAutocompleteViewController: UIViewController {

  private var tableView: UITableView!
  private var tableDataSource: GMSAutocompleteTableDataSource!

  override func viewDidLoad() {
    super.viewDidLoad()

    let searchBar = UISearchBar(frame: CGRect(x: 0, y: 20, width: self.view.frame.size.width, height: 44.0))
    searchBar.delegate = self
    view.addSubview(searchBar)

    tableDataSource = GMSAutocompleteTableDataSource()
    tableDataSource.delegate = self

    tableView = UITableView(frame: CGRect(x: 0, y: 64, width: self.view.frame.size.width, height: self.view.frame.size.height - 44))
    tableView.delegate = tableDataSource
    tableView.dataSource = tableDataSource

    view.addSubview(tableView)
  }
}

extension PlaceAutocompleteViewController: UISearchBarDelegate {
  func searchBar(_ searchBar: UISearchBar, textDidChange searchText: String) {
    // Update the GMSAutocompleteTableDataSource with the search text.
    tableDataSource.sourceTextHasChanged(searchText)
  }
}

extension PlaceAutocompleteViewController: GMSAutocompleteTableDataSourceDelegate {
  func didUpdateAutocompletePredictions(for tableDataSource: GMSAutocompleteTableDataSource) {
    // Turn the network activity indicator off.
    UIApplication.shared.isNetworkActivityIndicatorVisible = false
    // Reload table data.
    tableView.reloadData()
  }

  func didRequestAutocompletePredictions(for tableDataSource: GMSAutocompleteTableDataSource) {
    // Turn the network activity indicator on.
    UIApplication.shared.isNetworkActivityIndicatorVisible = true
    // Reload table data.
    tableView.reloadData()
  }

  func tableDataSource(_ tableDataSource: GMSAutocompleteTableDataSource, didAutocompleteWith place: GMSPlace) {
    // Do something with the selected place.
    print("Place name: \(place.name)")
    print("Place address: \(place.formattedAddress)")
    print("Place attributions: \(place.attributions)")
  }

  func tableDataSource(_ tableDataSource: GMSAutocompleteTableDataSource, didFailAutocompleteWithError error: Error) {
    // Handle the error.
    print("Error: \(error.localizedDescription)")
  }

  func tableDataSource(_ tableDataSource: GMSAutocompleteTableDataSource, didSelect prediction: GMSAutocompletePrediction) -> Bool {
    return true
  }
}
Objective-C
// Copyright 2020 Google LLC
//
// Licensed under the Apache License, Version 2.0 (the "License");
// you may not use this file except in compliance with the License.
// You may obtain a copy of the License at
//
//      http://www.apache.org/licenses/LICENSE-2.0
//
// Unless required by applicable law or agreed to in writing, software
// distributed under the License is distributed on an "AS IS" BASIS,
// WITHOUT WARRANTIES OR CONDITIONS OF ANY KIND, either express or implied.
// See the License for the specific language governing permissions and
// limitations under the License.

#import "PlaceAutocompleteViewController.h"
@import GooglePlaces;
@import UIKit;

@interface PlaceAutocompleteViewController () <GMSAutocompleteTableDataSourceDelegate, UISearchBarDelegate>

@end

@implementation PlaceAutocompleteViewController {
  UITableView *tableView;
  GMSAutocompleteTableDataSource *tableDataSource;
}

- (void)viewDidLoad {
  [super viewDidLoad];

  UISearchBar *searchBar = [[UISearchBar alloc] initWithFrame:CGRectMake(0, 20, self.view.frame.size.width, 44)];
  searchBar.delegate = self;

  [self.view addSubview:searchBar];

  tableDataSource = [[GMSAutocompleteTableDataSource alloc] init];
  tableDataSource.delegate = self;

  tableView = [[UITableView alloc] initWithFrame:CGRectMake(0, 64, self.view.frame.size.width, self.view.frame.size.height - 44)];
  tableView.delegate = tableDataSource;
  tableView.dataSource = tableDataSource;

  [self.view addSubview:tableView];
}

#pragma mark - GMSAutocompleteTableDataSourceDelegate

- (void)didUpdateAutocompletePredictionsForTableDataSource:(GMSAutocompleteTableDataSource *)tableDataSource {
  // Turn the network activity indicator off.
  UIApplication.sharedApplication.networkActivityIndicatorVisible = NO;

  // Reload table data.
  [tableView reloadData];
}

- (void)didRequestAutocompletePredictionsForTableDataSource:(GMSAutocompleteTableDataSource *)tableDataSource {
  // Turn the network activity indicator on.
  UIApplication.sharedApplication.networkActivityIndicatorVisible = YES;

  // Reload table data.
  [tableView reloadData];
}

- (void)tableDataSource:(GMSAutocompleteTableDataSource *)tableDataSource didAutocompleteWithPlace:(GMSPlace *)place {
  // Do something with the selected place.
  NSLog(@"Place name: %@", place.name);
  NSLog(@"Place address: %@", place.formattedAddress);
  NSLog(@"Place attributions: %@", place.attributions);
}

- (void)tableDataSource:(GMSAutocompleteTableDataSource *)tableDataSource didFailAutocompleteWithError:(NSError *)error {
  // Handle the error
  NSLog(@"Error %@", error.description);
}

- (BOOL)tableDataSource:(GMSAutocompleteTableDataSource *)tableDataSource didSelectPrediction:(GMSAutocompletePrediction *)prediction {
  return YES;
}

#pragma mark - UISearchBarDelegate

- (void)searchBar:(UISearchBar *)searchBar textDidChange:(NSString *)searchText {
  // Update the GMSAutocompleteTableDataSource with the search text.
  [tableDataSource sourceTextHasChanged:searchText];
}

@end
Metin ve arka plan renklerini özelleştirme
Widget'ın uygulamanızın görsel görünümüyle daha iyi eşleşmesi için otomatik tamamlama kullanıcı arayüzündeki tüm metin ve arka planların renklerini ayarlayabilirsiniz. Kullanıcı arayüzü kontrol renklerini ayarlamanın iki yolu vardır:
- Mümkün olan yerlerde kullanıcı arayüzü kontrollerini genel olarak stilize etmek için yerleşik iOS UIAppearance protokolünü kullanın. Bu ayarlar, kullanıcı arayüzü kontrol öğelerinin birçoğu için geçerlidir ancak tümü için geçerli değildir.
- UIAppearance protokolü tarafından desteklenmeyen özellikleri ayarlamak için widget sınıflarındaki SDK yöntemlerini kullanma.
Genellikle uygulamanız UIAppearance protokolü ve SDK yöntemlerinin bir kombinasyonunu kullanır. Aşağıdaki şemada hangi öğelerin stilinin değiştirilebileceği gösterilmektedir:
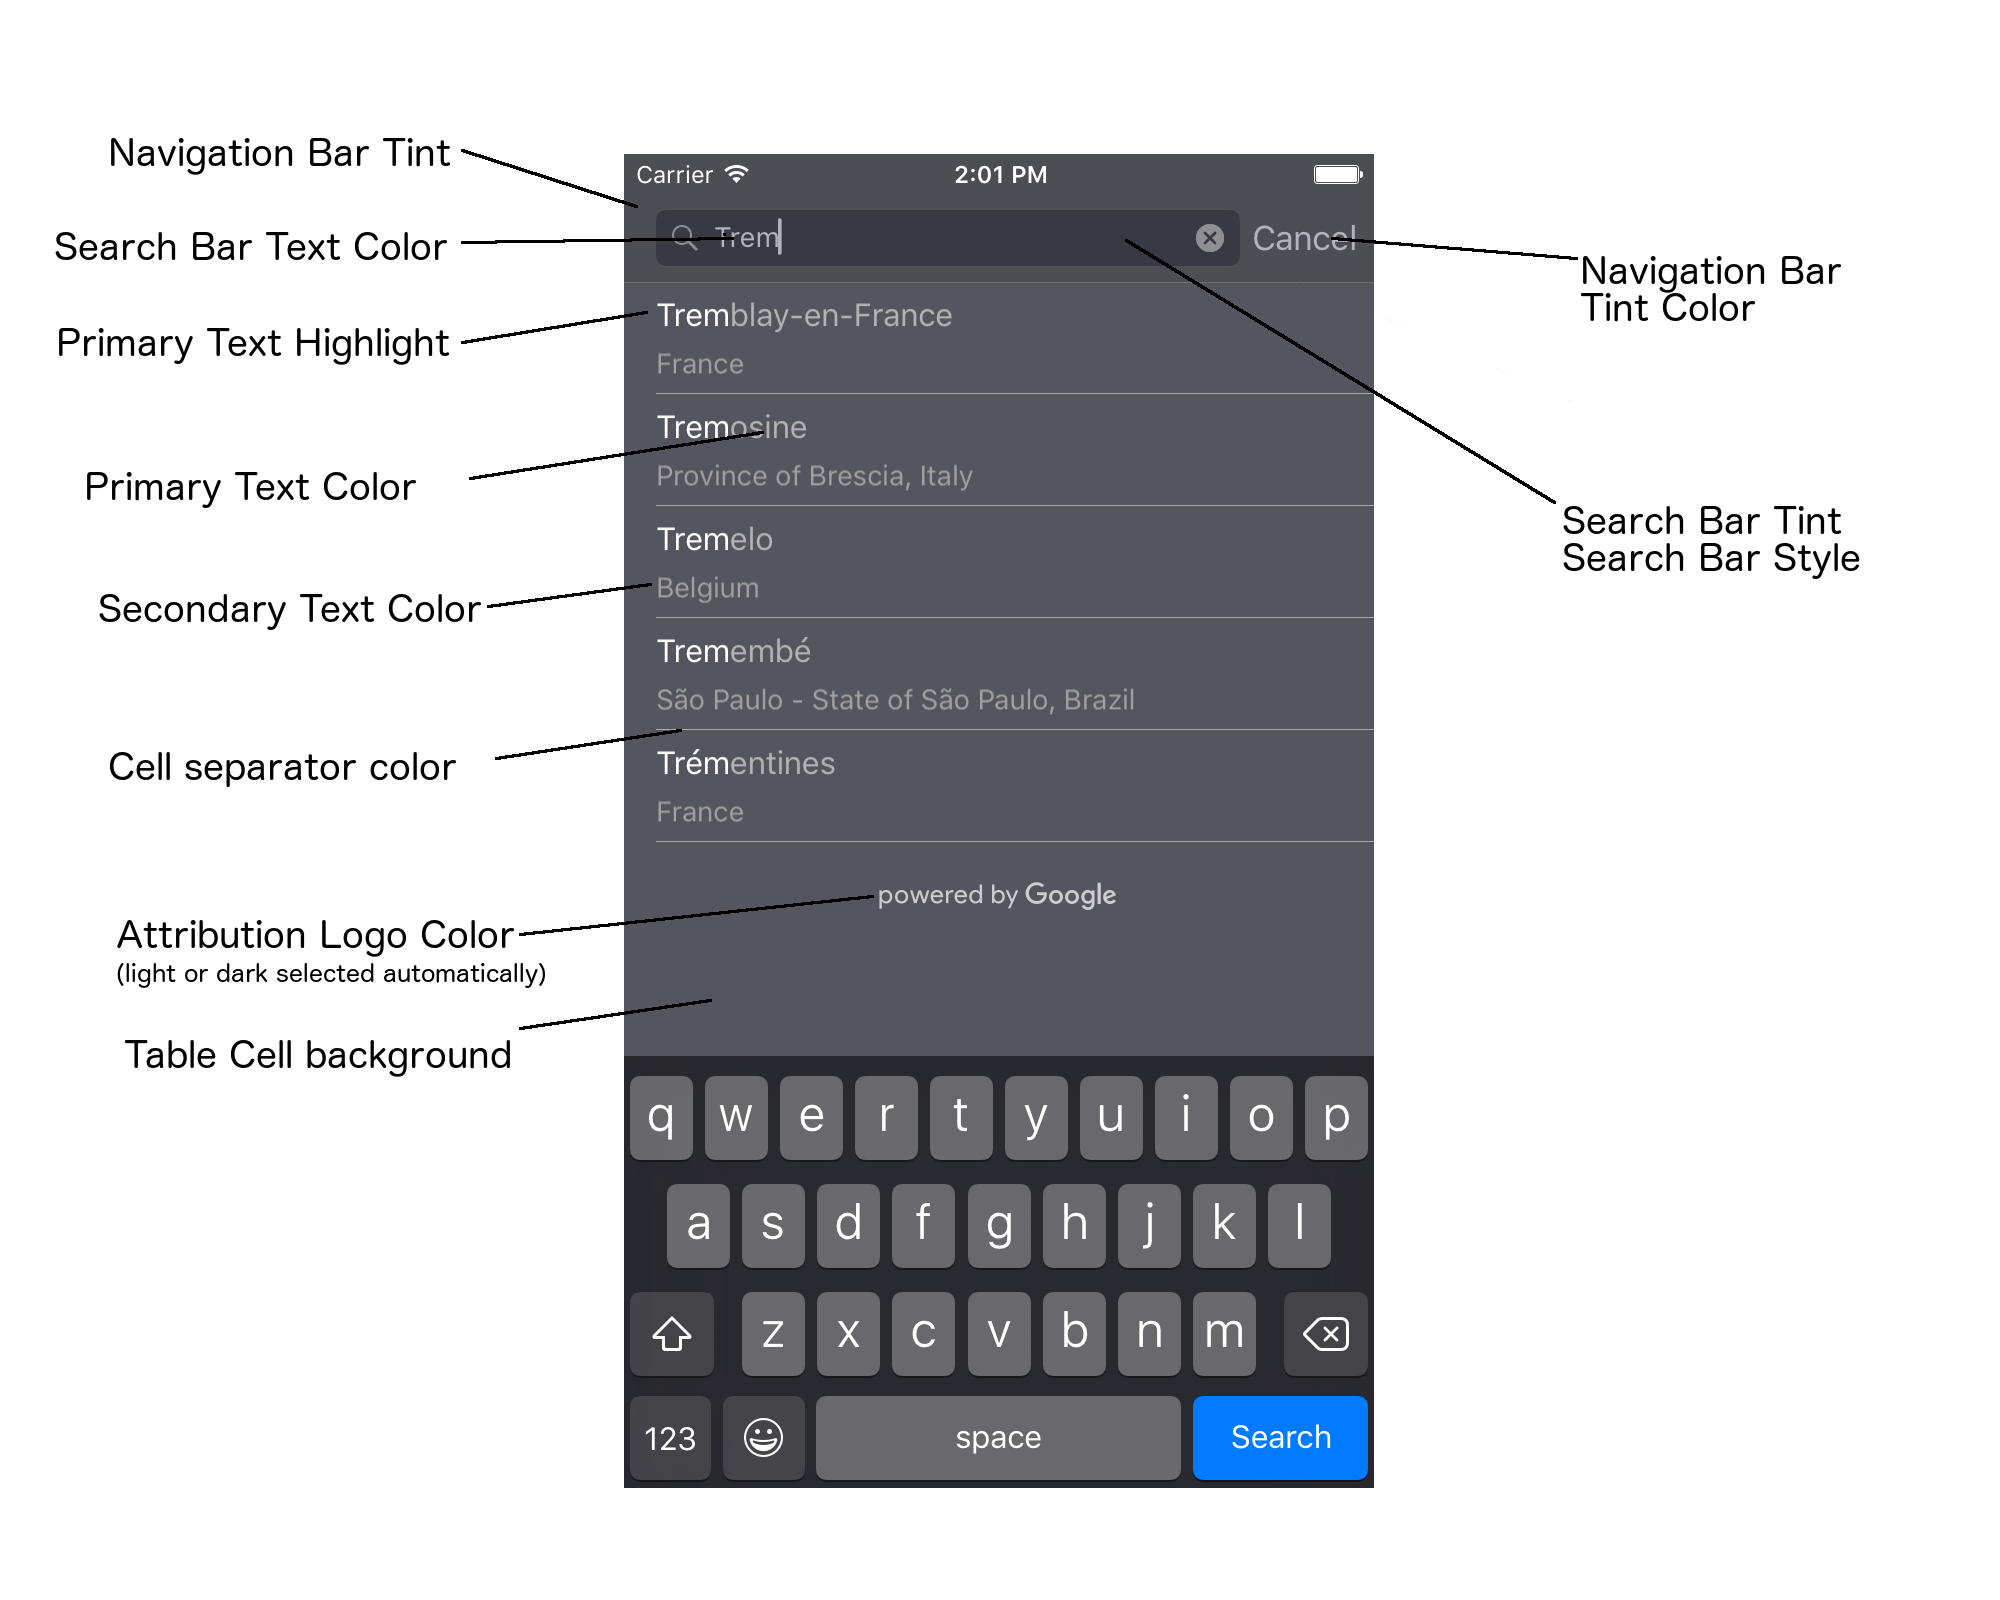
Aşağıdaki tabloda tüm kullanıcı arayüzü öğeleri listelenmekte ve her birinin nasıl stil verilmesi gerektiği (UIAppearance protokolü veya SDK yöntemi) belirtilmektedir.
| Kullanıcı Arayüzü Öğesi | Yöntem | Moda bilgileri |
|---|---|---|
| Gezinme çubuğu rengi (arka plan) | UIAppearance protokolü | UINavigationBar proxy'sinde setBarTintColor numaralı telefonu arama. |
| Gezinme çubuğu renk tonu (arama çubuğu metin imleci ve İptal düğmesi) | UIAppearance protokolü | UINavigationBar proxy'sinde setTintColor numaralı telefonu arama. |
| Arama çubuğu metin rengi | UIAppearance protokolü | searchBarTextAttributes içinde NSForegroundColorAttributeName değerini ayarlayın. |
| Arama çubuğu tonlama rengi | Yok | Arama çubuğu yarı saydamdır ve gezinme çubuğunun gölgeli bir sürümü olarak gösterilir. |
| Arama çubuğu yer tutucu metin rengi (varsayılan arama metni) | UIAppearance protokolü | placeholderAttributes içinde NSForegroundColorAttributeName değerini ayarlayın. |
| Birincil metin (hata ve ileti metnine de uygulanır) | SDK yöntemi | primaryTextColor Hizmetleri İçin Arayın. |
| Birincil metin vurgulama | SDK yöntemi | primaryTextHighlightColor Hizmetleri İçin Arayın. |
| İkincil metin | SDK yöntemi | secondaryTextColor Hizmetleri İçin Arayın. |
| Hata ve mesaj metni | SDK yöntemi | primaryTextColor Hizmetleri İçin Arayın. |
| Tablo hücresi arka planı | SDK yöntemi | tableCellBackgroundColor Hizmetleri İçin Arayın. |
| Tablo hücresi ayırıcı rengi | SDK yöntemi | tableCellSeparatorColor Hizmetleri İçin Arayın. |
| "Tekrar Dene" düğmesi | SDK yöntemi | tintColor Hizmetleri İçin Arayın. |
| Etkinlik göstergesi (ilerleme durumu döner simgesi) | UIAppearance protokolü | UIActivityIndicatorView proxy'sinde setColor numaralı telefonu arama. |
| "Google destekli" logosu, üzgün bulut resmi | Yok | Arka plan kontrastına göre beyaz veya gri sürüm otomatik olarak seçilir. |
| Arama çubuğu metin alanında büyüteç ve metni temizle simgeleri | Yok | Stil vermek için varsayılan resimleri istediğiniz renkteki resimlerle değiştirin. |
UIAppearance protokolünü kullanma
Belirli bir kullanıcı arayüzü öğesinin görünüm proxy'sini almak için UIAppearance
protocol öğesini kullanabilirsiniz. Ardından, bu proxy'yi kullanarak kullanıcı arayüzü öğesinin rengini ayarlayabilirsiniz. Bir değişiklik yapıldığında, belirli bir kullanıcı arayüzü öğesinin tüm örnekleri etkilenir. Örneğin, aşağıdaki örnek, UITextField sınıflarının metin rengini UISearchBar içinde yer aldıklarında genel olarak yeşile değiştirir:
[[UITextField appearanceWhenContainedIn:[UISearchBar class], nil]
    setDefaultTextAttributes:@{NSForegroundColorAttributeName:[UIColor greenColor]}];
Renk değerlerini tanımlama hakkında daha fazla bilgi için UIColor Class Reference başlıklı makaleyi inceleyin.
Aşağıdaki kod snippet'lerinde, tam ekran otomatik tamamlama kullanıcı arayüzü kontrolündeki her şeyi stilize etmek için kullanmanız gereken tüm proxy komutları gösterilmektedir. Bu kodu Appdelegate.m dosyasındaki didFinishLaunchingWithOptions yöntemine ekleyin:
// Define some colors.
UIColor *darkGray = [UIColor darkGrayColor];
UIColor *lightGray = [UIColor lightGrayColor];

// Navigation bar background.
[[UINavigationBar appearance] setBarTintColor:darkGray];
[[UINavigationBar appearance] setTintColor:lightGray];

// Color of typed text in the search bar.
NSDictionary *searchBarTextAttributes = @{
                                          NSForegroundColorAttributeName: lightGray,
                                          NSFontAttributeName : [UIFont systemFontOfSize:[UIFont systemFontSize]]
                                          };
[UITextField appearanceWhenContainedInInstancesOfClasses:@[[UISearchBar class]]]
    .defaultTextAttributes = searchBarTextAttributes;

// Color of the placeholder text in the search bar prior to text entry.
NSDictionary *placeholderAttributes = @{
                                        NSForegroundColorAttributeName: lightGray,
                                        NSFontAttributeName : [UIFont systemFontOfSize:[UIFont systemFontSize]]
                                        };

// Color of the default search text.
// NOTE: In a production scenario, "Search" would be a localized string.
NSAttributedString *attributedPlaceholder =
[[NSAttributedString alloc] initWithString:@"Search"
                                attributes:placeholderAttributes];
[UITextField appearanceWhenContainedInInstancesOfClasses:@[[UISearchBar class]]]
    .attributedPlaceholder = attributedPlaceholder;

// Color of the in-progress spinner.
[[UIActivityIndicatorView appearance] setColor:lightGray];

// To style the two image icons in the search bar (the magnifying glass
// icon and the 'clear text' icon), replace them with different images.
[[UISearchBar appearance] setImage:[UIImage imageNamed:@"custom_clear_x_high"]
                  forSearchBarIcon:UISearchBarIconClear
                            state:UIControlStateHighlighted];
[[UISearchBar appearance] setImage:[UIImage imageNamed:@"custom_clear_x"]
                  forSearchBarIcon:UISearchBarIconClear
                            state:UIControlStateNormal];
[[UISearchBar appearance] setImage:[UIImage imageNamed:@"custom_search"]
                    forSearchBarIcon:UISearchBarIconSearch
                            state:UIControlStateNormal];

// Color of selected table cells.
UIView *selectedBackgroundView = [[UIView alloc] init];
selectedBackgroundView.backgroundColor = [UIColor lightGrayColor];
[UITableViewCell appearanceWhenContainedIn:[GMSAutocompleteViewController class], nil]
    .selectedBackgroundView = selectedBackgroundView;
Kullanıcı arayüzü kontrolü stil özelliklerini ayarlama
Kullanıcı arayüzü kontrol öğelerinin bir alt kümesi, UIAppearance protokolünden etkilenmeyen özelliklere sahiptir ve bu nedenle doğrudan ayarlanmalıdır. Aşağıdaki kod örneğinde, ön plan ve arka plan renklerinin tanımlanması ve bunların acController adlı bir kullanıcı arayüzü denetim örneğine uygulanması gösterilmektedir. Bu kodu ViewController.m dosyasındaki onLaunchClicked
yöntemine ekleyin:
UIColor *darkGray = [UIColor darkGrayColor];
UIColor *lightGray = [UIColor lightGrayColor];

acController.secondaryTextColor = [UIColor colorWithWhite:1.0f alpha:0.5f];
acController.primaryTextColor = lightGray;
acController.primaryTextHighlightColor = [UIColor grayColor];
acController.tableCellBackgroundColor = darkGray;
acController.tableCellSeparatorColor = lightGray;
acController.tintColor = lightGray;
Yer tahminlerini programatik olarak alma
Otomatik tamamlama widget'ı tarafından sağlanan kullanıcı arayüzüne alternatif olarak özel bir arama kullanıcı arayüzü oluşturabilirsiniz. Bunun için uygulamanızın yer tahminlerini programatik olarak alması gerekir. Uygulamanız, tahmin edilen yer adlarının ve/veya adreslerin listesini aşağıdaki yöntemlerden biriyle alabilir:
GMSPlacesClient findAutocompletePredictionsFromQuery: aranıyor
Tahmin edilen yer adlarının ve/veya adreslerin listesini almak için önce GMSPlacesClient'ı örnekleyin, ardından GMSPlacesClient
findAutocompletePredictionsFromQuery: yöntemini aşağıdaki parametrelerle çağırın:
- Kullanıcının yazdığı metni içeren bir
autocompleteQuerydizesi. - Her bir oturumu tanımlamak için kullanılan bir
GMSAutocompleteSessionToken. Uygulamanız, her otomatik tamamlama isteği çağrısı için aynı jetonu iletmeli, ardından bu jetonu, bir yer kimliğiyle birlikte, kullanıcının seçtiği yerin Yer Ayrıntılarını almak içinfetchPlacefromPlaceID:'a yapılan sonraki çağrıda iletmelidir. - A
GMSAutocompleteFilterto:- Sonuçları belirli bir bölgeye göre önyargılı hale getirme veya sonuçları belirli bir bölgeyle sınırlama.
- Sonuçları belirli bir yer türüyle sınırlandırın.
- Sonuçları enlem ve boylam sınırlarıyla belirtilen belirli bir alana yönlendiren
GMSPlaceLocationBias/Restriction nesnesi.
- Döndürülen tahminleri işlemek için geri çağırma yöntemi.
Aşağıdaki kod örneklerinde findAutocompletePredictionsFromQuery: için bir çağrı gösterilmektedir.
Swift
/**
 *   Create a new session token. Be sure to use the same token for calling
 *   findAutocompletePredictions, as well as the subsequent place details request.
 *   This ensures that the user's query and selection are billed as a single session.
 */
let token = GMSAutocompleteSessionToken.init()

// Create a type filter.
let filter = GMSAutocompleteFilter()
filter.types = [.bank]
filter.locationBias = GMSPlaceRectangularLocationOption( northEastBounds,
                                   southWestBounds);

placesClient?.findAutocompletePredictions(fromQuery: "cheesebu",

                                          filter: filter,
                                          sessionToken: token,
                                          callback: { (results, error) in
    if let error = error {
      print("Autocomplete error: \(error)")
      return
    }
    if let results = results {
      for result in results {
        print("Result \(result.attributedFullText) with placeID \(result.placeID)")
      }
    }
})
Objective-C
/**
 *   Create a new session token. Be sure to use the same token for calling
 *   findAutocompletePredictionsFromQuery:, as well as the subsequent place details request.
 *   This ensures that the user's query and selection are billed as a single session.
 */
GMSAutocompleteSessionToken *token = [[GMSAutocompleteSessionToken alloc] init];

// Create a type filter.
GMSAutocompleteFilter *_filter = [[GMSAutocompleteFilter alloc] init];
_filter.types = @[ kGMSPlaceTypeBank ];

[_placesClient findAutocompletePredictionsFromQuery:@"cheesebu"
filter:_filter sessionToken:token callback:^(NSArray<GMSAutocompletePrediction *> * _Nullable results, NSError * _Nullable error) {
  if (error != nil) {
    NSLog(@"An error occurred %@", [error localizedDescription]);
    return;
  }
  if (results != nil) {
    for (GMSAutocompletePrediction *result in results) {
      NSLog(@"Result %@ with PlaceID %@", result.attributedFullText, result.placeID);
    }
  }
}];
API, belirtilen geri çağırma yöntemini çağırarak GMSAutocompletePrediction nesnelerinden oluşan bir dizi iletir.
Her
GMSAutocompletePrediction
nesnesi aşağıdaki bilgileri içerir:
attributedFullText: Tahminin tam metni,NSAttributedStringbiçiminde. Örneğin, "Sydney Opera Binası, Sidney, Yeni Güney Galler, Avustralya". Kullanıcı girişiyle eşleşen her metin aralığı bir özelliğe (kGMSAutocompleteMatchAttribute) sahiptir. Bu özelliği, kullanıcının sorgusundaki eşleşen metni vurgulamak için kullanabilirsiniz. Örneğin, aşağıda gösterildiği gibi.placeID– Tahmin edilen yerin yer kimliği. Yer kimliği, bir yeri benzersiz şekilde tanımlayan metin biçiminde bir tanımlayıcıdır. Yer kimlikleri hakkında daha fazla bilgi için Yer kimliğine genel bakış başlıklı makaleyi inceleyin.distanceMeters: Belirtilenoriginkonumundan hedefe olan kuş uçuşu mesafe.originözelliği ayarlanmamışsa mesafe değeri döndürülmez.
Aşağıdaki kod örneğinde, enumerateAttribute kullanılarak sonuçtaki kullanıcının sorgusundaki metinle eşleşen bölümlerin nasıl kalın metinle vurgulanacağı gösterilmektedir:
Swift
let regularFont = UIFont.systemFont(ofSize: UIFont.labelFontSize)
let boldFont = UIFont.boldSystemFont(ofSize: UIFont.labelFontSize)

let bolded = prediction.attributedFullText.mutableCopy() as! NSMutableAttributedString
bolded.enumerateAttribute(kGMSAutocompleteMatchAttribute, in: NSMakeRange(0, bolded.length), options: []) {
  (value, range: NSRange, stop: UnsafeMutablePointer<ObjCBool>) -> Void in
    let font = (value == nil) ? regularFont : boldFont
    bolded.addAttribute(NSFontAttributeName, value: font, range: range)
}

label.attributedText = bolded
Objective-C
UIFont *regularFont = [UIFont systemFontOfSize:[UIFont labelFontSize]];
UIFont *boldFont = [UIFont boldSystemFontOfSize:[UIFont labelFontSize]];

NSMutableAttributedString *bolded = [prediction.attributedFullText mutableCopy];
[bolded enumerateAttribute:kGMSAutocompleteMatchAttribute
                   inRange:NSMakeRange(0, bolded.length)
                   options:0
                usingBlock:^(id value, NSRange range, BOOL *stop) {
                  UIFont *font = (value == nil) ? regularFont : boldFont;
                  [bolded addAttribute:NSFontAttributeName value:font range:range];
                }];

label.attributedText = bolded;
Getiriciyi kullanma
Otomatik tamamlama kontrolünüzü sıfırdan oluşturmak istiyorsanız GMSAutocompleteFetcher öğesini kullanabilirsiniz. Bu öğe, GMSPlacesClient üzerinde autocompleteQuery yöntemini sarmalar. Getirici, istekleri kısıtlar ve yalnızca en son girilen arama metninin sonuçlarını döndürür. Kullanıcı arayüzü öğeleri sağlamaz.
GMSAutocompleteFetcher'ı uygulamak için aşağıdaki adımları uygulayın:
GMSAutocompleteFetcherDelegateprotokolünü uygulayın.GMSAutocompleteFetchernesnesi oluşturun.- Kullanıcı yazarken getirici üzerinde
sourceTextHasChangedişlevini çağırın. didAutcompleteWithPredictionsvedidFailAutocompleteWithErrorprotokol yöntemlerini kullanarak tahminleri ve hataları işleyin.
Aşağıdaki kod örneğinde, kullanıcı girişini almak ve yer eşleşmelerini bir metin görünümünde göstermek için getirme aracının nasıl kullanılacağı gösterilmektedir. Yer seçme işlevi çıkarıldı. FetcherSampleViewController, FetcherSampleViewController.h dosyasındaki UIViewController öğesinden türetilmiştir.
Swift
import UIKit
import GooglePlaces

class ViewController: UIViewController {

  var textField: UITextField?
  var resultText: UITextView?
  var fetcher: GMSAutocompleteFetcher?

  override func viewDidLoad() {
    super.viewDidLoad()

    view.backgroundColor = .white
    edgesForExtendedLayout = []

    // Set bounds to inner-west Sydney Australia.
    let neBoundsCorner = CLLocationCoordinate2D(latitude: -33.843366,
                                                longitude: 151.134002)
    let swBoundsCorner = CLLocationCoordinate2D(latitude: -33.875725,
                                                longitude: 151.200349)

    // Set up the autocomplete filter.
    let filter = GMSAutocompleteFilter()
    filter.locationRestriction = GMSPlaceRectangularLocationOption(neBoundsCorner, swBoundsCorner)

    // Create a new session token.
    let token: GMSAutocompleteSessionToken = GMSAutocompleteSessionToken.init()

    // Create the fetcher.
    fetcher = GMSAutocompleteFetcher(bounds: nil, filter: filter)
    fetcher?.delegate = self
    fetcher?.provide(token)

    textField = UITextField(frame: CGRect(x: 5.0, y: 10.0,
                                          width: view.bounds.size.width - 5.0,
                                          height: 64.0))
    textField?.autoresizingMask = .flexibleWidth
    textField?.addTarget(self, action: #selector(textFieldDidChange(textField:)),
                         for: .editingChanged)
    let placeholder = NSAttributedString(string: "Type a query...")

    textField?.attributedPlaceholder = placeholder

    resultText = UITextView(frame: CGRect(x: 0, y: 65.0,
                                          width: view.bounds.size.width,
                                          height: view.bounds.size.height - 65.0))
    resultText?.backgroundColor = UIColor(white: 0.95, alpha: 1.0)
    resultText?.text = "No Results"
    resultText?.isEditable = false

    self.view.addSubview(textField!)
    self.view.addSubview(resultText!)
  }

  @objc func textFieldDidChange(textField: UITextField) {
    fetcher?.sourceTextHasChanged(textField.text!)
  }

}

extension ViewController: GMSAutocompleteFetcherDelegate {
  func didAutocomplete(with predictions: [GMSAutocompletePrediction]) {
    let resultsStr = NSMutableString()
    for prediction in predictions {
      resultsStr.appendFormat("\n Primary text: %@\n", prediction.attributedPrimaryText)
      resultsStr.appendFormat("Place ID: %@\n", prediction.placeID)
    }

    resultText?.text = resultsStr as String
  }

  func didFailAutocompleteWithError(_ error: Error) {
    resultText?.text = error.localizedDescription
  }
}
Objective-C
#import "FetcherSampleViewController.h"
#import <GooglePlaces/GooglePlaces.h>

@interface FetcherSampleViewController () <GMSAutocompleteFetcherDelegate>

@end

@implementation FetcherSampleViewController {
  UITextField *_textField;
  UITextView *_resultText;
  GMSAutocompleteFetcher* _fetcher;
}

-   (void)viewDidLoad {
  [super viewDidLoad];

  self.view.backgroundColor = [UIColor whiteColor];
  self.edgesForExtendedLayout = UIRectEdgeNone;

  // Set bounds to inner-west Sydney Australia.
  CLLocationCoordinate2D neBoundsCorner = CLLocationCoordinate2DMake(-33.843366, 151.134002);
  CLLocationCoordinate2D swBoundsCorner = CLLocationCoordinate2DMake(-33.875725, 151.200349);

  GMSAutocompleteFilter *autocompleteFilter = [[GMSAutocompleteFilter alloc] init];
  autocompleteFilter.locationRestriction =
        GMSPlaceRectangularLocationOption(neBoundsCorner, swBoundsCorner);

  // Create the fetcher.
  _fetcher = [[GMSAutocompleteFetcher alloc] initWithBounds:nil
                                                     filter:filter];
  _fetcher.delegate = self;

  // Set up the UITextField and UITextView.
  _textField = [[UITextField alloc] initWithFrame:CGRectMake(5.0f,
                                                             0,
                                                             self.view.bounds.size.width - 5.0f,
                                                             44.0f)];
  _textField.autoresizingMask = UIViewAutoresizingFlexibleWidth;
  [_textField addTarget:self
                 action:@selector(textFieldDidChange:)
       forControlEvents:UIControlEventEditingChanged];
  _resultText =[[UITextView alloc] initWithFrame:CGRectMake(0,
                                                            45.0f,
                                                            self.view.bounds.size.width,
                                                            self.view.bounds.size.height - 45.0f)];
  _resultText.backgroundColor = [UIColor colorWithWhite:0.95f alpha:1.0f];
  _resultText.text = @"No Results";
  _resultText.editable = NO;
  [self.view addSubview:_textField];
  [self.view addSubview:_resultText];
}

-   (void)textFieldDidChange:(UITextField *)textField {
  NSLog(@"%@", textField.text);
  [_fetcher sourceTextHasChanged:textField.text];
}

#pragma mark - GMSAutocompleteFetcherDelegate
-   (void)didAutocompleteWithPredictions:(NSArray *)predictions {
  NSMutableString *resultsStr = [NSMutableString string];
  for (GMSAutocompletePrediction *prediction in predictions) {
      [resultsStr appendFormat:@"%@\n", [prediction.attributedPrimaryText string]];
  }
  _resultText.text = resultsStr;
}

-   (void)didFailAutocompleteWithError:(NSError *)error {
  _resultText.text = [NSString stringWithFormat:@"%@", error.localizedDescription];
}

@end
Oturum jetonları
Oturum jetonları, kullanıcı otomatik tamamlama aramasının sorgu ve seçim aşamalarını faturalandırma amacıyla ayrı bir oturumda gruplandırır. Oturum, kullanıcının sorgu yazmaya başlamasıyla başlar ve bir yer seçmesiyle sona erer. Her oturumda birden fazla sorgu ve ardından bir yer seçimi olabilir. Oturum sona erdiğinde jeton geçerliliğini kaybeder. Uygulamanız her oturum için yeni bir jeton oluşturmalıdır. Tüm programatik otomatik tamamlama oturumları için oturum jetonlarını kullanmanızı öneririz (Tam ekran denetleyiciyi veya sonuç denetleyicisini kullandığınızda API bunu otomatik olarak halleder).
iOS için Yerler SDK'sı, her oturumu tanımlamak için
GMSAutocompleteSessionToken kullanır. Uygulamanız her yeni oturumun başında yeni bir oturum jetonu iletmeli, ardından kullanıcının seçtiği yerin Yer Ayrıntılarını almak için fetchPlacefromPlaceID:'a yapılan sonraki çağrıda aynı jetonu bir yer kimliğiyle birlikte iletmelidir.
Oturum jetonları hakkında daha fazla bilgi edinin.
Yeni bir oturum jetonu oluşturmak için aşağıdaki kodu kullanın:
let token: GMSAutocompleteSessionToken = GMSAutocompleteSessionToken.init()
Kullanım sınırları
GMSPlacesClient findAutocompletePredictionsFromQueryyönteminin kullanımı, katmanlı sorgu sınırlarına tabidir. Kullanım sınırları ile ilgili belgelere bakın.
Uygulamanızda ilişkilendirmeleri gösterme
- Uygulamanız otomatik tamamlama hizmetini programatik olarak kullanıyorsa kullanıcı arayüzünüzde "Google tarafından desteklenmektedir" atfı gösterilmeli veya Google markalı bir harita yer almalıdır.
- Uygulamanızda otomatik tamamlama kullanıcı arayüzü denetimi kullanılıyorsa ek bir işlem yapılmasına gerek yoktur (gerekli ilişkilendirme varsayılan olarak gösterilir).
- Kimliğe göre yer alma işleminden sonra ek yer bilgileri alıp görüntülerseniz üçüncü taraf ilişkilendirmelerini de göstermeniz gerekir.
Daha fazla bilgi için ilişkilendirmeler ile ilgili dokümanlara bakın.
Ağ etkinliği göstergesini kontrol etme
Uygulamaların durum çubuğundaki ağ etkinliği göstergesini kontrol etmek için kullandığınız otomatik tamamlama sınıfı için uygun isteğe bağlı temsilci yöntemlerini uygulamanız ve ağ göstergesini kendiniz açıp kapatmanız gerekir.
GMSAutocompleteViewControlleriçindidRequestAutocompletePredictions:vedidUpdateAutocompletePredictions:temsilci yöntemlerini uygulamanız gerekir.GMSAutocompleteResultsViewControlleriçindidRequestAutocompletePredictionsForResultsController:vedidUpdateAutocompletePredictionsForResultsController:temsilci yöntemlerini uygulamanız gerekir.GMSAutocompleteTableDataSourceiçindidRequestAutocompletePredictionsForTableDataSource:vedidUpdateAutocompletePredictionsForTableDataSource:temsilci yöntemlerini uygulamanız gerekir.
Bu yöntemleri uygulayıp [UIApplication
sharedApplication].networkActivityIndicatorVisible ve NO değerlerini sırasıyla YES olarak ayarladığınızda durum çubuğu, otomatik tamamlama kullanıcı arayüzüyle doğru şekilde eşleşir.
Otomatik tamamlama sonuçlarını kısıtlama
Otomatik tamamlama kullanıcı arayüzü kontrolünü, sonuçları belirli bir coğrafi bölgeyle sınırlayacak ve/veya sonuçları bir veya daha fazla yer türüyle ya da belirli bir ülke veya ülkelerle filtreleyecek şekilde ayarlayabilirsiniz. Sonuçları sınırlamak için aşağıdakileri yapabilirsiniz:
- Tanımlanan bölgedeki sonuçları tercih etmek (yanlılık) için
locationBiasseçeneğiniGMSAutocompleteFilterolarak ayarlayın (tanımlanan bölgenin dışındaki bazı sonuçlar yine de döndürülebilir).locationRestrictionda ayarlanırsalocationBiasyoksayılır. Sonuçları yalnızca tanımlanan bölge içinde
locationRestriction(kısıtla) göstermek içinGMSAutocompleteFilterseçeneğini ayarlayın (yalnızca tanımlanan bölge içindeki sonuçlar döndürülür).- Not: Bu kısıtlama yalnızca rotaların tamamı için geçerlidir. Dikdörtgen sınırların dışında bulunan sentetik sonuçlar, konum kısıtlamasıyla çakışan bir rotaya göre döndürülebilir.
Yalnızca belirli bir yer türüne uygun sonuçlar döndürmek için
typesdeğeriniGMSAutocompleteFilterolarak ayarlayın (örneğin, TypeFilter.ADDRESS belirtildiğinde widget yalnızca tam adresi olan sonuçları döndürür).Yalnızca belirtilen en fazla beş ülke içindeki sonuçları döndürmek için
GMSAutocompleteFilterüzerindecountriesdeğerini ayarlayın.
Sonuçları belirli bir bölgeye göre önyargılı hale getirme
Tanımlanan bölgedeki sonuçları tercih etmek (yanlılık) için locationBias simgesini GMSAutocompleteFilter üzerinde ayarlayın.
northEast = CLLocationCoordinate2DMake(39.0, -95.0);  southWest =
CLLocationCoordinate2DMake(37.5, -100.0);  GMSAutocompleteFilter *filter =
[[GMSAutocompleteFilter alloc] init];  filter.locationBias =
GMSPlaceRectangularLocationOption(northEast, southWest);
Sonuçları belirli bir bölgeyle sınırlama
Sonuçları yalnızca tanımlanan bölge içinde locationRestriction göstermek (kısıtlamak) için GMSAutocompleteFilter üzerinde locationRestriction ayarını yapın.
northEast = CLLocationCoordinate2DMake(39.0, -95.0);  southWest =
CLLocationCoordinate2DMake(37.5, -100.0);  GMSAutocompleteFilter *filter =
[[GMSAutocompleteFilter alloc] init];  filter.locationRestriction =
GMSPlaceRectangularLocationOption(northEast, southWest);
Sonuçları ülkeye göre filtreleme
Sonuçları en fazla beş ülkede filtrelemek için countries simgesini GMSAutocompleteFilter olarak ayarlayın.
GMSAutocompleteFilter *filter = [[GMSAutocompleteFilter alloc] init];
filter.countries = @[ @"au", @"nz" ];
Sonuçları yer türüne veya tür koleksiyonuna göre filtreleme
GMSAutoCompleteFilter öğesinin types özelliğini ayarlayarak sonuçları belirli bir tür veya tür koleksiyonuyla sınırlandırın.
Yer Türleri ile ilgili Tablo 1, 2 ve 3'te listelenen filtreleri belirtmek için bu özelliği kullanın. Hiçbir şey belirtilmezse tüm türler döndürülür.
Bir tür veya tür koleksiyonu filtresi belirtmek için:
Yer Türleri sayfasında gösterilen Tablo 1 ve Tablo 2'deki en fazla beş tür değerini belirtmek için
typesözelliğini kullanın. Tür değerleri,GMSPlaceTypeiçindeki sabitler tarafından tanımlanır.Yer Türleri'nde gösterilen Tablo 3'teki tür koleksiyonunu belirtmek için
typesözelliğini kullanın. Tür koleksiyonu değerleri,GMSPlaceTypeiçindeki sabitler tarafından tanımlanır.İsteklerde yalnızca Tablo 3'teki tek bir türe izin verilir. Tablo 3'ten bir değer belirtirseniz Tablo 1 veya Tablo 2'den bir değer belirtemezsiniz. Aksi takdirde hata oluşur.
Örneğin, yalnızca belirli bir yer türüne uygun sonuçları döndürmek için types değerini GMSAutocompleteFilter olarak ayarlayın. Aşağıdaki örnekte, yalnızca tam adresi olan sonuçları döndürmek için filtrenin nasıl ayarlanacağı gösterilmektedir:
GMSAutocompleteFilter *filter = [[GMSAutocompleteFilter alloc] init];
filter.types = @[ kGMSPlaceTypeAirport, kGMSPlaceTypeAmusementPark ];
Yer Adı Otomatik Tamamlama (Eski) optimizasyonu
Bu bölümde, Yer Otomatik Tamamlama (Eski) hizmetinden en iyi şekilde yararlanmanıza yardımcı olacak en iyi uygulamalar açıklanmaktadır.
Genel kurallardan bazıları şunlardır:
- Çalışan bir kullanıcı arayüzü geliştirmenin en hızlı yolu şunları kullanmaktır: Maps JavaScript API Otomatik Yer Tamamlama (Eski) widget'ı, Android için Yerler SDK'sı Otomatik Yer Tamamlama (Eski) widget'ı, veya iOS için Yerler SDK'sı Otomatik Yer Tamamlama (Eski) kullanıcı arayüzü denetimi.
- Başlangıçtan itibaren temel Yer Otomatik Tamamlama (Eski) veri alanlarını anlayın.
- Konum tercihi ve konum kısıtlama alanları isteğe bağlıdır ancak otomatik tamamlama performansını önemli ölçüde etkileyebilir.
- API hata döndürürse uygulamanızın sorunsuz bir şekilde çalışmaya devam etmesini sağlamak için hata işlemeyi kullanın.
- Uygulamanızın seçim yapılmadığı durumları yönettiğinden ve kullanıcılara devam etme olanağı sunduğundan emin olun.
Maliyet optimizasyonu ile ilgili en iyi uygulamalar
Temel maliyet optimizasyonu
Yer Otomatik Tamamlama (Eski) hizmetinin kullanım maliyetini optimize etmek için Yer Ayrıntıları (Eski) ve Yer Otomatik Tamamlama (Eski) widget'larında alan maskeleri kullanarak yalnızca ihtiyacınız olan Yer Otomatik Tamamlama (Eski) veri alanlarını döndürün.
Gelişmiş maliyet optimizasyonu
SKU: Otomatik Tamamlama - İstek Başına fiyatlandırma'ya erişmek ve Yer Ayrıntıları (Eski) yerine seçilen yerle ilgili Geocoding API sonuçları istemek için Yer Otomatik Tamamlama (Eski) özelliğini programatik olarak uygulamayı düşünebilirsiniz. Aşağıdaki koşulların her ikisi de karşılanıyorsa Geocoding API ile birlikte kullanılan istek başına fiyatlandırma, oturum başına (oturum tabanlı) fiyatlandırmaya kıyasla daha uygun maliyetlidir:
- Yalnızca kullanıcının seçtiği yerin enlemi/boylamı veya adresi gerekiyorsa Geocoding API, bu bilgileri Yer Ayrıntıları (Eski) çağrısından daha düşük bir maliyetle sağlar.
- Kullanıcılar, ortalama dört veya daha az Yer Otomatik Tamamlama (Eski) tahmin isteği içinde bir otomatik tamamlama tahmini seçerse istek başına fiyatlandırma, oturum başına fiyatlandırmaya göre daha uygun maliyetli olabilir.
Uygulamanız, seçilen tahminin adresi ve enlem/boylamı dışında herhangi bir bilgi gerektiriyor mu?
Evet, daha fazla ayrıntı gerekiyor
Yer Ayrıntıları (Eski) ile oturum tabanlı Yer Otomatik Tamamlama (Eski) özelliğini kullanın.
Uygulamanızda yer adı, işletme durumu veya çalışma saatleri gibi Yer Ayrıntıları (Eski) gerektiğinden Yer Otomatik Tamamlama (Eski) uygulamanızda oturum jetonu (programatik olarak veya JavaScript, Android ya da iOS widget'larına yerleştirilmiş) oturum başına ve talep ettiğiniz yer verileri alanlarına bağlı olarak geçerli Yerler Verileri SKU'ları kullanılmalıdır.1
Widget uygulaması
Oturum yönetimi, otomatik olarak
JavaScript,
Android,
veya iOS
widget'larına yerleştirilmiştir. Buna, seçilen tahmindeki hem Yer Otomatik Tamamlama (Eski) istekleri hem de Yer Ayrıntıları (Eski) isteği dahildir. Yalnızca ihtiyacınız olan Yer Otomatik Tamamlama (Eski) veri alanlarını istediğinizden emin olmak için fields parametresini belirttiğinizden emin olun.
Programatik uygulama
Yer Otomatik Tamamlama (Eski) isteklerinizle birlikte
oturum jetonu
kullanın. Seçilen tahminle ilgili yer ayrıntıları (eski) isteğinde bulunurken aşağıdaki parametreleri ekleyin:
- Otomatik Yer Tamamlama (Eski) yanıtındaki yer kimliği
- Yer Adı Otomatik Tamamlama (Eski) isteğinde kullanılan oturum jetonu
- İhtiyacınız olan Yer Otomatik Tamamlama (Eski) veri alanlarını belirten
fieldsparametresi
Hayır, yalnızca adres ve konum gerekiyor
Place Autocomplete (Legacy) kullanımınızın performansına bağlı olarak, Geocoding API, uygulamanız için Place Details (Legacy) hizmetinden daha uygun maliyetli bir seçenek olabilir. Her uygulamanın Yer Otomatik Tamamlama (Eski) verimliliği, kullanıcıların ne girdiğine, uygulamanın nerede kullanıldığına ve performans optimizasyonuyla ilgili en iyi uygulamaların uygulanıp uygulanmadığına bağlı olarak değişir.
Aşağıdaki soruyu yanıtlamak için bir kullanıcının uygulamanızda Yer Otomatik Tamamlama (Eski) tahmini seçmeden önce ortalama kaç karakter yazdığını analiz edin.
Kullanıcılarınız, ortalama olarak dört veya daha az istekte bir Yer Otomatik Tamamlama (Eski) tahmini seçiyor mu?
Evet
Yer Otomatik Tamamlama (Eski) programını oturum jetonları olmadan programatik olarak uygulayın ve seçilen yer tahmini için Coğrafi Kodlama API'sini çağırın.
Geocoding API, adresleri ve enlem/boylam koordinatlarını sağlar.
Seçilen yer tahminiyle ilgili dört Otomatik Tamamlama - İstek Başına isteği ve bir Geocoding API çağrısı yapmak, oturum başına Otomatik Yer Tamamlama (Eski) oturum başına maliyetinden daha düşüktür.1
Kullanıcılarınızın aradıkları tahmini daha da az karakterle almalarına yardımcı olmak için performansla ilgili en iyi uygulamaları kullanabilirsiniz.
Hayır
Yer Ayrıntıları (Eski) ile oturum tabanlı Yer Otomatik Tamamlama (Eski) özelliğini kullanın.
Kullanıcı bir Yer Otomatik Tamamlama (Eski) tahmini seçmeden önce yapmayı beklediğiniz ortalama istek sayısı, oturum başına fiyatlandırmanın maliyetini aştığından Yer Otomatik Tamamlama (Eski) uygulamanız hem Yer Otomatik Tamamlama (Eski) istekleri hem de ilişkili Yer Ayrıntıları (Eski) isteği için oturum başına bir oturum jetonu kullanmalıdır.
1
Widget uygulaması
Oturum yönetimi,
JavaScript,
Android,
veya iOS
widget'larına otomatik olarak yerleştirilir. Buna, seçilen tahmindeki hem Yer Otomatik Tamamlama (Eski) istekleri hem de Yer Ayrıntıları (Eski) isteği dahildir. Yalnızca ihtiyacınız olan alanları istediğinizden emin olmak için fields parametresini belirttiğinizden emin olun.
Programatik uygulama
Yer Otomatik Tamamlama (Eski) isteklerinizle birlikte
oturum jetonu
kullanın.
Seçilen tahminle ilgili Yer Ayrıntıları (Eski) isteğinde bulunurken aşağıdaki parametreleri ekleyin:
- Otomatik Yer Tamamlama (Eski) yanıtındaki yer kimliği
- Yer Adı Otomatik Tamamlama (Eski) isteğinde kullanılan oturum jetonu
- Adres ve geometri gibi
fieldsparametresi Temel Veri alanlarını belirtir.
Yer Otomatik Tamamlama (Eski) isteklerini geciktirmeyi düşünün
Uygulamanızın daha az istekte bulunması için Yer Otomatik Tamamlama (Eski) isteğini kullanıcı ilk üç veya dört karakteri yazana kadar geciktirmek gibi stratejiler kullanabilirsiniz. Örneğin, kullanıcının üçüncü karakteri yazmasından sonra her karakter için Yer Otomatik Tamamlama (Eski) isteğinde bulunmak, kullanıcının yedi karakter yazıp bir Geocoding API isteğinde bulunduğunuz bir tahmini seçmesi durumunda toplam maliyetin 4 Yer Otomatik Tamamlama (Eski) İstek Başına + Geocoding olacağı anlamına gelir.1
İstekleri geciktirerek ortalama programatik istek sayınızı dörtten aşağıya düşürebilirseniz Geokodlama API'si ile yüksek performanslı Yer Adı Otomatik Tamamlama (Eski) uygulamasıyla ilgili yönergeleri uygulayabilirsiniz. İsteklerin geciktirilmesinin, her yeni tuş vuruşunda tahmin görmeyi bekleyen kullanıcı tarafından gecikme olarak algılanabileceğini unutmayın.
Kullanıcılarınızın aradığı tahmini daha az karakterle almasına yardımcı olmak için performansla ilgili en iyi uygulamaları kullanabilirsiniz.
-
Maliyetler için Google Haritalar Platformu fiyatlandırma listelerine bakın.
Performansla ilgili en iyi uygulamalar
Aşağıdaki yönergelerde, Yer Otomatik Tamamlama (Eski) performansını optimize etmenin yolları açıklanmaktadır:
- Yer Otomatik Tamamlama (Eski) uygulamanıza ülke kısıtlamaları, konum önyargısı ve (programatik uygulamalar için) dil tercihi ekleyin. Dil tercihi, kullanıcının tarayıcısından veya mobil cihazından dil tercihlerini aldıkları için widget'larda gerekli değildir.
- Yer Otomatik Tamamlama (Eski) özelliğine harita eşlik ediyorsa konumu harita görüntü alanına göre yönlendirebilirsiniz.
- Kullanıcının Yer Otomatik Tamamlama (Eski) tahminlerinden birini seçmediği durumlarda (genellikle bu tahminlerden hiçbiri istenen sonuç adresi olmadığı için) daha alakalı sonuçlar elde etmek amacıyla orijinal kullanıcı girişini yeniden kullanabilirsiniz:
- Kullanıcının yalnızca adres bilgisi gireceğini düşünüyorsanız Coğrafi Kodlama API'sine yapılan bir çağrıda orijinal kullanıcı girişini yeniden kullanın.
- Kullanıcının belirli bir yerle ilgili sorguları ada veya adrese göre girmesini bekliyorsanız Yer Ayrıntıları (Eski) isteği kullanın. Sonuçların yalnızca belirli bir bölgede beklenmesi durumunda konum önyargısı kullanın.
- Kullanıcılar, bir bina içindeki belirli birimlerin veya dairelerin adresleri gibi alt tesis adreslerini girerken. Örneğin, "Stroupežnického 3191/17, Praha" Çek adresi, Yer Otomatik Tamamlama (Eski) özelliğinde kısmi bir tahminle sonuçlanır.
- New York'ta "23-30 29th St, Queens" veya Hawaii'deki Kauai adasında "47-380 Kamehameha Hwy, Kaneohe" gibi yol segmenti ön ekleri içeren adresleri giren kullanıcılar.
Konum önyargısı
location parametresi ve radius parametresi ileterek sonuçları belirli bir alana yönlendirin. Bu, Yer Otomatik Tamamlama (Eski) özelliğine, tanımlanan alan içindeki sonuçları göstermeyi tercih etmesi talimatını verir. Tanımlanan alanın dışındaki sonuçlar gösterilmeye devam edebilir. Sonuçları yalnızca belirtilen bir ülke içindeki yerleri gösterecek şekilde filtrelemek için includedRegionCodes parametresini kullanabilirsiniz.
Konum kısıtlama
locationRestriction parametresi ileterek sonuçları belirli bir alanla sınırlayın.
Ayrıca, location ve radius parametresiyle tanımlanan bölgeyle sonuçları kısıtlamak için strictbounds parametresini ekleyebilirsiniz. Bu, Yer Otomatik Tamamlama (Eski) özelliğine yalnızca bu bölgedeki sonuçları döndürme talimatı verir.
Sorun giderme
Çok çeşitli hatalar oluşabilse de uygulamanızın karşılaşacağı hataların çoğu genellikle yapılandırma hatalarından (ör. yanlış API anahtarı kullanıldı veya API anahtarı yanlış yapılandırıldı) ya da kota hatalarından (uygulamanız kotasını aştı) kaynaklanır. Kotalar hakkında daha fazla bilgi için Kullanım Sınırları bölümüne bakın.
Otomatik tamamlama kontrollerinin kullanımında oluşan hatalar, çeşitli temsilci protokollerinin didFailAutocompleteWithError() yönteminde döndürülür. Sağlanan NSError nesnesinin code özelliği, GMSPlacesErrorCode numaralandırmasının değerlerinden birine ayarlanmış.