Restez organisé à l'aide des collections
Enregistrez et classez les contenus selon vos préférences.
Étape 6: Campagne Google Ads
Introduction et impact commercial
Pour les annonces produits en magasin, vous devez associer votre compte Google Ads. Depuis l'
"Informations sur l'entreprise et comptes" pour les annonces produits en magasin, avec une URL permettant
associer votre compte. Vous pouvez récupérer votre compte ou en créer un à l'adresse
Google Ads : Il est indiqué dans le coin supérieur droit de l’écran, à côté de
le profil de votre compte. Copiez et collez ce numéro dans l'onglet "Associer un compte Google Ads"
Account (Compte), puis sélectionnez Send Link Request (Envoyer une demande d'association).
Pour les requêtes API, vous devez ajouter le champ d'application suivant:
https://www.googleapis.com/auth/adwords
Associer le compte Ads dans Merchant Center
Vous pouvez associer ou créer un compte Google Ads via Merchant Center.
Pour en savoir plus, consultez le guide d'aide Merchant Center.
Associer votre compte Google Ads
Connectez-vous à Google Ads à l'aide du compte incluant vos annonces Google.
Campagnes.
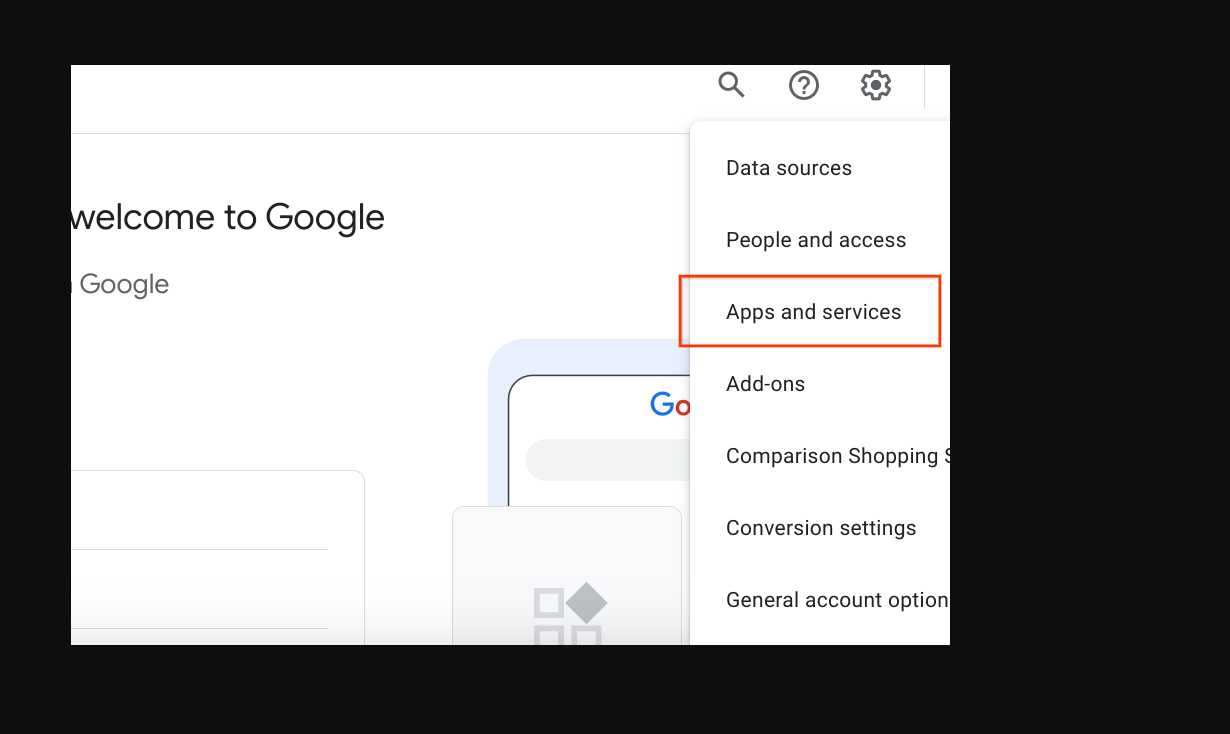
Cliquez sur le bouton "Admin" l'icône des paramètres, puis sélectionnez Comptes associés.
La liste des applications que vous pouvez associer s'affiche. Si vous avez associé le
l'identité de votre compte lorsque vous activez les annonces produits en magasin, Google Merchant Center
doit s'afficher en haut, avec "Gérer et Lien. Google Merchant Center est
liste générale, avec "Détails" vous avez peut-être associé
le mauvais compte,
connectés au mauvais compte Google Ads ou si vous n'avez pas associé le compte sur
tout. Consultez la section Activer les fiches produit en magasin sans frais pour
effectuez cette étape. Sélectionnez Gérer et Lien).
Associée
Dissocié
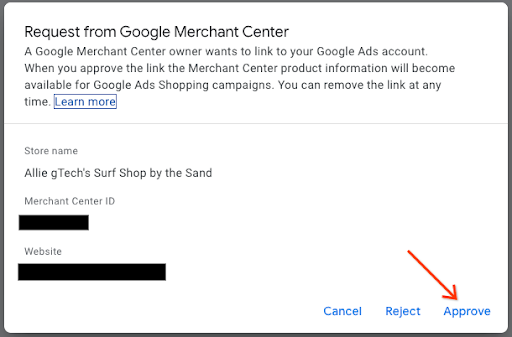
Dans la fenêtre "Demandes d'association", sélectionnez Afficher la demande.
Une fenêtre s'affiche et vous fournit des informations sur le compte
demandant l'association. Sélectionnez Approuver.
Une fois l'association effectuée, la nouvelle vue affiche le compte associé à l'état
"Associée".
Vue Google Ads
Vue Merchant Center
Créer une campagne d'annonces Shopping et activer les produits en magasin
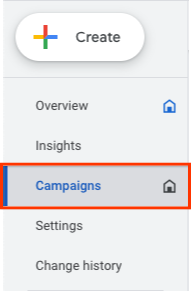
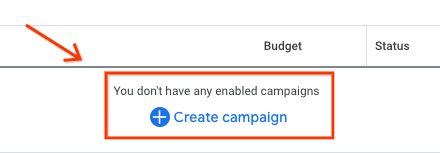
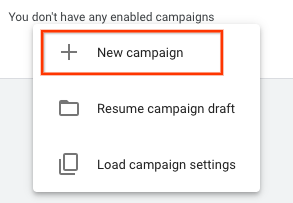
Sur le côté gauche de l'écran, sélectionnez Campagnes, puis dans
Pour les périodes de la campagne, sélectionnez Créer. Si une fenêtre s'affiche, sélectionnez
"+ Nouvelle campagne".
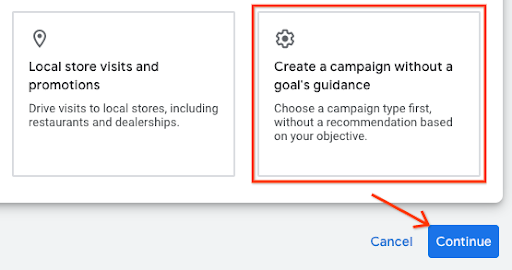
Lorsque l'écran de sélection de la campagne s'affiche,
Créer une campagne sans objectif spécifique Ensuite, sélectionnez Continuer.
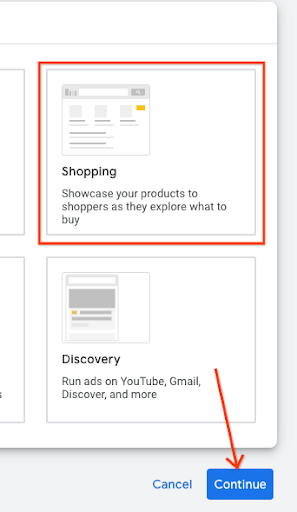
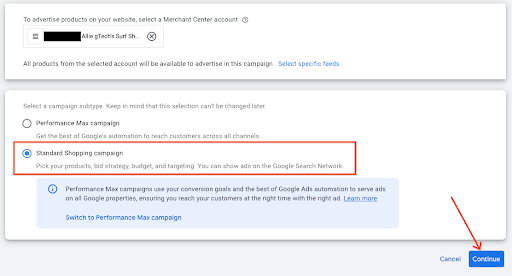
Dans la série d'options suivante, sélectionnez Shopping. carte,
puis sélectionnez Continuer.
Juste en dessous, plusieurs nouvelles options s'affichent. Tout d'abord, assurez-vous que le marchand
est indiqué dans le champ de texte. Sélectionnez ensuite
"Campagne Shopping standard" au lieu de la campagne Performance Max,
sélectionnez Continuer.
Le menu suivant apparaît sous "Paramètres généraux". Attribuez un nom à la campagne,
Sous "Produits en magasin", cliquez sur le chevron pour développer le menu. Cochez la case,
Activer les annonces pour les produits vendus dans les magasins locaux
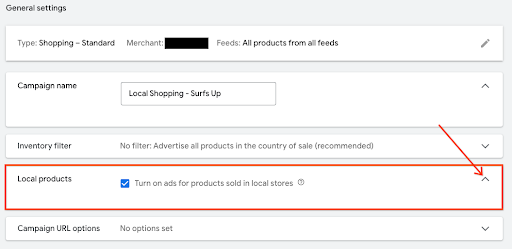
En bas de la page, sélectionnez Créer une campagne. Une fois l'enregistrement effectué,
la campagne que vous venez de créer apparaît sur l'écran correspondant.
Conseils sur l'expérience utilisateur
Vous pouvez associer la campagne plus tôt en l'associant au compte du marchand
le processus de collecte.
Conseils techniques
Pour Google Ads, si vous souhaitez utiliser l'API, assurez-vous d'avoir ajouté
le champ d'application suivant:
https://www.googleapis.com/auth/adwords.
Pour l'association des comptes, vous utilisez la requête suivante:
CustomerClientLinkService. Cela prend le
MutateCustomerClientLinkRequest, qui accepte un customer_id.
Vous pouvez créer une campagne de façon programmatique en utilisant
CampaignService.
Sauf indication contraire, le contenu de cette page est régi par une licence Creative Commons Attribution 4.0, et les échantillons de code sont régis par une licence Apache 2.0. Pour en savoir plus, consultez les Règles du site Google Developers. Java est une marque déposée d'Oracle et/ou de ses sociétés affiliées.
Dernière mise à jour le 2025/07/25 (UTC).
[null,null,["Dernière mise à jour le 2025/07/25 (UTC)."],[[["\u003cp\u003eTo run local inventory ads, link your Google Ads account to your Merchant Center account, ensuring the correct account is selected for a seamless connection.\u003c/p\u003e\n"],["\u003cp\u003eCreate a Standard Shopping campaign in Google Ads and enable local products to display ads for items sold in your physical stores.\u003c/p\u003e\n"],["\u003cp\u003eFor API access, include the \u003ccode\u003ehttps://www.googleapis.com/auth/adwords\u003c/code\u003e scope to manage your Google Ads campaigns programmatically.\u003c/p\u003e\n"],["\u003cp\u003eMerchants can link an advertising account managed by a third party if they don't directly handle their own Google Ads campaigns.\u003c/p\u003e\n"]]],["To utilize local inventory ads, link your Google Ads account in Merchant Center by finding your account number on Google Ads and sending a link request. In Google Ads, navigate to \"Linked Accounts\" under the \"Admin\" settings and \"Approve\" the Merchant Center link request. To create a Shopping Ads campaign, select \"Campaigns\" then \"+New Campaign,\" choose \"Shopping,\" and \"Standard Shopping Campaign\". Finally, enable \"Turn on ads for products sold in local stores\" and create your campaign. For API access, add the `https://www.googleapis.com/auth/adwords` scope.\n"],null,["Step 6: Google Ads Campaign\n---------------------------\n\n### Introduction and Business Impact\n\n*** ** * ** ***\n\nFor local inventory ads, you need to link your Google Ads Account. From the\nBusiness Information and Accounts menu for Local Inventory Ads, there's a URL to\nlink your account. You can retrieve your account or create one by going to\n[Google Ads](https://ads.google.com). It's listed in the top-right corner of the screen next to\nyour account profile. Copy and paste this number in the Link a Google Ads\nAccount modal, then select, \"**Send Link Request**\".\n\nFor API requests, you need to add the following scope: \n\n https://www.googleapis.com/auth/adwords\n\n### Link the Ads Account in Merchant Center\n\nYou can link or create a Google Ads account through Merchant Center.\nMore details are available in the [Merchant Center Help guide](https://support.google.com/google-ads/answer/12499498).\n\n#### Link your Google Ads Account\n\n1. Login to [Google Ads](https://ads.google.com) with the account that contains your Google Ads\n Campaigns.\n\n2. Click the \"Admin\" settings wheel, then select \"**Linked Accounts**\".\n\n3. A list of applications appears that you can link to. If you linked the\n account identity while enabling Local Inventory Ads, Google Merchant Center\n should be at the top, with Manage \\& Link. Google Merchant Center is in the\n general list, with \"Details\" you may have either linked the wrong account,\n logged into the incorrect Google Ads account, or have not linked the account at\n all. Visit the [*Enabling Free Local Inventory Ads Listing*](https://developers.google.com/merchant/storebuilder/local/sections/4_0_enabling_and_configure_lia_pos#enabling_free_local_product_listings) section to\n complete this step. Select \"**Manage \\& Link**\".\n\n *Linked*\n\n *Unlinked*\n\n4. In the Link Requests window, select \"**View Request**\"\n\n5. A modal appears providing you information about the account that is\n requesting the link. Select \"**Approve**\"\n\n6. When linked, the new view shows the account that is linked with the status of\n \"**Linked**\".\n\n *Google Ads View*\n\n *Merchant Center View*\n\n#### Create Shopping Ads Campaign and Enable Local Products\n\n1. Login to [Google Ads](https://ads.google.com)\n\n2. Along the left hand side of the screen, select \"**Campaigns** \", then in the\n Campaigns windows, select \"**Create** .\" If a window appears, select\n \"+ **New Campaign**.\"\n\n3. When the campaign selection screen appears, select\n \"**Create a campaign without a goal's guidance** .\" Then, select \"**Continue**\".\n\n4. On the next set of options, select the \"**Shopping** \" tile,\n then select \"**Continue**.\"\n\n5. Just below, several new options appears. First, make sure your merchant\n account is the one that is listed in the text field. Then, select\n \"**Standard Shopping Campaign** \" instead of the Performance Max Campaign,\n select \"**Continue**.\"\n\n6. The next menu appears under General Settings. Provide a Campaign name,\n then under local products, click the chevron to expand the menu. Check the box,\n \"**Turn on ads for products sold in local stores**.\"\n\n7. Go to the bottom, and select \"**Create Campaign**.\" When saved,\n the newly created campaign appears on the campaign screen.\n\n### UX Guidance\n\n*** ** * ** ***\n\nYou can help link the campaign earlier by linking it as part of the merchant\ncollection process.\n\n### Tech Guidance\n\n*** ** * ** ***\n\n- For Google Ads, if you want to use the API, ensure that you've added the following scope:\n\n https://www.googleapis.com/auth/adwords.\n\n- For account linking, you consume the following request:\n CustomerClientLinkService. This takes the\n [MutateCustomerClientLinkRequest](https://developers.google.com/google-ads/api/reference/rpc/v13/MutateCustomerClientLinkRequest), which accepts a *customer_id*.\n\n- You can create a new campaign programmatically by consuming\n the [CampaignService](https://developers.google.com/google-ads/api/reference/rpc/v13/CampaignService).\n\n- For more information about how to use the Google Ads API, visit the following\n [Client Libraries and Example](https://developers.google.com/google-ads/api/docs/client-libs) page.\n\n| **Tip:** The merchant doesn't need to use their own Ads account. If the merchant's ad business is managed by a different account other than their own, they can use the same link method to link their account."]]