Sử dụng bộ sưu tập để sắp xếp ngăn nắp các trang
Lưu và phân loại nội dung dựa trên lựa chọn ưu tiên của bạn.
Bước 6: Chiến dịch trên Google Ads
Giới thiệu và tác động đến hoạt động kinh doanh
Đối với quảng cáo kho hàng tại địa phương, bạn cần liên kết tài khoản Google Ads của mình. Từ
Trình đơn Thông tin doanh nghiệp và Tài khoản cho Quảng cáo kho hàng tại địa phương, có một URL để
liên kết tài khoản của bạn. Bạn có thể truy xuất tài khoản của mình hoặc tạo một tài khoản bằng cách truy cập
Google Ads. Nút này được liệt kê ở góc trên cùng bên phải màn hình bên cạnh
hồ sơ tài khoản của bạn. Sao chép và dán số này vào Liên kết tài khoản Google Ads
Cửa sổ tài khoản, rồi chọn "Gửi yêu cầu liên kết".
Đối với các yêu cầu API, bạn cần thêm phạm vi sau:
https://www.googleapis.com/auth/adwords
Liên kết tài khoản Google Ads trong Merchant Center
Bạn có thể liên kết hoặc tạo tài khoản Google Ads thông qua Merchant Center.
Bạn có thể xem thêm thông tin chi tiết trong Hướng dẫn trợ giúp Merchant Center.
Liên kết tài khoản Google Ads của bạn
Đăng nhập vào Google Ads bằng tài khoản chứa Google Ads của bạn
Chiến dịch.
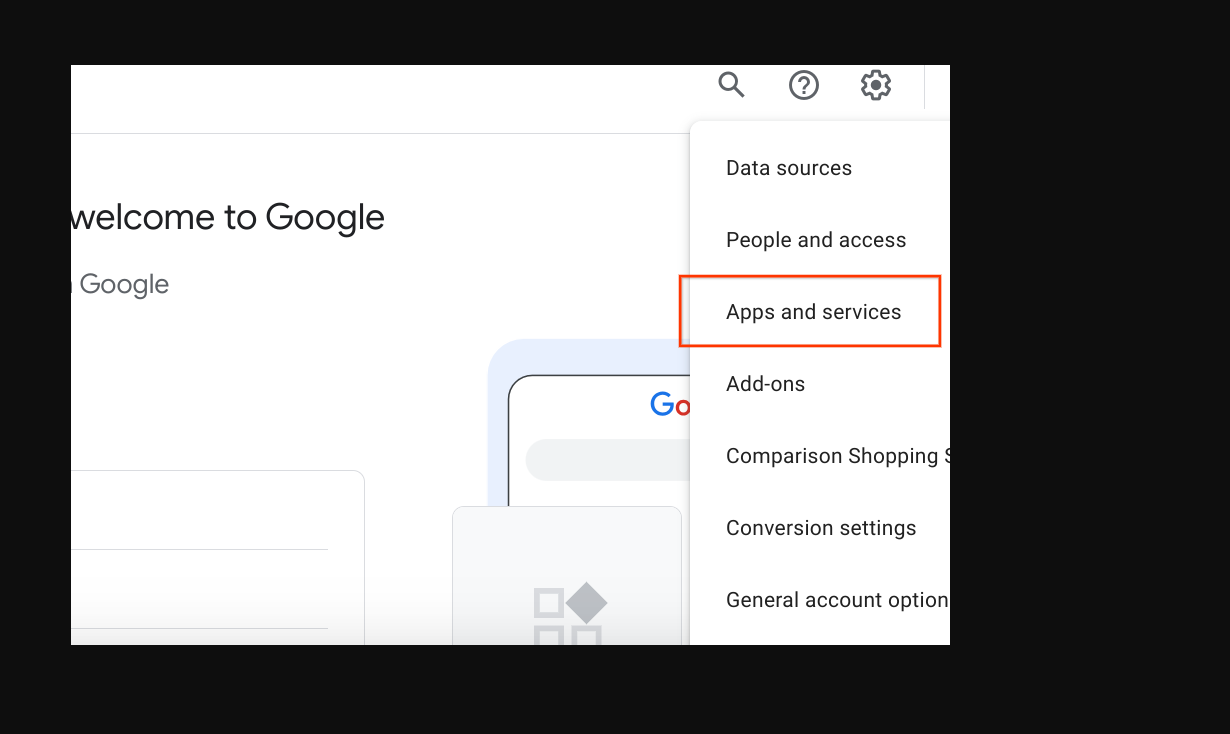
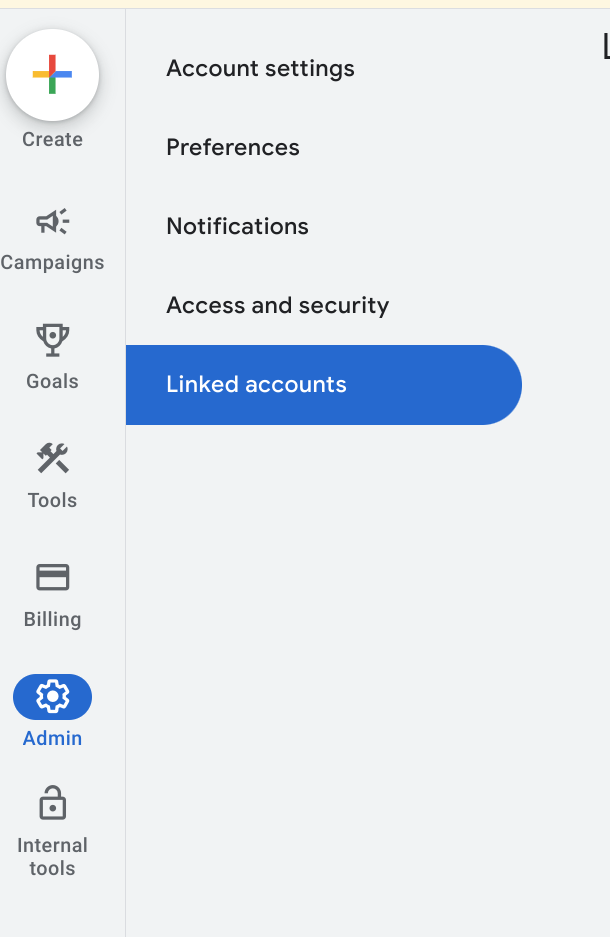
Nhấp vào mục "Quản trị viên" bánh xe cài đặt, sau đó chọn "Tài khoản được liên kết".
Một danh sách ứng dụng sẽ xuất hiện để bạn có thể liên kết đến. Nếu bạn đã liên kết
mã nhận dạng tài khoản khi bật Quảng cáo kho hàng tại địa phương, Google Merchant Center
sẽ nằm ở trên cùng, với mục Quản lý và Đường liên kết. Google Merchant Center đang ở
danh sách chung, kèm theo phần "Chi tiết" có thể bạn đã liên kết nhầm tài khoản,
đã đăng nhập vào tài khoản Google Ads không chính xác hoặc chưa liên kết tài khoản tại
tất cả. Hãy xem mục Bật trang thông tin miễn phí về quảng cáo kho hàng tại địa phương để
hoàn thành bước này. Chọn "Quản lý và Đường liên kết".
Đã liên kết
Đã huỷ liên kết
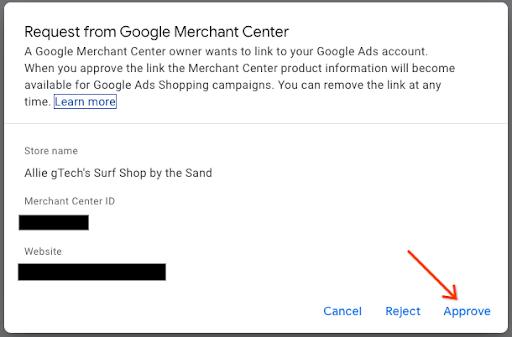
Trong cửa sổ Yêu cầu liên kết, hãy chọn "Xem yêu cầu"
Một cửa sổ phụ sẽ xuất hiện, cung cấp cho bạn thông tin về tài khoản
yêu cầu liên kết. Chọn "Phê duyệt"
Khi được liên kết, chế độ xem mới hiển thị tài khoản được liên kết với trạng thái
"Đã liên kết".
Chế độ xem Google Ads
Chế độ xem Merchant Center
Tạo chiến dịch quảng cáo Mua sắm và giới thiệu sản phẩm tại cửa hàng địa phương
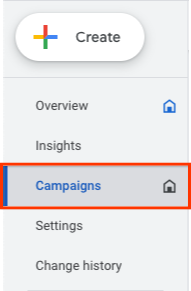
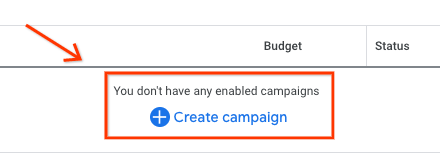
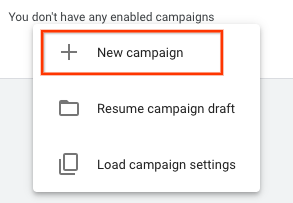
Dọc theo phía bên trái của màn hình, hãy chọn "Chiến dịch", sau đó trong
Cửa sổ chiến dịch, hãy chọn "Tạo". Nếu một cửa sổ xuất hiện, hãy chọn
"+ Chiến dịch mới".
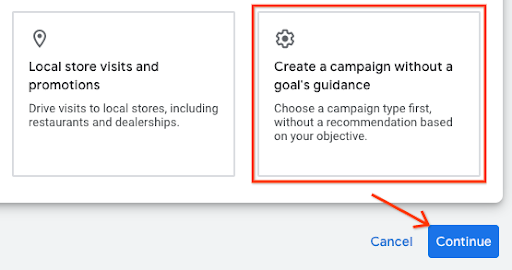
Khi màn hình chọn chiến dịch xuất hiện, hãy chọn
"Tạo một chiến dịch mà không cần hướng dẫn về mục tiêu". Sau đó, chọn "Tiếp tục".
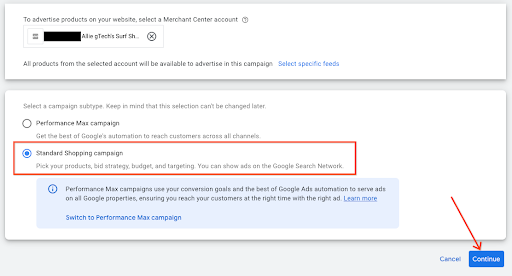
Trên bộ lựa chọn tiếp theo, hãy chọn "Mua sắm" ô,
sau đó chọn "Tiếp tục".
Ngay bên dưới, một số tuỳ chọn mới sẽ xuất hiện. Trước tiên, hãy đảm bảo rằng người bán của bạn
là tài khoản được liệt kê trong trường văn bản. Sau đó, chọn
"Chiến dịch mua sắm thông thường" thay vì Chiến dịch tối đa hoá hiệu suất,
chọn "Tiếp tục".
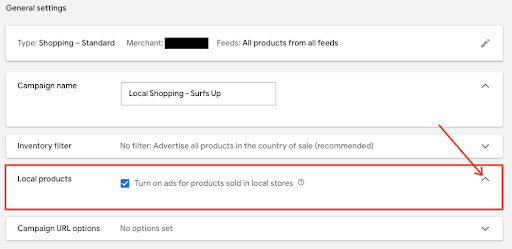
Trình đơn tiếp theo sẽ xuất hiện trong phần Cài đặt chung. Nhập tên Chiến dịch,
sau đó trong mục sản phẩm tại cửa hàng địa phương, hãy nhấp vào dấu hình chữ v để mở rộng trình đơn. Đánh dấu vào ô,
"Bật quảng cáo cho sản phẩm được bán tại cửa hàng địa phương."
Chuyển xuống dưới cùng và chọn "Tạo chiến dịch". Khi đã lưu,
chiến dịch mới tạo sẽ xuất hiện trên màn hình chiến dịch.
Hướng dẫn về trải nghiệm người dùng
Bạn có thể giúp liên kết chiến dịch sớm hơn bằng cách liên kết chiến dịch đó với tư cách là một phần của người bán
quá trình thu thập.
Hướng dẫn về công nghệ
Đối với Google Ads, nếu bạn muốn sử dụng API, hãy đảm bảo rằng bạn đã thêm
phạm vi sau:
https://www.googleapis.com/auth/adwords.
Đối với việc liên kết tài khoản, bạn cần thực hiện yêu cầu sau:
CustomerClientLinkService. Điều này sẽ đưa
MutateCustomerClientLinkRequest, chấp nhận customer_id.
Bạn có thể tạo chiến dịch mới theo phương thức lập trình bằng cách sử dụng
CampaignService.
Để biết thêm thông tin về cách sử dụng API Google Ads, hãy xem bài viết sau
Trang Ví dụ và Thư viện ứng dụng.
[null,null,["Cập nhật lần gần đây nhất: 2025-07-25 UTC."],[[["\u003cp\u003eTo run local inventory ads, link your Google Ads account to your Merchant Center account, ensuring the correct account is selected for a seamless connection.\u003c/p\u003e\n"],["\u003cp\u003eCreate a Standard Shopping campaign in Google Ads and enable local products to display ads for items sold in your physical stores.\u003c/p\u003e\n"],["\u003cp\u003eFor API access, include the \u003ccode\u003ehttps://www.googleapis.com/auth/adwords\u003c/code\u003e scope to manage your Google Ads campaigns programmatically.\u003c/p\u003e\n"],["\u003cp\u003eMerchants can link an advertising account managed by a third party if they don't directly handle their own Google Ads campaigns.\u003c/p\u003e\n"]]],["To utilize local inventory ads, link your Google Ads account in Merchant Center by finding your account number on Google Ads and sending a link request. In Google Ads, navigate to \"Linked Accounts\" under the \"Admin\" settings and \"Approve\" the Merchant Center link request. To create a Shopping Ads campaign, select \"Campaigns\" then \"+New Campaign,\" choose \"Shopping,\" and \"Standard Shopping Campaign\". Finally, enable \"Turn on ads for products sold in local stores\" and create your campaign. For API access, add the `https://www.googleapis.com/auth/adwords` scope.\n"],null,["Step 6: Google Ads Campaign\n---------------------------\n\n### Introduction and Business Impact\n\n*** ** * ** ***\n\nFor local inventory ads, you need to link your Google Ads Account. From the\nBusiness Information and Accounts menu for Local Inventory Ads, there's a URL to\nlink your account. You can retrieve your account or create one by going to\n[Google Ads](https://ads.google.com). It's listed in the top-right corner of the screen next to\nyour account profile. Copy and paste this number in the Link a Google Ads\nAccount modal, then select, \"**Send Link Request**\".\n\nFor API requests, you need to add the following scope: \n\n https://www.googleapis.com/auth/adwords\n\n### Link the Ads Account in Merchant Center\n\nYou can link or create a Google Ads account through Merchant Center.\nMore details are available in the [Merchant Center Help guide](https://support.google.com/google-ads/answer/12499498).\n\n#### Link your Google Ads Account\n\n1. Login to [Google Ads](https://ads.google.com) with the account that contains your Google Ads\n Campaigns.\n\n2. Click the \"Admin\" settings wheel, then select \"**Linked Accounts**\".\n\n3. A list of applications appears that you can link to. If you linked the\n account identity while enabling Local Inventory Ads, Google Merchant Center\n should be at the top, with Manage \\& Link. Google Merchant Center is in the\n general list, with \"Details\" you may have either linked the wrong account,\n logged into the incorrect Google Ads account, or have not linked the account at\n all. Visit the [*Enabling Free Local Inventory Ads Listing*](https://developers.google.com/merchant/storebuilder/local/sections/4_0_enabling_and_configure_lia_pos#enabling_free_local_product_listings) section to\n complete this step. Select \"**Manage \\& Link**\".\n\n *Linked*\n\n *Unlinked*\n\n4. In the Link Requests window, select \"**View Request**\"\n\n5. A modal appears providing you information about the account that is\n requesting the link. Select \"**Approve**\"\n\n6. When linked, the new view shows the account that is linked with the status of\n \"**Linked**\".\n\n *Google Ads View*\n\n *Merchant Center View*\n\n#### Create Shopping Ads Campaign and Enable Local Products\n\n1. Login to [Google Ads](https://ads.google.com)\n\n2. Along the left hand side of the screen, select \"**Campaigns** \", then in the\n Campaigns windows, select \"**Create** .\" If a window appears, select\n \"+ **New Campaign**.\"\n\n3. When the campaign selection screen appears, select\n \"**Create a campaign without a goal's guidance** .\" Then, select \"**Continue**\".\n\n4. On the next set of options, select the \"**Shopping** \" tile,\n then select \"**Continue**.\"\n\n5. Just below, several new options appears. First, make sure your merchant\n account is the one that is listed in the text field. Then, select\n \"**Standard Shopping Campaign** \" instead of the Performance Max Campaign,\n select \"**Continue**.\"\n\n6. The next menu appears under General Settings. Provide a Campaign name,\n then under local products, click the chevron to expand the menu. Check the box,\n \"**Turn on ads for products sold in local stores**.\"\n\n7. Go to the bottom, and select \"**Create Campaign**.\" When saved,\n the newly created campaign appears on the campaign screen.\n\n### UX Guidance\n\n*** ** * ** ***\n\nYou can help link the campaign earlier by linking it as part of the merchant\ncollection process.\n\n### Tech Guidance\n\n*** ** * ** ***\n\n- For Google Ads, if you want to use the API, ensure that you've added the following scope:\n\n https://www.googleapis.com/auth/adwords.\n\n- For account linking, you consume the following request:\n CustomerClientLinkService. This takes the\n [MutateCustomerClientLinkRequest](https://developers.google.com/google-ads/api/reference/rpc/v13/MutateCustomerClientLinkRequest), which accepts a *customer_id*.\n\n- You can create a new campaign programmatically by consuming\n the [CampaignService](https://developers.google.com/google-ads/api/reference/rpc/v13/CampaignService).\n\n- For more information about how to use the Google Ads API, visit the following\n [Client Libraries and Example](https://developers.google.com/google-ads/api/docs/client-libs) page.\n\n| **Tip:** The merchant doesn't need to use their own Ads account. If the merchant's ad business is managed by a different account other than their own, they can use the same link method to link their account."]]