
בפתרון הזה נעשה שימוש ב-Vertex AI וב-Gemini כדי לנתח הודעות ב-Gmail ולתייג אותן על סמך הסנטימנט שלהן.
רמת התכנות: בינונית
משך: 30 דקות
סוג הפרויקט: תוסף ל-Google Workspace
-
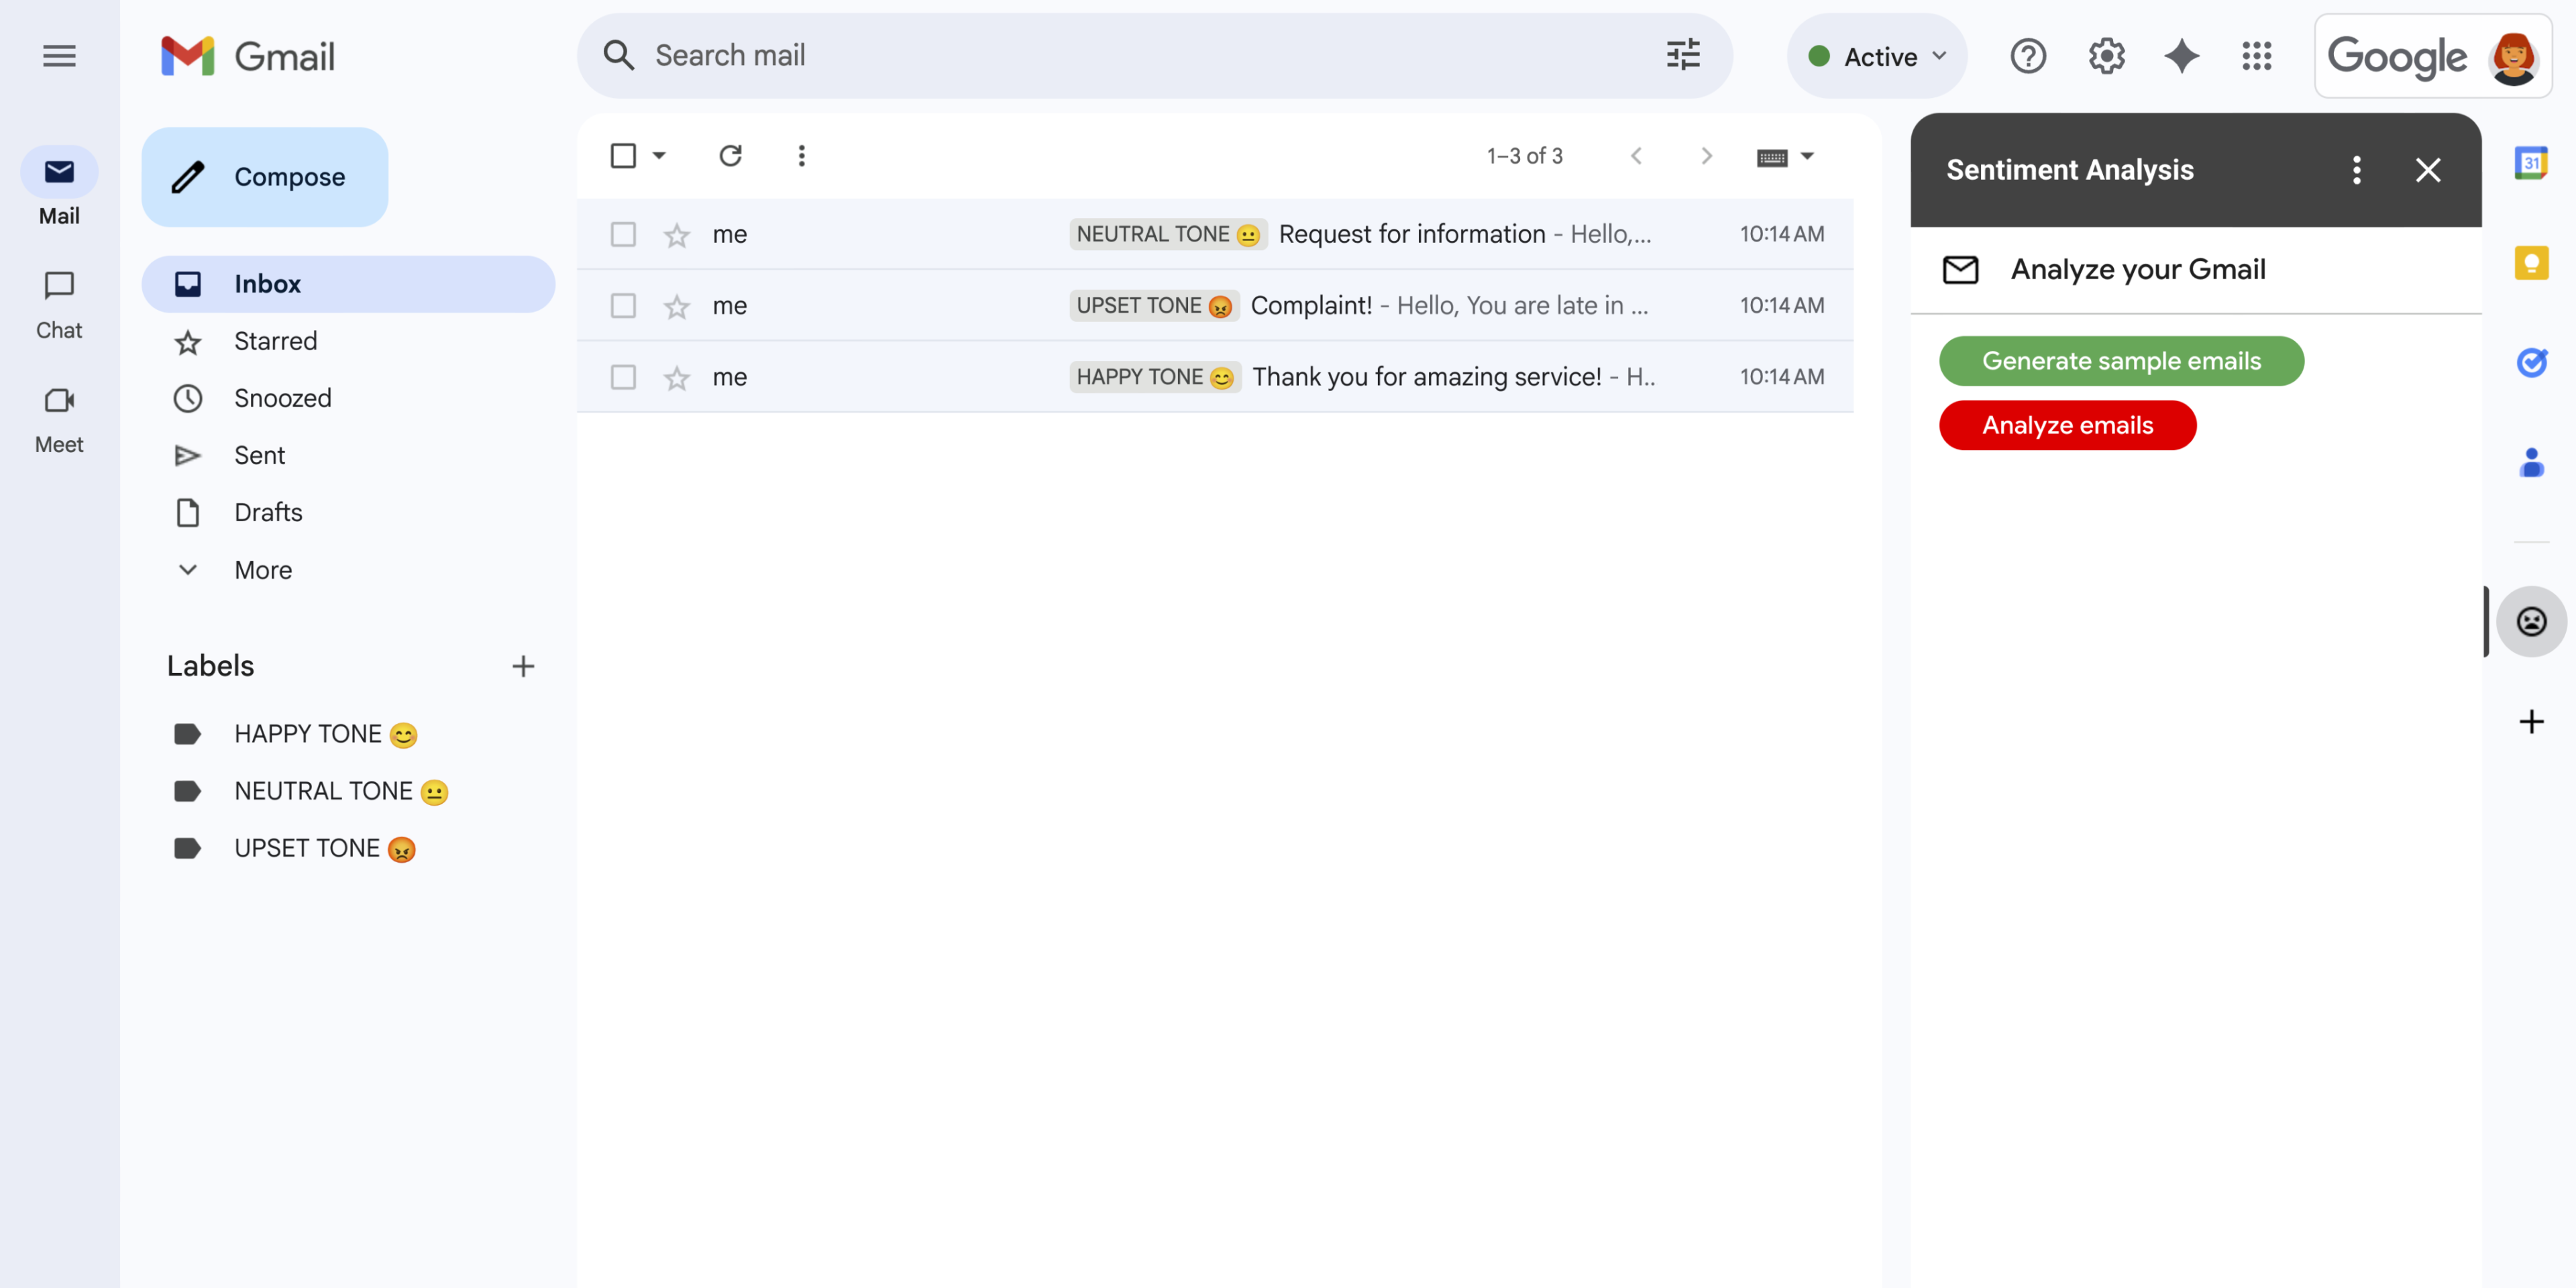
איור 1: התוסף Sentiment Analysis מציג סרגל צד ב-Gmail שבו המשתמשים יכולים לתת הנחיה ל-Gemini לנתח ולהחיל תוויות על הודעות על סמך הסנטימנט. -
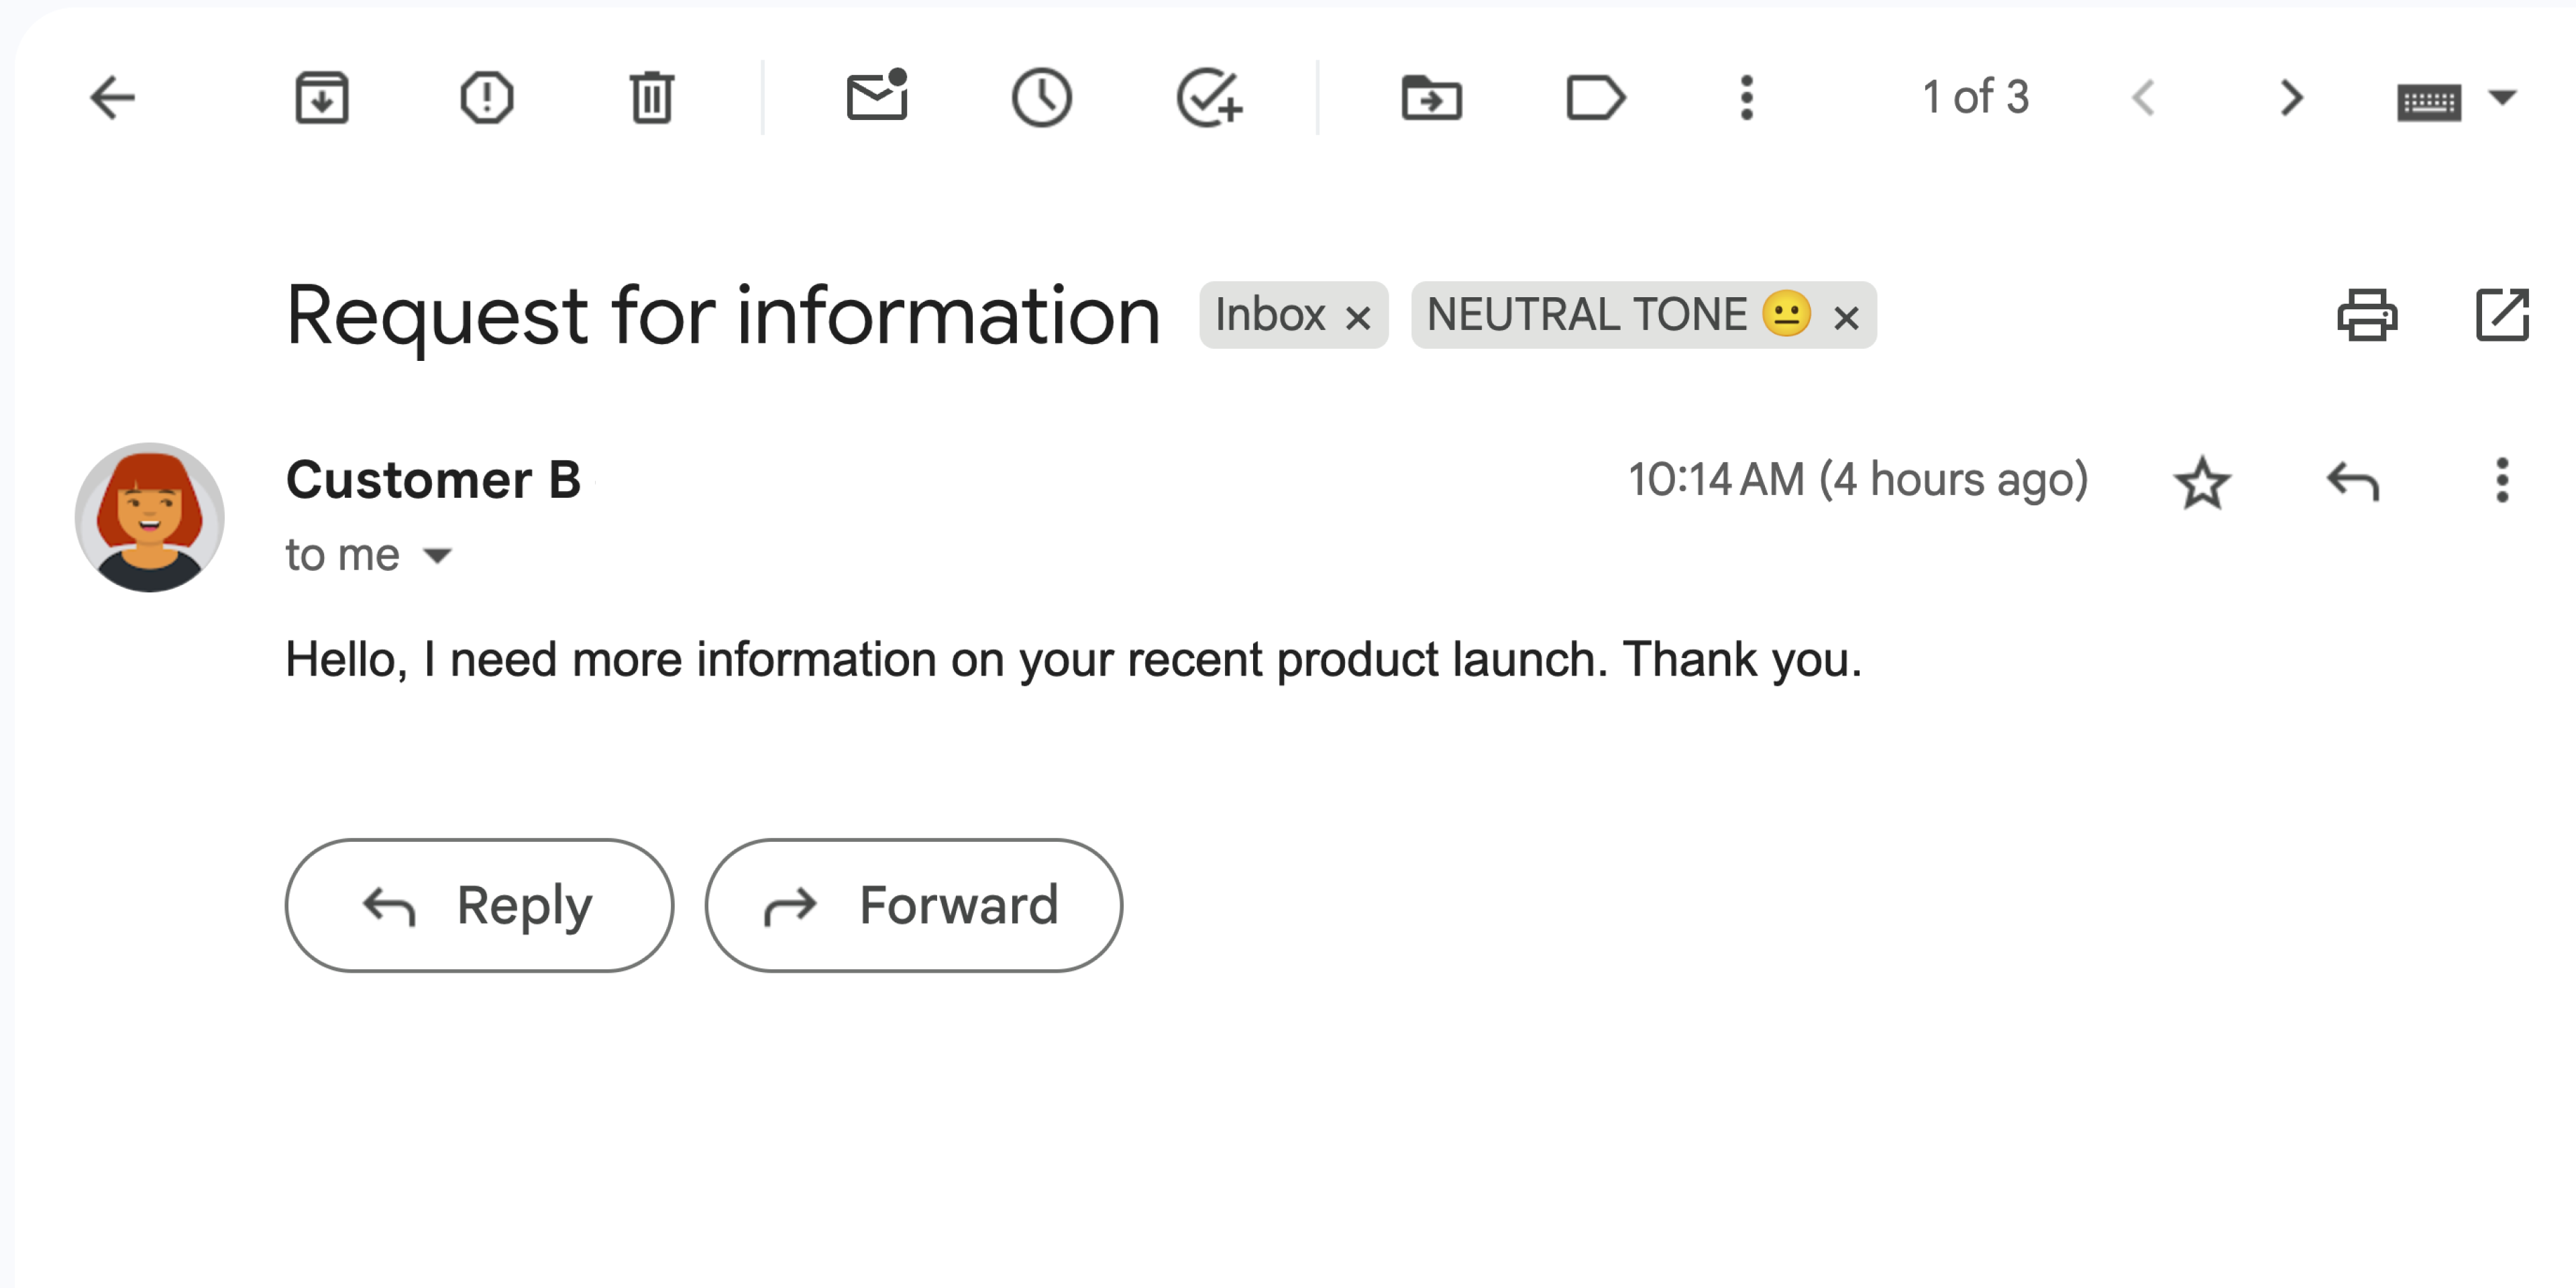
איור 2: התוסף מתייג הודעה ב-Gmail בתווית נימה ניטרלית 😐. -
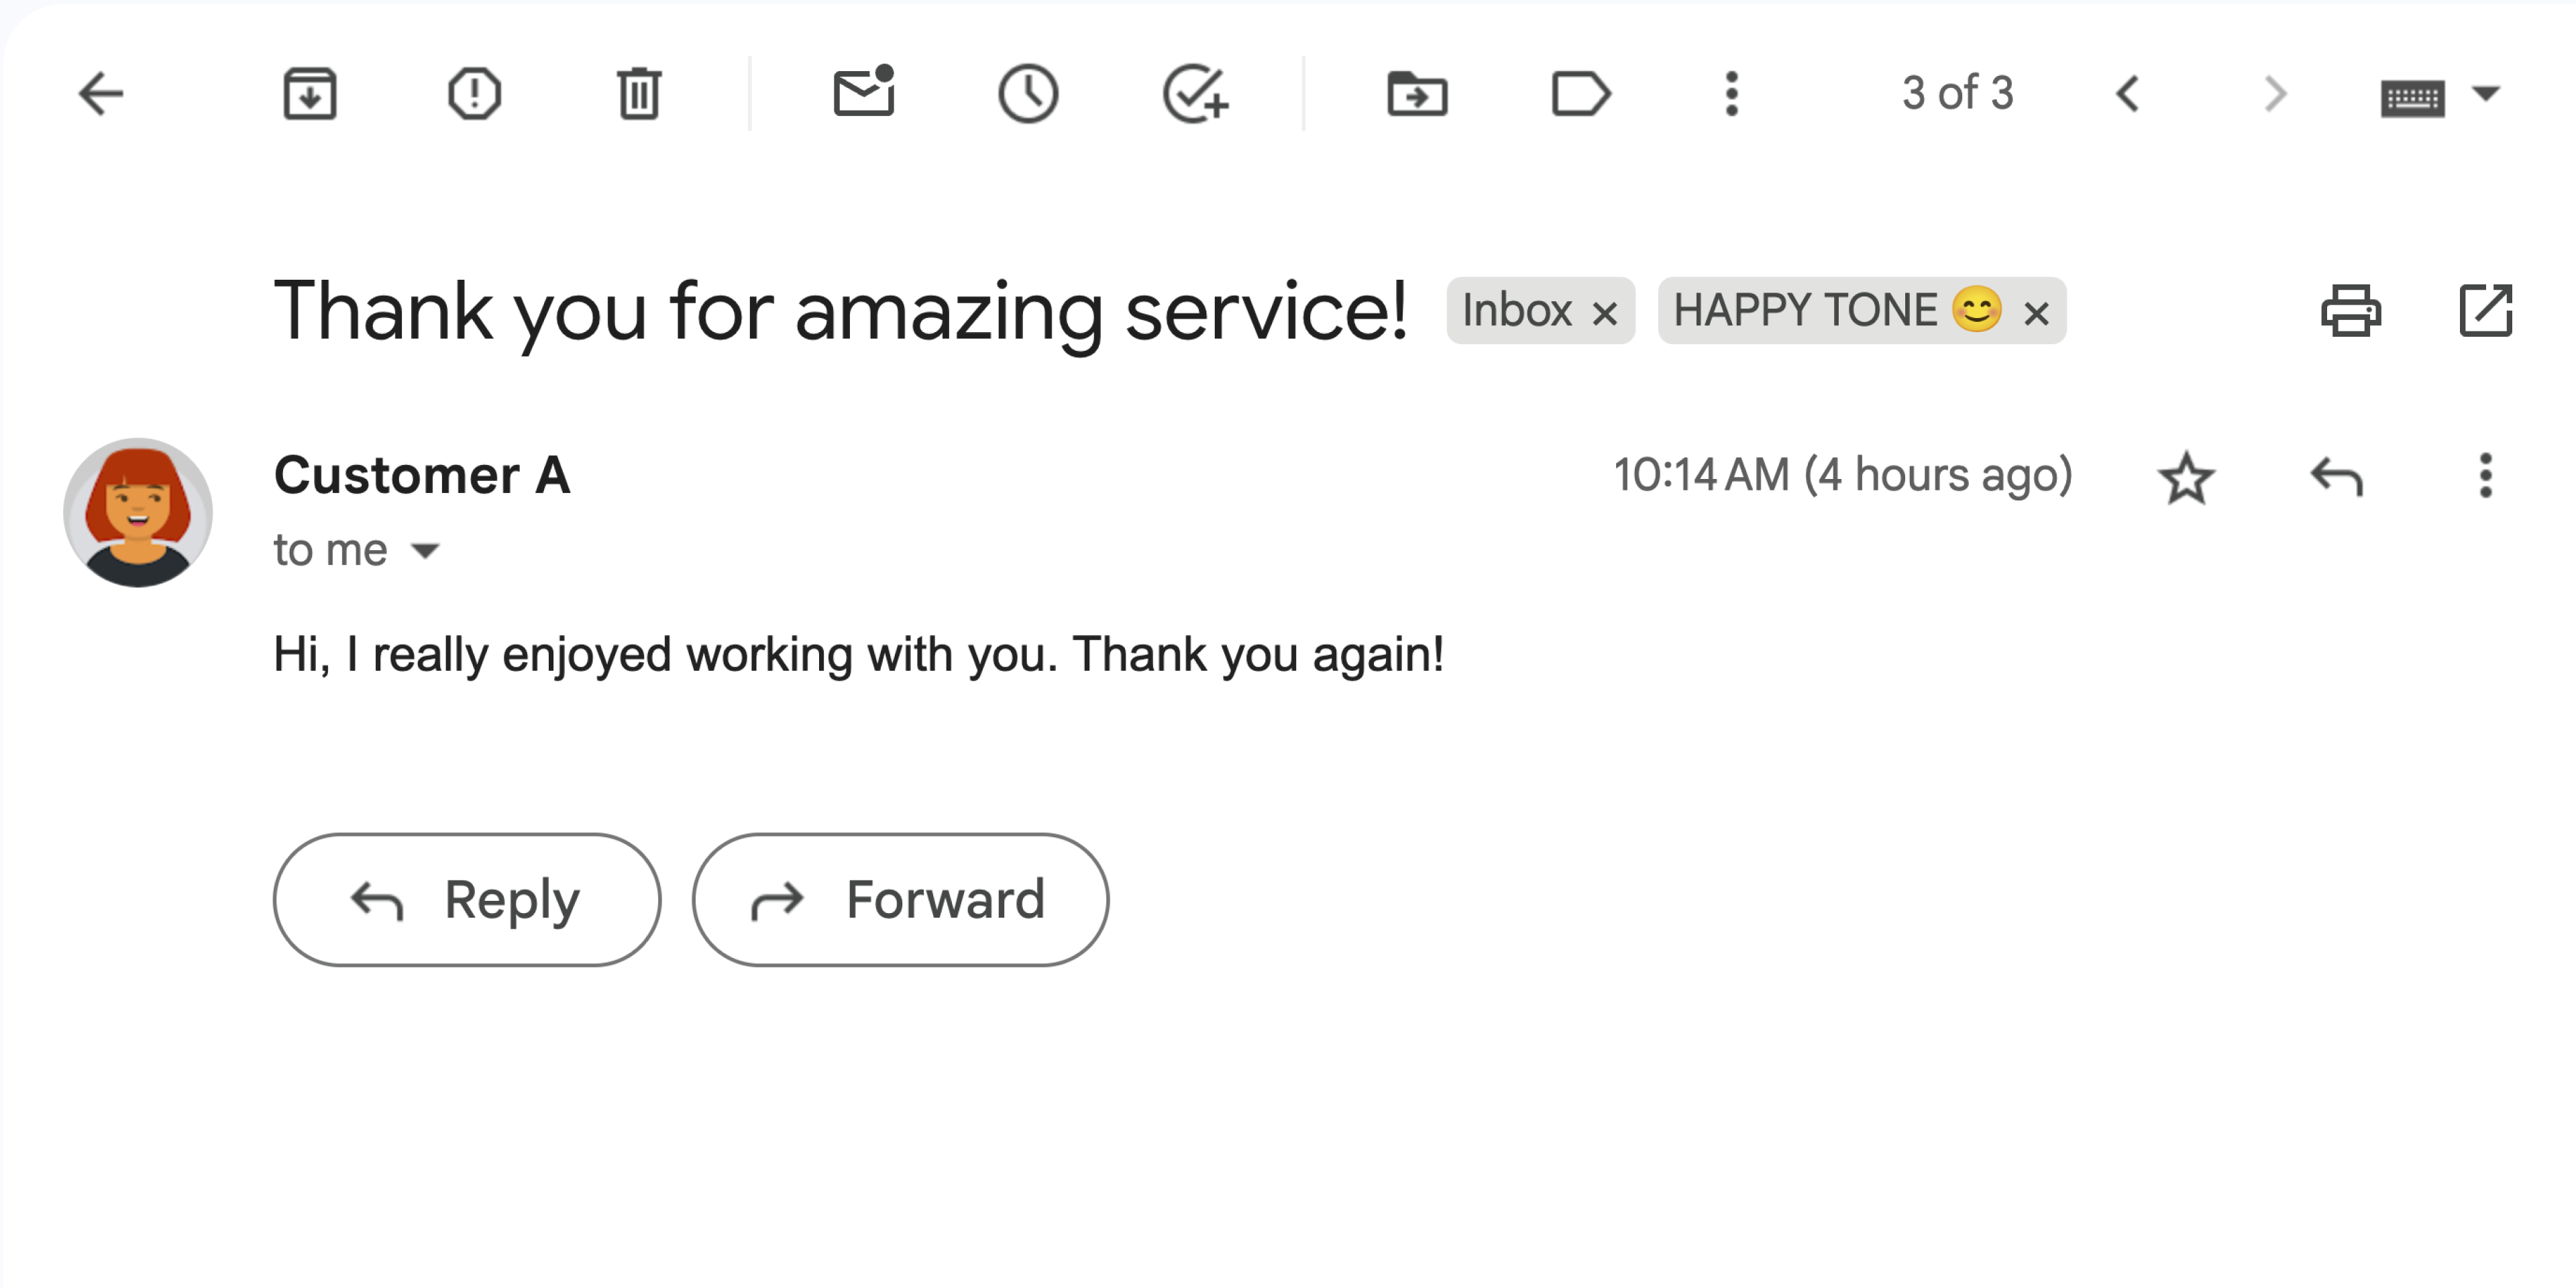
איור 3: התוסף מסמן הודעה ב-Gmail בתווית HAPPY TONE 😊. -
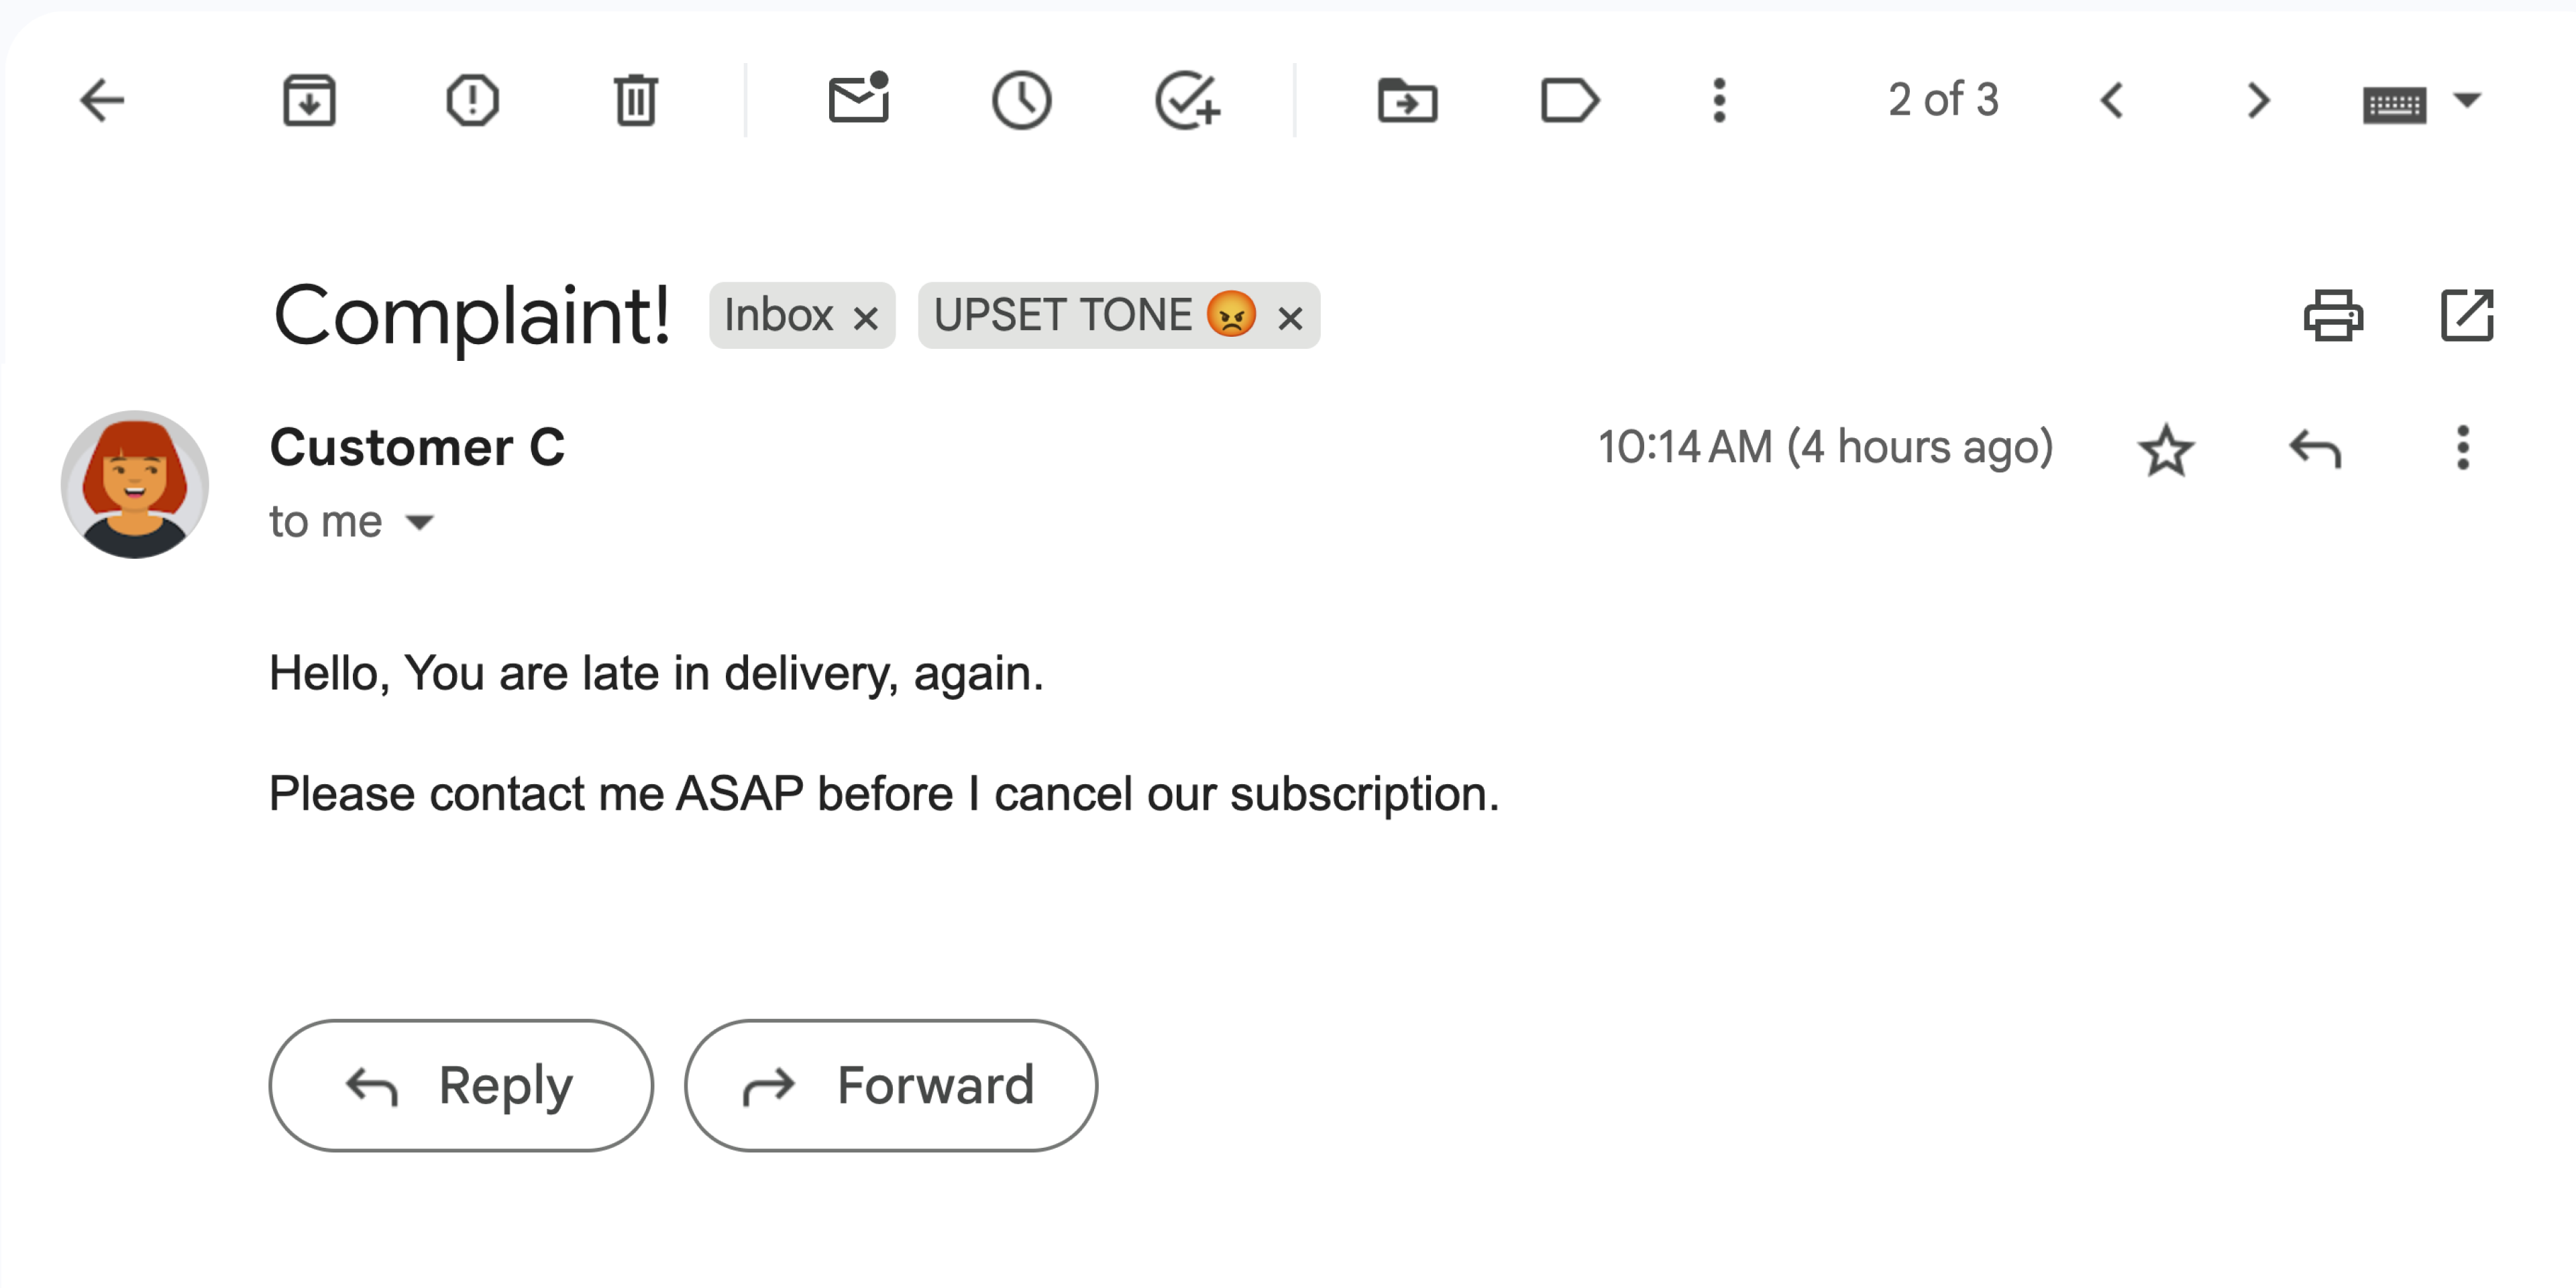
איור 4: התוסף מתייג הודעה ב-Gmail בתווית UPSET TONE 😡.
מטרות
- להבין מה הפתרון עושה.
- להבין מה עושים שירותי Google בפתרון.
- מגדירים את הסביבה.
- מגדירים את פרויקט Google Apps Script.
- מריצים את הסקריפט.
מידע על הפתרון הזה

הפתרון הזה הוא תוסף ל-Google Workspace שמחיל תוויות על סמך הסנטימנט של הודעות Gmail. כדי לנתח את תוכן ההודעה, התוסף משתמש ב-Vertex AI כדי להנחות את מודל Gemini 2.5 Flash ולהחזיר את אחת מהתוצאות הבאות:
- חיובית
- שלילית
- ניטרלי
התוסף משתמש בתשובה מ-Gemini כדי להוסיף תווית מתאימה ב-Gmail להודעה.
כדי להגביל את הבקשה ל-Vertex AI API, התוסף הזה מנתח רק את 10 ההודעות האחרונות בתיבת הדואר הנכנס של משתמש Gmail ומחיל עליהן תוויות. מידע נוסף על מכסות ומגבלות מופיע בתיעוד של Vertex AI.
איך זה עובד
הפתרון הזה מבוסס על Google Apps Script ומשתמש בשירותים ובמוצרים הבאים של Google:
- Vertex AI API – הנחיות למודל Gemini 2.5 Flash לניתוח התוכן של הודעות Gmail ולזיהוי הסנטימנט.
שירותי Apps Script:
- שירות Gmail – מאחזר ומחיל תוויות על הודעות Gmail. אופציונלי: יוצר הודעות לדוגמה לבדיקת התוסף.
- Card service – יוצר את ממשק המשתמש של התוסף שמופיע כסרגל צד ב-Gmail.
- שירות אחזור של כתובות אתרים – מתחבר ל-Vertex AI API לניתוח סנטימנט.
- Script service – כדי לשלוח קריאה ל-Vertex AI API, התוסף מקבל אסימון גישה מסוג OAuth 2.0 באמצעות השיטה
getOAuthToken.
דרישות מוקדמות
- פרויקט ב-Google Cloud שהחיוב בו מופעל. כדי לבדוק אם יש לכם גישה, אפשר לעיין במאמר בנושא ההרשאות שנדרשות להפעלת החיוב.
הגדרת הסביבה
בקטע הזה מוסבר איך להגדיר את הסביבה במסוף Google Cloud וב-Apps Script.
הגדרת פרויקט בענן ב-מסוף Google Cloud
בקטע הזה מוסבר איך להפעיל את Vertex AI API ולהגדיר את מסך ההסכמה ל-OAuth בפרויקט בענן שלכם.
הפעלה של Vertex AI API
במסוף Google Cloud, פותחים את הפרויקט בענן ב-Google Cloud ומפעילים את Vertex AI API:
מוודאים שמפעילים את ה-API בפרויקט הנכון בענן ולוחצים על הבא.
מוודאים שמפעילים את ה-API הנכון ולוחצים על הפעלה.
מגדירים את מסך ההסכמה של OAuth
כדי להשתמש בתוספים ל-Google Workspace, צריך להגדיר מסך הסכמה. הגדרת מסך ההסכמה ל-OAuth בתוסף קובעת מה Google מציגה למשתמשים.
- ב-Google API Console, עוברים אל תפריט > פלטפורמת אימות של Google > מיתוג.
- אם כבר הגדרתם את פלטפורמת אימות Google, אתם יכולים לקבוע את ההגדרות הבאות של מסך ההסכמה ל-OAuth בקטעים Branding, Audience וData Access. אם מופיעה ההודעה Google Auth platform not configured yet, לוחצים על Get Started:
- בקטע App Information בשדה App name, מזינים שם לאפליקציה.
- בקטע User support email, בוחרים כתובת אימייל לתמיכה שאליה משתמשים יפנו אם יש להם שאלות לגבי ההסכמה שלהם.
- לוחצים על Next.
- בקטע Audience, לוחצים על Internal.
- לוחצים על Next.
- בקטע Contact Information, מזינים כתובת אימייל שאליה אפשר לשלוח התראות על שינויים בפרויקט.
- לוחצים על Next.
- בקטע Finish, קוראים את המדיניות של Google בנושא נתוני משתמשים בשירותי API. אם אתם מסכימים, סמנו את התיבה I agree to the Google API Services: User Data Policy.
- לוחצים על Continue.
- לוחצים על Create.
- כרגע אתם יכולים לדלג על הוספת היקפי הרשאות. בעתיד, כשתיצרו אפליקציה לשימוש מחוץ לארגון שלכם ב-Google Workspace, תצטרכו לשנות את סוג המשתמש ל-External. לאחר מכן מוסיפים את היקפי ההרשאות שהאפליקציה דורשת. למידע נוסף, אפשר לעיין במדריך המלא בנושא הגדרת הסכמה ל-OAuth.
יצירה והגדרה של פרויקט Apps Script
כדי ליצור ולהגדיר את פרויקט Apps Script עבור התוסף, מבצעים את השלבים הבאים:
לוחצים על הכפתור הבא כדי לפתוח את הפרויקט ניתוח סנטימנט ב-Gmail באמצעות Gemini ו-Vertex AI ב-Apps Script.
פתיחת פרויקט Apps Scriptלוחצים על סקירה כללית .
בדף הסקירה הכללית, לוחצים על סמל יצירת העותק
 .
.כדי לקבל את מספר הפרויקט ב-Cloud:
- במסוף Google API, נכנסים לתפריט > IAM & Admin > Settings.
- מעתיקים את הערך בשדה מספר הפרויקט.
מקשרים את פרויקט בענן לפרויקט Apps Script:
- בפרויקט Apps Script שהעתקתם,
לוחצים על Project Settings (הגדרות הפרויקט)
 .
. - בקטע פרויקט Google Cloud Platform (GCP), לוחצים על שינוי הפרויקט.
- בקטע מספר פרויקט GCP, מדביקים את מספר הפרויקט בענן.
- לוחצים על הגדרת פרויקט.
- בפרויקט Apps Script שהעתקתם,
לוחצים על Project Settings (הגדרות הפרויקט)
בדיקת התוסף
כדי לנסות את התוסף, מתקינים פריסת בדיקה ואז פותחים את התוסף ב-Gmail:
- יצירה והתקנה של פריסת בדיקה של Apps Script:
- בפרויקט Apps Script שהעתקתם, לוחצים על עורך .
- פותחים את קובץ
Code.gsולוחצים על הפעלה. כשמוצגת בקשה, מאשרים את הסקריפט. - לוחצים על פריסה > בדיקת פריסות.
- לוחצים על התקנה > סיום.
פתח את Gmail.
בסרגל הצד משמאל, פותחים את התוסף Sentiment Analysis.
אם מוצגת בקשה, מאשרים את התוסף.
אופציונלי: כדי ליצור הודעות לבדיקה באמצעות התוסף, לוחצים על יצירת אימיילים לדוגמה. שלוש הודעות מופיעות בתיבת הדואר הנכנס. אם הם לא מופיעים, צריך לרענן את הדף.
כדי להוסיף תוויות, לוחצים על ניתוח הודעות אימייל.
התוסף בודק את 10 ההודעות האחרונות בתיבת הדואר הנכנס ואז מחיל אחת מהתוויות הבאות בהתאם לתוכן ההודעה:
- טון שמח 😊
- טון ניטרלי 😐
- טון כועס 😡
בדיקת הקוד
בודקים את הקוד של Apps Script לפתרון הזה:
הצגת קוד המקור
Code.gs
Cards.gs
Gmail.gs
Vertex.gs
appsscript.json
הסרת המשאבים
כדי להימנע מחיובים בחשבון Google Cloud בגלל השימוש במשאבים שנעשה במסגרת המדריך הזה, מומלץ למחוק את פרויקט בענן.
- במסוף Google API, עוברים לדף Manage resources. לוחצים על תפריט > IAM & Admin > Manage Resources.
- ברשימת הפרויקטים, בוחרים את הפרויקט שרוצים למחוק ולוחצים על Delete .
- כדי למחוק את הפרויקט, כותבים את מזהה הפרויקט בתיבת הדו-שיח ולוחצים על Shut down.
השלבים הבאים
- הרחבת Gmail באמצעות תוספים של Google Workspace
- הרחבת ממשק המשתמש של Google Workspace
- פיתוח תוספים ל-Google Workspace