안내
대화형 코드 스니펫 도구를 사용하면 API 요청을 쉽게 테스트하고 해당 요청에 맞는 코드 샘플을 생성할 수 있습니다. 특정 메서드에 대해 하나 이상의 사용 사례에 대한 코드 스니펫이 표시되며 각 사용 사례에서는 해당 메서드를 호출하는 일반적인 방법을 설명합니다. 예를 들어 channels.list 메서드를 호출하여 특정 채널 또는 현재 사용자의 채널에 관한 데이터를 검색할 수 있습니다.
API 요청 실행
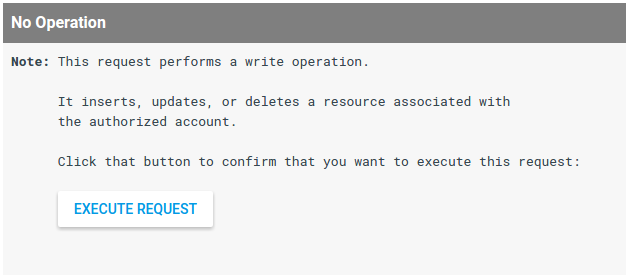
요청 매개변수 목록 옆에 있는 실행 버튼을 클릭하여 요청을 실행할 수 있습니다. 이전에 애플리케이션을 대신하여 API 요청을 제출하도록 승인하지 않은 경우 권한을 부여하라는 메시지가 표시됩니다. 추가 예방 조치로, 요청이 쓰기 작업(채널과 연결된 리소스 삽입, 업데이트 또는 삭제)을 수행하는 경우 실제로 요청을 실행하기 전에 실행할지 확인하라는 메시지가 표시됩니다.
코드 스니펫 및 전체 샘플 전환
각 사용 사례에서 도구는 호출 중인 특정 메서드에 해당하는 코드를 식별하는 코드 스니펫을 표시합니다. 각 스니펫은 호출 중인 메서드와 API 요청에 사용되는 매개변수 및 속성 값을 식별합니다.
또한 이 도구는 API 요청을 승인하고 API 요청을 작성하기 위한 상용구 함수를 정의하는 템플릿에 해당 코드 스니펫을 넣는 전체 코드 샘플도 보여줍니다. 샘플 위의 슬라이더를 사용하여 스니펫과 전체 샘플 간에 전환할 수 있습니다.

로컬에서 전체 코드 샘플 실행
전체 코드 샘플은 로컬에서 복사 및 실행되도록 설계되었습니다. 다음 기본 요건을 확인하고 전체 코드 샘플을 실행하기 위한 설정 단계를 확인하세요.
<ph type="x-smartling-placeholder">기본 요건
- Java 1.7 이상
- Gradle 2.3 이상
프로젝트 설정 및 코드 샘플 실행
-
API 콘솔에서 프로젝트를 만들고 웹 애플리케이션에 대한 사용자 인증 정보를 설정합니다. 승인된 리디렉션 URI를 적절하게 설정합니다.
-
API 자바 빠른 시작 가이드의 안내에 따라 프로젝트를 준비하되 기본
build.gradle파일의 내용을 다음 코드로 바꿉니다.apply plugin: 'java' apply plugin: 'application' mainClassName = 'ApiExample' sourceCompatibility = 1.7 targetCompatibility = 1.7 version = '1.0' repositories { mavenCentral() } dependencies { compile 'com.google.api-client:google-api-client:1.22.0' compile 'com.google.oauth-client:google-oauth-client-jetty:1.22.0' compile 'com.google.apis:google-api-services-youtube:v3-rev182-1.22.0' compile group: 'com.google.code.gson', name: 'gson', version: '1.7.2' compile group: 'com.fasterxml.jackson.core', name: 'jackson-databind', version: '2.4.4' } compileJava { options.compilerArgs << "-Xlint:unchecked" << "-Xlint:deprecation" } -
작업 디렉터리에서 사용자 인증 정보와 연결된
client_secrets.json파일을src/main/resources/client_secret.json에 저장합니다. -
작업 디렉터리에서 전체 코드 샘플을
src/main/java/ApiExample.java로 복사합니다. 각 샘플의 클래스 이름은ApiExample이므로 다른 샘플을 실행하기 위해build.gradle파일을 수정할 필요가 없습니다. -
명령줄에서 샘플을 실행합니다.
gradle -q run
-
대부분의 샘플은 무언가를
STDOUT에 출력합니다. YouTube 웹사이트에서 재생목록 또는 채널 섹션 생성 요청과 같이 데이터 작성 요청의 영향을 확인할 수도 있습니다.
-
API 콘솔에서 프로젝트를 만들고 웹 애플리케이션에 대한 사용자 인증 정보를 설정합니다. 요청을 보낼 URL을 식별하도록 승인된 JavaScript 출처 (예:
http://localhost)를 설정합니다. -
웹 서버에서 액세스할 수 있는 로컬 파일 (예:
/var/www/html/example.html)에 전체 코드 샘플을 복사합니다. -
코드 샘플에서 요청에 사용할 클라이언트 ID를 설정하는 줄을 찾아 값을 사용자 인증 정보의 클라이언트 ID로 바꿉니다.
gapi.client.init({ 'clientId': 'REPLACE_ME', -
브라우저에서 파일을 엽니다 (예:
http://localhost/example.html). Chrome과 같은 디버깅 콘솔이 있는 브라우저를 사용하는 것이 좋습니다. -
필요한 경우 요청을 승인합니다. 요청이 승인되면 디버깅 콘솔에 요청에 대한 API 응답을 JSON 객체로 표시해야 합니다.
기본 요건
- Node.js가 설치되어 있어야 합니다.
- npm 패키지 관리 도구 (Node.js와 함께 제공)
- Node.js용 Google API 클라이언트 라이브러리:
npm install googleapis --save
- 인터넷 및 웹브라우저 액세스
- Google 계정
프로젝트 설정 및 코드 샘플 실행
-
API 콘솔에서 프로젝트를 만들고 Google API 콘솔에서 OAuth 2.0 사용자 인증 정보를 설정합니다. 사용자 인증 정보를 설정할 때 애플리케이션 유형을 기타로 설정합니다.
-
사용자 인증 정보와 연결된
client_secret.json파일을 로컬 파일에 저장합니다. -
전체 코드 샘플을
client_secret.json파일과 동일한 디렉터리의 로컬 파일에 복사하거나 파일의 위치를 올바르게 식별하도록 샘플을 수정합니다. -
명령줄에서 샘플을 실행합니다.
node sample.js
-
대부분의 샘플은
STDOUT또는 현재 보고 있는 웹페이지(웹 애플리케이션 예시의 경우)로 인쇄합니다. YouTube 웹사이트에서 재생목록 또는 채널 섹션 생성 요청과 같이 데이터 작성 요청의 영향을 확인할 수도 있습니다.
기본 요건
- Python 2.6 이상
- pip 패키지 관리 도구
- Python용 Google API 클라이언트 라이브러리:
pip install --upgrade google-api-python-client
- 사용자 인증을 위한 google-auth, google-auth-oauthlib, google-auth-httplib2.
pip install --upgrade google-auth google-auth-oauthlib google-auth-httplib2
- Flask Python 웹 애플리케이션 프레임워크 (웹 서버 애플리케이션용 Python 샘플을 실행하는 경우)
pip install --upgrade flask
- 요청 HTTP 라이브러리
pip install --upgrade requests
프로젝트 설정 및 코드 샘플 실행
-
API 콘솔에서 프로젝트를 만들고 Google API 콘솔에서 OAuth 2.0 사용자 인증 정보를 설정합니다. 사용자 인증 정보를 설정할 때 Flask Python 웹 애플리케이션 프레임워크를 사용하는 샘플의 애플리케이션 유형을 웹 애플리케이션으로 설정하고 사용자 인증 정보에 승인된 리디렉션 URI도 설정합니다. 그 외의 경우에는 애플리케이션 유형을 기타로 설정합니다.
-
사용자 인증 정보와 연결된
client_secret.json파일을 로컬 파일에 저장합니다. -
전체 코드 샘플을
client_secret.json파일과 동일한 디렉터리의 로컬 파일에 복사하거나 파일의 위치를 올바르게 식별하도록 샘플을 수정합니다. -
명령줄에서 샘플을 실행합니다.
python sample.py
웹 서버 애플리케이션 예시 참고사항:
웹 서버 애플리케이션용 Python 샘플을 실행하는 경우 스크립트를 실행하면 로컬 웹 서버가 시작됩니다. 실제로 API 요청을 실행하려면 브라우저에서 제공되는 웹페이지로 이동해야 합니다. 예를 들어 Flask 웹 애플리케이션 프레임워크를 사용하는 Python 샘플에는 다음과 같은 줄이 포함됩니다.
app.run('localhost', 8080, debug=True)
이 코드는http://localhost:8080에서 로컬 웹 서버를 시작합니다. 그러나 스크립트는 실제로 브라우저에서http://localhost:8080로 이동할 때까지 API 요청을 실행하지 않습니다. 또한 로컬 서버의 URL을 승인 사용자 인증 정보에 대한 승인된 리디렉션 URI로 설정해야 합니다. -
대부분의 샘플은
STDOUT또는 현재 보고 있는 웹페이지(웹 애플리케이션 예시의 경우)로 인쇄합니다. YouTube 웹사이트에서 재생목록 또는 채널 섹션 생성 요청과 같이 데이터 작성 요청의 영향을 확인할 수도 있습니다.
기본 요건
- 명령줄 인터페이스 (CLI) 및 JSON 확장 프로그램이 설치된 PHP 5.4 이상
- Composer 종속 항목 관리 도구
- PHP용 Google API 클라이언트 라이브러리:
php composer.phar require google/apiclient:^2.0
프로젝트 설정 및 코드 샘플 실행
-
API 콘솔에서 프로젝트를 만들고 Google API 콘솔에서 OAuth 2.0 사용자 인증 정보를 설정합니다. 사용자 인증 정보를 설정할 때 애플리케이션 유형을 기타로 설정합니다.
-
사용자 인증 정보와 연결된
client_secret.json파일을 로컬 파일에 저장합니다. -
전체 코드 샘플을
client_secret.json파일과 동일한 디렉터리의 로컬 파일에 복사하거나 파일의 위치를 올바르게 식별하도록 샘플을 수정합니다. -
명령줄에서 샘플을 실행합니다.
php sample.php
-
대부분의 샘플은
STDOUT또는 현재 보고 있는 웹페이지(웹 애플리케이션 예시의 경우)로 인쇄합니다. YouTube 웹사이트에서 재생목록 또는 채널 섹션 생성 요청과 같이 데이터 작성 요청의 영향을 확인할 수도 있습니다.
기본 요건
- Ruby 2.0 이상
- Ruby용 Google API 클라이언트 라이브러리:
gem install google-api-client
프로젝트 설정 및 코드 샘플 실행
-
API 콘솔에서 프로젝트를 만들고 Google API 콘솔에서 OAuth 2.0 사용자 인증 정보를 설정합니다. 사용자 인증 정보를 설정할 때 애플리케이션 유형을 기타로 설정합니다.
-
사용자 인증 정보와 연결된
client_secret.json파일을 로컬 파일에 저장합니다. -
전체 코드 샘플을
client_secret.json파일과 동일한 디렉터리의 로컬 파일에 복사하거나 파일의 위치를 올바르게 식별하도록 샘플을 수정합니다. -
명령줄에서 샘플을 실행합니다.
ruby sample.rb
-
대부분의 샘플은
STDOUT또는 현재 보고 있는 웹페이지(웹 애플리케이션 예시의 경우)로 인쇄합니다. YouTube 웹사이트에서 재생목록 또는 채널 섹션 생성 요청과 같이 데이터 작성 요청의 영향을 확인할 수도 있습니다.
-
API 콘솔에서 프로젝트를 만들고 Google API 콘솔에서 OAuth 2.0 사용자 인증 정보를 설정합니다. 사용자 인증 정보를 설정할 때 애플리케이션 유형을 기타로 설정합니다.
-
사용자 인증 정보와 연결된
client_secret.json파일을 로컬 파일에 저장합니다. -
전체 코드 샘플을
client_secret.json파일과 동일한 디렉터리의 로컬 파일에 복사하거나 파일의 위치를 올바르게 식별하도록 샘플을 수정합니다. -
명령줄에서 샘플을 실행합니다.
go run sample.go
-
대부분의 샘플은
STDOUT또는 현재 보고 있는 웹페이지(웹 애플리케이션 예시의 경우)로 인쇄합니다. YouTube 웹사이트에서 재생목록 또는 채널 섹션 생성 요청과 같이 데이터 작성 요청의 영향을 확인할 수도 있습니다.
상용구 함수 사용
위에서 언급했듯이, 전체 코드 샘플은 API 요청을 승인하고 생성하기 위해 상용구 코드를 사용합니다. 예를 들어 Python 샘플의 build_resource 함수는 리소스 속성을 값에 매핑하는 사전을 사용하여 삽입하거나 업데이트할 수 있는 리소스를 구성합니다. JavaScript, PHP, Ruby, Go, Apps Script에 대해 유사한 함수가 제공됩니다.
예를 들어 아래 탭은 playlist 리소스를 구성하기 위해 리소스 빌드를 위한 상용구 함수가 어떻게 호출되는지 보여줍니다. 상용구 함수는 어떤 유형의 리소스가 생성되고 있는지 알 필요가 없습니다.
function createResource(properties) {
  var resource = {};
  var normalizedProps = properties;
  for (var p in properties) {
    var value = properties[p];
    if (p && p.substr(-2, 2) == '[]') {
      var adjustedName = p.replace('[]', '');
      if (value) {
        normalizedProps[adjustedName] = value.split(',');
      }
      delete normalizedProps[p];
    }
  }
  for (var p in normalizedProps) {
    // Leave properties that don't have values out of inserted resource.
    if (normalizedProps.hasOwnProperty(p) && normalizedProps[p]) {
      var propArray = p.split('.');
      var ref = resource;
      for (var pa = 0; pa < propArray.length; pa++) {
        var key = propArray[pa];
        if (pa == propArray.length - 1) {
          ref[key] = normalizedProps[p];
        } else {
          ref = ref[key] = ref[key] || {};
        }
      }
    };
  }
  return resource;
}
var resource = createResource({
    'snippet.title': 'Sample playlist ',
    'snippet.description': 'This is a sample playlist description.',
    'snippet.tags[]': 'JavaScript code, interactive',
    'snippet.defaultLanguage': '',
    'status.privacyStatus': 'private'
}
# Build a resource based on a list of properties given as key-value pairs.
# Leave properties with empty values out of the inserted resource.
def build_resource(properties):
  resource = {}
  for p in properties:
    # Given a key like "snippet.title", split into "snippet" and "title", where
    # "snippet" will be an object and "title" will be a property in that object.
    prop_array = p.split('.')
    ref = resource
    for pa in range(0, len(prop_array)):
      is_array = False
      key = prop_array[pa]
      # Convert a name like "snippet.tags[]" to snippet.tags, but handle
      # the value as an array.
      if key[-2:] == '[]':
        key = key[0:len(key)-2:]
        is_array = True
      if pa == (len(prop_array) - 1):
        # Leave properties without values out of inserted resource.
        if properties[p]:
          if is_array:
            ref[key] = properties[p].split(',')
          else:
            ref[key] = properties[p]
      elif key not in ref:
        # For example, the property is "snippet.title", but the resource does
        # not yet have a "snippet" object. Create the snippet object here.
        # Setting "ref = ref[key]" means that in the next time through the
        # "for pa in range ..." loop, we will be setting a property in the
        # resource's "snippet" object.
        ref[key] = {}
        ref = ref[key]
      else:
        # For example, the property is "snippet.description", and the resource
        # already has a "snippet" object.
        ref = ref[key]
  return resource

resource = build_resource({
    'snippet.title': 'Sample playlist ',
    'snippet.description': 'This is a sample playlist description.',
    'snippet.tags[]': 'Python code, interactive',
    'snippet.defaultLanguage': '',
    'status.privacyStatus': 'private'}
// Add a property to the resource.
function addPropertyToResource(&$ref, $property, $value) {
    $keys = explode(".", $property);
    $is_array = false;
    foreach ($keys as $key) {
        // Convert a name like "snippet.tags[]" to "snippet.tags" and
        // set a boolean variable to handle the value like an array.
        if (substr($key, -2) == "[]") {
            $key = substr($key, 0, -2);
            $is_array = true;
        }
        $ref = &$ref[$key];
    }

    // Set the property value. Make sure array values are handled properly.
    if ($is_array && $value) {
        $ref = $value;
        $ref = explode(",", $value);
    } elseif ($is_array) {
        $ref = array();
    } else {
        $ref = $value;
    }
}

// Build a resource based on a list of properties given as key-value pairs.
function createResource($properties) {
    $resource = array();
    foreach ($properties as $prop => $value) {
        if ($value) {
            addPropertyToResource($resource, $prop, $value);
        }
    }
    return $resource;
}

$propertyObject = createResource(array(
    'snippet.title' => 'Sample playlist ',
    'snippet.description' => 'This is a sample playlist description.',
    'snippet.tags[]' => 'Python code, interactive',
    'snippet.defaultLanguage' => '',
    'status.privacyStatus' => 'private'));
드림
# Build a resource based on a list of properties given as key-value pairs.
def create_resource(properties)
  resource = {}
  properties.each do |prop, value|
    ref = resource
    prop_array = prop.to_s.split(".")
    for p in 0..(prop_array.size - 1)
      is_array = false
      key = prop_array[p]
      if key[-2,2] == "[]"
        key = key[0...-2]
        is_array = true
      end
      if p == (prop_array.size - 1)
        if is_array
          if value == ""
            ref[key.to_sym] = []
          else
            ref[key.to_sym] = value.split(",")
          end
        elsif value != ""
          ref[key.to_sym] = value
        end
      elsif ref.include?(key.to_sym)
        ref = ref[key.to_sym]
      else
        ref[key.to_sym] = {}
        ref = ref[key.to_sym]
      end
    end
  end
  return resource
end

resource = create_resource({
    'snippet.title': 'Sample playlist ',
    'snippet.description': 'This is a sample playlist description.',
    'snippet.tags[]': 'Ruby code, interactive',
    'snippet.default_language': '',
    'status.privacy_status': 'private'})
// Build an object from an object containing properties as key-value pairs
function createResource(properties) {
  var res = {};
  var normalizedProps = {};
  for (var p in properties) {
    var value = properties[p];
    if (p.substr(-2, 2) == '[]' && value) {
      var adjustedName = p.replace('[]', '');
      normalizedProps[adjustedName] = value.split(',');
    } else {
      normalizedProps[p] = value;
    }
  }
  for (var p in normalizedProps) {
    if (normalizedProps.hasOwnProperty(p) && normalizedProps[p]) {
      var propArray = p.split('.');
      var ref = res;
      for (var pa = 0; pa < propArray.length; pa++) {
        var key = propArray[pa];
        if (pa == propArray.length - 1) {
          ref[key] = normalizedProps[p];
        } else {
          ref = ref[key] = ref[key] || {};
        }
      }
    };
  }
  return res;
}

var resource = createResource({
    'snippet.title': 'Sample playlist ',
    'snippet.description': 'This is a sample playlist description.',
    'snippet.tags[]': 'Apps Script code, interactive',
    'snippet.defaultLanguage': '',
    'status.privacyStatus': 'private'
});
func addPropertyToResource(ref map[string]interface{}, keys []string, value string, count int) map[string]interface{} {
for k := count; k < (len(keys) - 1); k++ {
switch val := ref[keys[k]].(type) {
case map[string]interface{}:
ref[keys[k]] = addPropertyToResource(val, keys, value, (k + 1))
case nil:
next := make(map[string]interface{})
ref[keys[k]] = addPropertyToResource(next, keys, value, (k + 1))
}
}
// Only include properties that have values.
if (count == len(keys) - 1 && value != "") {
valueKey := keys[len(keys)-1]
if valueKey[len(valueKey)-2:] == "[]" {
ref[valueKey[0:len(valueKey)-2]] = strings.Split(value, ",")
} else if len(valueKey) > 4 && valueKey[len(valueKey)-4:] == "|int" {
ref[valueKey[0:len(valueKey)-4]], _ = strconv.Atoi(value)
} else if value == "true" {
ref[valueKey] = true
} else if value == "false" {
ref[valueKey] = false
} else {
ref[valueKey] = value
}
}
return ref
}
func createResource(properties map[string]string) string {
resource := make(map[string]interface{})
for key, value := range properties {
keys := strings.Split(key, ".")
ref := addPropertyToResource(resource, keys, value, 0)
resource = ref
}
propJson, err := json.Marshal(resource)
if err != nil {
log.Fatal("cannot encode to JSON ", err)
}
return string(propJson)
}
func main() {
properties := (map[string]string{
"snippet.title": "Sample playlist ",
"snippet.description": "This is a sample playlist description.",
"snippet.tags[]": "Go code, interactive",
"snippet.defaultLanguage": "",
"status.privacyStatus": "private",
})
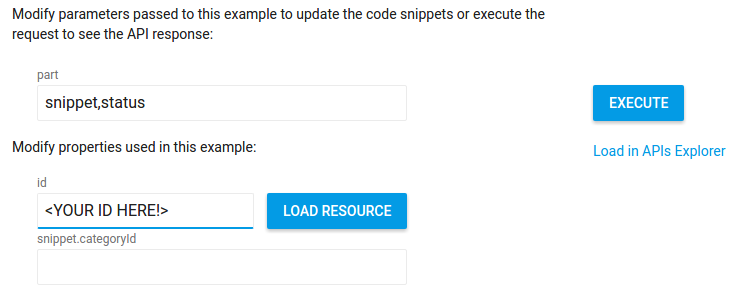
res := createResource(properties)기존 리소스 로드
기존 리소스 업데이트 요청을 테스트하려면 해당 리소스의 현재 속성 값을 업데이트 양식에 로드하면 됩니다. 예를 들어 동영상에 대한 메타데이터를 업데이트하려면 id 속성 필드에 동영상 ID를 입력하고 리소스 로드 버튼을 클릭합니다. 현재 속성 값이 양식에 로드되며 변경하려는 값만 업데이트할 수 있습니다.