Petunjuk
Alat cuplikan kode interaktif memungkinkan Anda menguji permintaan API dengan mudah dan membuat contoh kode khusus untuk permintaan tersebut. Untuk setiap metode, alat ini menampilkan cuplikan kode untuk satu atau beberapa kasus penggunaan, dan setiap kasus penggunaan menjelaskan cara umum untuk memanggil metode tersebut. Misalnya, Anda dapat memanggil metode channels.list untuk mengambil data tentang saluran tertentu atau saluran pengguna saat ini.
Menjalankan permintaan API
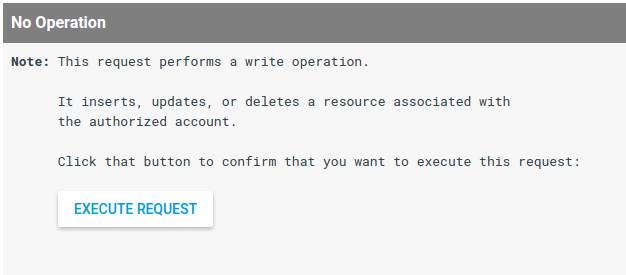
Anda dapat menjalankan permintaan dengan mengklik tombol Execute di samping daftar parameter permintaan. Jika sebelumnya Anda belum memberikan otorisasi kepada aplikasi untuk mengirim permintaan API atas nama Anda, Anda akan diminta untuk melakukannya. Sebagai tindakan pencegahan tambahan, jika permintaan Anda melakukan operasi tulis – menyisipkan, memperbarui, atau menghapus resource yang terkait dengan saluran – Anda akan diminta untuk mengonfirmasi bahwa Anda ingin mengeksekusi permintaan sebelum permintaan benar-benar dieksekusi.
Tampilkan/sembunyikan cuplikan kode dan contoh lengkap
Untuk setiap kasus penggunaan, alat ini menampilkan cuplikan kode yang mengidentifikasi kode khusus untuk metode tertentu yang dipanggil. Setiap cuplikan mengidentifikasi metode yang dipanggil serta parameter dan nilai properti yang digunakan dalam permintaan API.
Selain itu, alat ini juga menampilkan contoh kode lengkap yang menempatkan cuplikan kode tersebut ke dalam template yang menentukan fungsi boilerplate untuk memberi otorisasi permintaan API dan membuat permintaan API. Anda dapat menggunakan penggeser di atas contoh untuk beralih antara cuplikan dan sampel lengkap:

Menjalankan contoh kode lengkap secara lokal
Contoh kode lengkap dirancang untuk disalin dan dijalankan secara lokal. Harap perhatikan prasyarat dan langkah-langkah penyiapan berikut untuk menjalankan contoh kode lengkap:
Prasyarat
- Java 1.7 atau yang lebih baru
- Gradle 2.3 atau yang lebih baru
Menyiapkan project dan menjalankan contoh kode
-
Buat project di Konsol API dan siapkan kredensial untuk aplikasi web. Tetapkan URI pengalihan yang diberi otorisasi sesuai kebutuhan.
-
Ikuti petunjuk di Panduan Memulai API Java untuk menyiapkan project Anda, tetapi ganti konten file
build.gradledefault dengan kode berikut:apply plugin: 'java' apply plugin: 'application' mainClassName = 'ApiExample' sourceCompatibility = 1.7 targetCompatibility = 1.7 version = '1.0' repositories { mavenCentral() } dependencies { compile 'com.google.api-client:google-api-client:1.22.0' compile 'com.google.oauth-client:google-oauth-client-jetty:1.22.0' compile 'com.google.apis:google-api-services-youtube:v3-rev182-1.22.0' compile group: 'com.google.code.gson', name: 'gson', version: '1.7.2' compile group: 'com.fasterxml.jackson.core', name: 'jackson-databind', version: '2.4.4' } compileJava { options.compilerArgs << "-Xlint:unchecked" << "-Xlint:deprecation" } -
Dari direktori kerja, simpan file
client_secrets.jsonyang terkait dengan kredensial Anda kesrc/main/resources/client_secret.json. -
Dari direktori kerja Anda, salin contoh kode lengkap ke
src/main/java/ApiExample.java. (Nama class dalam setiap contoh adalahApiExamplesehingga Anda tidak perlu mengubah filebuild.gradleuntuk menjalankan contoh yang berbeda.) -
Jalankan contoh dari command line:
gradle -q run
-
Sebagian besar contoh mencetak sesuatu ke
STDOUT. Anda juga dapat memeriksa situs YouTube untuk melihat efek permintaan yang menulis data, seperti permintaan yang membuat playlist atau bagian channel.
-
Buat project di Konsol API dan siapkan kredensial untuk aplikasi web. Tetapkan origin JavaScript yang diotorisasi untuk mengidentifikasi URL asal pengiriman permintaan (misalnya,
http://localhost). -
Salin contoh kode lengkap ke file lokal yang dapat diakses oleh server web Anda (misalnya,
/var/www/html/example.html). -
Temukan baris dalam contoh kode yang menetapkan client ID yang akan digunakan untuk permintaan, dan ganti nilai dengan client ID untuk kredensial Anda:
gapi.client.init({ 'clientId': 'REPLACE_ME', -
Buka file di browser Anda (misalnya,
http://localhost/example.html). Sebaiknya gunakan browser dengan konsol proses debug, seperti Google Chrome. -
Otorisasi permintaan jika perlu. Jika permintaan diotorisasi, konsol proses debug akan menampilkan respons API terhadap permintaan sebagai objek JSON.
Prasyarat
- Node.js harus diinstal.
- Alat pengelolaan paket npm (dilengkapi dengan Node.js).
- Library Klien Google API untuk Node.js:
npm install googleapis --save
- Akses ke internet dan browser web.
- Akun Google.
Menyiapkan project dan menjalankan contoh kode
-
Buat project di Konsol API dan siapkan kredensial OAuth 2.0 di Konsol API Google. Saat menyiapkan kredensial Anda, setel jenis aplikasi ke Lainnya.
-
Simpan file
client_secret.jsonyang terkait dengan kredensial Anda ke file lokal. -
Salin contoh kode lengkap ke file lokal di direktori yang sama dengan file
client_secret.json(atau ubah contoh untuk mengidentifikasi lokasi file tersebut dengan benar. -
Jalankan contoh dari command line:
node sample.js
-
Sebagian besar contoh mencetak sesuatu ke
STDOUTatau, untuk contoh aplikasi web, ke halaman web yang Anda lihat. Anda juga dapat memeriksa situs YouTube untuk melihat efek permintaan yang menulis data, seperti permintaan yang membuat playlist atau bagian channel.
Prasyarat
- Python 2.6 atau yang lebih baru
- Alat pengelolaan paket pip
- Library Klien Google API untuk Python:
pip install --upgrade google-api-python-client
- File google-auth, google-auth-oauthlib, dan google-auth-httplib2 untuk otorisasi pengguna.
pip install --upgrade google-auth google-auth-oauthlib google-auth-httplib2
- Framework aplikasi web Flask Python (jika Anda menjalankan contoh Python untuk aplikasi server web).
pip install --upgrade flask
- Library HTTP permintaan.
pip install --upgrade requests
Menyiapkan project dan menjalankan contoh kode
-
Buat project di Konsol API dan siapkan kredensial OAuth 2.0 di Konsol API Google. Saat menyiapkan kredensial, setel jenis aplikasi ke Web application untuk contoh yang menggunakan framework aplikasi web Flask Python dan juga menetapkan URI pengalihan yang diberi otorisasi untuk kredensial tersebut. Jika tidak, tetapkan jenis aplikasi ke Lainnya.
-
Simpan file
client_secret.jsonyang terkait dengan kredensial Anda ke file lokal. -
Salin contoh kode lengkap ke file lokal di direktori yang sama dengan file
client_secret.json(atau ubah contoh untuk mengidentifikasi lokasi file tersebut dengan benar. -
Jalankan contoh dari command line:
python sample.py
Catatan untuk contoh aplikasi server web:
Jika Anda menjalankan contoh Python untuk aplikasi server web, menjalankan skrip tersebut akan memulai server web lokal. Untuk benar-benar mengeksekusi permintaan API, Anda harus membuka halaman web yang dilayani di browser. Misalnya, contoh Python yang menggunakan framework aplikasi web Flask berisi baris seperti ini:
app.run('localhost', 8080, debug=True)
Kode ini memulai server web lokal dihttp://localhost:8080. Namun, skrip tidak akan mencoba menjalankan permintaan API hingga Anda benar-benar membukahttp://localhost:8080di browser. (URL untuk server lokal Anda juga harus ditetapkan sebagai URI pengalihan yang diberi otorisasi untuk kredensial otorisasi Anda.) -
Sebagian besar contoh mencetak sesuatu ke
STDOUTatau, untuk contoh aplikasi web, ke halaman web yang Anda lihat. Anda juga dapat memeriksa situs YouTube untuk melihat efek permintaan yang menulis data, seperti permintaan yang membuat playlist atau bagian channel.
Prasyarat
- PHP 5.4 atau yang lebih baru dengan antarmuka command line (CLI) dan ekstensi JSON yang terinstal.
- Alat pengelolaan dependensi Composer.
- Library Klien Google API untuk PHP:
php composer.phar require google/apiclient:^2.0
Menyiapkan project dan menjalankan contoh kode
-
Buat project di Konsol API dan siapkan kredensial OAuth 2.0 di Konsol API Google. Saat menyiapkan kredensial Anda, setel jenis aplikasi ke Lainnya.
-
Simpan file
client_secret.jsonyang terkait dengan kredensial Anda ke file lokal. -
Salin contoh kode lengkap ke file lokal di direktori yang sama dengan file
client_secret.json(atau ubah contoh untuk mengidentifikasi lokasi file tersebut dengan benar. -
Jalankan contoh dari command line:
php sample.php
-
Sebagian besar contoh mencetak sesuatu ke
STDOUTatau, untuk contoh aplikasi web, ke halaman web yang Anda lihat. Anda juga dapat memeriksa situs YouTube untuk melihat efek permintaan yang menulis data, seperti permintaan yang membuat playlist atau bagian channel.
Prasyarat
- Ruby 2.0 atau yang lebih baru
- Library Klien Google API untuk Ruby:
gem install google-api-client
Menyiapkan project dan menjalankan contoh kode
-
Buat project di Konsol API dan siapkan kredensial OAuth 2.0 di Konsol API Google. Saat menyiapkan kredensial Anda, setel jenis aplikasi ke Lainnya.
-
Simpan file
client_secret.jsonyang terkait dengan kredensial Anda ke file lokal. -
Salin contoh kode lengkap ke file lokal di direktori yang sama dengan file
client_secret.json(atau ubah contoh untuk mengidentifikasi lokasi file tersebut dengan benar. -
Jalankan contoh dari command line:
ruby sample.rb
-
Sebagian besar contoh mencetak sesuatu ke
STDOUTatau, untuk contoh aplikasi web, ke halaman web yang Anda lihat. Anda juga dapat memeriksa situs YouTube untuk melihat efek permintaan yang menulis data, seperti permintaan yang membuat playlist atau bagian channel.
-
Buat project di Konsol API dan siapkan kredensial OAuth 2.0 di Konsol API Google. Saat menyiapkan kredensial Anda, setel jenis aplikasi ke Lainnya.
-
Simpan file
client_secret.jsonyang terkait dengan kredensial Anda ke file lokal. -
Salin contoh kode lengkap ke file lokal di direktori yang sama dengan file
client_secret.json(atau ubah contoh untuk mengidentifikasi lokasi file tersebut dengan benar. -
Jalankan contoh dari command line:
go run sample.go
-
Sebagian besar contoh mencetak sesuatu ke
STDOUTatau, untuk contoh aplikasi web, ke halaman web yang Anda lihat. Anda juga dapat memeriksa situs YouTube untuk melihat efek permintaan yang menulis data, seperti permintaan yang membuat playlist atau bagian channel.
Menggunakan fungsi boilerplate
Seperti disebutkan di atas, contoh kode lengkap menggunakan kode boilerplate untuk memberi otorisasi dan membuat permintaan API. Misalnya, fungsi build_resource dalam contoh Python menggunakan kamus yang memetakan properti resource ke nilainya untuk membuat resource yang dapat disisipkan atau diperbarui. Fungsi serupa disediakan untuk JavaScript, PHP, Ruby, Go, dan Apps Script.
Misalnya, tab di bawah menunjukkan cara fungsi boilerplate untuk mem-build resource akan dipanggil guna membuat resource playlist. Perhatikan bahwa fungsi boilerplate tidak perlu mengetahui jenis resource yang sedang dibuat.
function createResource(properties) {
  var resource = {};
  var normalizedProps = properties;
  for (var p in properties) {
    var value = properties[p];
    if (p && p.substr(-2, 2) == '[]') {
      var adjustedName = p.replace('[]', '');
      if (value) {
        normalizedProps[adjustedName] = value.split(',');
      }
      delete normalizedProps[p];
    }
  }
  for (var p in normalizedProps) {
    // Leave properties that don't have values out of inserted resource.
    if (normalizedProps.hasOwnProperty(p) && normalizedProps[p]) {
      var propArray = p.split('.');
      var ref = resource;
      for (var pa = 0; pa < propArray.length; pa++) {
        var key = propArray[pa];
        if (pa == propArray.length - 1) {
          ref[key] = normalizedProps[p];
        } else {
          ref = ref[key] = ref[key] || {};
        }
      }
    };
  }
  return resource;
}
var resource = createResource({
    'snippet.title': 'Sample playlist ',
    'snippet.description': 'This is a sample playlist description.',
    'snippet.tags[]': 'JavaScript code, interactive',
    'snippet.defaultLanguage': '',
    'status.privacyStatus': 'private'
}
# Build a resource based on a list of properties given as key-value pairs.
# Leave properties with empty values out of the inserted resource.
def build_resource(properties):
  resource = {}
  for p in properties:
    # Given a key like "snippet.title", split into "snippet" and "title", where
    # "snippet" will be an object and "title" will be a property in that object.
    prop_array = p.split('.')
    ref = resource
    for pa in range(0, len(prop_array)):
      is_array = False
      key = prop_array[pa]
      # Convert a name like "snippet.tags[]" to snippet.tags, but handle
      # the value as an array.
      if key[-2:] == '[]':
        key = key[0:len(key)-2:]
        is_array = True
      if pa == (len(prop_array) - 1):
        # Leave properties without values out of inserted resource.
        if properties[p]:
          if is_array:
            ref[key] = properties[p].split(',')
          else:
            ref[key] = properties[p]
      elif key not in ref:
        # For example, the property is "snippet.title", but the resource does
        # not yet have a "snippet" object. Create the snippet object here.
        # Setting "ref = ref[key]" means that in the next time through the
        # "for pa in range ..." loop, we will be setting a property in the
        # resource's "snippet" object.
        ref[key] = {}
        ref = ref[key]
      else:
        # For example, the property is "snippet.description", and the resource
        # already has a "snippet" object.
        ref = ref[key]
  return resource

resource = build_resource({
    'snippet.title': 'Sample playlist ',
    'snippet.description': 'This is a sample playlist description.',
    'snippet.tags[]': 'Python code, interactive',
    'snippet.defaultLanguage': '',
    'status.privacyStatus': 'private'}
// Add a property to the resource.
function addPropertyToResource(&$ref, $property, $value) {
    $keys = explode(".", $property);
    $is_array = false;
    foreach ($keys as $key) {
        // Convert a name like "snippet.tags[]" to "snippet.tags" and
        // set a boolean variable to handle the value like an array.
        if (substr($key, -2) == "[]") {
            $key = substr($key, 0, -2);
            $is_array = true;
        }
        $ref = &$ref[$key];
    }

    // Set the property value. Make sure array values are handled properly.
    if ($is_array && $value) {
        $ref = $value;
        $ref = explode(",", $value);
    } elseif ($is_array) {
        $ref = array();
    } else {
        $ref = $value;
    }
}

// Build a resource based on a list of properties given as key-value pairs.
function createResource($properties) {
    $resource = array();
    foreach ($properties as $prop => $value) {
        if ($value) {
            addPropertyToResource($resource, $prop, $value);
        }
    }
    return $resource;
}

$propertyObject = createResource(array(
    'snippet.title' => 'Sample playlist ',
    'snippet.description' => 'This is a sample playlist description.',
    'snippet.tags[]' => 'Python code, interactive',
    'snippet.defaultLanguage' => '',
    'status.privacyStatus' => 'private'));
# Build a resource based on a list of properties given as key-value pairs.
def create_resource(properties)
  resource = {}
  properties.each do |prop, value|
    ref = resource
    prop_array = prop.to_s.split(".")
    for p in 0..(prop_array.size - 1)
      is_array = false
      key = prop_array[p]
      if key[-2,2] == "[]"
        key = key[0...-2]
        is_array = true
      end
      if p == (prop_array.size - 1)
        if is_array
          if value == ""
            ref[key.to_sym] = []
          else
            ref[key.to_sym] = value.split(",")
          end
        elsif value != ""
          ref[key.to_sym] = value
        end
      elsif ref.include?(key.to_sym)
        ref = ref[key.to_sym]
      else
        ref[key.to_sym] = {}
        ref = ref[key.to_sym]
      end
    end
  end
  return resource
end

resource = create_resource({
    'snippet.title': 'Sample playlist ',
    'snippet.description': 'This is a sample playlist description.',
    'snippet.tags[]': 'Ruby code, interactive',
    'snippet.default_language': '',
    'status.privacy_status': 'private'})
// Build an object from an object containing properties as key-value pairs
function createResource(properties) {
  var res = {};
  var normalizedProps = {};
  for (var p in properties) {
    var value = properties[p];
    if (p.substr(-2, 2) == '[]' && value) {
      var adjustedName = p.replace('[]', '');
      normalizedProps[adjustedName] = value.split(',');
    } else {
      normalizedProps[p] = value;
    }
  }
  for (var p in normalizedProps) {
    if (normalizedProps.hasOwnProperty(p) && normalizedProps[p]) {
      var propArray = p.split('.');
      var ref = res;
      for (var pa = 0; pa < propArray.length; pa++) {
        var key = propArray[pa];
        if (pa == propArray.length - 1) {
          ref[key] = normalizedProps[p];
        } else {
          ref = ref[key] = ref[key] || {};
        }
      }
    };
  }
  return res;
}

var resource = createResource({
    'snippet.title': 'Sample playlist ',
    'snippet.description': 'This is a sample playlist description.',
    'snippet.tags[]': 'Apps Script code, interactive',
    'snippet.defaultLanguage': '',
    'status.privacyStatus': 'private'
});
func addPropertyToResource(ref map[string]interface{}, keys []string, value string, count int) map[string]interface{} {
for k := count; k < (len(keys) - 1); k++ {
switch val := ref[keys[k]].(type) {
case map[string]interface{}:
ref[keys[k]] = addPropertyToResource(val, keys, value, (k + 1))
case nil:
next := make(map[string]interface{})
ref[keys[k]] = addPropertyToResource(next, keys, value, (k + 1))
}
}
// Only include properties that have values.
if (count == len(keys) - 1 && value != "") {
valueKey := keys[len(keys)-1]
if valueKey[len(valueKey)-2:] == "[]" {
ref[valueKey[0:len(valueKey)-2]] = strings.Split(value, ",")
} else if len(valueKey) > 4 && valueKey[len(valueKey)-4:] == "|int" {
ref[valueKey[0:len(valueKey)-4]], _ = strconv.Atoi(value)
} else if value == "true" {
ref[valueKey] = true
} else if value == "false" {
ref[valueKey] = false
} else {
ref[valueKey] = value
}
}
return ref
}
func createResource(properties map[string]string) string {
resource := make(map[string]interface{})
for key, value := range properties {
keys := strings.Split(key, ".")
ref := addPropertyToResource(resource, keys, value, 0)
resource = ref
}
propJson, err := json.Marshal(resource)
if err != nil {
log.Fatal("cannot encode to JSON ", err)
}
return string(propJson)
}
func main() {
properties := (map[string]string{
"snippet.title": "Sample playlist ",
"snippet.description": "This is a sample playlist description.",
"snippet.tags[]": "Go code, interactive",
"snippet.defaultLanguage": "",
"status.privacyStatus": "private",
})
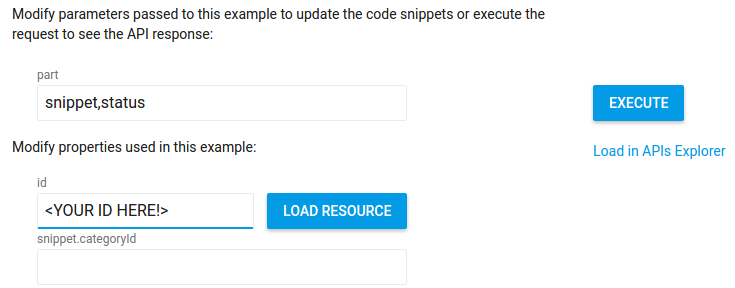
res := createResource(properties)Memuat resource yang ada
Untuk menguji permintaan guna memperbarui resource yang ada, Anda dapat memuat nilai properti saat ini untuk resource tersebut ke dalam formulir pembaruan. Misalnya, untuk memperbarui metadata tentang sebuah video, masukkan ID video di kolom properti id, lalu klik tombol Muat referensi. Nilai properti saat ini akan dimuat ke dalam formulir dan Anda hanya dapat memperbarui nilai yang ingin diubah.