顯示系統定義的原生廣告格式
原生廣告載入後,應用程式會透過其中一種 GADAdLoaderDelegate 通訊協定訊息收到原生廣告物件,然後由應用程式顯示廣告 (不一定會立刻執行這項作業)。SDK 提供了一些實用資源,簡化顯示系統定義廣告格式的方式。
GADNativeAdView
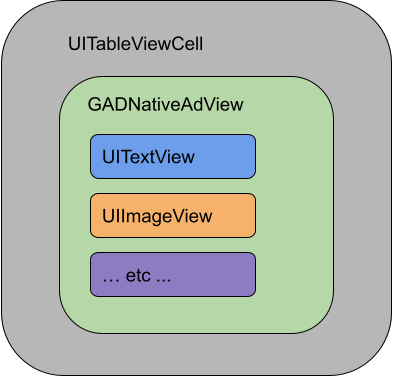
GADNativeAd 對應「廣告檢視區塊」類別 GADNativeAdView。這個類別是 UIView,供發布商用來呈現廣告;比方說,一個 GADNativeAdView 可顯示單一 GADNativeAd 例項,而每個用來呈現廣告素材資源的 UIView 物件,都應該是這個 GADNativeAdView 物件的子檢視區塊。
舉例來說,在 UITableView 中顯示廣告時,其中一個單元格的檢視區塊階層可能如下所示:

GADNativeAdView 類別也提供 IBOutlets,可註冊各個素材資源使用的檢視區塊,此外還有用來註冊 GADNativeAd 物件的方法。以這種方式註冊檢視區塊,SDK 就能自動處理下列任務:
- 記錄點擊。
- 記錄曝光 (第一個像素在畫面中顯示時)。
- 顯示 AdChoices 疊加層。
AdChoices 疊加層
如果顯示的是間接原生廣告 (透過 AdMob 候補廣告或 Ad Exchange/AdSense 放送),SDK 會加入 AdChoices 疊加層,因此請在原生廣告檢視區塊的指定角落中保留空間,讓系統自動插入 AdChoices 標誌。而且該角落的內容不應太過繁雜,確保使用者一眼就能看到 AdChoices 疊加層。若想進一步瞭解這個疊加層的外觀與功能,請參閱程式輔助原生廣告導入指南。
廣告標示
顯示程式輔助原生廣告時,須一併呈現廣告標示,表明該檢視區塊是廣告。程式碼範例
本節說明如何使用從 xib 檔案動態載入的檢視區塊,顯示原生廣告。透過設定 GADAdLoaders 來請求多種格式時,這種做法相當實用。
決定 UIView 版面設置
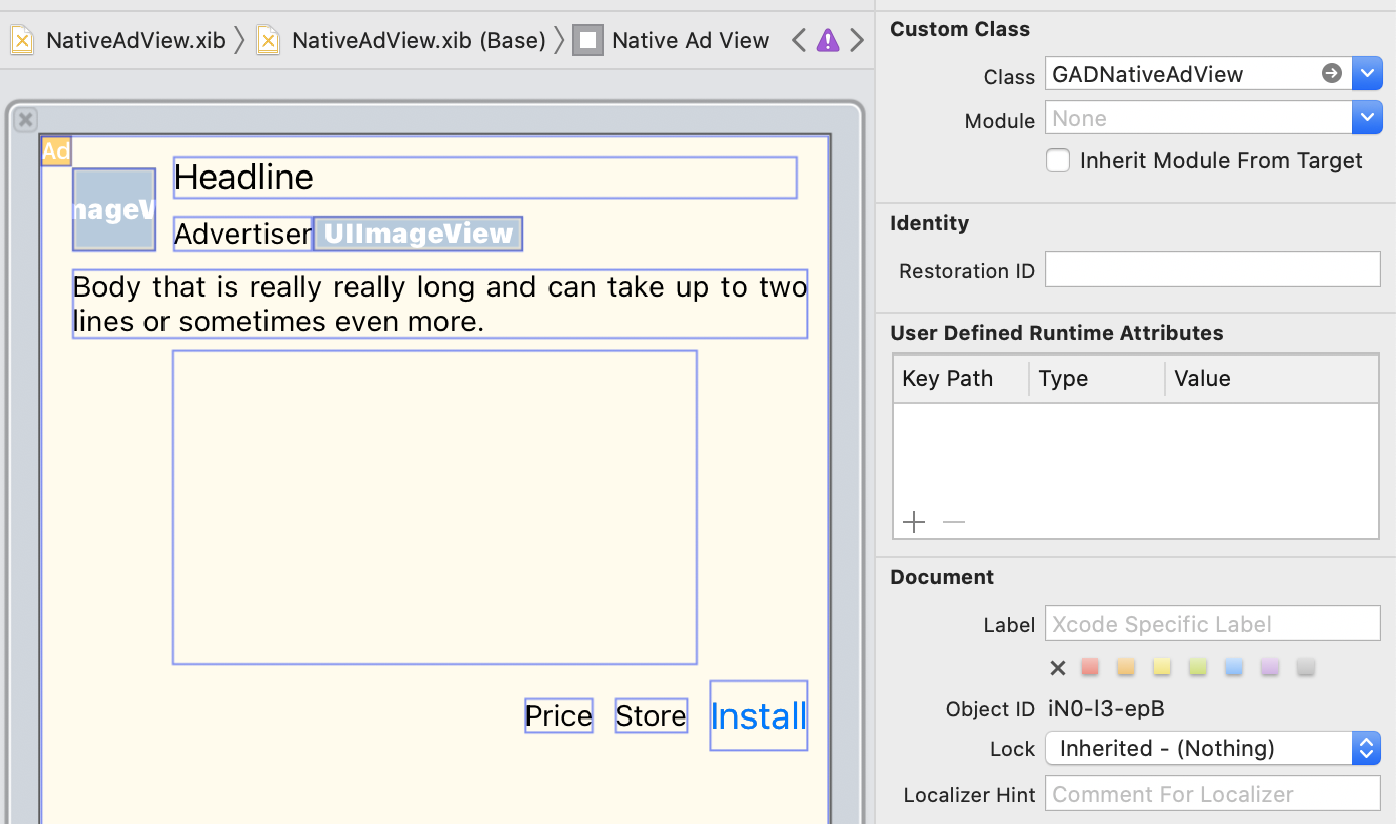
首先,請為用來呈現原生廣告素材資源的 UIViews 決定擺放位置;您可以在 Interface Builder 中完成這項設定,就像建立其他 xib 檔案一樣。請參考以下原生廣告版面配置範例:

圖片右上方的「Custom Class」值設為
GADNativeAdView,也就是用來呈現 GADNativeAd 的廣告檢視區塊類別。
您也需要設定 GADMediaView 的自訂類別 (用來呈現廣告的影片或圖片)。
將 outlet 連結至檢視區塊
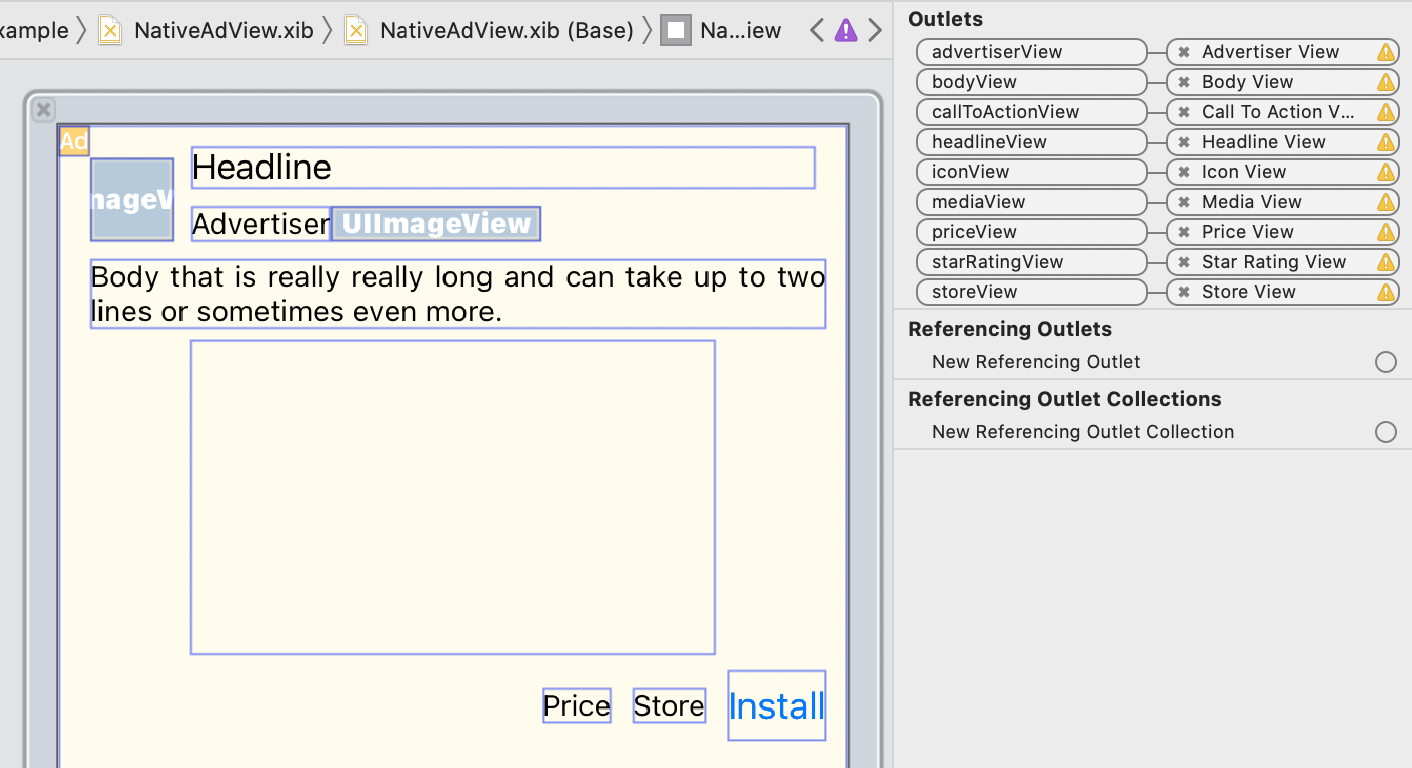
決定檢視區塊的位置,並為版面配置指派正確的廣告檢視區塊類別後,請將廣告檢視區塊的素材資源 outlet 連結至先前建立的 UIViews。請參閱下方範例,瞭解如何將廣告檢視區塊的素材資源 outlet 連結至為廣告建立的 UIViews:

在 outlet 面板中,GADNativeAdView 裡的 outlet 已連結至 Interface Builder 內配置的 UIViews,這樣一來,SDK 就能知道各個 UIView 分別會顯示哪些素材資源。此外別忘了,這些 outlet 代表廣告中的可點擊檢視區塊。
顯示廣告
完成版面配置並連結 outlet 後,請在應用程式中加入下列程式碼,讓廣告在載入後立即顯示:
Swift
func adLoader(_ adLoader: AdLoader, didReceive nativeAd: NativeAd) {
// ...
// Set ourselves as the native ad delegate to be notified of native ad events.
nativeAd.delegate = self
// Populate the native ad view with the native ad assets.
// The headline and mediaContent are guaranteed to be present in every native ad.
(nativeAdView.headlineView as? UILabel)?.text = nativeAd.headline
nativeAdView.mediaView?.mediaContent = nativeAd.mediaContent
// Some native ads will include a video asset, while others do not. Apps can use the
// GADVideoController's hasVideoContent property to determine if one is present, and adjust their
// UI accordingly.
let mediaContent = nativeAd.mediaContent
if mediaContent.hasVideoContent {
// By acting as the delegate to the GADVideoController, this ViewController receives messages
// about events in the video lifecycle.
mediaContent.videoController.delegate = self
videoStatusLabel.text = "Ad contains a video asset."
} else {
videoStatusLabel.text = "Ad does not contain a video."
}
// This app uses a fixed width for the GADMediaView and changes its height to match the aspect
// ratio of the media it displays.
if let mediaView = nativeAdView.mediaView, nativeAd.mediaContent.aspectRatio > 0 {
let aspectRatioConstraint = NSLayoutConstraint(
item: mediaView,
attribute: .width,
relatedBy: .equal,
toItem: mediaView,
attribute: .height,
multiplier: CGFloat(nativeAd.mediaContent.aspectRatio),
constant: 0)
mediaView.addConstraint(aspectRatioConstraint)
nativeAdView.layoutIfNeeded()
}
// These assets are not guaranteed to be present. Check that they are before
// showing or hiding them.
(nativeAdView.bodyView as? UILabel)?.text = nativeAd.body
nativeAdView.bodyView?.isHidden = nativeAd.body == nil
(nativeAdView.callToActionView as? UIButton)?.setTitle(nativeAd.callToAction, for: .normal)
nativeAdView.callToActionView?.isHidden = nativeAd.callToAction == nil
(nativeAdView.iconView as? UIImageView)?.image = nativeAd.icon?.image
nativeAdView.iconView?.isHidden = nativeAd.icon == nil
(nativeAdView.starRatingView as? UIImageView)?.image = imageOfStars(from: nativeAd.starRating)
nativeAdView.starRatingView?.isHidden = nativeAd.starRating == nil
(nativeAdView.storeView as? UILabel)?.text = nativeAd.store
nativeAdView.storeView?.isHidden = nativeAd.store == nil
(nativeAdView.priceView as? UILabel)?.text = nativeAd.price
nativeAdView.priceView?.isHidden = nativeAd.price == nil
(nativeAdView.advertiserView as? UILabel)?.text = nativeAd.advertiser
nativeAdView.advertiserView?.isHidden = nativeAd.advertiser == nil
// In order for the SDK to process touch events properly, user interaction should be disabled.
nativeAdView.callToActionView?.isUserInteractionEnabled = false
// Associate the native ad view with the native ad object. This is
// required to make the ad clickable.
// Note: this should always be done after populating the ad views.
nativeAdView.nativeAd = nativeAd
}
SwiftUI
建立檢視區塊模型
您可以建立檢視區塊模型,用來載入原生廣告及發布廣告資料變更:
import GoogleMobileAds
class NativeAdViewModel: NSObject, ObservableObject, NativeAdLoaderDelegate {
@Published var nativeAd: NativeAd?
private var adLoader: AdLoader!
func refreshAd() {
adLoader = AdLoader(
adUnitID: "ca-app-pub-3940256099942544/3986624511",
// The UIViewController parameter is optional.
rootViewController: nil,
adTypes: [.native], options: nil)
adLoader.delegate = self
adLoader.load(Request())
}
func adLoader(_ adLoader: AdLoader, didReceive nativeAd: NativeAd) {
// Native ad data changes are published to its subscribers.
self.nativeAd = nativeAd
nativeAd.delegate = self
}
func adLoader(_ adLoader: AdLoader, didFailToReceiveAdWithError error: Error) {
print("\(adLoader) failed with error: \(error.localizedDescription)")
}
}
建立 UIViewRepresentable
請建立 NativeView 的 UIViewRepresentable,然後監控 ViewModel 類別中的資料變更。
private struct NativeAdViewContainer: UIViewRepresentable {
typealias UIViewType = NativeAdView
// Observer to update the UIView when the native ad value changes.
@ObservedObject var nativeViewModel: NativeAdViewModel
func makeUIView(context: Context) -> NativeAdView {
return
Bundle.main.loadNibNamed(
"NativeAdView",
owner: nil,
options: nil)?.first as! NativeAdView
}
func updateUIView(_ nativeAdView: NativeAdView, context: Context) {
guard let nativeAd = nativeViewModel.nativeAd else { return }
// Each UI property is configurable using your native ad.
(nativeAdView.headlineView as? UILabel)?.text = nativeAd.headline
nativeAdView.mediaView?.mediaContent = nativeAd.mediaContent
(nativeAdView.bodyView as? UILabel)?.text = nativeAd.body
(nativeAdView.iconView as? UIImageView)?.image = nativeAd.icon?.image
(nativeAdView.starRatingView as? UIImageView)?.image = imageOfStars(from: nativeAd.starRating)
(nativeAdView.storeView as? UILabel)?.text = nativeAd.store
(nativeAdView.priceView as? UILabel)?.text = nativeAd.price
(nativeAdView.advertiserView as? UILabel)?.text = nativeAd.advertiser
(nativeAdView.callToActionView as? UIButton)?.setTitle(nativeAd.callToAction, for: .normal)
// For the SDK to process touch events properly, user interaction should be disabled.
nativeAdView.callToActionView?.isUserInteractionEnabled = false
// Associate the native ad view with the native ad object. This is required to make the ad
// clickable.
// Note: this should always be done after populating the ad views.
nativeAdView.nativeAd = nativeAd
}
將檢視區塊加進檢視區塊階層
請查看下方範例程式程,瞭解如何將 UIViewRepresentable 加進檢視區塊階層:
struct NativeContentView: View {
// Single source of truth for the native ad data.
@StateObject private var nativeViewModel = NativeAdViewModel()
var body: some View {
ScrollView {
VStack(spacing: 20) {
// Updates when the native ad data changes.
NativeAdViewContainer(nativeViewModel: nativeViewModel)
.frame(minHeight: 300) // minHeight determined from xib.
Objective-C
- (void)adLoader:(GADAdLoader *)adLoader didReceiveNativeAd:(GADNativeAd *)nativeAd {
// ...
GADNativeAdView *nativeAdView = self.nativeAdView;
// Set ourselves as the ad delegate to be notified of native ad events.
nativeAd.delegate = self;
// Populate the native ad view with the native ad assets.
// The headline and mediaContent are guaranteed to be present in every native ad.
((UILabel *)nativeAdView.headlineView).text = nativeAd.headline;
nativeAdView.mediaView.mediaContent = nativeAd.mediaContent;
// This app uses a fixed width for the GADMediaView and changes its height
// to match the aspect ratio of the media content it displays.
if (nativeAdView.mediaView != nil && nativeAd.mediaContent.aspectRatio > 0) {
NSLayoutConstraint *aspectRatioConstraint =
[NSLayoutConstraint constraintWithItem:nativeAdView.mediaView
attribute:NSLayoutAttributeWidth
relatedBy:NSLayoutRelationEqual
toItem:nativeAdView.mediaView
attribute:NSLayoutAttributeHeight
multiplier:(nativeAd.mediaContent.aspectRatio)
constant:0];
[nativeAdView.mediaView addConstraint:aspectRatioConstraint];
[nativeAdView layoutIfNeeded];
}
if (nativeAd.mediaContent.hasVideoContent) {
// By acting as the delegate to the GADVideoController, this ViewController
// receives messages about events in the video lifecycle.
nativeAd.mediaContent.videoController.delegate = self;
self.videoStatusLabel.text = @"Ad contains a video asset.";
} else {
self.videoStatusLabel.text = @"Ad does not contain a video.";
}
// These assets are not guaranteed to be present. Check that they are before
// showing or hiding them.
((UILabel *)nativeAdView.bodyView).text = nativeAd.body;
nativeAdView.bodyView.hidden = nativeAd.body ? NO : YES;
[((UIButton *)nativeAdView.callToActionView) setTitle:nativeAd.callToAction
forState:UIControlStateNormal];
nativeAdView.callToActionView.hidden = nativeAd.callToAction ? NO : YES;
((UIImageView *)nativeAdView.iconView).image = nativeAd.icon.image;
nativeAdView.iconView.hidden = nativeAd.icon ? NO : YES;
((UIImageView *)nativeAdView.starRatingView).image = [self imageForStars:nativeAd.starRating];
nativeAdView.starRatingView.hidden = nativeAd.starRating ? NO : YES;
((UILabel *)nativeAdView.storeView).text = nativeAd.store;
nativeAdView.storeView.hidden = nativeAd.store ? NO : YES;
((UILabel *)nativeAdView.priceView).text = nativeAd.price;
nativeAdView.priceView.hidden = nativeAd.price ? NO : YES;
((UILabel *)nativeAdView.advertiserView).text = nativeAd.advertiser;
nativeAdView.advertiserView.hidden = nativeAd.advertiser ? NO : YES;
// In order for the SDK to process touch events properly, user interaction
// should be disabled.
nativeAdView.callToActionView.userInteractionEnabled = NO;
// Associate the native ad view with the native ad object. This is
// required to make the ad clickable.
// Note: this should always be done after populating the ad views.
nativeAdView.nativeAd = nativeAd;
}
GitHub 上的完整範例
請點按對應的 GitHub 連結,查看使用 Swift、SwiftUI 和 Objective-C 整合原生廣告的完整範例。
Swift 原生進階範例 SwiftUI 原生廣告範例 Objective-C 原生進階範例GADMediaView
圖片和影片素材資源都是透過 GADMediaView 向使用者顯示。這個 UIView 可以在 xib 檔案中定義,也可以動態建構,而且和其他素材資源檢視區塊一樣,需要放進 GADNativeAdView 的檢視區塊階層。
和其他素材資源檢視區塊一樣,媒體檢視區塊需要填入內容才能正常顯示。您可使用 GADMediaView 的 mediaContent 屬性設定內容;GADNativeAd 的 mediaContent 屬性中,包含可傳遞至 GADMediaView 的媒體內容。
以下是原生進階範例 (Swift | Objective-C) 的程式碼片段,展示如何使用 GADNativeAd 中的 GADMediaContent,將原生廣告素材資源填入 GADMediaView:
Swift
nativeAdView.mediaView?.mediaContent = nativeAd.mediaContent
Objective-C
nativeAdView.mediaView.mediaContent = nativeAd.mediaContent;
請查看原生廣告檢視區塊的 Interface Builder 檔案,確認檢視區塊的自訂類別已設為 GADMediaView,並連結至 mediaView outlet。
變更圖片內容模式
GADMediaView 類別顯示圖片時,會遵循 UIView 的 contentMode 屬性設定。如要調整圖片在 GADMediaView 中的縮放方式,請在 GADMediaView 的 contentMode 屬性上,設定對應的 UIViewContentMode。
例如在廣告沒有影片時顯示圖片,並填滿 GADMediaView:
Swift
nativeAdView.mediaView?.contentMode = .scaleAspectFit
Objective-C
nativeAdView.mediaView.contentMode = UIViewContentModeScaleAspectFit;
GADMediaContent
GADMediaContent 類別中,會保留原生廣告媒體內容 (用 GADMediaView 類別顯示) 的相關資料。如果對 GADMediaView 的 mediaContent 屬性設定這個類別:
若有可用的影片素材資源,影片會緩衝處理並開始在
GADMediaView播放。您可以檢查hasVideoContent,判斷是否有影片素材資源。如果廣告不含影片素材資源,系統會下載
mainImage素材資源,並加進GADMediaView。
後續步驟
進一步瞭解使用者隱私。
