במדריך הזה מוסבר איך להגדיר אירוע של purchase באתר כדי
יכולים למדוד מקרים שבהם משתמש מבצע רכישה. המדריך כולל את המימדים,
מדדים ודוחות שמערכת Analytics מאכלסת בהם נתונים מהאירוע. למידה
מידע נוסף על אירועי המסחר האלקטרוני זמין במאמר מדידת מסחר אלקטרוני.
לפני שמתחילים
המדריך הזה מבוסס על ההנחה שביצעתם את הפעולות הבאות:
בנוסף, אנחנו יוצאים מנקודת הנחה שיש לכם:
- שיש לכם גישה לקוד המקור של האתר
- הרשאת עריכה (או הרשאה גבוהה יותר) בחשבון Google Analytics
שלב 1: מוסיפים את האירוע לאתר
יש למקם את האירוע purchase בדף באתר שבו
מישהו מבצע רכישה. לדוגמה, אפשר להוסיף את האירוע
דף אישור שמופיע כשמשתמש מבצע רכישה. המדריך הזה
מראה לך איך להוסיף את האירוע לדף שבו מישהו לוחץ על 'רכישה'
לחצן.
צריך למקם את האירוע בתג <script> בסוף התג <body>. מיקום
האירוע ישירות בתג <script> מפעיל את האירוע כשהדף נטען.
בקטע הבא נסביר איך להפעיל את האירוע כשמשתמש לוחץ על 'רכישה'.
<!--
  Note: In the following code sample, make sure to
  replace "TAG_ID" with your tag ID.
  Learn more: https://support.google.com/tagmanager/answer/12326985
-->
<!DOCTYPE html>
<html lang="en">
<head>
    <!-- Google tag (gtag.js) -->
    <script async src="https://www.googletagmanager.com/gtag/js?id=TAG_ID"></script>
    <script>
        window.dataLayer = window.dataLayer || [];
        function gtag(){dataLayer.push(arguments);}
        gtag('js', new Date());

        gtag('config', 'TAG_ID');
    </script>
</head>
<body>
    <div>This is where the purchase form would go</div>
    <button>Submit</button>
    <script>
    gtag("event", "purchase", {
        transaction_id: "T_12345_1",
        value: 30.03,
        tax: 4.90,
        shipping: 5.99,
        currency: "USD",
        coupon: "SUMMER_SALE",
        items: [
        // If someone purchases more than one item,
        // you can add those items to the items array
         {
          item_id: "SKU_12345",
          item_name: "Stan and Friends Tee",
          affiliation: "Google Merchandise Store",
          coupon: "SUMMER_FUN",
          discount: 2.22,
          index: 0,
          item_brand: "Google",
          item_category: "Apparel",
          item_category2: "Adult",
          item_category3: "Shirts",
          item_category4: "Crew",
          item_category5: "Short sleeve",
          item_list_id: "related_products",
          item_list_name: "Related Products",
          item_variant: "green",
          location_id: "ChIJIQBpAG2ahYAR_6128GcTUEo",
          price: 10.01,
          quantity: 3
        }]
    });
    </script>
</body>
</html>
שלב 2: מחברים את האירוע ללחצן
אפשר להגדיר את האירוע purchase כך שיופעל כשמישהו ילחץ על
"רכישה" בכמה דרכים. דרך אחת היא להוסיף מזהה ל'רכישה'
ולאחר מכן למקם את קוד האירוע ב-event listener. בתוך
לדוגמה, האירוע נשלח רק כשמישהו לוחץ על לחצן עם המזהה
purchase
<!--
  Note: In the following code sample, make sure to
  replace "TAG_ID" with your tag ID.
  Learn more: https://support.google.com/tagmanager/answer/12326985
-->
<!DOCTYPE html>
<html lang="en">
<head>
    <!-- Google tag (gtag.js) -->
    <script async src="https://www.googletagmanager.com/gtag/js?id=TAG_ID"></script>
    <script>
        window.dataLayer = window.dataLayer || [];
        function gtag(){dataLayer.push(arguments);}
        gtag('js', new Date());

        gtag('config', 'TAG_ID');
    </script>
</head>
<body>
    <div>This is where the purchase form would go</div>
    <button id="purchase">Purchase</button>
    <script>
    document.getElementById("purchase").addEventListener("click", function () {
        gtag("event", "purchase", {
                // This purchase event uses a different transaction ID
                // from the previous purchase event so Analytics
                // doesn't deduplicate the events.
                // Learn more: https://support.google.com/analytics/answer/12313109
                transaction_id: "T_12345_2",
                value: 30.03,
                tax: 4.90,
                shipping: 5.99,
                currency: "USD",
                coupon: "SUMMER_SALE",
                items: [
                {
                  item_id: "SKU_12345",
                  item_name: "Stan and Friends Tee",
                  affiliation: "Google Merchandise Store",
                  coupon: "SUMMER_FUN",
                  discount: 2.22,
                  index: 0,
                  item_brand: "Google",
                  item_category: "Apparel",
                  item_category2: "Adult",
                  item_category3: "Shirts",
                  item_category4: "Crew",
                  item_category5: "Short sleeve",
                  item_list_id: "related_products",
                  item_list_name: "Related Products",
                  item_variant: "green",
                  location_id: "ChIJIQBpAG2ahYAR_6128GcTUEo",
                  price: 10.01,
                  quantity: 3
                }]
          });
      });
    </script>
</body>
</html>
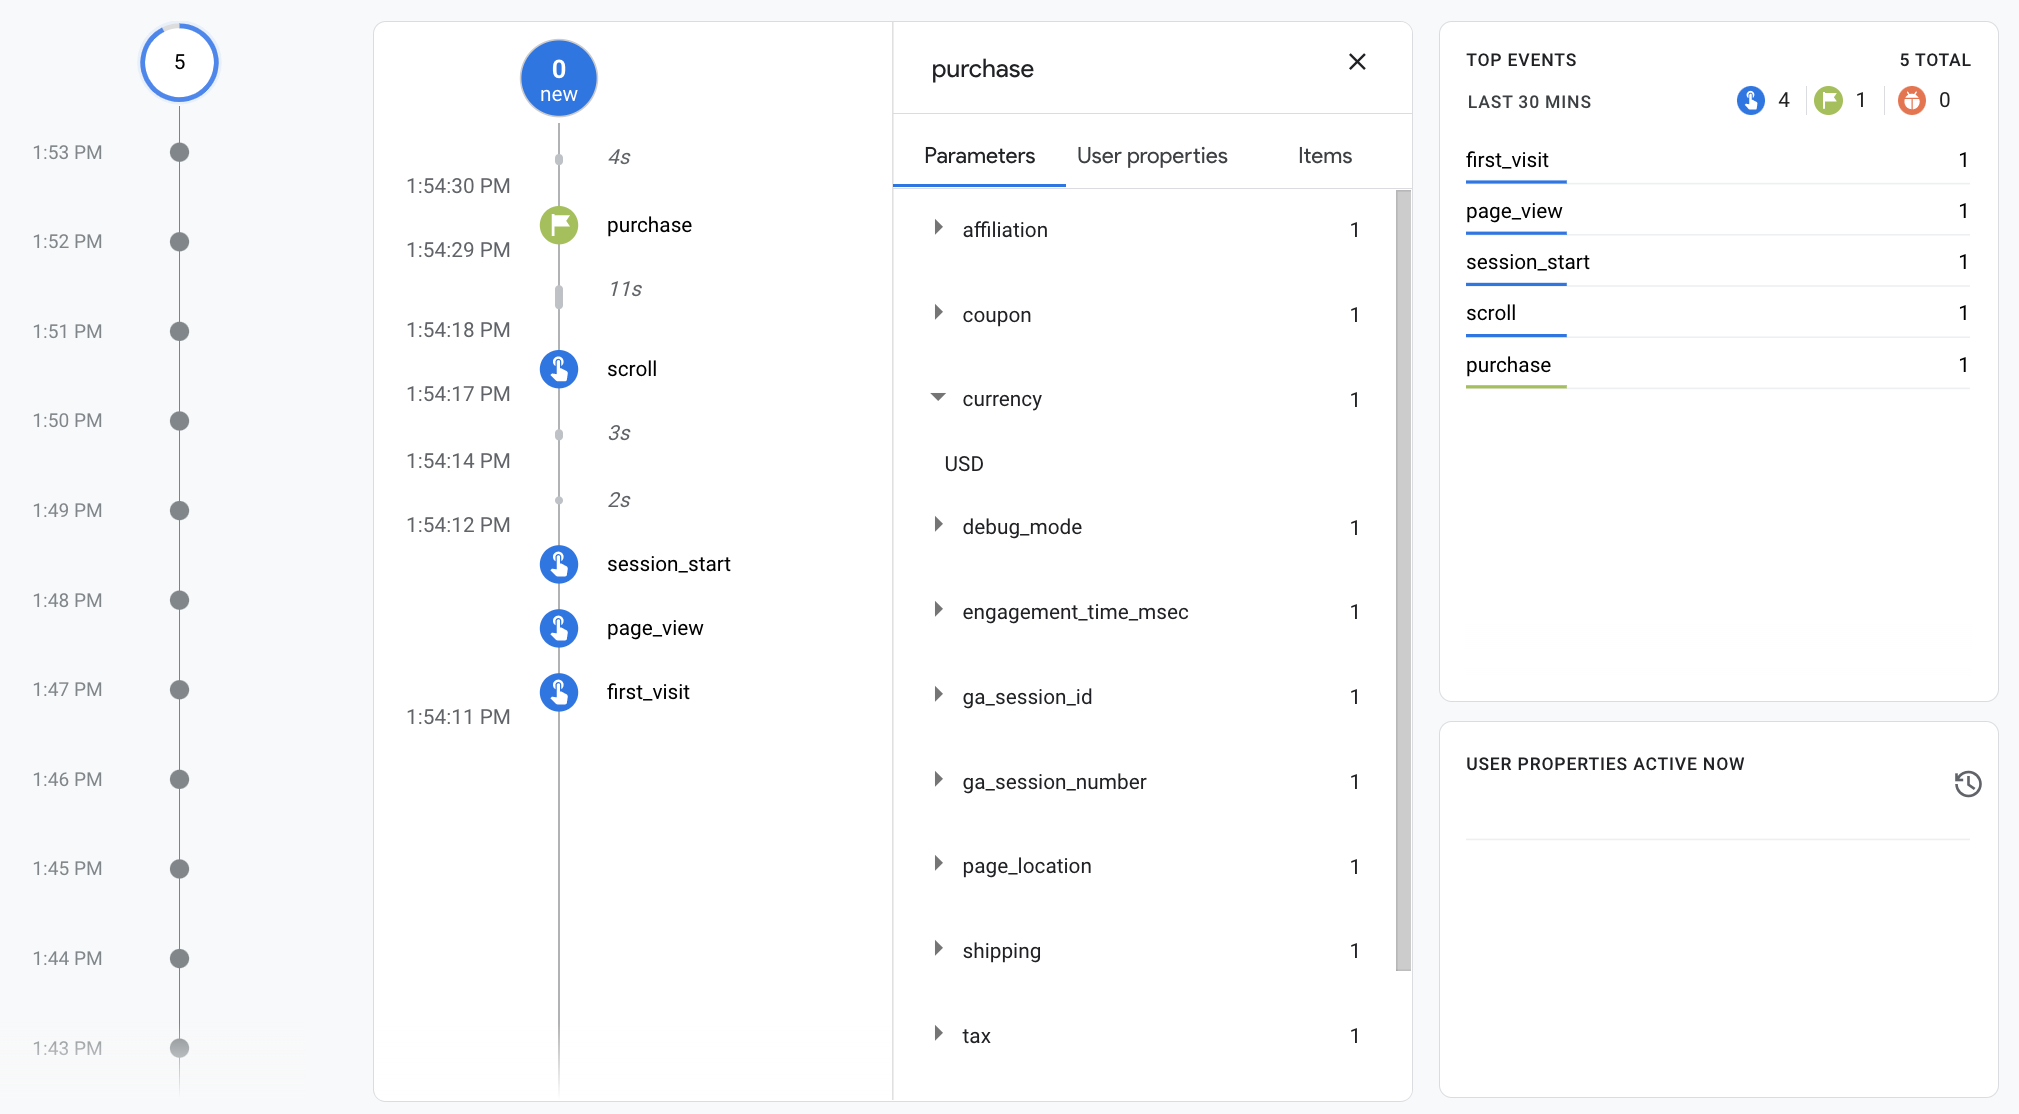
שלב 3: מוודאים שאתם אוספים את הנתונים
בדוח DebugView מוצגים נתונים בזמן אמת מהאתר, כדי שתוכלו ליצור
להגדיר את האירועים בצורה נכונה. כדי להפעיל את מצב ניפוי הבאגים בדף אינטרנט, צריך להוסיף
את הפרמטר debug_mode הבא לפקודה config:
<!--
  Note: In the following code sample, make sure to
  replace "TAG_ID" with your tag ID.
  Learn more: https://support.google.com/tagmanager/answer/12326985
-->
<!DOCTYPE html>
<html lang="en">
<head>
    <!-- Google tag (gtag.js) -->
    <script async src="https://www.googletagmanager.com/gtag/js?id=TAG_ID"></script>
    <script>
        window.dataLayer = window.dataLayer || [];
        function gtag(){dataLayer.push(arguments);}
        gtag('js', new Date());

        gtag('config', 'TAG_ID',{ 'debug_mode': true });
    </script>
</head>
<body>
    <div>This is where the purchase form would go</div>
    <button id="purchase">Purchase</button>
    <script>
    document.getElementById("purchase").addEventListener("click", function () {
        gtag("event", "purchase", {
                // This purchase event uses a different transaction ID
                // from the previous purchase event so Analytics
                // doesn't deduplicate the events.
                // Learn more: https://support.google.com/analytics/answer/12313109
                transaction_id: "T_12345_3",
                value: 30.03,
                tax: 4.90,
                shipping: 5.99,
                currency: "USD",
                coupon: "SUMMER_SALE",
                items: [
                {
                  item_id: "SKU_12345",
                  item_name: "Stan and Friends Tee",
                  affiliation: "Google Merchandise Store",
                  coupon: "SUMMER_FUN",
                  discount: 2.22,
                  index: 0,
                  item_brand: "Google",
                  item_category: "Apparel",
                  item_category2: "Adult",
                  item_category3: "Shirts",
                  item_category4: "Crew",
                  item_category5: "Short sleeve",
                  item_list_id: "related_products",
                  item_list_name: "Related Products",
                  item_variant: "green",
                  location_id: "ChIJIQBpAG2ahYAR_6128GcTUEo",
                  price: 10.01,
                  quantity: 3
                }]
        });
    });
    </script>
</body>
</html>
אחרי שמפעילים את מצב ניפוי הבאגים, מתחילים לראות אירועים שמאכלסים את יוצרים דוח DebugView כשאנשים משתמשים באתר. לדוגמה, לחיצה על "רכישה" באתר שלך מאכלס את הדוח בנתונים הבאים. אפשר לבחור אירוע כדי לראות את הפרמטרים, מאפייני המשתמשים והפריטים שמשויך לאירוע.
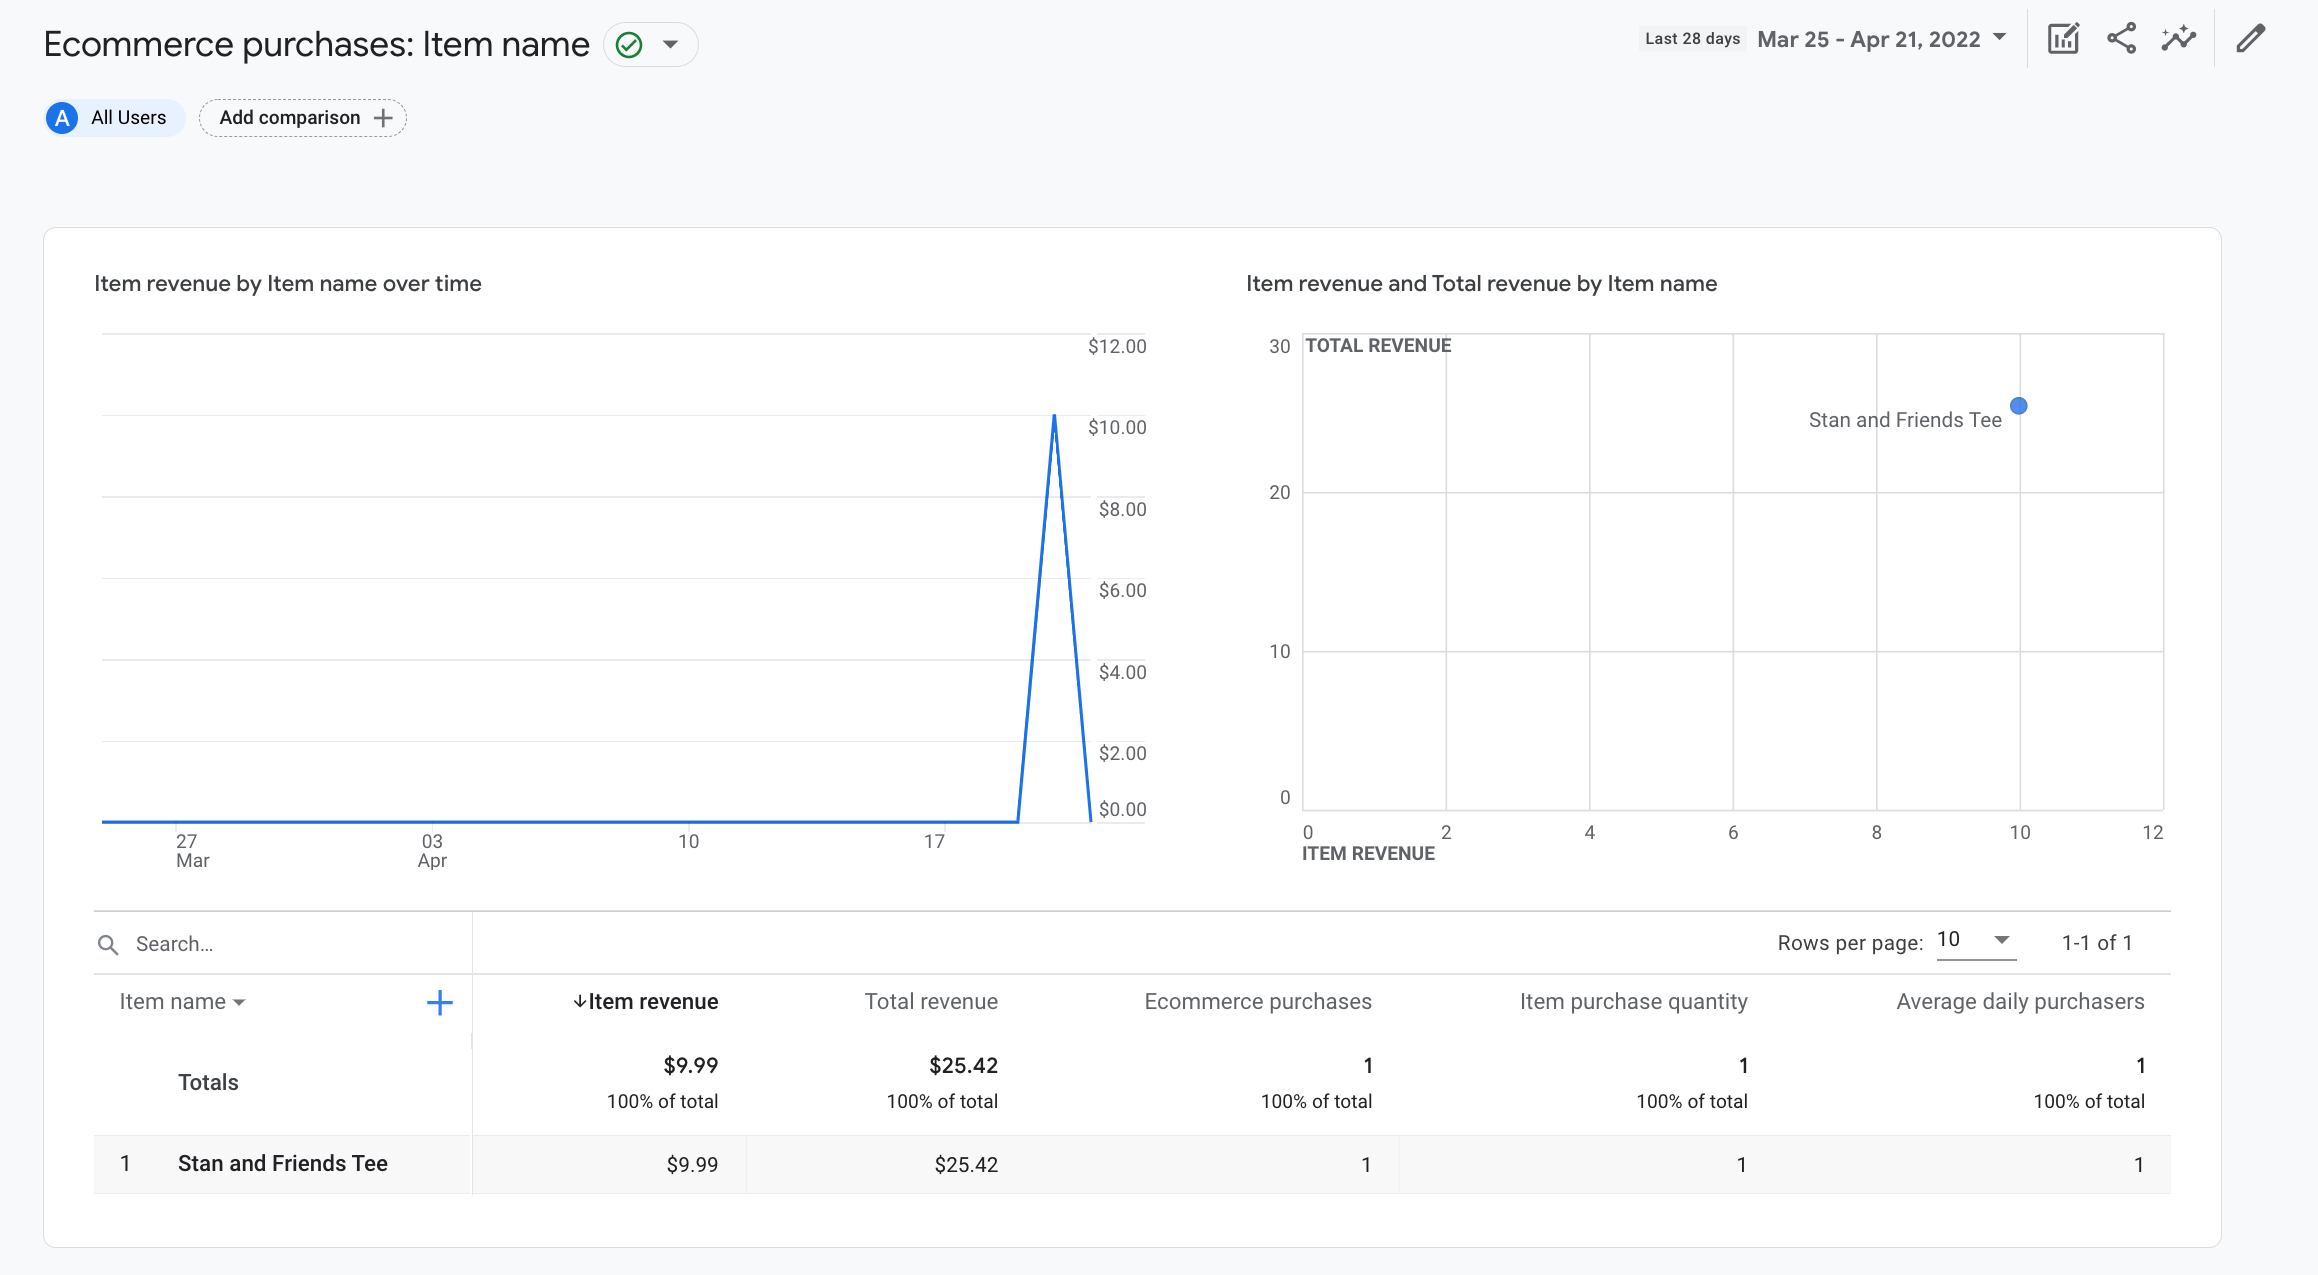
שלב 4: מציגים את נתוני המסחר האלקטרוני
לאחר כ-24 שעות, הנתונים ששלחת עם האירוע purchase הופכים
זמין בדוחות, בכלי הניתוחים וב-Google Analytics Data API.
אפשר לגשת לנתונים ב-BigQuery גם כשמגדירים את BigQuery Export.
"רכישה" האירוע מאכלס באופן אוטומטי מגוון מאפיינים שהוגדרו מראש
ומדדים שבהם נעשה שימוש בדוחות ובניתוחים.
למטה מופיעים כמה מהמאפיינים שמאוכלסים בנתונים
אירוע אחד (purchase) בשלב הראשון:
| פרמטר | מאפיין | ערך |
|---|---|---|
affiliation |
השיוך של הפריט | חנות Google Merchandise Store |
currency |
מטבע | USD |
discount |
סכום ההנחה על פריט | 2.22 |
index |
המיקום של רשימת הפריטים | 0 |
item_brand |
המותג של הפריט | |
item_category |
קטגוריית פריט | ביגוד |
item_id |
מזהה פריט | SKU_12345 |
item_list_id |
מזהה רשימת הפריטים | related_products |
item_list_name |
השם של רשימת הפריטים | מוצרים קשורים |
item_name |
שם הפריט | חולצת Stan and Friends |
item_variant |
וריאציית הפריט | green |
location_id |
מזהה מיקום של פריט | ChIJIQBpAG2ahYAR_6128GcTUEo (מזהה Google Place בסן פרנסיסקו) |
shipping |
סכום המשלוח | 5.99 |
tax |
סכום המס | 4.90 |
transaction_id |
מזהה עסקה | T_12345 |
בנוסף למאפיינים, מערכת Google Analytics מאכלסת מספר מסחר אלקטרוני ומדדים הקשורים להכנסות. לדוגמה, אם משתמש לוחץ על הלחצן 'רכישה' לחצן פעם אחת, המדדים הבאים מאוכלסים ב-Google Analytics:
- הערך של המדד הכנסה מפריט הוא 30.03$
- הערך של המדד סה"כ הכנסות הוא 30.03$
- הערך של המדד רכישות במסחר אלקטרוני הוא 1
אפשר להשתמש במאפיינים ובמדדים האלה כדי ליצור ניתוחים והתאמה אישית אבל אפשר גם להשתמש ברכישות במסחר אלקטרוני המוכנות מראש הדוח כדי לראות את נתוני המסחר האלקטרוני: