
La vinculación de cuentas se puede completar directamente en tu app para dispositivos móviles, lo que permite que los usuarios vinculen sus cuentas en tu servicio con sus Cuentas de Google. El vínculo establecido otorga a Google acceso a los datos que el usuario acepta compartir.
Este enfoque mejora el rendimiento de la vinculación de cuentas, ya que involucra a los usuarios en el contexto familiar de tu app en lugar de en una conversación con el Asistente. Se puede integrar en la incorporación de usuarios, la configuración y otras plataformas de la app, lo que crea oportunidades para el descubrimiento y la participación de tu Acción de Asistente de Google. Por ejemplo, después de la vinculación, podrías ofrecerle al usuario que lo lleve directamente a tu Acción.
Estos son algunos de los beneficios para los usuarios:
- Los usuarios pueden iniciar y completar el proceso de vinculación de cuentas en tu app, un entorno con el que ya están familiarizados.
- Los usuarios no requieren credenciales de acceso porque ya se autenticaron en el dispositivo y en tu app para dispositivos móviles.
Los desarrolladores pueden disfrutar los siguientes beneficios:
- Controla dónde promocionar e iniciar la vinculación de cuentas en tu aplicación para dispositivos móviles, por ejemplo, en la configuración del usuario, en los anuncios intersticiales o después de que un usuario accede a tu aplicación para dispositivos móviles. Agrega varios puntos de entrada para iniciar la vinculación de cuentas, lo que ayuda a que esta sea más fácil de encontrar, lo que aumenta la participación y la cantidad de cuentas vinculadas.
- Aumento en el porcentaje de conversiones, ya que los usuarios pueden completar el proceso de vinculación en menos pasos que el flujo estándar de OAuth basado en la Web.
- Se requiere un esfuerzo de ingeniería bajo para implementar el vínculo desde tu plataforma (Android), ya que este flujo aprovecha tu implementación existente de OAuth2.0, siempre y cuando ya tengas una implementada.
- Porcentajes de abandono reducidos, ya que los usuarios no necesitan volver a ingresar sus credenciales de acceso y pueden completar el proceso en menos pasos. Las tasas de abandono pueden llegar al 80% en flujos en los que los usuarios deben recuperar e ingresar sus credenciales de acceso.
Cómo funciona
La vinculación desde tu plataforma se completa en los siguientes pasos:
- El usuario hará clic o activará un activador de vinculación en tu app para dispositivos móviles.
- El usuario selecciona la Cuenta de Google que desea vincular.
- El usuario selecciona una Cuenta de Google existente en el dispositivo para vincular o accede con una cuenta nueva.
- Se le muestran al usuario pantallas de consentimiento alojadas en Google, y debe aceptar para continuar o cancelar para detener el proceso de vinculación.
- Se le muestra al usuario tu pantalla de consentimiento, y debe aceptar para continuar o cancelar para detener el proceso de vinculación.
- Se establece la vinculación entre la cuenta del usuario en tu servicio y su Cuenta de Google.
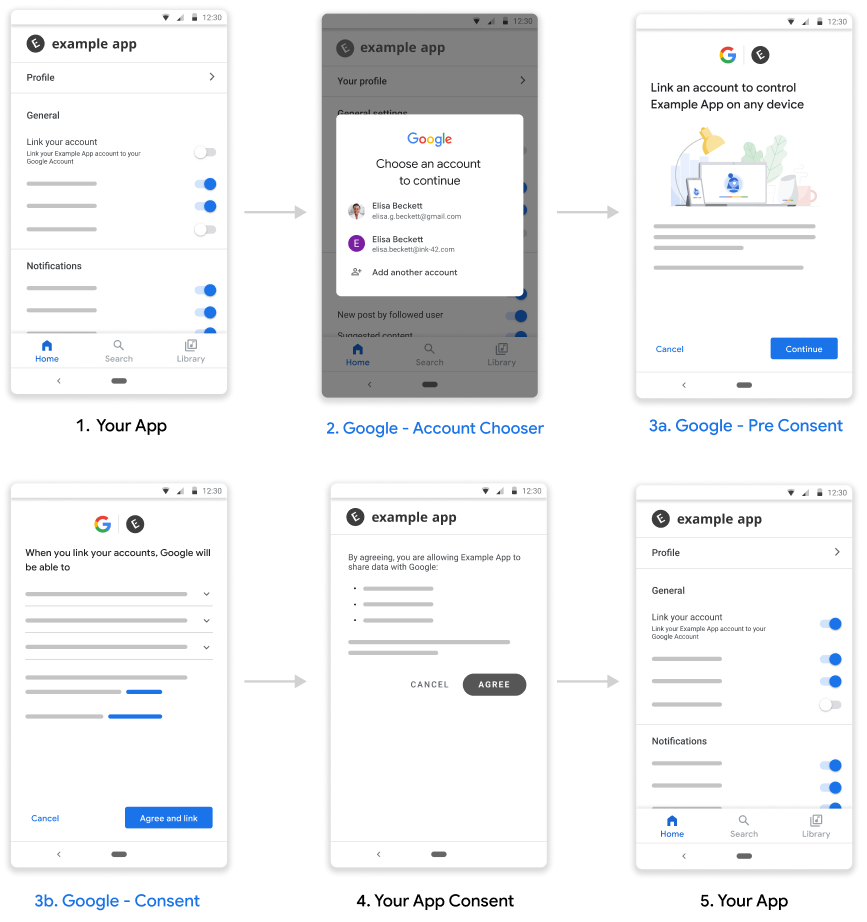
Figura 1. Flujo de vinculación desde tu plataforma
Requisitos
Para implementar la vinculación desde tu plataforma, necesitas lo siguiente:
- Una app para Android
- Poseer, administrar y mantener un servidor de OAuth 2.0 que admita el flujo de código de autorización de OAuth 2.0
Configuración
Antes de continuar con los pasos que se indican a continuación, debes haber completado el proceso de registro de vinculación de cuentas registration process.
Configura tu entorno de desarrollo
Obtén los Servicios de Google Play más recientes en tu host de desarrollo:
- Abre el Administrador de SDK de Android.
En herramientas del SDK, busca Servicios de Google Play.
Si el estado de estos paquetes no es Installed, selecciónalos y haz clic en Install Packages.
Cómo configurar tu app
En el archivo
build.gradlea nivel del proyecto, incluye el repositorio de Maven de Google en las seccionesbuildscriptyallprojects.buildscript { repositories { google() } } allprojects { repositories { google() } }Agrega las dependencias de la API de “Vincular con Google” al archivo Gradle a nivel de la app de tu módulo, que suele ser
app/build.gradle:dependencies { implementation 'com.google.android.gms:play-services-auth:21.6.0' }
Agrega compatibilidad con la vinculación desde tu plataforma
El flujo de vinculación desde tu plataforma hará que Google guarde un token de acceso que proporciona tu servicio. Se debe recibir el consentimiento antes de devolver el token al usuario.
Sigue los pasos que se indican a continuación para obtener el consentimiento del usuario y devolver un token de código de autenticación a través del SDK de los Servicios de Google Play.
Compila un PendingIntent que pueda iniciar tu actividad de consentimiento. La API de Play Services inicia el consentimiento. Deberás proporcionar un
PendingIntent(que se denominaráconsentPendingIntentpara mayor claridad) cuando se llame a la API.Kotlin
// Build a PendingIntent that can launch the consent activity
val consentPendingIntent = buildConsentPendingIntent()
Java
// Build a PendingIntent that can launch your consent activity
PendingIntent consentPendingIntent =
          buildConsentPendingIntent();
Crea la actividad correspondiente para controlar el intent de consentimiento.
Kotlin
  class ConsentActivity : AppCompatActivity

  private fun onConsentAccepted() {
      // Obtain a token (for simplicity, we’ll ignore the async nature
      // of the following call)
      val token = getToken()
      val intent = Intent()
                  .putExtra(SaveAccountLinkingTokenRequest.EXTRA_TOKEN,
                            token)
      setResult(Activity.RESULT_OK, intent)
      finish()
  }

  private fun onConsentRejectedOrCanceled() {
      setResult(Activity.RESULT_CANCELED)
      finish()
  }
Java
  public class ConsentActivity extends AppCompatActivity {
    ...
    private void onConsentAccepted() {
      // Obtain a token (for simplicity, we’ll ignore the async nature of
      // the following call
      String token = getToken();
      Intent intent = new Intent();
      intent.putExtra(SaveAccountLinkingTokenRequest.EXTRA_TOKEN, token);
      setResult(Activity.RESULT_OK, intent);
      finish();
    }

    private void onConsentRejectedOrCanceled() {
      setResult(Activity.RESULT_CANCELED, null);
      finish();
    }
 }
Suponemos que se llaman a los métodos
onConsentAccpeted()yonConsentRejectedOrCanceled()si el usuario acepta o rechaza/cancela tu consentimiento, respectivamente.Crea una solicitud para guardar el token y, entre otros parámetros de configuración, pasa el
PendingIntentcreado en el paso 1 anterior.Kotlin
  // Create an ActivityResultLauncher which registers a callback for the
  // Activity result contract
  val activityResultLauncher = registerForActivityResult(
    ActivityResultContracts.StartIntentSenderForResult())
    { result ->
      if (result.resultCode == RESULT_OK) {
        // Successfully finished the flow and saved the token
      } else {
        // Flow failed, for example the user may have canceled the flow
      }
    }

  // Build token save request
  val request = SaveAccountLinkingTokenRequest.builder()
    .setTokenType(SaveAccountLinkingTokenRequest.TOKEN_TYPE_AUTH_CODE)
    .setConsentPendingIntent(consentPendingIntent)
    .setServiceId("service-id-of-and-defined-by-developer")
    //Set the scopes that the token is valid for on your platform
    .setScopes(scopes)
    .build()

   // Launch consent activity and retrieve token
   Identity.getCredentialSavingClient(this)
     .saveAccountLinkingToken(request)
     .addOnSuccessListener( saveAccountLinkingTokenResult -> {
        if (saveAccountLinkingTokenResult.hasResolution()) {
          val pendingIntent = saveAccountLinkingTokenResult
                              .getPendingIntent()
          val intentSenderRequest = IntentSenderRequest
                                    .Builder(pendingIntent).build()
          activityResultLauncher.launch(intentSenderRequest)
        } else {
           // This should not happen, let’s log this
           Log.e(TAG, "Failed to save token");
        }
      })
      .addOnFailureListener(e -> Log.e(TAG, “Failed to save token”, e))
Java
  // Create an ActivityResultLauncher which registers a callback for the
  // Activity result contract
  ActivityResultLauncher<IntentSenderRequest>
      activityResultLauncher =
      registerForActivityResult(new ActivityResultContracts
                                    .StartIntentSenderForResult(),
                                result -> {
      if (result.getResultCode() == RESULT_OK) {
          // Successfully finished the flow and saved the token
      } else {
          // Flow failed, for example the user may have canceled the flow
      }
  });

 // Build token save request
 SaveAccountLinkingTokenRequest request =
    SaveAccountLinkingTokenRequest.builder()
        .setTokenType(
            SaveAccountLinkingTokenRequest.TOKEN_TYPE_AUTH_CODE)
        .setConsentPendingIntent(consentPendingIntent)
        .setServiceId("service-id-of-and-defined-by-developer")
        //Set the scopes that the token is valid for on your platform
        .setScopes(scopes)
        .build();

  // Launch consent activity and retrieve token
  Identity.getCredentialSavingClient(this)
      .saveAccountLinkingToken(request)
      .addOnSuccessListener(
          saveAccountLinkingTokenResult -> {
            if (saveAccountLinkingTokenResult.hasResolution()) {
              // Launch the resolution intent
              PendingIntent pendingIntent =
                  saveAccountLinkingTokenResult.getPendingIntent();
              IntentSenderRequest intentSenderRequest =
                  new IntentSenderRequest.Builder(pendingIntent).build();
              activityResultLauncher.launch(intentSenderRequest);
            } else {
              // This should not happen, let’s log this
              Log.e(TAG, "Failed to save token");
            }
          })
      .addOnFailureListener(e -> Log.e(TAG, "Failed to save token", e));
  ```
Los pasos anteriores solicitan el consentimiento del usuario y devuelven un código de autorización a Google.
Prácticas recomendadas
Tu app debe indicar el estado de vinculación al usuario a través de un botón, un botón de activación o un elemento visual similar.

Figura 1. Imagen de ejemplo del estado de vinculación
Debes notificar al usuario después de una vinculación exitosa, p.ej., mostrar un mensaje emergente, activar un cambio de estado o redireccionar al usuario a una página de éxito de vinculación independiente.
Te recomendamos que solicites a los usuarios de la app que vinculen sus cuentas, idealmente en función de indicadores sólidos de que la vinculación los beneficiaría.
Después de vincular correctamente, debes darles a los usuarios un ejemplo de qué hacer con la cuenta vinculada, p.ej., si acabas de vincular un servicio de transmisión de música, pídele a Asistente de Google que reproduzca música.
Permite que los usuarios administren sus cuentas vinculadas, incluida la opción de desvincularlas. Dirígelos a su página de administración de cuentas vinculadas de Google, es decir, https://myaccount.google.com/accountlinking.
Referencia
Documentación de referencia de la API de autenticación de Android