Page Summary
-
SimpleExampleServlet is the simplest example implementation of a data source provided with the library.
-
Instructions are given for running and testing SimpleExampleServlet by creating a web application and viewing the data with a visualization.
-
Creating a web application on Apache Tomcat involves setting up directories, copying necessary files, and configuring the web.xml.
-
Testing the setup involves accessing the servlet URL to see the returned data and a separate HTML file to view the data visualized.
This section introduces SimpleExampleServlet, which is
the simplest example implementation of a data source that is provided
with the library. This section also provides step-by-step instructions
on how to run and test SimpleExampleServlet.
Introducing SimpleExampleServlet
The SimpleExampleServlet class is located in the examples
package. This class provides an example of the simplest implementation
of a data source. SimpleExampleServlet inherits from DataSourceServlet,
implements generateDataTable(), and must be run
within a servlet container.
A snippet of SimpleExampleServlet is provided below. The generateDataTable function
exposes data to the library. This function creates a data table description,
defines the data table columns, and populates the data table with data.
The library handles all other actions required to return the data table
to the querying visualization.
// This example extends DataSourceServlet public class SimpleExampleServlet extends DataSourceServlet { @Override public DataTable generateDataTable(Query query, HttpServletRequest request) { // Create a data table, DataTable data = new DataTable(); ArrayListcd = new ArrayList (); cd.add(new ColumnDescription("name", ValueType.TEXT, "Animal name")); cd.add(new ColumnDescription("link", ValueType.TEXT, "Link to wikipedia")); cd.add(new ColumnDescription("population", ValueType.NUMBER, "Population size")); cd.add(new ColumnDescription("vegeterian", ValueType.BOOLEAN, "Vegetarian?")); data.addColumns(cd); // Fill the data table. try { data.addRowFromValues("Aye-aye", "http://en.wikipedia.org/wiki/Aye-aye", 100, true); data.addRowFromValues("Sloth", "http://en.wikipedia.org/wiki/Sloth", 300, true); data.addRowFromValues("Leopard", "http://en.wikipedia.org/wiki/Leopard", 50, false); data.addRowFromValues("Tiger", "http://en.wikipedia.org/wiki/Tiger", 80, false); } catch (TypeMismatchException e) { System.out.println("Invalid type!"); } return data; } }
Running and testing SimpleExampleServlet
This section provides instructions on how to run and test SimpleExampleServlet.
If you haven't already done so, see the Installation section for information about prerequisites, and instructions on how to download and build the library. Make sure you install a web server that also functions as a servlet container, such as Apache Tomcat, if you do not already have one on your system. The instructions in this section are specific to Apache Tomcat on a Windows system.
To run and test SimpleExampleServlet, create a web application
that
runs the SimpleExampleServlet data source,
then run an example web
page with a visualization showing data queried from the data
source. This is described in the following sections:
Creating a Web Application on Apache Tomcat
Follow or adapt the instructions below to create a web application on Apache Tomcat. These instructions are specific to Apache Tomcat on a Windows system:
- Navigate to the directory in which you installed Tomcat. This is written
in this document as
<tomcat_home>.
- Navigate to
the
webappssubdirectory.
- Create a subdirectory called
myWebApp.
- Change to the subdirectory you have just created and create another
subdirectory called
WEB-INF.
- Change to the
WEB-INFsubdirectory and create another subdirectory calledlib.
The full path should be<tomcat_home>/webapps/myWebApp/WEB-INF/lib.
- Copy
web.xmlfrom<data_source_library_install>/examples/src/htmlto theWEB-INFdirectory. Where<data_source_library_install>is the directory in which you installed the data source library. The following lines inweb.xmldefine and mapSimpleExampleServlet:
<servlet>
  <servlet-name>My Servlet</servlet-name>
  <description>My servlet description.</description>
  <servlet-class>SimpleExampleServlet</servlet-class>
</servlet>

<servlet-mapping>
  <servlet-name>My Servlet</servlet-name>
  <url-pattern>/simpleexample</url-pattern>
</servlet-mapping>
- Navigate to the directory in which you installed the data source library.
This is written in this document as
<data_source_library_install>.
- Copy all the dependency packages
to
<tomcat_home>/webapps/myWebApp/WEB-INF/lib. The packages are installed in<data_source_library_install>/lib, unless you put them in a different directory.
- If you have built the library yourself, copy
visualization-datasource-1.0.2.jarandvisualization-datasource-examples.jar
from<data_source_library_install>/build
to<tomcat_home>/webapps/myWebApp/WEB-INF/lib.
If you have unzipped the zip file, copyvisualization-datasource-1.0.2.jarandvisualization-datasource-examples.jar
from<data_source_library_install>
to<tomcat_home>/webapps/myWebApp/WEB-INF/lib.
Note that the version number in the jar file name may vary depending on the latest version number.
- Start Tomcat, or restart Tomcat if it is already running.
- Click the following link:
http://localhost:8080/myWebApp/simpleexample
The screen displays 6-7 lines of text, depending on your screen width.
The text begins withgoogle.visualization.Query.setResponse
and ends with/Tiger'},{v:80.0},{v:false}]}]}});
This is the data that is returned by your data source to a querying visualization.
Using a Visualization to View the Data
The getting_started.html file in the <data_source_library_install>/examples/src/html directory
can be used to view a visualization of the data. The following line, taken
from getting_started.html, specifies
the servlet to use. The servlet mapping was set up in step 8 of Creating
a Web Application on Apache Tomcat.
var query = new google.visualization.Query('simpleexample');
For more information on how to specify a visualization and use the query language, see Using Charts and the Query Language Reference.
Follow, or adapt, the instructions below to view a visualization of the data provided by the data source:
- Copy the
getting_started.htmlfile from the<data_source_library_install>/examples/src/htmldirectory
to the<tomcat_home>/webapps/myWebApp/directory.
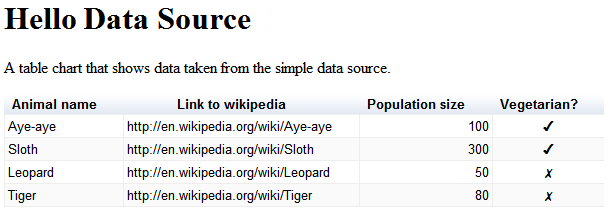
- Click the following link http://localhost:8080/myWebApp/getting_started.html,
you should see the following:

That's it! You have set up your first data source.
Next Steps
The next example is described in the Using an External Data Store section. Alternatively you can return to the Introduction, or explore the following links:
- For an introduction to the library's most commonly used classes, see Key Classes.
- For an example of how to implement your own flow of events, and query capabilities, see Defining Capabilities and the Flow of Events.
- If you do not want to inherit from
DataSourceServlet, you can implement a data source as described in Using Your Own Servlet. For example you might not want to inherit fromDataSourceServletif you inherit a servlet from another class. - If you do not want to use a servlet, see Implementing a Non-servlet Data Source.
- To learn about how to pass parameters from an application to a data
source, see Passing Parameters to
DataTableGenerator.generateDataTable.