如果您的 GDK Glassware 需要透過網路服務驗證使用者, GDK 提供的 API 可讓使用者在 安裝 Glassware。
使用此 API 即可提供一致的使用者 Glass 使用者的使用體驗,不必自行實作。 自訂驗證機制
建立 Google API 服務帳戶
如果正確設定驗證程序,網頁應用程式的後端 可使用 Mirror API 推送使用者將帳戶資訊提供給 Glass 向對方發出服務驗證要求
如要存取這個 API,請建立 Google API 專案,然後 建立「服務帳戶」的用戶端 ID(且不是「網頁應用程式」)。變更者: 只要使用服務帳戶,使用者就不必另外授予 應用程式權限,無法將憑證推送至 Glass 會看到 OAuth 權限頁面和您自己的驗證 網頁。
如要建立這個帳戶,請按照下列步驟操作:
- 前往 Google Developers Console。
- 按一下「建立專案」按鈕,然後輸入必要資訊。
- 建立專案後,請記下專案編號, 稍後會用到
- 在「API 與」驗證,按一下 API,並啟用 Google Mirror API 建立新專案
- 在「API 與」驗證,然後依序按一下憑證和建立新用戶端 ID:勾選標示「服務帳戶」的方塊,建立新的 OAuth 2.0 專案的用戶端 ID。
- 畫面上會顯示彈出式視窗,告知系統正在下載私密金鑰 並提供該私密金鑰的密碼。 關閉這個視窗後,你就無法下載這個私人影片 金鑰,或是再次看到密碼。如果資料遺失,您必須建立新的 一。
- 記下服務帳戶的電子郵件地址,您將需要使用該電子郵件地址 再進行 API 呼叫
提供 Glassware 的相關中繼資料
準備提交 Glassware 時,您必須提供 下列資訊。方便我們將您的 Glassware 設為 才能正確驗證
- 您的驗證網址,系統將使用者重新導向 他們在 MyGlass 中開啟你的 Glassware。
- 帳戶類型 (當您呼叫
Glass 裝置上的 Android
AccountManagerAPI) AndroidManifest.xml中的應用程式套件名稱- 您所建立專案的 Google API 專案 ID (數值) 高於
- 要上傳到 MyGlass 的 APK。針對測試,您只需要提供
這個 APK 只需在 Glassware 於
這原本就在 MyGlass 內開啟;之後,您就可以在本機上疊代並偵錯
來覆寫裝置上的 APK請注意,這個 APK 必須符合
符合以下條件:
- 必須與 zip 對齊。
- 您不得變更套件名稱或私人簽名 才能升級金鑰 (Android 套件管理員不允許升級) 如果有任何異動,就會觸發這個事件
- 必須小於 50 MB。
- 必須使用最新版本的 GDK 編譯。
實作驗證流程
下圖顯示 GDK Glassware:
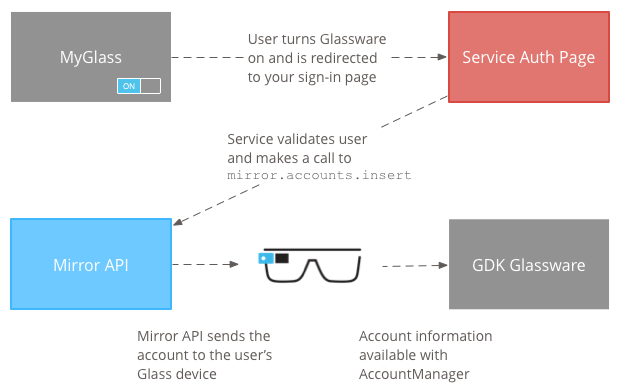
如何實作驗證流程:
使用者在 MyGlass 中啟用您的 Glassware 後,系統會將他們重新導向 並新增至驗證網址。這些要求包含一個名為
userToken,稍後需要用到。使用者在驗證頁面輸入自己的憑證。
您的伺服器會驗證使用者的憑證。如果憑證有效 對
mirror.accounts.insert方法發出 Mirror API 呼叫。這個方法 您必須指定https://www.googleapis.com/auth/glass.thirdpartyauth範圍 鏡像服務物件。使用原始 HTTP 或 Java 如帳戶建立範例所示。您在下方提供的參數和要求主體中 需要提供給 Android 的
AccountManager的資訊 直接在裝置上建立帳戶屬性名稱 值 說明 features[]字串清單 功能清單 (請參閱 AccountManager.hasFeatures)。password字串 帳戶密碼 (請參閱 AccountManager.getPassword)。建議做法 「並未」儲存使用者的實際密碼 而是用來儲存長期私人內容 例如更新權杖userData[]物件清單 與帳戶相關聯的一或多組使用者資料 (請參閱 AccountManager.getUserData)。userData[].key字串 與特定使用者資料鍵/值相關聯的鍵 配對。 userData[].value字串 與特定使用者資料鍵/值相關聯的值 配對。 authTokens[]物件清單 與該帳戶相關聯的一或多個驗證權杖 (請參閱 AccountManager.getAuthToken)。authTokens[].type字串 驗證權杖的類型。 authTokens[].authToken字串 驗證權杖。 收到
mirror.account.insert要求後,Mirror API 會推送 登入使用者的 Google Glass 裝置,方便您存取 透過AccountManager類別建立物件 ID
建議的驗證流程
請按照下列指南實作容易使用的驗證流程:
- 配合行動裝置調整廣告流程。
- 如果流程有範圍且使用者取消,請使用設計完善的 錯誤訊息。
- 確認您要求的範圍確實已在 Glassware 中使用。
- 如果可連結使用者帳戶,請務必建立連結。
- 並盡可能將使用者資料備份到雲端。
如要維持 Glassware 驗證的一致性,請使用下列其中一種做法 驗證流程:
在沒有帳戶的情況下鏡像或混合
- 在 MyGlass 中啟用這項功能後,驗證網址隨即會在彈出式視窗中開啟。
- 這會直接將使用者導向接受的範圍。
- 在使用者接受或取消範圍後,請關閉彈出式視窗。
使用帳戶鏡像
- 在 MyGlass 中啟用這項功能後,驗證網址隨即會在彈出式視窗中開啟。
- 如果使用者已登入服務,請直接將他們傳送給使用者 範圍。
- 如果使用者未登入,請顯示登入欄位,並允許使用者登入 再將資料傳送至範圍
- 如果使用者沒有帳戶,請提供建立 讓他們使用服務帳戶使用者必須具有建立帳戶的方式, 安裝流程
- 使用者接受範圍。
- 如果您的 Glassware 有可調整的設定,請將使用者導向 頁面,其中已選取合理的預設值。
- 如果您的 Glassware 沒有可供調整的設定,請將使用者導向 確認頁面如果沒有額外設定,請關閉彈出式視窗 這通常代表交易 不會十分要求關聯語意
使用帳戶的混合模式
- 在 MyGlass 中啟用這項功能後,驗證網址隨即會在彈出式視窗中開啟。
- 如果使用者已登入服務,請直接將他們傳送給使用者 範圍。
- 如果使用者未登入,顯示登入欄位,允許他們登入 再將資料傳送至範圍
- 如果使用者沒有帳戶,請提供建立帳戶的連結。
- 使用者接受範圍。
- 傳送要求至 Mirror API,以插入 GDK 帳戶。
- 將使用者導向設定網頁,且已選取合理的預設值。
- 向使用者傳送確認頁面。如果沒有其他說明,請關閉彈出式視窗 必須選取設定
使用帳戶和自訂範圍建立鏡像或混合模式
- 在 MyGlass 中啟用這項功能後,驗證網址隨即會在彈出式視窗中開啟。
- 如果使用者已經登入服務,請將使用者帶往您的 內部範圍
- 如果使用者未登入,顯示登入欄位,允許他們登入 再傳送至內部範圍
- 如果使用者沒有帳戶,請提供建立帳戶的連結。
- 使用者接受您的自訂範圍後,請將使用者傳送到 Google 的範圍。
- 傳送要求至 Mirror API,以插入 GDK 帳戶。
- 將使用者導向設定網頁,且已選取合理的預設值。
- 向使用者傳送確認頁面。如果沒有其他說明,請關閉彈出式視窗 必須選取設定
透過 Android/iPhone 應用程式享受鏡像或混合地圖
- 在 MyGlass 中啟用這項功能後,驗證網址隨即會在彈出式視窗中開啟。
- 這會直接將使用者導向接受的範圍。
- 使用者接受範圍後:
- 如果使用者擁有隨附應用程式且已通過驗證,請關閉彈出式視窗 視窗。
- 如果沒有,則請將使用者帶往插頁式廣告,引導他們下載 請前往 Google Play 商店或 iOS 商店
- 安裝應用程式並進行驗證後,請關閉彈出式視窗
GDK 但沒有帳戶
如要進行這個流程,只需在 MyGlass 中切換 Glassware 即可。
GDK (登入帳戶)
- 在 MyGlass 中啟用這項功能後,驗證網址隨即會在彈出式視窗中開啟。
- 如果使用者已經登入服務,請將使用者導向 確認畫面。
- 如果使用者未登入,請顯示登入欄位,讓他們能 登入,然後傳送到確認畫面
- 如果使用者沒有帳戶,請提供建立帳戶的連結。
- 使用者接受範圍。
- 傳送要求至 Mirror API,以插入 GDK 帳戶。
- 顯示確認畫面,然後在顯示訊息後關閉 壓低成本
帳戶建立範例
使用用戶端程式庫
。這會呼叫 mirror.accounts.insert
輕鬆建立帳戶
原始 HTTP 範例
以下範例只會顯示要求的網址,以及 符合其要求的 JSON 主體代表服務提出原始 HTTP 要求 是比較複雜的帳戶 (詳情請參閱 針對伺服器對伺服器應用程式使用 OAuth 2.0 以便取得完整詳細資料),因此我們建議您使用其中一個 Google API 用戶端程式庫 盡可能提供相關資訊
要求方法和網址:
POST https://www.googleapis.com/mirror/v1/accounts/{userToken}/com.example.myapp/username%40email.com
要求主體:
{
    "features": ["a", "b", "c"],
    "userData": [
        { "key": "realName", "value": "Rusty Shackleford" },
        { "key": "foo", "value": "bar" }
    ],
    "authTokens": [
        { "type": "your_token_type", "authToken": "zT419Ma3X2pBr0L..." }
    ]
}
將要求網址中的 {userToken} 替換為傳遞給該權杖的權杖
步驟 1 的
實作驗證流程。
Java 範例
本範例說明如何使用 Java 用戶端程式庫
mirror.accounts.insert
import com.google.api.client.googleapis.auth.oauth2.GoogleCredential;
import com.google.api.client.http.HttpTransport;
import com.google.api.client.http.javanet.NetHttpTransport;
import com.google.api.client.json.JsonFactory;
import com.google.api.client.json.jackson.JacksonFactory;
import com.google.api.services.mirror.Mirror;
import com.google.api.services.mirror.model.Account;
import com.google.api.services.mirror.model.AuthToken;
import com.google.common.collect.Lists;
...

/** Email of the Service Account */
private static final String SERVICE_ACCOUNT_EMAIL =
    "<some-id>@developer.gserviceaccount.com";

/** Path to the Service Account's Private Key file */
private static final String SERVICE_ACCOUNT_PKCS12_FILE_PATH =
    "/path/to/<public_key_fingerprint>-privatekey.p12";

/** The account type, usually based on your company or app's package. */
private static final String ACCOUNT_TYPE = "com.example.myapp";

/** The Mirror API scopes needed to access the API. */
private static final String MIRROR_ACCOUNT_SCOPES =
    "https://www.googleapis.com/auth/glass.thirdpartyauth";

/**
 * Build and returns a Mirror service object authorized with the service accounts.
 *
 * @return Mirror service object that is ready to make requests.
 */
public static Mirror getMirrorService() throws GeneralSecurityException,
    IOException, URISyntaxException {
  HttpTransport httpTransport = new NetHttpTransport();
  JacksonFactory jsonFactory = new JacksonFactory();
  GoogleCredential credential = new GoogleCredential.Builder()
      .setTransport(httpTransport)
      .setJsonFactory(jsonFactory)
      .setServiceAccountId(SERVICE_ACCOUNT_EMAIL)
      .setServiceAccountScopes(MIRROR_ACCOUNT_SCOPES)
      .setServiceAccountPrivateKeyFromP12File(
          new java.io.File(SERVICE_ACCOUNT_PKCS12_FILE_PATH))
      .build();
  Mirror service = new Mirror.Builder(httpTransport, jsonFactory, null)
      .setHttpRequestInitializer(credential).build();
  return service;
}

/**
 * Creates an account and causes it to be synced up with the user's Glass.
 * This example only supports one auth token; modify it if you need to add
 * more than one, or to add features, user data, or the password field.
 *
 * @param mirror the service returned by getMirrorService()
 * @param userToken the user token sent to your auth callback URL
 * @param accountName the account name for this particular user
 * @param authTokenType the type of the auth token (chosen by you)
 * @param authToken the auth token
 */
public static void createAccount(Mirror mirror, String userToken, String accountName,
    String authTokenType, String authToken) {
  try {
    Account account = new Account();
    List<AuthToken> authTokens = Lists.newArrayList(
        new AuthToken().setType(authTokenType).setAuthToken(authToken));
    account.setAuthTokens(authTokens);
    mirror.accounts().insert(
        userToken, ACCOUNT_TYPE, accountName, account).execute();
  } catch (IOException e) {
    e.printStackTrace();
  }
}
在 Glass 擷取帳戶
擷取並使用 Account
Glass 的物件與使用標準的 Android 裝置類似
AccountManager。
在
AndroidManifest.xml檔案中宣告下列資訊清單權限:<uses-permission android:name="android.permission.GET_ACCOUNTS" /> <uses-permission android:name="android.permission.USE_CREDENTIALS" />擷取 Glassware 的帳戶:
AccountManager accountManager = AccountManager.get(mContext);
// Use your Glassware's account type.
Account[] accounts = accountManager.getAccountsByType("com.example");

// Pick an account from the list of returned accounts.
從
Account擷取驗證權杖:// Your auth token type. final String AUTH_TOKEN_TYPE = "oauth2:https://www.example.com/auth/login"; accountManager.getAuthToken(account, AUTH_TOKEN_TYPE, null, activity, new AccountManagerCallback<Bundle>() { public void run(AccountManagerFuture<Bundle> future) { try { String token = future.getResult().getString(AccountManager.KEY_AUTHTOKEN); // Use the token. } catch (Exception e) { // Handle exception. } } }, null);