Le schede attive vengono visualizzate nella sezione attuale della sequenza temporale e mostrano informazioni pertinenti al momento attuale.
Le schede live sono ideali quando gli utenti sono attivamente impegnati in un'attività, ma vogliono controllare periodicamente Glass per ulteriori informazioni. Ad esempio, per controllare il tempo trascorso durante una corsa a intervalli di pochi minuti o controllare un lettore musicale per saltare o mettere in pausa un brano.
Se è la prima volta che sviluppi per Glass, leggi prima la guida relativa alle attività continue. Il documento spiega come creare un Glassware completo con una scheda online, seguendo le best practice di progettazione.
Funzionamento
Le schede attive consentono di mantenere le schede nella sezione attuale della sequenza temporale per tutto il tempo pertinenti. A differenza delle schede statiche, le live card non rimangono nella sequenza temporale e gli utenti le rimuovono esplicitamente dopo che hanno finito di utilizzarle.
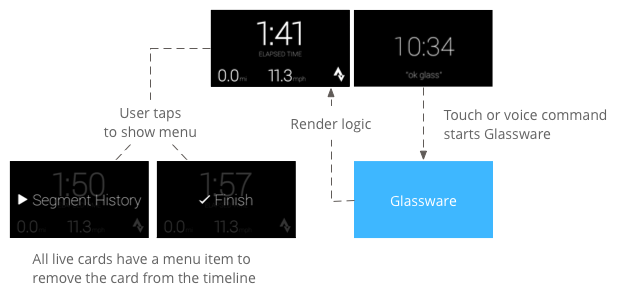
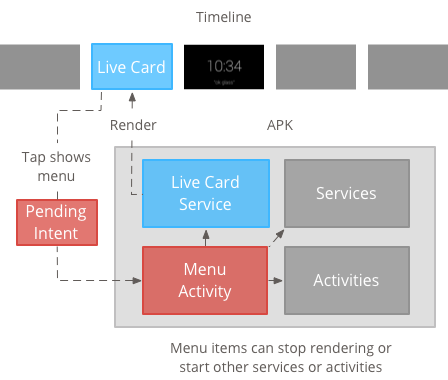
Gli utenti in genere avviano le schede pubblicate pronunciando un comando vocale nel menu principale, che avvia un servizio in background che esegue il rendering della scheda. Possono quindi toccare la scheda per mostrare le voci di menu che possono agire sulla scheda, ad esempio chiuderla dalla sequenza temporale.
Quando utilizzarli
Le schede live sono progettate per attività in corso a cui gli utenti possono accedere e uscire spesso, ad esempio una visualizzazione che mostra lo stato di esecuzione di un'azione, una mappa animata durante la navigazione o un lettore musicale.
Un altro vantaggio delle schede live è che sono adatte a UI che richiedono l'interazione in tempo reale con gli utenti e aggiornamenti dell'UI.
Quando utilizzi le schede online, la sequenza temporale continua ad avere il controllo sull'esperienza dell'utente, quindi se scorri in avanti o indietro su una scheda attiva, puoi spostarti nella sequenza temporale invece di agire sulla scheda stessa. Inoltre, lo schermo si attiva e disattiva in base al comportamento del sistema (dopo 5 secondi senza interazione dell'utente o durante un sollecito verso l'alto).
Tuttavia, le schede live hanno accesso a molte delle funzionalità di un'immersione, come ad esempio i dati dei sensori o GPS. In questo modo puoi creare esperienze avvincenti e, allo stesso tempo, consentire agli utenti di rimanere nella sequenza temporale per fare altre cose, come controllare i messaggi.
Architettura
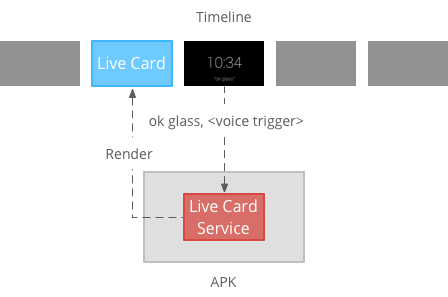
Le schede live richiedono un contesto a lungo termine per detenerne la proprietà per tutto il tempo in cui sono visibili, quindi gestiscile in un servizio in background.
Puoi quindi pubblicare ed eseguire il rendering di una scheda pubblicata all'avvio del servizio o in risposta ad altri eventi monitorati dal servizio. Puoi eseguire il rendering delle schede attive con una frequenza bassa (una volta ogni pochi secondi) o alta (fino al numero di volte che il sistema può aggiornare).
Quando la scheda live non è più pertinente, elimina il servizio per interrompere il rendering.
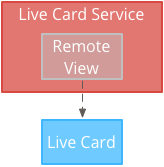
Rendering a bassa frequenza
Il rendering a bassa frequenza è limitato a un piccolo gruppo di visualizzazioni Android e può aggiornare il display solo una volta ogni pochi secondi.
È un modo semplice per creare schede attive con contenuti semplici che non richiedono rendering costante o aggiornamenti frequenti.
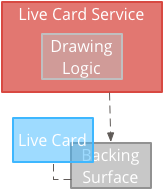
Rendering ad alta frequenza
Il rendering ad alta frequenza ti consente di utilizzare un maggior numero delle opzioni disponibili nel framework grafico Android.
Il sistema fornisce l'effettiva superficie di supporto della scheda pubblicata su cui disegni direttamente utilizzando visualizzazioni e layout 2D o persino grafica 3D complessa con OpenGL.
Creazione di schede attive a bassa frequenza
Il rendering a bassa frequenza richiede una UI fornita da un oggetto RemoteViews, che supporta il seguente sottoinsieme di layout e viste Android:
Utilizza il rendering a bassa frequenza quando:
- Sono necessarie solo le API Android View standard elencate in precedenza.
- Sono necessari solo aggiornamenti relativamente poco frequenti (alcuni secondi tra un aggiornamento e l'altro).
Ricorda:
- Le schede attive devono sempre avere una
dichiarazione
PendingIntentconsetAction()affinché la cronologia di pubblicazione della scheda. - Per apportare modifiche a una scheda dopo la pubblicazione, chiama
setViews()sulla scheda con l'oggetto RemoteViews aggiornato prima di pubblicarla di nuovo.
Per creare schede attive a bassa frequenza:
Crea il layout o la visualizzazione di cui vuoi eseguire il rendering. L'esempio seguente mostra un layout per una partita di basket immaginaria:
 <TextView
     android:id="@+id/home_team_name_text_view"
     android:layout_width="249px"
     android:layout_height="wrap_content"
     android:layout_alignParentRight="true"
     android:gravity="center"
     android:textSize="40px" />

 <TextView
     android:id="@+id/away_team_name_text_view"
     android:layout_width="249px"
     android:layout_height="wrap_content"
     android:layout_alignParentLeft="true"
     android:gravity="center"
     android:textSize="40px" />

 <TextView
     android:id="@+id/away_score_text_view"
     android:layout_width="249px"
     android:layout_height="wrap_content"
     android:layout_alignLeft="@+id/away_team_name_text_view"
     android:layout_below="@+id/away_team_name_text_view"
     android:gravity="center"
     android:textSize="70px" />

 <TextView
     android:id="@+id/home_score_text_view"
     android:layout_width="249px"
     android:layout_height="wrap_content"
     android:layout_alignLeft="@+id/home_team_name_text_view"
     android:layout_below="@+id/home_team_name_text_view"
     android:gravity="center"
     android:textSize="70px" />

 <TextView
     android:id="@+id/footer_text"
     android:layout_width="wrap_content"
     android:layout_height="wrap_content"
     android:layout_alignParentBottom="true"
     android:layout_alignParentLeft="true"
     android:layout_marginBottom="33px"
     android:textSize="26px" />
Crea un servizio che gestisca la scheda pubblicata e esegua il rendering del tuo layout o della tua visualizzazione. Questo servizio di esempio aggiorna il punteggio di una partita di basket immaginaria ogni 30 secondi.
import java.util.Random;

import com.google.android.glass.timeline.LiveCard;
import com.google.android.glass.timeline.LiveCard.PublishMode;

import android.app.PendingIntent;
import android.app.Service;
import android.content.Intent;
import android.os.Handler;
import android.os.IBinder;
import android.widget.RemoteViews;

public class LiveCardService extends Service {

    private static final String LIVE_CARD_TAG = "LiveCardDemo";

    private LiveCard mLiveCard;
    private RemoteViews mLiveCardView;

    private int homeScore, awayScore;
    private Random mPointsGenerator;

    private final Handler mHandler = new Handler();
    private final UpdateLiveCardRunnable mUpdateLiveCardRunnable =
        new UpdateLiveCardRunnable();
    private static final long DELAY_MILLIS = 30000;

    @Override
    public void onCreate() {
        super.onCreate();
        mPointsGenerator = new Random();
    }

    @Override
    public int onStartCommand(Intent intent, int flags, int startId) {
        if (mLiveCard == null) {

            // Get an instance of a live card
            mLiveCard = new LiveCard(this, LIVE_CARD_TAG);

            // Inflate a layout into a remote view
            mLiveCardView = new RemoteViews(getPackageName(),
                    R.layout.main_layout);

            // Set up initial RemoteViews values
            homeScore = 0;
            awayScore = 0;
            mLiveCardView.setTextViewText(R.id.home_team_name_text_view,
                    getString(R.string.home_team));
            mLiveCardView.setTextViewText(R.id.away_team_name_text_view,
                    getString(R.string.away_team));
            mLiveCardView.setTextViewText(R.id.footer_text,
                    getString(R.string.game_quarter));

            // Set up the live card's action with a pending intent
            // to show a menu when tapped
            Intent menuIntent = new Intent(this, MenuActivity.class);
            menuIntent.addFlags(Intent.FLAG_ACTIVITY_NEW_TASK |
                    Intent.FLAG_ACTIVITY_CLEAR_TASK);
            mLiveCard.setAction(PendingIntent.getActivity(
                    this, 0, menuIntent, 0));

            // Publish the live card
            mLiveCard.publish(PublishMode.REVEAL);

            // Queue the update text runnable
            mHandler.post(mUpdateLiveCardRunnable);
        }
        return START_STICKY;
    }

    @Override
    public void onDestroy() {
        if (mLiveCard != null && mLiveCard.isPublished()) {
            //Stop the handler from queuing more Runnable jobs
            mUpdateLiveCardRunnable.setStop(true);

            mLiveCard.unpublish();
            mLiveCard = null;
        }
        super.onDestroy();
    }

    /**
     * Runnable that updates live card contents
     */
    private class UpdateLiveCardRunnable implements Runnable{

        private boolean mIsStopped = false;

        /*
         * Updates the card with a fake score every 30 seconds as a demonstration.
         * You also probably want to display something useful in your live card.
         *
         * If you are executing a long running task to get data to update a
         * live card(e.g, making a web call), do this in another thread or
         * AsyncTask.
         */
        public void run(){
            if(!isStopped()){
                // Generate fake points.
                homeScore += mPointsGenerator.nextInt(3);
                awayScore += mPointsGenerator.nextInt(3);

                // Update the remote view with the new scores.
                mLiveCardView.setTextViewText(R.id.home_score_text_view,
                        String.valueOf(homeScore));
                mLiveCardView.setTextViewText(R.id.away_score_text_view,
                        String.valueOf(awayScore));

                // Always call setViews() to update the live card's RemoteViews.
                mLiveCard.setViews(mLiveCardView);

                // Queue another score update in 30 seconds.
                mHandler.postDelayed(mUpdateLiveCardRunnable, DELAY_MILLIS);
            }
        }

        public boolean isStopped() {
            return mIsStopped;
        }

        public void setStop(boolean isStopped) {
            this.mIsStopped = isStopped;
        }
    }

    @Override
    public IBinder onBind(Intent intent) {
      /*
       * If you need to set up interprocess communication
       * (activity to a service, for instance), return a binder object
       * so that the client can receive and modify data in this service.
       *
       * A typical use is to give a menu activity access to a binder object
       * if it is trying to change a setting that is managed by the live card
       * service. The menu activity in this sample does not require any
       * of these capabilities, so this just returns null.
       */
       return null;
    }
}
Creazione di schede attive ad alta frequenza
Il rendering ad alta frequenza ti consente di disegnare direttamente sulla superficie di supporto della scheda pubblicata.
Utilizza il rendering ad alta frequenza quando:
- Devi aggiornare la scheda pubblicata di frequente (molte volte al secondo).
- Hai bisogno di flessibilità in merito a ciò che puoi visualizzare. Il rendering ad alta frequenza ti consente di usare le visualizzazioni e i layout Android per grafiche OpenGL complesse.
Ricorda:
- Devi sempre creare un servizio in background per il rendering sulla piattaforma della scheda pubblicata.
- Le schede live devono sempre avere una dichiarazione
PendingIntentconsetAction(). - Utilizza
GLRendererse stai eseguendo il rendering di OpenGL eDirectRenderingCallbackper tutti gli altri casi.
Utilizzo di DirectRenderingCallback
Per creare schede attive con le visualizzazioni Android standard e la logica di disegno:
Crea una classe che implementi
DirectRenderingCallback. L'implementazione dei callback in queste interfacce ti consente di eseguire azioni durante eventi importanti del ciclo di vita della scheda pubblicata.L'esempio seguente crea un thread in background da visualizzare periodicamente, ma puoi aggiornare la scheda in risposta a eventi esterni (ad esempio aggiornamenti di sensori o di posizione).
public class LiveCardRenderer implements DirectRenderingCallback {

    // About 30 FPS.
    private static final long FRAME_TIME_MILLIS = 33;

    private SurfaceHolder mHolder;
    private boolean mPaused;
    private RenderThread mRenderThread;

    @Override
    public void surfaceChanged(SurfaceHolder holder, int format,
            int width, int height) {
        // Update your views accordingly.
    }

    @Override
    public void surfaceCreated(SurfaceHolder holder) {
        mPaused = false;
        mHolder = holder;
        updateRendering();
    }

    @Override
    public void surfaceDestroyed(SurfaceHolder holder) {
        mHolder = null;
        updateRendering();
    }

    @Override
    public void renderingPaused(SurfaceHolder holder, boolean paused) {
        mPaused = paused;
        updateRendering();
    }

    /**
     * Start or stop rendering according to the timeline state.
     */
    private void updateRendering() {
        boolean shouldRender = (mHolder != null) && !mPaused;
        boolean rendering = mRenderThread != null;

        if (shouldRender != rendering) {
            if (shouldRender) {
                mRenderThread = new RenderThread();
                mRenderThread.start();
            } else {
                mRenderThread.quit();
                mRenderThread = null;
            }
        }
    }

    /**
     * Draws the view in the SurfaceHolder's canvas.
     */
    private void draw() {
        Canvas canvas;
        try {
            canvas = mHolder.lockCanvas();
        } catch (Exception e) {
            return;
        }
        if (canvas != null) {
            // Draw on the canvas.
            mHolder.unlockCanvasAndPost(canvas);
        }
    }

    /**
     * Redraws in the background.
     */
    private class RenderThread extends Thread {
        private boolean mShouldRun;

        /**
         * Initializes the background rendering thread.
         */
        public RenderThread() {
            mShouldRun = true;
        }

        /**
         * Returns true if the rendering thread should continue to run.
         *
         * @return true if the rendering thread should continue to run
         */
        private synchronized boolean shouldRun() {
            return mShouldRun;
        }

        /**
         * Requests that the rendering thread exit at the next
         opportunity.
         */
        public synchronized void quit() {
            mShouldRun = false;
        }

        @Override
        public void run() {
            while (shouldRun()) {
                draw();
                SystemClock.sleep(FRAME_TIME_MILLIS);
            }
        }
    }
}
Imposta un'istanza di
DirectRenderingCallbackcome callback diLiveCardSurfaceHolder. Ciò consente alla scheda attiva di sapere quale logica utilizzare per il rendering stesso.// Tag used to identify the LiveCard in debugging logs. private static final String LIVE_CARD_TAG = "my_card"; // Cached instance of the LiveCard created by the publishCard() method. private LiveCard mLiveCard; private void publishCard(Context context) { if (mLiveCard == null) { mLiveCard = new LiveCard(this, LIVE_CARD_TAG); // Enable direct rendering. mLiveCard.setDirectRenderingEnabled(true); mLiveCard.getSurfaceHolder().addCallback( new LiveCardRenderer()); Intent intent = new Intent(context, MenuActivity.class); mLiveCard.setAction(PendingIntent.getActivity(context, 0, intent, 0)); mLiveCard.publish(LiveCard.PublishMode.SILENT); } else { // Card is already published. return; } } private void unpublishCard(Context context) { if (mLiveCard != null) { mLiveCard.unpublish(); mLiveCard = null; } }
Utilizzo di OpenGL
Crea un corso che implementa
GlRenderer. L'implementazione dei callback in questa interfaccia ti consente di eseguire azioni durante eventi importanti del ciclo di vita della scheda dal vivo. In questo esempio disegna un cubo colorato in rotazione.import com.google.android.glass.timeline.GlRenderer; import android.opengl.GLES20; import android.opengl.Matrix; import android.os.SystemClock; import java.util.concurrent.TimeUnit; import javax.microedition.khronos.egl.EGLConfig; /** * Renders a 3D OpenGL Cube on a {@link LiveCard}. */ public class CubeRenderer implements GlRenderer { /** Rotation increment per frame. */ private static final float CUBE_ROTATION_INCREMENT = 0.6f; /** The refresh rate, in frames per second. */ private static final int REFRESH_RATE_FPS = 60; /** The duration, in milliseconds, of one frame. */ private static final float FRAME_TIME_MILLIS = TimeUnit.SECONDS.toMillis(1) / REFRESH_RATE_FPS; private final float[] mMVPMatrix; private final float[] mProjectionMatrix; private final float[] mViewMatrix; private final float[] mRotationMatrix; private final float[] mFinalMVPMatrix; private Cube mCube; private float mCubeRotation; private long mLastUpdateMillis; public CubeRenderer() { mMVPMatrix = new float[16]; mProjectionMatrix = new float[16]; mViewMatrix = new float[16]; mRotationMatrix = new float[16]; mFinalMVPMatrix = new float[16]; // Set the fixed camera position (View matrix). Matrix.setLookAtM(mViewMatrix, 0, 0.0f, 0.0f, -4.0f, 0.0f, 0.0f, 0.0f, 0.0f, 1.0f, 0.0f); } @Override public void onSurfaceCreated(EGLConfig config) { // Set the background frame color GLES20.glClearColor(0.0f, 0.0f, 0.0f, 1.0f); GLES20.glClearDepthf(1.0f); GLES20.glEnable(GLES20.GL_DEPTH_TEST); GLES20.glDepthFunc(GLES20.GL_LEQUAL); mCube = new Cube(); } @Override public void onSurfaceChanged(int width, int height) { float ratio = (float) width / height; GLES20.glViewport(0, 0, width, height); // This projection matrix is applied to object coordinates in the onDrawFrame() method. Matrix.frustumM(mProjectionMatrix, 0, -ratio, ratio, -1.0f, 1.0f, 3.0f, 7.0f); // modelView = projection x view Matrix.multiplyMM(mMVPMatrix, 0, mProjectionMatrix, 0, mViewMatrix, 0); } @Override public void onDrawFrame() { GLES20.glClear(GLES20.GL_COLOR_BUFFER_BIT | GLES20.GL_DEPTH_BUFFER_BIT); // Apply the rotation. Matrix.setRotateM(mRotationMatrix, 0, mCubeRotation, 1.0f, 1.0f, 1.0f); // Combine the rotation matrix with the projection and camera view Matrix.multiplyMM(mFinalMVPMatrix, 0, mMVPMatrix, 0, mRotationMatrix, 0); // Draw cube. mCube.draw(mFinalMVPMatrix); updateCubeRotation(); } /** Updates the cube rotation. */ private void updateCubeRotation() { if (mLastUpdateMillis != 0) { float factor = (SystemClock.elapsedRealtime() - mLastUpdateMillis) / FRAME_TIME_MILLIS; mCubeRotation += CUBE_ROTATION_INCREMENT * factor; } mLastUpdateMillis = SystemClock.elapsedRealtime(); } }Crea un servizio che gestisca la live card e imposti la classe
CubeRenderercome renderer della scheda live.import com.google.android.glass.timeline.LiveCard; import com.google.android.glass.timeline.LiveCard.PublishMode; import android.app.PendingIntent; import android.app.Service; import android.content.Intent; import android.os.IBinder; /** * Creates a {@link LiveCard} rendering a rotating 3D cube with OpenGL. */ public class OpenGlService extends Service { private static final String LIVE_CARD_TAG = "opengl"; private LiveCard mLiveCard; @Override public IBinder onBind(Intent intent) { return null; } @Override public int onStartCommand(Intent intent, int flags, int startId) { if (mLiveCard == null) { mLiveCard = new LiveCard(this, LIVE_CARD_TAG); mLiveCard.setRenderer(new CubeRenderer()); mLiveCard.setAction( PendingIntent.getActivity(this, 0, new Intent(this, MenuActivity.class), 0)); mLiveCard.publish(PublishMode.REVEAL); } else { mLiveCard.navigate(); } return START_STICKY; } @Override public void onDestroy() { if (mLiveCard != null && mLiveCard.isPublished()) { mLiveCard.unpublish(); mLiveCard = null; } super.onDestroy(); } }
import android.opengl.GLES20;

import java.nio.ByteBuffer;
import java.nio.ByteOrder;
import java.nio.FloatBuffer;

/**
 * Renders a 3D Cube using OpenGL ES 2.0.
 *
 * For more information on how to use OpenGL ES 2.0 on Android, see the
 * <a href="//developer.android.com/training/graphics/opengl/index.html">
 * Displaying Graphics with OpenGL ES</a> developer guide.
 */
public class Cube {

    /** Cube vertices */
    private static final float VERTICES[] = {
        -0.5f, -0.5f, -0.5f,
        0.5f, -0.5f, -0.5f,
        0.5f, 0.5f, -0.5f,
        -0.5f, 0.5f, -0.5f,
        -0.5f, -0.5f, 0.5f,
        0.5f, -0.5f, 0.5f,
        0.5f, 0.5f, 0.5f,
        -0.5f, 0.5f, 0.5f
    };

    /** Vertex colors. */
    private static final float COLORS[] = {
        0.0f, 1.0f, 1.0f, 1.0f,
        1.0f, 0.0f, 0.0f, 1.0f,
        1.0f, 1.0f, 0.0f, 1.0f,
        0.0f, 1.0f, 0.0f, 1.0f,
        0.0f, 0.0f, 1.0f, 1.0f,
        1.0f, 0.0f, 1.0f, 1.0f,
        1.0f, 1.0f, 1.0f, 1.0f,
        0.0f, 1.0f, 1.0f, 1.0f,
    };


    /** Order to draw vertices as triangles. */
    private static final byte INDICES[] = {
        0, 1, 3, 3, 1, 2, // Front face.
        0, 1, 4, 4, 5, 1, // Bottom face.
        1, 2, 5, 5, 6, 2, // Right face.
        2, 3, 6, 6, 7, 3, // Top face.
        3, 7, 4, 4, 3, 0, // Left face.
        4, 5, 7, 7, 6, 5, // Rear face.
    };

    /** Number of coordinates per vertex in {@link VERTICES}. */
    private static final int COORDS_PER_VERTEX = 3;

    /** Number of values per colors in {@link COLORS}. */
    private static final int VALUES_PER_COLOR = 4;

    /** Vertex size in bytes. */
    private final int VERTEX_STRIDE = COORDS_PER_VERTEX * 4;

    /** Color size in bytes. */
    private final int COLOR_STRIDE = VALUES_PER_COLOR * 4;

    /** Shader code for the vertex. */
    private static final String VERTEX_SHADER_CODE =
            "uniform mat4 uMVPMatrix;" +
            "attribute vec4 vPosition;" +
            "attribute vec4 vColor;" +
            "varying vec4 _vColor;" +
            "void main() {" +
            "  _vColor = vColor;" +
            "  gl_Position = uMVPMatrix * vPosition;" +
            "}";

    /** Shader code for the fragment. */
    private static final String FRAGMENT_SHADER_CODE =
            "precision mediump float;" +
            "varying vec4 _vColor;" +
            "void main() {" +
            "  gl_FragColor = _vColor;" +
            "}";


    private final FloatBuffer mVertexBuffer;
    private final FloatBuffer mColorBuffer;
    private final ByteBuffer mIndexBuffer;
    private final int mProgram;
    private final int mPositionHandle;
    private final int mColorHandle;
    private final int mMVPMatrixHandle;

    public Cube() {
        ByteBuffer byteBuffer = ByteBuffer.allocateDirect(VERTICES.length * 4);

        byteBuffer.order(ByteOrder.nativeOrder());
        mVertexBuffer = byteBuffer.asFloatBuffer();
        mVertexBuffer.put(VERTICES);
        mVertexBuffer.position(0);

        byteBuffer = ByteBuffer.allocateDirect(COLORS.length * 4);
        byteBuffer.order(ByteOrder.nativeOrder());
        mColorBuffer = byteBuffer.asFloatBuffer();
        mColorBuffer.put(COLORS);
        mColorBuffer.position(0);

        mIndexBuffer = ByteBuffer.allocateDirect(INDICES.length);
        mIndexBuffer.put(INDICES);
        mIndexBuffer.position(0);

        mProgram = GLES20.glCreateProgram();
        GLES20.glAttachShader(mProgram, loadShader(GLES20.GL_VERTEX_SHADER, VERTEX_SHADER_CODE));
        GLES20.glAttachShader(
                mProgram, loadShader(GLES20.GL_FRAGMENT_SHADER, FRAGMENT_SHADER_CODE));
        GLES20.glLinkProgram(mProgram);

        mPositionHandle = GLES20.glGetAttribLocation(mProgram, "vPosition");
        mColorHandle = GLES20.glGetAttribLocation(mProgram, "vColor");
        mMVPMatrixHandle = GLES20.glGetUniformLocation(mProgram, "uMVPMatrix");
    }

    /**
     * Encapsulates the OpenGL ES instructions for drawing this shape.
     *
     * @param mvpMatrix The Model View Project matrix in which to draw this shape
     */
    public void draw(float[] mvpMatrix) {
        // Add program to OpenGL environment.
        GLES20.glUseProgram(mProgram);

        // Prepare the cube coordinate data.
        GLES20.glEnableVertexAttribArray(mPositionHandle);
        GLES20.glVertexAttribPointer(
                mPositionHandle, 3, GLES20.GL_FLOAT, false, VERTEX_STRIDE, mVertexBuffer);

        // Prepare the cube color data.
        GLES20.glEnableVertexAttribArray(mColorHandle);
        GLES20.glVertexAttribPointer(
                mColorHandle, 4, GLES20.GL_FLOAT, false, COLOR_STRIDE, mColorBuffer);

        // Apply the projection and view transformation.
        GLES20.glUniformMatrix4fv(mMVPMatrixHandle, 1, false, mvpMatrix, 0);

        // Draw the cube.
        GLES20.glDrawElements(
                GLES20.GL_TRIANGLES, INDICES.length, GLES20.GL_UNSIGNED_BYTE, mIndexBuffer);

        // Disable vertex arrays.
        GLES20.glDisableVertexAttribArray(mPositionHandle);
        GLES20.glDisableVertexAttribArray(mColorHandle);
    }

    /** Loads the provided shader in the program. */
    private static int loadShader(int type, String shaderCode){
        int shader = GLES20.glCreateShader(type);

        GLES20.glShaderSource(shader, shaderCode);
        GLES20.glCompileShader(shader);

        return shader;
    }
}
Mettere a fuoco una scheda live
Quando pubblichi una scheda live con LiveCard.publish(), gli passi un parametro
per controllare se è immediatamente attiva o meno.
Per fare in modo che la sequenza temporale passi alla scheda subito dopo la pubblicazione, utilizza LiveCard.PublishMode.REVEAL.
Per pubblicare la scheda in modalità invisibile e consentire agli utenti di accedervi autonomamente, utilizza LiveCard.PublishMode.SILENT.
Inoltre, il metodo LiveCard.navigate() ti consente di passare alla scheda dopo che è stata pubblicata. Ad esempio, se gli utenti tentano di avviare la live card dal menu vocale principale e questa è già avviata, puoi passare alla live card con questo metodo.
Creazione e visualizzazione di un menu
Le schede live non possono mostrare il proprio sistema di menu, quindi devi creare un'attività per visualizzare un menu per la scheda live.
L'attività del menu può quindi contenere voci per interrompere la scheda pubblicata, avviare un'immersione o qualsiasi altra azione che vuoi eseguire. Puoi anche aggiungere attività delle impostazioni di sistema, ad esempio il controllo del volume, come voce di menu. Per ulteriori informazioni, consulta la sezione Impostazioni di avvio.
Creazione delle risorse del menu
La creazione di risorse del menu è la stessa che sulla piattaforma Android, ma segui queste linee guida per Glass:
- Per ogni voce di menu, fornisci un'icona di voce di menu di 50 × 50 pixel. L'icona del menu deve essere bianca su uno sfondo trasparente. Consulta le icone delle voci di menu in vetro per un esempio o per scaricarle per l'uso personale.
- Utilizza un nome breve che descriva l'azione e che sia in maiuscolo. Un verbo imperativo funziona correttamente (ad es. Condividi o Rispondi a tutti).
- Glass non mostra le schede attive senza una voce di menu. Specifica almeno una voce di menu Interrompi, in modo che gli utenti possano rimuovere la scheda attiva dalla cronologia.
Il widget CheckBox non è supportato.
<menu xmlns:android="http://schemas.android.com/apk/res/android">
    <item
        android:id="@+id/menu_item_1"
        android:title="@string/Menu_Item_1"       <!-- must have "Stop" menu item -->
        android:icon="@drawable/menu_item_1_icon" />   <!-- white on transparent icon -->
</menu>
Creazione di un'attività per gestire i callback del menu
Devi definire un'attività di menu che la tua scheda attiva deve richiamare quando gli utenti la toccano.
Esegui l'override dei seguenti metodi di callback di Activity per creare, mostrare e chiudere correttamente i menu nell'attività dei menu:
onCreateOptionsMenu()gonfia la risorsa del menu XML.onAttachedToWindow()mostra il menu quando l'attività è a fuoco.onPrepareOptionsMenu()mostra o nasconde le voci di menu se necessario. Ad esempio, puoi mostrare diverse voci di menu in base a ciò che fanno gli utenti. Ad esempio, puoi mostrare diverse voci di menu in base ad alcuni dati contestuali.onOptionsItemSelected()gestisce la selezione dell'utente.onOptionsMenuClosed()per completare l'attività in modo che non venga più visualizzata nella scheda online.
Devi terminare l'attività qui in modo che venga completata correttamente quando il menu viene chiuso per selezione o scorrendo verso il basso.
/**
 * Activity showing the options menu.
 */
public class MenuActivity extends Activity {

    @Override
    public void onAttachedToWindow() {
        super.onAttachedToWindow();
        openOptionsMenu();
    }

    @Override
    public boolean onCreateOptionsMenu(Menu menu) {
        MenuInflater inflater = getMenuInflater();
        inflater.inflate(R.menu.stopwatch, menu);
        return true;
    }

    @Override
    public boolean onOptionsItemSelected(MenuItem item) {
        // Handle item selection.
        switch (item.getItemId()) {
            case R.id.stop:
                stopService(new Intent(this, StopwatchService.class));
                return true;
            default:
                return super.onOptionsItemSelected(item);
        }
    }

    @Override
    public void onOptionsMenuClosed(Menu menu) {
        // Nothing else to do, closing the activity.
        finish();
    }
}
Rendere l'attività del menu trasparente
Per rispettare lo stile di Glass, rendi l'attività del menu traslucida, in modo che la scheda attiva sia ancora visibile sotto il menu:
Crea un file
res/values/styles.xmle dichiara uno stile che rende trasparente lo sfondo dell'attività:<resources> <style name="MenuTheme" parent="@android:style/Theme.DeviceDefault"> <item name="android:windowBackground">@android:color/transparent</item> <item name="android:colorBackgroundCacheHint">@null</item> <item name="android:windowIsTranslucent">true</item> <item name="android:windowAnimationStyle">@null</item> </style> </resources>Nel file
AndroidManifest.xml, assegna il tema all'attività del menu:<?xml version="1.0" encoding="utf-8"?> <manifest ... > ... <application ... > ... <activity android:name=".MenuActivity" android:theme="@style/MenuTheme" ...> </activity> </application> </manifest>
Visualizzazione del menu
Specifica un simbolo
PendingIntent
per l'azione della scheda utilizzando setAction(). L'intent in sospeso viene utilizzato per avviare
l'attività nel menu quando gli utenti toccano la scheda:
Intent menuIntent = new Intent(this, MenuActivity.class);
mLiveCard.setAction(PendingIntent.getActivity(this, 0, menuIntent, 0));
mLiveCard.publish(LiveCard.PublishMode.REVEAL); // or SILENT
Supporto di comandi vocali contestuali
Indica che l'
MenuActivitysupporta i comandi vocali contestuali:// Initialize your LiveCard as usual. mLiveCard.setVoiceActionEnabled(true); mLiveCard.publish(LiveCard.PublishMode.REVEAL); // or SILENTModifica
MenuActivityper supportare le chiamate tramite il flusso vocale:/** * Activity showing the options menu. */ public class MenuActivity extends Activity { private boolean mFromLiveCardVoice; private boolean mIsFinishing; @Override protected void onCreate(Bundle savedInstanceState) { super.onCreate(savedInstanceState); mFromLiveCardVoice = getIntent().getBooleanExtra(LiveCard.EXTRA_FROM_LIVECARD_VOICE, false); if (mFromLiveCardVoice) { // When activated by voice from a live card, enable voice commands. The menu // will automatically "jump" ahead to the items (skipping the guard phrase // that was already said at the live card). getWindow().requestFeature(WindowUtils.FEATURE_VOICE_COMMANDS); } } @Override public void onAttachedToWindow() { super.onAttachedToWindow(); if (!mFromLiveCardVoice) { openOptionsMenu(); } } @Override public boolean onCreatePanelMenu(int featureId, Menu menu) { if (isMyMenu(featureId)) { getMenuInflater().inflate(R.menu.stopwatch, menu); return true; } return super.onCreatePanelMenu(featureId, menu); } @Override public boolean onPreparePanel(int featureId, View view, Menu menu) { if (isMyMenu(featureId)) { // Don't reopen menu once we are finishing. This is necessary // since voice menus reopen themselves while in focus. return !mIsFinishing; } return super.onPreparePanel(featureId, view, menu); } @Override public boolean onMenuItemSelected(int featureId, MenuItem item) { if (isMyMenu(featureId)) { // Handle item selection. switch (item.getItemId()) { case R.id.stop_this: stopService(new Intent(this, StopwatchService.class)); return true; } } return super.onMenuItemSelected(featureId, item); } @Override public void onPanelClosed(int featureId, Menu menu) { super.onPanelClosed(featureId, menu); if (isMyMenu(featureId)) { // When the menu panel closes, either an item is selected from the menu or the // menu is dismissed by swiping down. Either way, we end the activity. isFinishing = true; finish(); } } /** * Returns {@code true} when the {@code featureId} belongs to the options menu or voice * menu that are controlled by this menu activity. */ private boolean isMyMenu(int featureId) { return featureId == Window.FEATURE_OPTIONS_PANEL || featureId == WindowUtils.FEATURE_VOICE_COMMANDS; } }
Per ulteriori informazioni, consulta la guida ai comandi vocali contestuali.
Utilità dei menu
Sono disponibili alcuni metodi helper per modificare l'aspetto e il comportamento dei menu. Per saperne di più, visita la pagina MenuUtils.