लाइव कार्ड, टाइमलाइन के मौजूदा सेक्शन में दिखते हैं और उस समय प्रासंगिक जानकारी दिखाएं.
जब उपयोगकर्ता सक्रिय रहते हैं, तब लाइव कार्ड का इस्तेमाल करना बेहतर होता है काम में शामिल हैं, लेकिन समय-समय पर Glass देखना चाहते हैं पर जाएं. उदाहरण के लिए, उनका समय देखना हर कुछ मिनट में चलाया जाता है या म्यूज़िक प्लेयर को कंट्रोल किया जाता है, वे किसी गाने को स्किप करना या रोकना चाहते हैं.
अगर Glass के लिए पहली बार डेवलप किया जा रहा है, चल रहे टास्क से जुड़ी गाइड पढ़ें चुनें. इस दस्तावेज़ में, पूरी जानकारी जोड़ने के तरीके के बारे में बताया गया है डिज़ाइन से जुड़े हमारे सबसे सही तरीकों का पालन करते हुए, लाइव कार्ड के साथ कांच का सामान.
इनके काम करने का तरीका
लाइव कार्ड की मदद से, मौजूदा समय में कार्ड का इस्तेमाल जारी रखा जा सकता है सेक्शन में तब तक बदलाव करें, जब तक वे प्रासंगिक हों. स्टैटिक कार्ड से अलग, लाइव कार्ड, टाइमलाइन में सेव नहीं होते हैं और उपयोगकर्ताओं ने साफ़ तौर पर बताया है यह काम पूरा हो जाने के बाद उन्हें हटा दिया जाएगा.

उपयोगकर्ता आम तौर पर लाइव कार्ड बोलकर शुरू करते हैं जिससे कार्ड को रेंडर करने वाली बैकग्राउंड सेवा शुरू हो जाती है. इसके बाद, उपयोगकर्ता कार्ड पर टैप करके, वे मेन्यू आइटम देख सकते हैं जो काम कर सकते हैं अपलोड करें, जैसे टाइमलाइन से खारिज करना.
इनका इस्तेमाल कब करना चाहिए
लाइव कार्ड, चल रहे टास्क के लिए डिज़ाइन किए गए हैं. उपयोगकर्ता इन्हें आसानी से कर सकते हैं और बार-बार बंद हो जाते हैं, जैसे कि दौड़ने की स्थिति दिखाने वाला डिसप्ले किसी कार्रवाई, नेविगेशन के दौरान ऐनिमेशन वाले मैप या म्यूज़िक प्लेयर की इमेज.
लाइव कार्ड का एक और फ़ायदा यह भी है कि वे ऐसे यूज़र इंटरफ़ेस (यूआई) जिनके लिए उपयोगकर्ताओं को रीयल-टाइम में इंटरैक्ट करना पड़ता है और यूज़र इंटरफ़ेस (यूआई) के रीयल-टाइम अपडेट होते हैं.
लाइव कार्ड इस्तेमाल करते समय भी टाइमलाइन का कंट्रोल उपयोगकर्ता के पास रहता है क्योंकि लाइव कार्ड पर आगे या पीछे की ओर स्वाइप करने की सुविधा मिलती है लाइव कार्ड पर कार्रवाई करने के बजाय, टाइमलाइन पर नेविगेट करता है. इसके अलावा, सिस्टम के काम करने के तरीके के हिसाब से स्क्रीन चालू या बंद होती है (इसके बाद 5 सेकंड का समय, बिना किसी उपयोगकर्ता के इंटरैक्शन के या तब तक बिना किसी रुकावट के चलना.
हालांकि, लाइव कार्ड में कई सुविधाएं एक जैसी होती हैं इमर्शन की मदद से सेंसर या इमेज को प्रोसेस किया जाता है जीपीएस डेटा. इसकी मदद से, आपका कॉन्टेंट शानदार तरीके से बनाया जा सकता है साथ ही, उपयोगकर्ताओं को अन्य काम करने के लिए जैसे कि मैसेज देखना.
आर्किटेक्चर
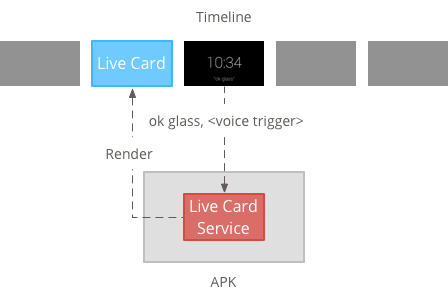
लाइव कार्ड में लंबे समय तक चलने वाली जानकारी होनी चाहिए, ताकि वे दिखते हैं, इसलिए उन्हें बैकग्राउंड सेवा में मैनेज करें.
इसके बाद, सेवा शुरू होते ही लाइव कार्ड को पब्लिश और रेंडर किया जा सकता है शुरू होता है या उन अन्य इवेंट के जवाब में होता है जिन्हें सेवा मॉनिटर करती है. कम फ़्रीक्वेंसी वाले लाइव कार्ड, कुछ सेकंड में एक बार रेंडर किए जा सकते हैं. या ज़्यादा से ज़्यादा फ़्रीक्वेंसी (ज़्यादा से ज़्यादा बार सिस्टम रीफ़्रेश कर सकता है).
जब लाइव कार्ड अब काम का न हो, तो इस सेवा को बंद कर दें रेंडरिंग बंद कर देनी चाहिए.
कम फ़्रीक्वेंसी रेंडरिंग
कम फ़्रीक्वेंसी वाली रेंडरिंग, Android के कुछ ही सेट के लिए उपलब्ध है बार देखा जाता है और हर बार सिर्फ़ एक बार डिसप्ले को अपडेट किया जा सकता है कुछ सेकंड.
यह ऐप्लिकेशन की मदद से लाइव कार्ड बनाने का एक आसान तरीका है आसान कॉन्टेंट जिसे लगातार रेंडरिंग की ज़रूरत नहीं होती या नियमित अपडेट.

हाई फ़्रीक्वेंसी रेंडरिंग
हाई फ़्रीक्वेंसी रेंडरिंग से, ज़्यादा विकल्पों का इस्तेमाल किया जा सकता है जो Android ग्राफ़िक्स फ़्रेमवर्क में उपलब्ध है.
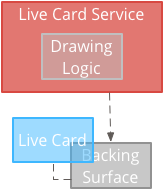
सिस्टम आपको उसकी वास्तविक बैकिंग सतह ऐसा लाइव कार्ड जिस पर 2D का इस्तेमाल करके सीधे ड्रॉ किया जा सकता है देखें और लेआउट या OpenGL के साथ जटिल 3D ग्राफ़िक्स भी शामिल हैं.
कम फ़्रीक्वेंसी वाले लाइव कार्ड बनाना
कम फ़्रीक्वेंसी वाली रेंडरिंग के लिए, यूज़र इंटरफ़ेस (यूआई) की ज़रूरत होती है RemoteViews ऑब्जेक्ट है, जो Android लेआउट और व्यू के नीचे दिए गए सबसेट के साथ काम करता है:
कम फ़्रीक्वेंसी वाली रेंडरिंग का इस्तेमाल तब करें, जब:
- आपको सिर्फ़ उन स्टैंडर्ड Android व्यू एपीआई की ज़रूरत होगी जिनकी सूची पहले से दी गई है.
- आपको बहुत ही कम अपडेट की ज़रूरत होती है (कुछ सेकंड के बीच में) रीफ़्रेश करता है).
ध्यान रखें:
- लाइव कार्ड में हमेशा
PendingIntentइसके साथ घोषित किया गयाsetAction()देखें कि कार्ड को कब पब्लिश करना है. - पब्लिश करने के बाद कार्ड में बदलाव करने के लिए, कॉल करें
setViews()अपडेट किए गए RemoteViews वाले कार्ड पर फिर से प्रकाशित करने से पहले ऑब्जेक्ट हटाएं.
कम फ़्रीक्वेंसी वाले लाइव कार्ड बनाने के लिए:
वह लेआउट या व्यू बनाएं जिसे आपको रेंडर करना है. यह उदाहरण काल्पनिक बास्केटबॉल गेम का लेआउट दिखाता है:
 <TextView
     android:id="@+id/home_team_name_text_view"
     android:layout_width="249px"
     android:layout_height="wrap_content"
     android:layout_alignParentRight="true"
     android:gravity="center"
     android:textSize="40px" />

 <TextView
     android:id="@+id/away_team_name_text_view"
     android:layout_width="249px"
     android:layout_height="wrap_content"
     android:layout_alignParentLeft="true"
     android:gravity="center"
     android:textSize="40px" />

 <TextView
     android:id="@+id/away_score_text_view"
     android:layout_width="249px"
     android:layout_height="wrap_content"
     android:layout_alignLeft="@+id/away_team_name_text_view"
     android:layout_below="@+id/away_team_name_text_view"
     android:gravity="center"
     android:textSize="70px" />

 <TextView
     android:id="@+id/home_score_text_view"
     android:layout_width="249px"
     android:layout_height="wrap_content"
     android:layout_alignLeft="@+id/home_team_name_text_view"
     android:layout_below="@+id/home_team_name_text_view"
     android:gravity="center"
     android:textSize="70px" />

 <TextView
     android:id="@+id/footer_text"
     android:layout_width="wrap_content"
     android:layout_height="wrap_content"
     android:layout_alignParentBottom="true"
     android:layout_alignParentLeft="true"
     android:layout_marginBottom="33px"
     android:textSize="26px" />
ऐसी सेवा बनाएं जो लाइव कार्ड को मैनेज करती हो और आपके लेआउट या व्यू को रेंडर करती हो. उदाहरण के तौर पर दी गई यह सेवा, एक काल्पनिक बास्केटबॉल गेम के स्कोर को हर अपडेट करती है 30 सेकंड.
import java.util.Random;

import com.google.android.glass.timeline.LiveCard;
import com.google.android.glass.timeline.LiveCard.PublishMode;

import android.app.PendingIntent;
import android.app.Service;
import android.content.Intent;
import android.os.Handler;
import android.os.IBinder;
import android.widget.RemoteViews;

public class LiveCardService extends Service {

    private static final String LIVE_CARD_TAG = "LiveCardDemo";

    private LiveCard mLiveCard;
    private RemoteViews mLiveCardView;

    private int homeScore, awayScore;
    private Random mPointsGenerator;

    private final Handler mHandler = new Handler();
    private final UpdateLiveCardRunnable mUpdateLiveCardRunnable =
        new UpdateLiveCardRunnable();
    private static final long DELAY_MILLIS = 30000;

    @Override
    public void onCreate() {
        super.onCreate();
        mPointsGenerator = new Random();
    }

    @Override
    public int onStartCommand(Intent intent, int flags, int startId) {
        if (mLiveCard == null) {

            // Get an instance of a live card
            mLiveCard = new LiveCard(this, LIVE_CARD_TAG);

            // Inflate a layout into a remote view
            mLiveCardView = new RemoteViews(getPackageName(),
                    R.layout.main_layout);

            // Set up initial RemoteViews values
            homeScore = 0;
            awayScore = 0;
            mLiveCardView.setTextViewText(R.id.home_team_name_text_view,
                    getString(R.string.home_team));
            mLiveCardView.setTextViewText(R.id.away_team_name_text_view,
                    getString(R.string.away_team));
            mLiveCardView.setTextViewText(R.id.footer_text,
                    getString(R.string.game_quarter));

            // Set up the live card's action with a pending intent
            // to show a menu when tapped
            Intent menuIntent = new Intent(this, MenuActivity.class);
            menuIntent.addFlags(Intent.FLAG_ACTIVITY_NEW_TASK |
                    Intent.FLAG_ACTIVITY_CLEAR_TASK);
            mLiveCard.setAction(PendingIntent.getActivity(
                    this, 0, menuIntent, 0));

            // Publish the live card
            mLiveCard.publish(PublishMode.REVEAL);

            // Queue the update text runnable
            mHandler.post(mUpdateLiveCardRunnable);
        }
        return START_STICKY;
    }

    @Override
    public void onDestroy() {
        if (mLiveCard != null && mLiveCard.isPublished()) {
            //Stop the handler from queuing more Runnable jobs
            mUpdateLiveCardRunnable.setStop(true);

            mLiveCard.unpublish();
            mLiveCard = null;
        }
        super.onDestroy();
    }

    /**
     * Runnable that updates live card contents
     */
    private class UpdateLiveCardRunnable implements Runnable{

        private boolean mIsStopped = false;

        /*
         * Updates the card with a fake score every 30 seconds as a demonstration.
         * You also probably want to display something useful in your live card.
         *
         * If you are executing a long running task to get data to update a
         * live card(e.g, making a web call), do this in another thread or
         * AsyncTask.
         */
        public void run(){
            if(!isStopped()){
                // Generate fake points.
                homeScore += mPointsGenerator.nextInt(3);
                awayScore += mPointsGenerator.nextInt(3);

                // Update the remote view with the new scores.
                mLiveCardView.setTextViewText(R.id.home_score_text_view,
                        String.valueOf(homeScore));
                mLiveCardView.setTextViewText(R.id.away_score_text_view,
                        String.valueOf(awayScore));

                // Always call setViews() to update the live card's RemoteViews.
                mLiveCard.setViews(mLiveCardView);

                // Queue another score update in 30 seconds.
                mHandler.postDelayed(mUpdateLiveCardRunnable, DELAY_MILLIS);
            }
        }

        public boolean isStopped() {
            return mIsStopped;
        }

        public void setStop(boolean isStopped) {
            this.mIsStopped = isStopped;
        }
    }

    @Override
    public IBinder onBind(Intent intent) {
      /*
       * If you need to set up interprocess communication
       * (activity to a service, for instance), return a binder object
       * so that the client can receive and modify data in this service.
       *
       * A typical use is to give a menu activity access to a binder object
       * if it is trying to change a setting that is managed by the live card
       * service. The menu activity in this sample does not require any
       * of these capabilities, so this just returns null.
       */
       return null;
    }
}
ज़्यादा फ़्रीक्वेंसी वाले लाइव कार्ड बनाना
हाई फ़्रीक्वेंसी रेंडरिंग की मदद से, आपको सीधे तौर पर ड्रॉ करने की सुविधा मिलती है बैकिंग प्लैटफ़ॉर्म पर पोस्ट करने की ज़रूरत नहीं होती.
हाई फ़्रीक्वेंसी रेंडरिंग का इस्तेमाल तब करें, जब:
- आपको लाइव कार्ड की जानकारी बार-बार अपडेट करनी पड़ती है. ऐसा एक सेकंड में कई बार होता है.
- आपको क्या रेंडर किया जा सकता है, इसके लिए आपको ज़रूरत है. हाई फ़्रीक्वेंसी रेंडरिंग से आपको जटिल OpenGL ग्राफ़िक्स के लिए Android व्यू और लेआउट का इस्तेमाल किया जा सकता है.
ध्यान रखें:
- लाइव कार्ड के सरफ़ेस पर रेंडर करने के लिए, आपको हमेशा बैकग्राउंड सेवा बनानी चाहिए.
- लाइव कार्ड में हमेशा
PendingIntentइसके साथ घोषित किया गयाsetAction(). GLRendererका इस्तेमाल करें, अगर: OpenGL औरDirectRenderingCallbackअन्य सभी मामलों के लिए.
DirectServingCallback का इस्तेमाल करना
स्टैंडर्ड Android व्यू और ड्रॉइंग लॉजिक का इस्तेमाल करके लाइव कार्ड बनाने के लिए:
लागू करने वाली क्लास बनाना
DirectRenderingCallbackइन इंटरफ़ेस में कॉलबैक लागू करने से, लाइव कार्ड के सरफ़ेस लाइफ़साइकल के अहम इवेंट के दौरान कार्रवाइयां की जा सकती हैं.नीचे दिए गए उदाहरण में समय-समय पर रेंडर करने के लिए बैकग्राउंड थ्रेड बनाया गया है, लेकिन बाहरी इवेंट के जवाब में कार्ड को अपडेट कर सकता है (उदाहरण के लिए, सेंसर या जगह की जानकारी से जुड़े अपडेट डालें).
public class LiveCardRenderer implements DirectRenderingCallback {

    // About 30 FPS.
    private static final long FRAME_TIME_MILLIS = 33;

    private SurfaceHolder mHolder;
    private boolean mPaused;
    private RenderThread mRenderThread;

    @Override
    public void surfaceChanged(SurfaceHolder holder, int format,
            int width, int height) {
        // Update your views accordingly.
    }

    @Override
    public void surfaceCreated(SurfaceHolder holder) {
        mPaused = false;
        mHolder = holder;
        updateRendering();
    }

    @Override
    public void surfaceDestroyed(SurfaceHolder holder) {
        mHolder = null;
        updateRendering();
    }

    @Override
    public void renderingPaused(SurfaceHolder holder, boolean paused) {
        mPaused = paused;
        updateRendering();
    }

    /**
     * Start or stop rendering according to the timeline state.
     */
    private void updateRendering() {
        boolean shouldRender = (mHolder != null) && !mPaused;
        boolean rendering = mRenderThread != null;

        if (shouldRender != rendering) {
            if (shouldRender) {
                mRenderThread = new RenderThread();
                mRenderThread.start();
            } else {
                mRenderThread.quit();
                mRenderThread = null;
            }
        }
    }

    /**
     * Draws the view in the SurfaceHolder's canvas.
     */
    private void draw() {
        Canvas canvas;
        try {
            canvas = mHolder.lockCanvas();
        } catch (Exception e) {
            return;
        }
        if (canvas != null) {
            // Draw on the canvas.
            mHolder.unlockCanvasAndPost(canvas);
        }
    }

    /**
     * Redraws in the background.
     */
    private class RenderThread extends Thread {
        private boolean mShouldRun;

        /**
         * Initializes the background rendering thread.
         */
        public RenderThread() {
            mShouldRun = true;
        }

        /**
         * Returns true if the rendering thread should continue to run.
         *
         * @return true if the rendering thread should continue to run
         */
        private synchronized boolean shouldRun() {
            return mShouldRun;
        }

        /**
         * Requests that the rendering thread exit at the next
         opportunity.
         */
        public synchronized void quit() {
            mShouldRun = false;
        }

        @Override
        public void run() {
            while (shouldRun()) {
                draw();
                SystemClock.sleep(FRAME_TIME_MILLIS);
            }
        }
    }
}
अपने
DirectRenderingCallbackका इंस्टेंस सेट करेंLiveCardके तौर परSurfaceHolderका कॉलबैक. यह लाइव कार्ड को यह पता चलता है कि खुद को रेंडर करने के लिए किस लॉजिक का इस्तेमाल करना है.// Tag used to identify the LiveCard in debugging logs. private static final String LIVE_CARD_TAG = "my_card"; // Cached instance of the LiveCard created by the publishCard() method. private LiveCard mLiveCard; private void publishCard(Context context) { if (mLiveCard == null) { mLiveCard = new LiveCard(this, LIVE_CARD_TAG); // Enable direct rendering. mLiveCard.setDirectRenderingEnabled(true); mLiveCard.getSurfaceHolder().addCallback( new LiveCardRenderer()); Intent intent = new Intent(context, MenuActivity.class); mLiveCard.setAction(PendingIntent.getActivity(context, 0, intent, 0)); mLiveCard.publish(LiveCard.PublishMode.SILENT); } else { // Card is already published. return; } } private void unpublishCard(Context context) { if (mLiveCard != null) { mLiveCard.unpublish(); mLiveCard = null; } }
OpenGL का इस्तेमाल करना
लागू करने वाली क्लास बनाना
GlRenderer. इस इंटरफ़ेस में कॉलबैक लागू करने से, आपको अहम इवेंट के दौरान कार्रवाइयां करने की सुविधा मिलती है लाइव कार्ड के सरफ़ेस लाइफ़साइकल के हिसाब से. यह उदाहरण एक रंगीन, घूमने वाला क्यूब बनाता है.import com.google.android.glass.timeline.GlRenderer; import android.opengl.GLES20; import android.opengl.Matrix; import android.os.SystemClock; import java.util.concurrent.TimeUnit; import javax.microedition.khronos.egl.EGLConfig; /** * Renders a 3D OpenGL Cube on a {@link LiveCard}. */ public class CubeRenderer implements GlRenderer { /** Rotation increment per frame. */ private static final float CUBE_ROTATION_INCREMENT = 0.6f; /** The refresh rate, in frames per second. */ private static final int REFRESH_RATE_FPS = 60; /** The duration, in milliseconds, of one frame. */ private static final float FRAME_TIME_MILLIS = TimeUnit.SECONDS.toMillis(1) / REFRESH_RATE_FPS; private final float[] mMVPMatrix; private final float[] mProjectionMatrix; private final float[] mViewMatrix; private final float[] mRotationMatrix; private final float[] mFinalMVPMatrix; private Cube mCube; private float mCubeRotation; private long mLastUpdateMillis; public CubeRenderer() { mMVPMatrix = new float[16]; mProjectionMatrix = new float[16]; mViewMatrix = new float[16]; mRotationMatrix = new float[16]; mFinalMVPMatrix = new float[16]; // Set the fixed camera position (View matrix). Matrix.setLookAtM(mViewMatrix, 0, 0.0f, 0.0f, -4.0f, 0.0f, 0.0f, 0.0f, 0.0f, 1.0f, 0.0f); } @Override public void onSurfaceCreated(EGLConfig config) { // Set the background frame color GLES20.glClearColor(0.0f, 0.0f, 0.0f, 1.0f); GLES20.glClearDepthf(1.0f); GLES20.glEnable(GLES20.GL_DEPTH_TEST); GLES20.glDepthFunc(GLES20.GL_LEQUAL); mCube = new Cube(); } @Override public void onSurfaceChanged(int width, int height) { float ratio = (float) width / height; GLES20.glViewport(0, 0, width, height); // This projection matrix is applied to object coordinates in the onDrawFrame() method. Matrix.frustumM(mProjectionMatrix, 0, -ratio, ratio, -1.0f, 1.0f, 3.0f, 7.0f); // modelView = projection x view Matrix.multiplyMM(mMVPMatrix, 0, mProjectionMatrix, 0, mViewMatrix, 0); } @Override public void onDrawFrame() { GLES20.glClear(GLES20.GL_COLOR_BUFFER_BIT | GLES20.GL_DEPTH_BUFFER_BIT); // Apply the rotation. Matrix.setRotateM(mRotationMatrix, 0, mCubeRotation, 1.0f, 1.0f, 1.0f); // Combine the rotation matrix with the projection and camera view Matrix.multiplyMM(mFinalMVPMatrix, 0, mMVPMatrix, 0, mRotationMatrix, 0); // Draw cube. mCube.draw(mFinalMVPMatrix); updateCubeRotation(); } /** Updates the cube rotation. */ private void updateCubeRotation() { if (mLastUpdateMillis != 0) { float factor = (SystemClock.elapsedRealtime() - mLastUpdateMillis) / FRAME_TIME_MILLIS; mCubeRotation += CUBE_ROTATION_INCREMENT * factor; } mLastUpdateMillis = SystemClock.elapsedRealtime(); } }ऐसी सेवा बनाएं जो लाइव कार्ड और सेट को मैनेज करे
CubeRendererक्लास को लाइव कार्ड के रेंडरर के तौर पर इस्तेमाल कर सकते हैं.import com.google.android.glass.timeline.LiveCard; import com.google.android.glass.timeline.LiveCard.PublishMode; import android.app.PendingIntent; import android.app.Service; import android.content.Intent; import android.os.IBinder; /** * Creates a {@link LiveCard} rendering a rotating 3D cube with OpenGL. */ public class OpenGlService extends Service { private static final String LIVE_CARD_TAG = "opengl"; private LiveCard mLiveCard; @Override public IBinder onBind(Intent intent) { return null; } @Override public int onStartCommand(Intent intent, int flags, int startId) { if (mLiveCard == null) { mLiveCard = new LiveCard(this, LIVE_CARD_TAG); mLiveCard.setRenderer(new CubeRenderer()); mLiveCard.setAction( PendingIntent.getActivity(this, 0, new Intent(this, MenuActivity.class), 0)); mLiveCard.publish(PublishMode.REVEAL); } else { mLiveCard.navigate(); } return START_STICKY; } @Override public void onDestroy() { if (mLiveCard != null && mLiveCard.isPublished()) { mLiveCard.unpublish(); mLiveCard = null; } super.onDestroy(); } }
import android.opengl.GLES20;

import java.nio.ByteBuffer;
import java.nio.ByteOrder;
import java.nio.FloatBuffer;

/**
 * Renders a 3D Cube using OpenGL ES 2.0.
 *
 * For more information on how to use OpenGL ES 2.0 on Android, see the
 * <a href="//developer.android.com/training/graphics/opengl/index.html">
 * Displaying Graphics with OpenGL ES</a> developer guide.
 */
public class Cube {

    /** Cube vertices */
    private static final float VERTICES[] = {
        -0.5f, -0.5f, -0.5f,
        0.5f, -0.5f, -0.5f,
        0.5f, 0.5f, -0.5f,
        -0.5f, 0.5f, -0.5f,
        -0.5f, -0.5f, 0.5f,
        0.5f, -0.5f, 0.5f,
        0.5f, 0.5f, 0.5f,
        -0.5f, 0.5f, 0.5f
    };

    /** Vertex colors. */
    private static final float COLORS[] = {
        0.0f, 1.0f, 1.0f, 1.0f,
        1.0f, 0.0f, 0.0f, 1.0f,
        1.0f, 1.0f, 0.0f, 1.0f,
        0.0f, 1.0f, 0.0f, 1.0f,
        0.0f, 0.0f, 1.0f, 1.0f,
        1.0f, 0.0f, 1.0f, 1.0f,
        1.0f, 1.0f, 1.0f, 1.0f,
        0.0f, 1.0f, 1.0f, 1.0f,
    };


    /** Order to draw vertices as triangles. */
    private static final byte INDICES[] = {
        0, 1, 3, 3, 1, 2, // Front face.
        0, 1, 4, 4, 5, 1, // Bottom face.
        1, 2, 5, 5, 6, 2, // Right face.
        2, 3, 6, 6, 7, 3, // Top face.
        3, 7, 4, 4, 3, 0, // Left face.
        4, 5, 7, 7, 6, 5, // Rear face.
    };

    /** Number of coordinates per vertex in {@link VERTICES}. */
    private static final int COORDS_PER_VERTEX = 3;

    /** Number of values per colors in {@link COLORS}. */
    private static final int VALUES_PER_COLOR = 4;

    /** Vertex size in bytes. */
    private final int VERTEX_STRIDE = COORDS_PER_VERTEX * 4;

    /** Color size in bytes. */
    private final int COLOR_STRIDE = VALUES_PER_COLOR * 4;

    /** Shader code for the vertex. */
    private static final String VERTEX_SHADER_CODE =
            "uniform mat4 uMVPMatrix;" +
            "attribute vec4 vPosition;" +
            "attribute vec4 vColor;" +
            "varying vec4 _vColor;" +
            "void main() {" +
            "  _vColor = vColor;" +
            "  gl_Position = uMVPMatrix * vPosition;" +
            "}";

    /** Shader code for the fragment. */
    private static final String FRAGMENT_SHADER_CODE =
            "precision mediump float;" +
            "varying vec4 _vColor;" +
            "void main() {" +
            "  gl_FragColor = _vColor;" +
            "}";


    private final FloatBuffer mVertexBuffer;
    private final FloatBuffer mColorBuffer;
    private final ByteBuffer mIndexBuffer;
    private final int mProgram;
    private final int mPositionHandle;
    private final int mColorHandle;
    private final int mMVPMatrixHandle;

    public Cube() {
        ByteBuffer byteBuffer = ByteBuffer.allocateDirect(VERTICES.length * 4);

        byteBuffer.order(ByteOrder.nativeOrder());
        mVertexBuffer = byteBuffer.asFloatBuffer();
        mVertexBuffer.put(VERTICES);
        mVertexBuffer.position(0);

        byteBuffer = ByteBuffer.allocateDirect(COLORS.length * 4);
        byteBuffer.order(ByteOrder.nativeOrder());
        mColorBuffer = byteBuffer.asFloatBuffer();
        mColorBuffer.put(COLORS);
        mColorBuffer.position(0);

        mIndexBuffer = ByteBuffer.allocateDirect(INDICES.length);
        mIndexBuffer.put(INDICES);
        mIndexBuffer.position(0);

        mProgram = GLES20.glCreateProgram();
        GLES20.glAttachShader(mProgram, loadShader(GLES20.GL_VERTEX_SHADER, VERTEX_SHADER_CODE));
        GLES20.glAttachShader(
                mProgram, loadShader(GLES20.GL_FRAGMENT_SHADER, FRAGMENT_SHADER_CODE));
        GLES20.glLinkProgram(mProgram);

        mPositionHandle = GLES20.glGetAttribLocation(mProgram, "vPosition");
        mColorHandle = GLES20.glGetAttribLocation(mProgram, "vColor");
        mMVPMatrixHandle = GLES20.glGetUniformLocation(mProgram, "uMVPMatrix");
    }

    /**
     * Encapsulates the OpenGL ES instructions for drawing this shape.
     *
     * @param mvpMatrix The Model View Project matrix in which to draw this shape
     */
    public void draw(float[] mvpMatrix) {
        // Add program to OpenGL environment.
        GLES20.glUseProgram(mProgram);

        // Prepare the cube coordinate data.
        GLES20.glEnableVertexAttribArray(mPositionHandle);
        GLES20.glVertexAttribPointer(
                mPositionHandle, 3, GLES20.GL_FLOAT, false, VERTEX_STRIDE, mVertexBuffer);

        // Prepare the cube color data.
        GLES20.glEnableVertexAttribArray(mColorHandle);
        GLES20.glVertexAttribPointer(
                mColorHandle, 4, GLES20.GL_FLOAT, false, COLOR_STRIDE, mColorBuffer);

        // Apply the projection and view transformation.
        GLES20.glUniformMatrix4fv(mMVPMatrixHandle, 1, false, mvpMatrix, 0);

        // Draw the cube.
        GLES20.glDrawElements(
                GLES20.GL_TRIANGLES, INDICES.length, GLES20.GL_UNSIGNED_BYTE, mIndexBuffer);

        // Disable vertex arrays.
        GLES20.glDisableVertexAttribArray(mPositionHandle);
        GLES20.glDisableVertexAttribArray(mColorHandle);
    }

    /** Loads the provided shader in the program. */
    private static int loadShader(int type, String shaderCode){
        int shader = GLES20.glCreateShader(type);

        GLES20.glShaderSource(shader, shaderCode);
        GLES20.glCompileShader(shader);

        return shader;
    }
}
लाइव कार्ड पर फ़ोकस करना
LiveCard.publish() की मदद से लाइव कार्ड पब्लिश करने पर, उसे एक पैरामीटर पास किया जाता है
का इस्तेमाल करके यह कंट्रोल किया जा सकता है कि उस पर तुरंत फ़ोकस हो या नहीं.
टाइमलाइन को पब्लिश करने के तुरंत बाद कार्ड पर जाने के लिए, इसका इस्तेमाल करें
LiveCard.PublishMode.REVEAL.
बिना किसी रुकावट के कार्ड को पब्लिश करने और उपयोगकर्ताओं को खुद कार्ड पर नेविगेट करने की सुविधा देने के लिए, इसका इस्तेमाल करें
LiveCard.PublishMode.SILENT.
इसके अलावा, LiveCard.navigate()
तरीके से, आपको कार्ड के पब्लिश होने के बाद सीधे उस पर जाने में मदद मिलती है. उदाहरण के लिए, अगर उपयोगकर्ता आपकी
मुख्य वॉइस मेन्यू से लाइव कार्ड है और यह पहले से ही चालू है, तो आप सीधे लाइव स्ट्रीम पर जा सकते हैं
इस तरीके का इस्तेमाल करें.
मेन्यू बनाना और दिखाना
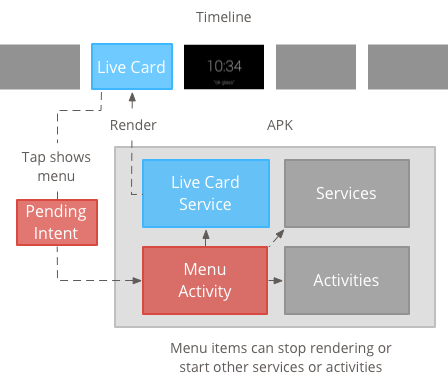
लाइव कार्ड में खुद का मेन्यू सिस्टम नहीं दिखाया जा सकता, इसलिए मेन्यू दिखाने के लिए आपको गतिविधि बनानी होगी लाइव कार्ड के लिए.
इसके बाद, मेन्यू की गतिविधि में लाइव कार्ड को बंद करने वाले आइटम शामिल हो सकते हैं. कोई अनुभव या कोई अन्य कार्रवाई की जा सकती है. इन्हें भी जोड़ा जा सकता है सिस्टम सेटिंग की गतिविधियां, जैसे कि वॉल्यूम को कंट्रोल करना. ज़्यादा के लिए जानकारी, देखें शुरुआती सेटिंग.
मेन्यू संसाधन बनाना
मेन्यू में मौजूद संसाधनों को बनाने की सुविधा, Android प्लैटफ़ॉर्म पर दी गई सुविधा जैसी ही है. हालांकि, इनका पालन करें Glass के लिए दिशा-निर्देश:
- मेन्यू के हर आइटम के लिए, 50 × 50 पिक्सल वाला मेन्यू आइटम आइकॉन दें. मेन्यू पारदर्शी बैकग्राउंड पर आइकॉन सफ़ेद रंग का होना चाहिए. ज़्यादा जानकारी के लिए, इसके लिए ग्लास मेन्यू आइटम आइकॉन या अपने इस्तेमाल के लिए डाउनलोड कर सकते हैं.
- कार्रवाई के बारे में बताने वाला एक छोटा नाम इस्तेमाल करें और यह नाम के पहले अक्षर केस में होना चाहिए. इंपेरेटिव क्रिया काम करती है उदाहरण के लिए, शेयर करें या सभी को जवाब दें).
- Glass, मेन्यू आइटम के बिना लाइव कार्ड नहीं दिखाता है. कम से कम, रोकें मेन्यू आइटम उपलब्ध कराएं, ताकि उपयोगकर्ता लाइव कार्ड को समयावधि.
कॉन्टेंट बनाने CheckBox विजेट समर्थित नहीं है.
<menu xmlns:android="http://schemas.android.com/apk/res/android">
    <item
        android:id="@+id/menu_item_1"
        android:title="@string/Menu_Item_1"       <!-- must have "Stop" menu item -->
        android:icon="@drawable/menu_item_1_icon" />   <!-- white on transparent icon -->
</menu>
मेन्यू कॉलबैक मैनेज करने के लिए, कोई गतिविधि बनाई जा रही है
आपको एक ऐसी मेन्यू गतिविधि तय करनी होगी जिसे आपका लाइव कार्ड तब शुरू हो, जब लोग उस पर टैप करें.
इन्हें बदलें
Activity कॉलबैक के तरीके
मेन्यू को सही तरीके से बनाने, दिखाने, और खारिज करने के लिए:
onCreateOptionsMenu()एक्सएमएल मेन्यू रिसॉर्स को इनफ़्लेट करता है.onAttachedToWindow()गतिविधि पर फ़ोकस होने पर मेन्यू दिखाता है.onPrepareOptionsMenu()ज़रूरी होने पर मेन्यू आइटम को दिखाता या छिपाता है. उदाहरण के लिए, आपके पास अलग-अलग मेन्यू आइटम दिखाने का विकल्प है उसी क्रम में प्राथमिकता दें जिस क्रम में आपको उन्हें दिखाना है. उदाहरण के लिए, अलग-अलग मेन्यू आइटम के आधार पर उन्हें दिखाया जा सकता है काफ़ी अहम जानकारी मिलती है.- उपयोगकर्ता के चुने गए विकल्प को
onOptionsItemSelected()हैंडल करता है. onOptionsMenuClosed()ताकि यह लाइव कार्ड पर न दिखे.
आपको यह गतिविधि यहां खत्म करनी होगी, ताकि जब मेन्यू को चुने गए विकल्प से बंद किया जाए या नीचे की ओर स्वाइप किया जाए, तो यह ठीक से पूरी हो जाए.
/**
 * Activity showing the options menu.
 */
public class MenuActivity extends Activity {

    @Override
    public void onAttachedToWindow() {
        super.onAttachedToWindow();
        openOptionsMenu();
    }

    @Override
    public boolean onCreateOptionsMenu(Menu menu) {
        MenuInflater inflater = getMenuInflater();
        inflater.inflate(R.menu.stopwatch, menu);
        return true;
    }

    @Override
    public boolean onOptionsItemSelected(MenuItem item) {
        // Handle item selection.
        switch (item.getItemId()) {
            case R.id.stop:
                stopService(new Intent(this, StopwatchService.class));
                return true;
            default:
                return super.onOptionsItemSelected(item);
        }
    }

    @Override
    public void onOptionsMenuClosed(Menu menu) {
        // Nothing else to do, closing the activity.
        finish();
    }
}
मेन्यू में की गई गतिविधि के डेटा को पारदर्शी बनाना
Glass की स्टाइल को एक जैसा बनाए रखने के लिए, मेन्यू की गतिविधि करें पारदर्शी, ताकि लाइव कार्ड अब भी नीचे दिखे मेन्यू:
कोई
res/values/styles.xmlफ़ाइल बनाएं और किसी स्टाइल का एलान करें जो गतिविधि का बैकग्राउंड पारदर्शी बनाए:<resources> <style name="MenuTheme" parent="@android:style/Theme.DeviceDefault"> <item name="android:windowBackground">@android:color/transparent</item> <item name="android:colorBackgroundCacheHint">@null</item> <item name="android:windowIsTranslucent">true</item> <item name="android:windowAnimationStyle">@null</item> </style> </resources>अपनी
AndroidManifest.xmlफ़ाइल में, मेन्यू की गतिविधि के लिए थीम असाइन करें:<?xml version="1.0" encoding="utf-8"?> <manifest ... > ... <application ... > ... <activity android:name=".MenuActivity" android:theme="@style/MenuTheme" ...> </activity> </application> </manifest>
मेन्यू दिखाया जा रहा है
किसी को
PendingIntent
setAction() का इस्तेमाल करके कार्ड की कार्रवाई के लिए. शुरू करने के लिए, मंज़ूरी बाकी वाले इंटेंट का इस्तेमाल किया गया है
जब उपयोगकर्ता कार्ड पर टैप करते हैं, तो मेन्यू गतिविधि:
Intent menuIntent = new Intent(this, MenuActivity.class);
mLiveCard.setAction(PendingIntent.getActivity(this, 0, menuIntent, 0));
mLiveCard.publish(LiveCard.PublishMode.REVEAL); // or SILENT
कॉन्टेक्स्ट के हिसाब से बोलकर दिए जाने वाले निर्देशों के साथ काम करने की सुविधा
बताएं कि आपका
MenuActivityसमर्थन करता है बोलकर दिए जाने वाले निर्देश:// Initialize your LiveCard as usual. mLiveCard.setVoiceActionEnabled(true); mLiveCard.publish(LiveCard.PublishMode.REVEAL); // or SILENTवॉइस फ़्लो के ज़रिए बातचीत शुरू करने के लिए, अपने
MenuActivityमें बदलाव करें:/** * Activity showing the options menu. */ public class MenuActivity extends Activity { private boolean mFromLiveCardVoice; private boolean mIsFinishing; @Override protected void onCreate(Bundle savedInstanceState) { super.onCreate(savedInstanceState); mFromLiveCardVoice = getIntent().getBooleanExtra(LiveCard.EXTRA_FROM_LIVECARD_VOICE, false); if (mFromLiveCardVoice) { // When activated by voice from a live card, enable voice commands. The menu // will automatically "jump" ahead to the items (skipping the guard phrase // that was already said at the live card). getWindow().requestFeature(WindowUtils.FEATURE_VOICE_COMMANDS); } } @Override public void onAttachedToWindow() { super.onAttachedToWindow(); if (!mFromLiveCardVoice) { openOptionsMenu(); } } @Override public boolean onCreatePanelMenu(int featureId, Menu menu) { if (isMyMenu(featureId)) { getMenuInflater().inflate(R.menu.stopwatch, menu); return true; } return super.onCreatePanelMenu(featureId, menu); } @Override public boolean onPreparePanel(int featureId, View view, Menu menu) { if (isMyMenu(featureId)) { // Don't reopen menu once we are finishing. This is necessary // since voice menus reopen themselves while in focus. return !mIsFinishing; } return super.onPreparePanel(featureId, view, menu); } @Override public boolean onMenuItemSelected(int featureId, MenuItem item) { if (isMyMenu(featureId)) { // Handle item selection. switch (item.getItemId()) { case R.id.stop_this: stopService(new Intent(this, StopwatchService.class)); return true; } } return super.onMenuItemSelected(featureId, item); } @Override public void onPanelClosed(int featureId, Menu menu) { super.onPanelClosed(featureId, menu); if (isMyMenu(featureId)) { // When the menu panel closes, either an item is selected from the menu or the // menu is dismissed by swiping down. Either way, we end the activity. isFinishing = true; finish(); } } /** * Returns {@code true} when the {@code featureId} belongs to the options menu or voice * menu that are controlled by this menu activity. */ private boolean isMyMenu(int featureId) { return featureId == Window.FEATURE_OPTIONS_PANEL || featureId == WindowUtils.FEATURE_VOICE_COMMANDS; } }
ज़्यादा जानकारी के लिए बोलकर दिए जाने वाले निर्देश गाइड देखें.
मेन्यू से जुड़ी सुविधाएं
मेन्यू के लुक और व्यवहार को बदलने के लिए, कुछ सहायक तरीके उपलब्ध हैं. यहां जाएं:
MenuUtils
हमारा वीडियो देखें.