
Halaman ini membahas contoh cara menambahkan peta 3D dasar ke aplikasi Android menggunakan Maps 3D SDK for Android. Petunjuk di halaman ini mengasumsikan bahwa Anda telah menyelesaikan langkah-langkah di halaman Penyiapan dan memiliki hal berikut:
- Project Google Cloud dengan Maps 3D SDK for Android diaktifkan
- Kunci API yang dikonfigurasi untuk digunakan dengan Maps 3D SDK for Android
- Project Android Studio yang disiapkan untuk digunakan dengan Maps 3D SDK for Android
Untuk mengetahui informasi selengkapnya tentang prasyarat ini, lihat Penyiapan.
Bagian 1: Perbarui File Tata Letak (activity_main.xml) untuk menambahkan komponen Map3DView
Komponen Map3DView adalah tampilan yang merender peta 3D dalam aplikasi.
Langkah-langkah berikut menambahkan komponen dan mengonfigurasi status awal peta, termasuk posisi kamera dan atribut terkait:
Buka file tata letak aktivitas utama Anda, yang biasanya terletak di
app/src/main/res/layout/activity_main.xml.Di
ConstraintLayoutroot (atau elemen tata letak root), tambahkan namespace XMLmap3d:xmlns:map3d="http://schemas.android.com/apk/res-auto"Hapus
<TextView>default yang menampilkan "Hello World!".Tambahkan komponen
Map3DViewke tata letak Anda. Anda dapat menyesuaikan posisi kamera dan atribut lainnya:<?xml version="1.0" encoding="utf-8"?> <androidx.constraintlayout.widget.ConstraintLayout xmlns:android="http://schemas.android.com/apk/res/android" xmlns:app="http://schemas.android.com/apk/res-auto" xmlns:map3d="http://schemas.android.com/apk/res-auto" xmlns:tools="http://schemas.android.com/tools" android:id="@+id/main" android:layout_width="match_parent" android:layout_height="match_parent" tools:context=".MainActivity"> <com.google.android.gms.maps3d.Map3DView android:id="@+id/map3dView" android:layout_width="match_parent" android:layout_height="match_parent" map3d:mode="hybrid" map3d:centerLat="38.544012" map3d:centerLng="-107.670428" map3d:centerAlt="2427.6" map3d:heading="310" map3d:tilt="63" map3d:range="8266" map3d:roll="0" map3d:minAltitude="0" map3d:maxAltitude="1000000" map3d:minHeading="0" map3d:maxHeading="360" map3d:minTilt="0" map3d:maxTilt="90" app:layout_constraintBottom_toBottomOf="parent" app:layout_constraintEnd_toEndOf="parent" app:layout_constraintStart_toStartOf="parent" app:layout_constraintTop_toTopOf="parent" /> </androidx.constraintlayout.widget.ConstraintLayout>
Bagian 2: Update MainActivity.kt
Langkah-langkah berikut menginisialisasi komponen Map3DView yang ditambahkan ke file
activity_main.xml di Bagian 1 dan mengelola peristiwa siklus proses komponen.
Perhatikan bahwa Maps 3D SDK for Android hanya mendukung satu instance Map3DView
aktif dalam satu waktu. Menampilkan beberapa instance Map3DView secara bersamaan
(misalnya, dalam tata letak yang sama atau Aktivitas atau Fragmen yang terlihat berbeda) tidak
didukung dan dapat menyebabkan masalah rendering, seperti layar hitam pada tampilan
sekunder.
Selain itu, semua Map3DView akan berbagi dan mencerminkan status peta yang sama
(misalnya, posisi kamera, penanda yang ditambahkan, poligon, dll.), yang akan tetap ada meskipun
satu Map3DView dihancurkan (menggunakan onDestroy) dan yang lainnya dibuat, kecuali
dihapus secara manual. Misalnya, jika Anda menambahkan penanda ke Map3DView1, lalu menghancurkan
Map3DView1 dan membuat Map3DView2, penanda yang sama tersebut akan tetap ada di
Map3DView2.
Tanggung Jawab Developer:
- Satu tampilan dalam satu waktu: Pastikan hanya ada satu
Map3DViewdi bagian aktif hierarki tampilan Anda setiap saat. - Pembersihan manual: Saat beralih dari satu
Map3DView(misalnya,Map3DView1) keMap3DViewlain (misalnya,Map3DView2), Anda harus memanggilonDestroy()pada instance lama (Map3DView1). Karena status peta yang mendasarinya dibagikan, untuk memastikanMap3DView2dimulai dengan status baru atau spesifik, Anda bertanggung jawab untuk menghapus secara manual status apa pun yang ditetapkan olehMap3DView1. Hal ini mencakup menghapus penanda, overlay, dll., dan mereset posisi kamera menggunakan objekGoogleMap3Dyang diperoleh diOnMap3DViewReadyCallback.
Buka file
MainActivity.kt, yang biasanya terletak diapp/src/main/java/com/example/yourpackagename/MainActivity.kt.Tambahkan impor yang diperlukan untuk Maps 3D SDK for Android:
import com.google.android.gms.maps3d.GoogleMap3D
import com.google.android.gms.maps3d.Map3DView
import com.google.android.gms.maps3d.OnMap3DViewReadyCallback
Ubah class
MainActivityuntuk menerapkanOnMap3DViewReadyCallback:class MainActivity : AppCompatActivity(), OnMap3DViewReadyCallback {Deklarasikan variabel untuk
Map3DViewdanGoogleMap3D:private lateinit var map3DView: Map3DView private var googleMap3D: GoogleMap3D? = nullDalam metode
onCreate, setelahsetContentView(...)dan blokViewCompat.setOnApplyWindowInsetsListener, lakukan inisialisasimap3DView, panggil metode siklus prosesonCreate, dan minta peta secara asinkron:override fun onCreate(savedInstanceState: Bundle?) { super.onCreate(savedInstanceState) enableEdgeToEdge() setContentView(R.layout.activity_main) ViewCompat.setOnApplyWindowInsetsListener(findViewById(R.id.main)) { v, insets -> val systemBars = insets.getInsets(WindowInsetsCompat.Type.systemBars()) v.setPadding(systemBars.left, systemBars.top, systemBars.right, systemBars.bottom) insets } map3DView = findViewById(R.id.map3dView) map3DView.onCreate(savedInstanceState) map3DView.getMap3DViewAsync(this) }Ganti metode
onMap3DViewReady. Callback ini dipicu saat peta siap digunakan:override fun onMap3DViewReady(googleMap3D: GoogleMap3D) { // Interact with the googleMap3D object here this.googleMap3D = googleMap3D // You can now make calls to the googleMap3D object, e.g., // googleMap3D.cameraController.flyTo(camera { ... }) }Teruskan peristiwa siklus proses dari Aktivitas Anda ke
Map3DViewdengan menambahkan penggantian berikut keMainActivity:override fun onStart() { super.onStart() map3DView.onStart() } override fun onResume() { super.onResume() map3DView.onResume() } override fun onPause() { map3DView.onPause() super.onPause() } override fun onStop() { map3DView.onStop() super.onStop() } override fun onDestroy() { map3DView.onDestroy() super.onDestroy() } override fun onSaveInstanceState(outState: Bundle) { super.onSaveInstanceState(outState) map3DView.onSaveInstanceState(outState) } override fun onLowMemory() { super.onLowMemory() map3DView.onLowMemory() }
Bagian 3: Sinkronkan Gradle dan Jalankan
Setelah memperbarui tata letak dan aktivitas aplikasi, Anda dapat membangun dan menjalankan aplikasi untuk melihat tampilan peta 3D.
Untuk menyinkronkan project dengan Gradle, pilih File > Sync Project with Gradle Files.
Untuk membuat dan menjalankan aplikasi di emulator atau perangkat fisik, pilih Run > Run.
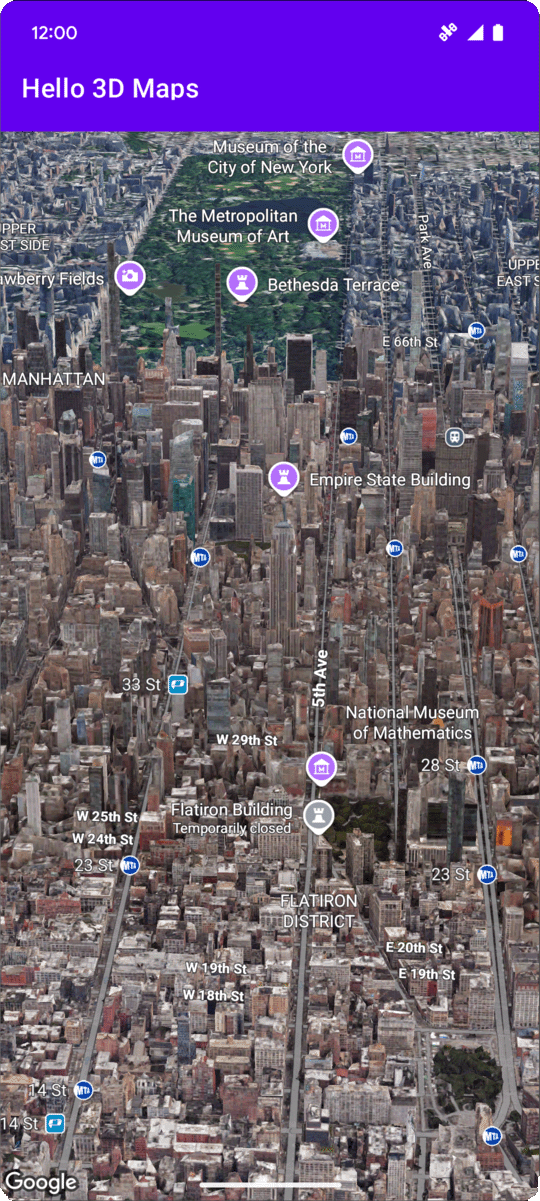
Jika semuanya dikonfigurasi dengan benar, Anda akan melihat peta 3D yang ditampilkan di
aplikasi Anda, yang berpusat di dekat koordinat yang ditentukan dalam
activity_main.xml.
Langkah berikutnya
Setelah menambahkan peta 3D dasar ke aplikasi, Anda dapat mempelajari fitur yang lebih canggih dari Maps 3D SDK for Android, seperti animasi jalur kamera, penanda 3D, atau poligon.
Memproses peristiwa klik peta
Untuk memproses peristiwa klik di peta, gunakan
GoogleMap3D.setMap3DClickListener. Pemroses ini dipicu saat pengguna mengklik peta, dan memberikan lokasi serta ID tempat dari titik yang diklik.
Contoh berikut menunjukkan cara menyetel pemroses klik peta:
googleMap3D.setMap3DClickListener { location, placeId ->
    lifecycleScope.launch(Dispatchers.Main) {
        if (placeId != null) {
            Toast.makeText(this@MainActivity, "Clicked on place with ID: $placeId", Toast.LENGTH_SHORT).show()
        } else {
            Toast.makeText(this@MainActivity, "Clicked on location: $location", Toast.LENGTH_SHORT).show()
        }
    }
}
Perhatikan bahwa pengendali klik tidak berjalan di thread Utama (atau UI). Jika Anda
ingin melakukan perubahan pada UI (seperti menampilkan pesan Toast), Anda harus
beralih ke thread Utama. Untuk Kotlin, Anda dapat melakukannya menggunakan
lifecycleScope.launch(Dispatchers.Main).