
Bu sayfada, Android için Haritalar 3D SDK'sını kullanarak Android uygulamasına temel bir 3D haritanın nasıl ekleneceğine dair bir örnek açıklanmaktadır. Bu sayfadaki talimatlar, Kurulum sayfasındaki adımları tamamladığınızı ve aşağıdakilere sahip olduğunuzu varsayar:
- Android için Haritalar 3D SDK'sının etkin olduğu bir Google Cloud projesi
- Android için Haritalar 3D SDK'sı ile kullanılacak şekilde yapılandırılmış bir API anahtarı
- Android için Haritalar 3D SDK'sı ile kullanılmak üzere ayarlanmış bir Android Studio projesi
Bu ön koşullar hakkında daha fazla bilgi için Kurulum başlıklı makaleyi inceleyin.
1. bölüm: Map3DView bileşenini eklemek için düzen dosyasını (activity_main.xml) güncelleyin
Map3DView bileşeni, uygulamadaki 3D haritayı oluşturmak için kullanılan görünümdür.
Aşağıdaki adımlarda, bileşen eklenir ve haritanın ilk durumu (kamera konumu ve ilgili özellikler dahil) yapılandırılır:
Ana etkinliğinizin düzen dosyasını açın. Bu dosya genellikle
app/src/main/res/layout/activity_main.xmlkonumunda bulunur.Kök
ConstraintLayoutöğesine (veya kök düzen öğenize)map3dXML ad alanını ekleyin:xmlns:map3d="http://schemas.android.com/apk/res-auto""Hello World!" ifadesini gösteren varsayılan
<TextView>öğesini silin.Düzeninize
Map3DViewbileşenini ekleyin. Kamera konumunu ve diğer özellikleri özelleştirebilirsiniz:<?xml version="1.0" encoding="utf-8"?> <androidx.constraintlayout.widget.ConstraintLayout xmlns:android="http://schemas.android.com/apk/res/android" xmlns:app="http://schemas.android.com/apk/res-auto" xmlns:map3d="http://schemas.android.com/apk/res-auto" xmlns:tools="http://schemas.android.com/tools" android:id="@+id/main" android:layout_width="match_parent" android:layout_height="match_parent" tools:context=".MainActivity"> <com.google.android.gms.maps3d.Map3DView android:id="@+id/map3dView" android:layout_width="match_parent" android:layout_height="match_parent" map3d:mode="hybrid" map3d:centerLat="38.544012" map3d:centerLng="-107.670428" map3d:centerAlt="2427.6" map3d:heading="310" map3d:tilt="63" map3d:range="8266" map3d:roll="0" map3d:minAltitude="0" map3d:maxAltitude="1000000" map3d:minHeading="0" map3d:maxHeading="360" map3d:minTilt="0" map3d:maxTilt="90" app:layout_constraintBottom_toBottomOf="parent" app:layout_constraintEnd_toEndOf="parent" app:layout_constraintStart_toStartOf="parent" app:layout_constraintTop_toTopOf="parent" /> </androidx.constraintlayout.widget.ConstraintLayout>
2. bölüm: MainActivity.kt dosyasını güncelleme
Aşağıdaki adımlarda, Bölüm 1'de activity_main.xml dosyasına eklenen Map3DView bileşeni başlatılır ve bileşen yaşam döngüsü etkinlikleri yönetilir.
Android için Haritalar 3D SDK'sının aynı anda yalnızca bir etkin Map3DView
örneği desteklediğini unutmayın. Aynı anda birden fazla Map3DView örneğinin gösterilmesi (ör. aynı düzende veya farklı görünür Etkinlikler ya da Parçalar) desteklenmez ve ikincil görünümlerde siyah ekran gibi oluşturma sorunlarına yol açabilir.
Ayrıca, tüm Map3DView aynı harita durumunu (ör.kamera konumu, eklenen işaretçiler, poligonlar vb.) paylaşır ve yansıtır. Bu durum, bir Map3DView yok edilip (onDestroy kullanılarak) başka bir Map3DView oluşturulsa bile manuel olarak temizlenmediği sürece devam eder. Örneğin, Map3DView1 öğesine işaretçi ekleyip bu öğeyi yok edip Map3DView2 öğesini oluşturursanız aynı işaretçiler Map3DView2 öğesinde de yer alır.
Geliştiricinin Sorumlulukları:
- Tek seferde bir görünüm: Herhangi bir anda görünüm hiyerarşinizin etkin bir bölümünde yalnızca bir
Map3DViewolduğundan emin olun. - Manuel temizleme: Bir
Map3DView'den (ör.Map3DView1) diğerine (ör.Map3DView2) geçerken eski örnekte (Map3DView1)onDestroy()işlevini çağırmanız gerekir. Temel harita durumu paylaşıldığındanMap3DView2'in yeni veya belirli bir durumla başlamasını sağlamak içinMap3DView1tarafından ayarlanan tüm durumları manuel olarak temizlemek sizin sorumluluğunuzdadır. Buna işaretçilerin, kaplamaların vb. kaldırılması veGoogleMap3Diçinde elde edilenOnMap3DViewReadyCallbacknesnesi kullanılarak kamera konumunun sıfırlanması dahildir.
Genellikle
MainActivity.ktkonumunda bulunanapp/src/main/java/com/example/yourpackagename/MainActivity.ktdosyanızı açın.Android için Haritalar 3D SDK'sı ile ilgili gerekli içe aktarmaları ekleyin:
import com.google.android.gms.maps3d.GoogleMap3D import com.google.android.gms.maps3d.Map3DView import com.google.android.gms.maps3d.OnMap3DViewReadyCallbackMainActivitysınıfınıOnMap3DViewReadyCallback'yi uygulayacak şekilde değiştirin:class MainActivity : AppCompatActivity(), OnMap3DViewReadyCallback {Map3DViewveGoogleMap3Diçin değişkenleri bildirin:private lateinit var map3DView: Map3DView private var googleMap3D: GoogleMap3D? = nullonCreateyönteminde,setContentView(...)veViewCompat.setOnApplyWindowInsetsListenerbloğundan sonramap3DViewöğesini başlatın,onCreateyaşam döngüsü yöntemini çağırın ve haritayı eşzamansız olarak isteyin:override fun onCreate(savedInstanceState: Bundle?) { super.onCreate(savedInstanceState) enableEdgeToEdge() setContentView(R.layout.activity_main) ViewCompat.setOnApplyWindowInsetsListener(findViewById(R.id.main)) { v, insets -> val systemBars = insets.getInsets(WindowInsetsCompat.Type.systemBars()) v.setPadding(systemBars.left, systemBars.top, systemBars.right, systemBars.bottom) insets } map3DView = findViewById(R.id.map3dView) map3DView.onCreate(savedInstanceState) map3DView.getMap3DViewAsync(this) }onMap3DViewReadyyöntemini geçersiz kılın. Bu geri çağırma, harita kullanıma hazır olduğunda tetiklenir:override fun onMap3DViewReady(googleMap3D: GoogleMap3D) { // Interact with the googleMap3D object here this.googleMap3D = googleMap3D // You can now make calls to the googleMap3D object, e.g., // googleMap3D.cameraController.flyTo(camera { ... }) }Aşağıdaki geçersiz kılmaları
MainActivity'ye ekleyerek etkinlik yaşam döngüsü etkinliklerini EtkinliğinizdenMap3DView'ye yönlendirin:override fun onStart() { super.onStart() map3DView.onStart() } override fun onResume() { super.onResume() map3DView.onResume() } override fun onPause() { map3DView.onPause() super.onPause() } override fun onStop() { map3DView.onStop() super.onStop() } override fun onDestroy() { map3DView.onDestroy() super.onDestroy() } override fun onSaveInstanceState(outState: Bundle) { super.onSaveInstanceState(outState) map3DView.onSaveInstanceState(outState) } override fun onLowMemory() { super.onLowMemory() map3DView.onLowMemory() }
3. bölüm: Gradle'ı senkronize etme ve çalıştırma
Uygulamanızın düzenini ve etkinliğini güncellediğinize göre artık 3D harita görünümünü görmek için uygulamayı oluşturup çalıştırabilirsiniz.
Projenizi Gradle ile senkronize etmek için Dosya > Projeyi Gradle Dosyalarıyla Senkronize Et'i seçin.
Uygulamanızı bir emülatörde veya fiziksel cihazda oluşturup çalıştırmak için Run > Run'ı (Çalıştır > Çalıştır) seçin.
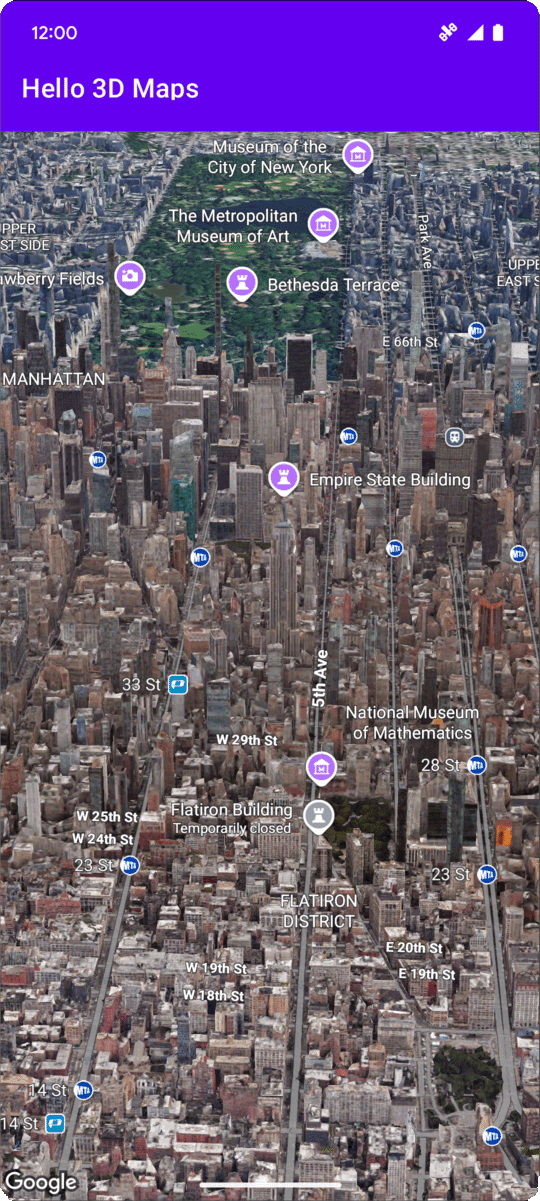
Her şey doğru şekilde yapılandırıldıysa uygulamanızda 3D harita gösterilir. Bu harita, activity_main.xml dosyanızda belirtilen koordinatların yakınında ortalanır.
Sonraki adımlar
Uygulamanıza temel bir 3D harita eklediğinize göre artık Android için Maps 3D SDK'sının kamera yolu animasyonları, 3D işaretçiler veya çokgenler gibi daha ileri seviye özelliklerini keşfedebilirsiniz.
Harita tıklama etkinliklerini dinleme
Haritadaki tıklama etkinliklerini dinlemek için GoogleMap3D.setMap3DClickListener tuşunu kullanın. Bu dinleyici, kullanıcı haritayı tıkladığında tetiklenir ve tıklanan noktanın konumunu ve yer kimliğini sağlar.
Aşağıdaki örnekte, harita tıklama işleyicisinin nasıl ayarlanacağı gösterilmektedir:
googleMap3D.setMap3DClickListener { location, placeId ->
    lifecycleScope.launch(Dispatchers.Main) {
        if (placeId != null) {
            Toast.makeText(this@MainActivity, "Clicked on place with ID: $placeId", Toast.LENGTH_SHORT).show()
        } else {
            Toast.makeText(this@MainActivity, "Clicked on location: $location", Toast.LENGTH_SHORT).show()
        }
    }
}
Tıklama işleyicinin ana (veya kullanıcı arayüzü) iş parçacığında çalışmadığını unutmayın. Kullanıcı arayüzünde değişiklik yapmak (ör. Toast mesajı göstermek) istiyorsanız ana iş parçacığına geçmeniz gerekir. Kotlin için bu işlemi lifecycleScope.launch(Dispatchers.Main) kullanarak yapabilirsiniz.