आपके ऐप्लिकेशन से, Business Profile के एपीआई को भेजे जाने वाले हर अनुरोध के लिए यह ज़रूरी है अनुमति टोकन शामिल करना होगा. ऑथराइज़ेशन टोकन से उपयोगकर्ता या Google के ऐप्लिकेशन को जोड़ना, जो Business Profile के एपीआई ऐक्सेस करने की अनुमति देता है. आपके ऐप्लिकेशन में OAuth 2.0 का इस्तेमाल होना चाहिए प्रोटोकॉल का इस्तेमाल करें.
इस गाइड में उन अलग-अलग तरीकों के बारे में बताया गया है जिनका इस्तेमाल करके, OAuth 2.0 के साथ काम करता है. Google Identity Platform 'Google साइन-इन' और OAuth की सुविधा देता है. इनका इस्तेमाल पूरे पढ़ें.
यह जानने के लिए कि वेब सर्वर के लिए Oauth 2.0 कैसे इस्तेमाल करें आवेदन के लिए, कृपया यहां दी गई गाइड देखें.
OAuth 2.0 को लागू करने के ये फ़ायदे हैं:
- कारोबार के मालिक के डेटा को ऐक्सेस किया जा सकता है.
- कारोबार के मालिक की पहचान तब होती है, जब वे अपने खाते में साइन इन करते हैं Google खाता.
- यह तय करता है कि कोई पार्टनर प्लैटफ़ॉर्म या ऐप्लिकेशन, ऐक्सेस कर सकता है और बदलाव कर सकता है कारोबार के मालिक की साफ़ तौर पर सहमति के साथ जगह की जानकारी का डेटा. मालिक ये काम कर सकता है बाद में यह ऐक्सेस वापस ले लें.
- पार्टनर प्लैटफ़ॉर्म की पहचान पहचानी जाती है.
- पार्टनर प्लैटफ़ॉर्म को इनकी ओर से ऑनलाइन या ऑफ़लाइन कार्रवाइयां करने में मदद करता है कारोबार के मालिक के तौर पर. इसमें समीक्षाओं पर दिए गए जवाब, पोस्ट बनाना, और मेन्यू आइटम के अपडेट.
OAuth 2.0 के साथ एपीआई ऐक्सेस
शुरू करने से पहले, आपको अपना Google Cloud प्रोजेक्ट कॉन्फ़िगर करना होगा. इसके बाद, Business Profile के एपीआई. ज़्यादा जानकारी के लिए, बुनियादी सेटअप.
OAuth और उस स्क्रीन को कॉन्फ़िगर करें जहां सहमति दी जाती है
क्रेडेंशियल और सहमति वाली स्क्रीन बनाने के लिए यह तरीका अपनाएं:
- क्रेडेंशियल पेज से एपीआई कंसोल में, क्रेडेंशियल बनाएं पर क्लिक करें और "OAuth Client-ID" चुनें भेजने वाला ड्रॉप-डाउन सूची.
- चुनें कि आपका ऐप्लिकेशन किस तरह का है. इसके बाद, ज़रूरी जानकारी भरें और बनाएं.
- सेव करें पर क्लिक करें.
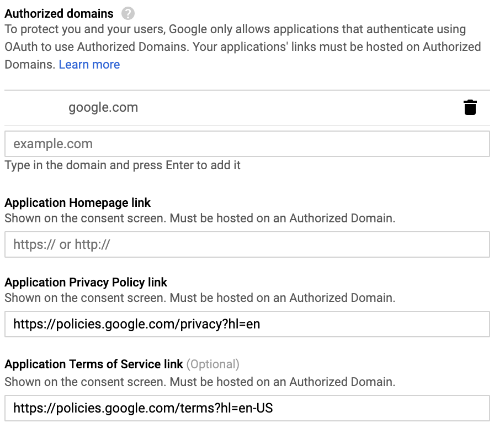
- OAuth की सहमति वाली स्क्रीन की सेटिंग अपडेट करें. वहां से, आप ऐप्लिकेशन का नाम, लोगो, और साथ ही अपडेट कर सकते हैं अपनी सेवा की शर्तों और निजता नीति का लिंक शामिल करें.
नीचे दी गई इमेज, OAuth पर ऐप्लिकेशन का नाम और लोगो फ़ील्ड दिखाती है सहमति वाली स्क्रीन:
इस इमेज में, ऐसे अन्य फ़ील्ड दिखाए गए हैं जो OAuth की सहमति वाले पेज पर दिखते हैं स्क्रीन:
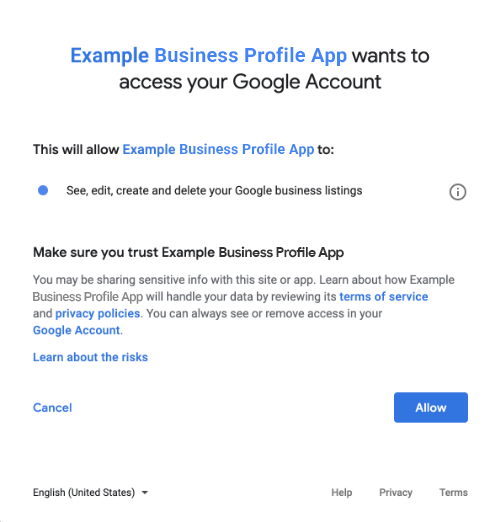
नीचे दी गई इमेज में एक उदाहरण दिया गया है. इसमें बताया गया है कि विज्ञापन देने से पहले, लोगों को कौनसी जानकारी दिख सकती है सहमति:
OAuth 2.0 को शामिल करने के तरीके
OAuth 2.0 को लागू करने के लिए, नीचे दिए गए तरीकों का इस्तेमाल किया जा सकता है:
नीचे दिए गए कॉन्टेंट में, विज्ञापन और कमाई करने के तरीकों के बारे में बताया गया है. OAuth 2.0 के साथ काम करता है.
अनुमति पाने के लिंक
इनमें से किसी एक OAuth स्कोप की ज़रूरत होती है:
- https://www.googleapis.com/auth/business.manage
- https://www.googleapis.com/auth/plus.business.manage
Plus.business.manage का स्कोप अब सेवा में नहीं है. इसे बनाए रखने के लिए उपलब्ध कराया गया है मौजूदा तरीकों के साथ पुराने सिस्टम के साथ काम करने की सुविधा.
क्लाइंट लाइब्रेरी
इस पेज पर भाषा के हिसाब से दिए गए उदाहरणों में, Google API क्लाइंट लाइब्रेरी का इस्तेमाल किया गया है OAuth 2.0 प्राधिकरण लागू करने के लिए. कोड सैंपल चलाने के लिए, पहले आपको क्लाइंट लाइब्रेरी इंस्टॉल करने के लिए किया जा सकता है.
क्लाइंट लाइब्रेरी इन भाषाओं में उपलब्ध हैं:
Google साइन-इन
Google साइन-इन, OAuth को अपने प्लैटफ़ॉर्म में इंटिग्रेट करें. यह Android, iOS, वेब, के साथ और भी बहुत कुछ.

'Google साइन-इन' पुष्टि करने का एक सुरक्षित सिस्टम है. इसकी मदद से लोग साइन इन कर सकते हैं साइन इन करने के लिए, अपने Google खाते से साइन इन करें. यह वही खाता है जिसका इस्तेमाल करके वे साइन इन करते हैं अन्य Google सेवाओं को ऐक्सेस करने की अनुमति दें. उपयोगकर्ता के साइन इन करने के बाद, वह Business Profile API को कॉल करने और ऑथराइज़ेशन कोड का इस्तेमाल करें. इसका इस्तेमाल रीफ़्रेश करने और ऐक्सेस टोकन पाने के लिए किया जाता है.
बिना इंटरनेट के इस्तेमाल
आप किसी उपयोगकर्ता की ओर से Business Profile API को कॉल करना चाहें, भले ही जब उपयोगकर्ता ऑफ़लाइन हो. हमारा सुझाव है कि प्लैटफ़ॉर्म को सुविधा उपलब्ध है, क्योंकि आप इस उपयोगकर्ता ने साइन इन किया है और सहमति दी है.
Google यह मानता है कि उपयोगकर्ता ने पहले ही अपने Google खाते से साइन इन किया हुआ है और ने आपके ऐप्लिकेशन को Business Profile API को कॉल करने की सहमति दी है और ऑथराइज़ेशन कोड को एक्सचेंज किया गया हो, जिसका इस्तेमाल रीफ़्रेश टोकन पाने के लिए किया गया हो और बाद में, ऐक्सेस टोकन मिलेगा. उपयोगकर्ता रीफ़्रेश टोकन को सुरक्षित तरीके से सेव करके इस्तेमाल कर सकता है बाद में किसी भी समय नया ऐक्सेस टोकन हासिल किया जा सकता है. ज़्यादा जानकारी के लिए, पढ़ें सर्वर-साइड के लिए Google साइन-इन ऐप्लिकेशन हैं.
नीचे दिया गया कोड स्निपेट, अपने कैंपेन में ऑफ़लाइन ऐक्सेस लागू करने का तरीका बताता है का इस्तेमाल करें. इस कोड को चलाने के लिए, सैंपल चलाएं देखें.
<!-- The top of file index.html -->
<html itemscope itemtype="http://schema.org/Article">
<head>
  <!-- BEGIN Pre-requisites -->
  <script src="https://ajax.googleapis.com/ajax/libs/jquery/1.8.2/jquery.min.js">
  </script>
  <script src="https://apis.google.com/js/client:platform.js?onload=start" async defer>
  </script>
  <!-- END Pre-requisites -->
<!-- Continuing the <head> section -->
  <script>
    function start() {
      gapi.load('auth2', function() {
        auth2 = gapi.auth2.init({
          client_id: 'YOUR_CLIENT_ID.apps.googleusercontent.com',
          // Scopes to request in addition to 'profile' and 'email'
          scope: 'https://www.googleapis.com/auth/business.manage',
          immediate: true
        });
      });
    }
  </script>
</head>
<body>
  <!-- Add where you want your sign-in button to render -->
<!-- Use an image that follows the branding guidelines in a real app, more info here:
 https://developers.google.com/identity/branding-guidelines
-->
<h1>Business Profile Offline Access Demo</h1>

<p> This demo demonstrates the use of Google Identity Services and OAuth to gain authorization to call the Business Profile APIs on behalf of the user, even when the user is offline.

When a refresh token is acquired, store this token securely on your database. You will then be able to use this token to refresh the OAuth credentials and make offline API calls on behalf of the user.

The user may revoke access at any time from the <a href='https://myaccount.google.com/permissions'>Account Settings</a> page.
</p>

<button id="signinButton">Sign in with Google</button><br>
<input id="authorizationCode" type="text" placeholder="Authorization Code" style="width: 60%"><button id="accessTokenButton" disabled>Retrieve Access/Refresh Token</button><br>
 <input id="refreshToken" type="text" placeholder="Refresh Token, never expires unless revoked" style="width: 60%"><button id="refreshSubmit">Refresh Access Token</button><br>
 <input id="accessToken" type="text" placeholder="Access Token" style="width: 60%"><button id="gmbAccounts">Get Business Profile Accounts</button><br>
 <p>API Responses:</p>
<script>
    //Will be populated after sign in.
    var authCode;
  $('#signinButton').click(function() {
    // signInCallback
    auth2.grantOfflineAccess().then(signInCallback);
  });

  $('#accessTokenButton').click(function() {
    // signInCallback defined in step 6.
    retrieveAccessTokenAndRefreshToken(authCode);
  });

  $('#refreshSubmit').click(function() {
    // signInCallback defined in step 6.
    retrieveAccessTokenFromRefreshToken($('#refreshToken').val());
  });

   $('#gmbAccounts').click(function() {
    // signInCallback defined in step 6.
    retrieveGoogleMyBusinessAccounts($('#accessToken').val());
  });


function signInCallback(authResult) {
    //the 'code' field from the response, used to retrieve access token and bearer token
  if (authResult['code']) {
    // Hide the sign-in button now that the user is authorized, for example:
    $('#signinButton').attr('style', 'display: none');
    authCode = authResult['code'];

    $("#accessTokenButton").attr( "disabled", false );

    //Pretty print response
    var e = document.createElement("pre")
    e.innerHTML = JSON.stringify(authResult, undefined, 2);
    document.body.appendChild(e);

    //autofill authorization code input
    $('#authorizationCode').val(authResult['code'])


  } else {
    // There was an error.
  }
}

//WARNING: THIS FUNCTION IS DISPLAYED FOR DEMONSTRATION PURPOSES ONLY. YOUR CLIENT_SECRET SHOULD NEVER BE EXPOSED ON THE CLIENT SIDE!!!!
function retrieveAccessTokenAndRefreshToken(code) {
      $.post('https://www.googleapis.com/oauth2/v4/token',
      { //the headers passed in the request
        'code' : code,
        'client_id' : 'YOUR_CLIENT_ID.apps.googleusercontent.com',
        'client_secret' : 'YOUR_CLIENT_SECRET',
        'redirect_uri' : 'http://localhost:8000',
        'grant_type' : 'authorization_code'
      },
      function(returnedData) {
        console.log(returnedData);
        //pretty print JSON response
        var e = document.createElement("pre")
        e.innerHTML = JSON.stringify(returnedData, undefined, 2);
        document.body.appendChild(e);
        $('#refreshToken').val(returnedData['refresh_token'])
      });
}

//WARNING: THIS FUNCTION IS DISPLAYED FOR DEMONSTRATION PURPOSES ONLY. YOUR CLIENT_SECRET SHOULD NEVER BE EXPOSED ON THE CLIENT SIDE!!!!
function retrieveAccessTokenFromRefreshToken(refreshToken) {
    $.post('https://www.googleapis.com/oauth2/v4/token',
        { // the headers passed in the request
        'refresh_token' : refreshToken,
        'client_id' : 'YOUR_CLIENT_ID.apps.googleusercontent.com',
        'client_secret' : 'YOUR_CLIENT_SECRET',
        'redirect_uri' : 'http://localhost:8000',
        'grant_type' : 'refresh_token'
      },
      function(returnedData) {
        var e = document.createElement("pre")
        e.innerHTML = JSON.stringify(returnedData, undefined, 2);
        document.body.appendChild(e);
        $('#accessToken').val(returnedData['access_token'])
      });
}

function retrieveGoogleMyBusinessAccounts(accessToken) {
    $.ajax({
        type: 'GET',
        url: 'https://mybusinessaccountmanagement.googleapis.com/v1/accounts',
        headers: {
            'Authorization' : 'Bearer ' + accessToken
        },
        success: function(returnedData) {
            var e = document.createElement("pre")
            e.innerHTML = JSON.stringify(returnedData, undefined, 2);
            document.body.appendChild(e);
        }
    });
}
</script>
</body>
</html>
सिर्फ़ ऑनलाइन ऐक्सेस
आसानी से लागू करने के लिए, Business Profile API से कॉल किए जा सकते हैं उपयोगकर्ता रीफ़्रेश टोकन को कैश मेमोरी में सेव किए बिना. हालांकि, उपयोगकर्ता को हस्ताक्षर करना ज़रूरी है का इस्तेमाल, उपयोगकर्ता के तौर पर एपीआई कॉल करने के लिए किया जाता है.
नीचे दिए गए कोड स्निपेट में, 'Google साइन इन' को लागू करने की जानकारी दी गई है फ़्लो के साथ-साथ एपीआई कॉल करने का तरीका भी बताया गया है. उपयोगकर्ता के साइन इन करने के बाद आपके ऐप्लिकेशन के लिए सहमति देता है, तो ऐक्सेस टोकन अनुमति दी गई है. यह ऐक्सेस टोकन उपयोगकर्ता की पहचान करता है. इसलिए, इसे हेडर को मैन्युअल तरीके से कॉन्फ़िगर करें.
इस कोड को चलाने के लिए, सैंपल चलाएं देखें.
<!-- The top of file index.html -->
<html lang="en">
  <head>
    <meta name="google-signin-scope" content="profile email https://www.googleapis.com/auth/business.manage">
    <meta name="google-signin-client_id" content="YOUR_CLIENT_ID.apps.googleusercontent.com">
    <script src="https://apis.google.com/js/platform.js" async defer></script>
  </head>
  <body>
    <div class="g-signin2" data-onsuccess="onSignIn" data-theme="dark"></div>
    <script>
      var gmb_api_version = 'https://mybusinessaccountmanagement.googleapis.com/v1';
      function onSignIn(googleUser) {
        // Useful data for your client-side scripts:
        var profile = googleUser.getBasicProfile();
        console.log('Full Name: ' + profile.getName());
        console.log("Email: " + profile.getEmail());
        var access_token = googleUser.getAuthResponse().access_token;

        //Using the sign in data to make a Business Profile APIs call
        var req = gmb_api_version + '/accounts';
        var xhr = new XMLHttpRequest();
        xhr.open('GET', req);
        xhr.setRequestHeader('Authorization', 'Bearer ' + access_token);

        //Displaying the API response
        xhr.onload = function () {
          document.body.appendChild(document.createTextNode(xhr.responseText));
        }
        xhr.send();
      }
    </script>
  </body>
</html>
अभी तक किसी भी व्यक्ति ने चेक इन नहीं किया है
सैंपल चलाएं
दिए गए सैंपल कोड को चलाने के लिए, यह तरीका अपनाएं:
- कोड स्निपेट को
index.htmlटाइटल वाली फ़ाइल में सेव करें. पक्का करें कि आपने फ़ाइल में अपना क्लाइंट आईडी सेट किया हुआ है. अपनी वर्किंग डायरेक्ट्री से, वेब सर्वर को यहां दिए गए निर्देश से शुरू करें:
Python 2.X
python -m SimpleHTTPServer 8000
Python 3.X
python -m http.server 8000
क्रेडेंशियल से पेज पर जाएं, तो इस्तेमाल किया गया क्लाइंट आईडी चुनें.
अनुमति वाले JavaScript ऑरिजिन फ़ील्ड में, अपनी वेबसाइट का यूआरएल डालें. यहां की यात्रा पर हूं इस गाइड में सैंपल कोड चलाने के लिए, आपको
http://localhost:8000भी जोड़ना होगा.अपने ब्राउज़र में, यहां दिए गए यूआरएल को लोड करें:
http://localhost:8000/index.html
अभी तक किसी भी व्यक्ति ने चेक इन नहीं किया है