您的应用向商家资料 API 发送的每个请求都必须包含授权令牌。授权令牌可用于向 Google 确认用户或应用的身份,以允许其访问商家资料 API。您的应用必须使用 OAuth 2.0 协议才能对请求进行授权。
本指南介绍了可用于在您的平台上实现 OAuth 2.0 的多个方法。Google Identity Platform 可提供本指南介绍的 Google 登录和 OAuth 功能。
为了进一步了解如何将 OAuth 2.0 用于 Web 服务器应用,请参阅此处的指南。
实现 OAuth 2.0 后可获享以下益处:
- 保护对企业主数据的访问。
- 在企业主登录其 Google 账号时确认其身份。
- 确认合作伙伴平台或应用可在获得企业主明确同意时访问并修改营业地点数据。企业主此后可撤消此访问权限。
- 确认合作伙伴平台的身份。
- 让合作伙伴平台可以代表企业主执行线上或线下操作,包括回复评价、创建帖子和更新菜单项。
通过 OAuth 2.0 访问 API
在开始之前,您需要配置 Google Cloud 项目并启用商家资料 API。如需了解详情,请参阅基本设置文档。
配置 OAuth 和权限请求页面
请按以下步骤创建凭据和权限请求页面:
- 在 API 控制台的“凭据”页面中,点击创建凭据,然后从下拉列表中选择“OAuth 客户端 ID”。
- 选择您的应用类型,填写相关信息,然后点击创建。
- 点击保存。
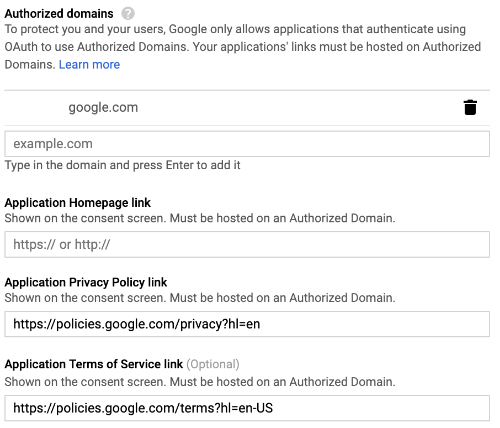
- 更新 OAuth 权限请求页面设置。您可以在此更新应用名称和徽标,以及添加指向您的服务条款和隐私权政策的链接。
下图显示了 OAuth 权限请求页面上的应用名称和徽标字段:
下图显示了 OAuth 权限请求页面上的其他字段:
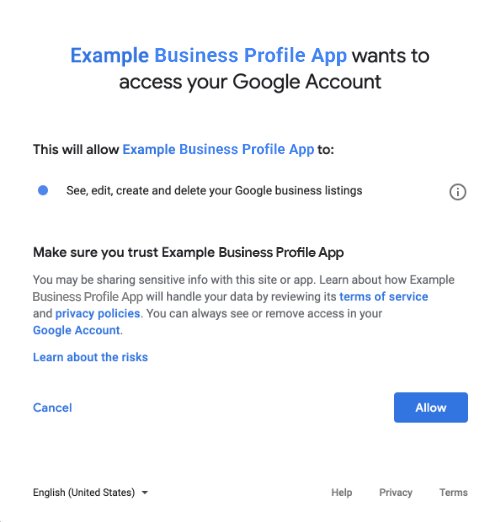
下图显示了用户在表示同意之前可能会看到的页面示例:
用于集成 OAuth 2.0 的方法
您可以使用以下方法实现 OAuth 2.0:
以下内容介绍了如何使用这些方法将 OAuth 2.0 集成到您的应用中。
授权范围
需要以下 OAuth 范围之一:
- https://www.googleapis.com/auth/business.manage
- https://www.googleapis.com/auth/plus.business.manage
plus.business.manage 范围已弃用,仅可用于维护现有实现的向后兼容性。
客户端库
本页面上针对不同语言的示例使用的是 Google API 客户端库来实现 OAuth 2.0 授权。要想运行代码示例,您必须先安装适用于您的语言的客户端库。
客户端库支持以下语言:
Google 登录
Google 登录是将 OAuth 集成到您的平台的最快方式。该方式适用于 Android、iOS、Web 等平台。

Google 登录是一种安全的身份验证系统,可让用户使用自己的 Google 账号(登录其他 Google 服务所用的账号)进行登录。用户登录后,就可以同意您的应用调用商家资料 API 并交换用于获取刷新令牌和访问令牌的授权代码。
离线访问
即使用户处于离线状态,您也可以代表用户调用商家资料 API。建议您在平台中集成离线访问功能,这样用户登录并表示同意后,您便可借助该功能随时修改、查看和管理商家信息。
Google 假定用户已登录其 Google 账号,且已同意您的应用调用商家资料 API,而且也已交换用于获取刷新令牌和之后的访问令牌的授权代码。用户可以安全地存储刷新令牌,以便后续可以随时使用刷新令牌获取新的访问令牌。如需了解详情,请参阅适用于服务器端应用的 Google 登录。
以下代码段展示了如何在应用中实现离线访问。如需运行此代码,请参阅运行示例代码。
<!-- The top of file index.html -->
<html itemscope itemtype="http://schema.org/Article">
<head>
  <!-- BEGIN Pre-requisites -->
  <script src="https://ajax.googleapis.com/ajax/libs/jquery/1.8.2/jquery.min.js">
  </script>
  <script src="https://apis.google.com/js/client:platform.js?onload=start" async defer>
  </script>
  <!-- END Pre-requisites -->
<!-- Continuing the <head> section -->
  <script>
    function start() {
      gapi.load('auth2', function() {
        auth2 = gapi.auth2.init({
          client_id: 'YOUR_CLIENT_ID.apps.googleusercontent.com',
          // Scopes to request in addition to 'profile' and 'email'
          scope: 'https://www.googleapis.com/auth/business.manage',
          immediate: true
        });
      });
    }
  </script>
</head>
<body>
  <!-- Add where you want your sign-in button to render -->
<!-- Use an image that follows the branding guidelines in a real app, more info here:
 https://developers.google.com/identity/branding-guidelines
-->
<h1>Business Profile Offline Access Demo</h1>

<p> This demo demonstrates the use of Google Identity Services and OAuth to gain authorization to call the Business Profile APIs on behalf of the user, even when the user is offline.

When a refresh token is acquired, store this token securely on your database. You will then be able to use this token to refresh the OAuth credentials and make offline API calls on behalf of the user.

The user may revoke access at any time from the <a href='https://myaccount.google.com/permissions'>Account Settings</a> page.
</p>

<button id="signinButton">Sign in with Google</button><br>
<input id="authorizationCode" type="text" placeholder="Authorization Code" style="width: 60%"><button id="accessTokenButton" disabled>Retrieve Access/Refresh Token</button><br>
 <input id="refreshToken" type="text" placeholder="Refresh Token, never expires unless revoked" style="width: 60%"><button id="refreshSubmit">Refresh Access Token</button><br>
 <input id="accessToken" type="text" placeholder="Access Token" style="width: 60%"><button id="gmbAccounts">Get Business Profile Accounts</button><br>
 <p>API Responses:</p>
<script>
    //Will be populated after sign in.
    var authCode;
  $('#signinButton').click(function() {
    // signInCallback
    auth2.grantOfflineAccess().then(signInCallback);
  });

  $('#accessTokenButton').click(function() {
    // signInCallback defined in step 6.
    retrieveAccessTokenAndRefreshToken(authCode);
  });

  $('#refreshSubmit').click(function() {
    // signInCallback defined in step 6.
    retrieveAccessTokenFromRefreshToken($('#refreshToken').val());
  });

   $('#gmbAccounts').click(function() {
    // signInCallback defined in step 6.
    retrieveGoogleMyBusinessAccounts($('#accessToken').val());
  });


function signInCallback(authResult) {
    //the 'code' field from the response, used to retrieve access token and bearer token
  if (authResult['code']) {
    // Hide the sign-in button now that the user is authorized, for example:
    $('#signinButton').attr('style', 'display: none');
    authCode = authResult['code'];

    $("#accessTokenButton").attr( "disabled", false );

    //Pretty print response
    var e = document.createElement("pre")
    e.innerHTML = JSON.stringify(authResult, undefined, 2);
    document.body.appendChild(e);

    //autofill authorization code input
    $('#authorizationCode').val(authResult['code'])


  } else {
    // There was an error.
  }
}

//WARNING: THIS FUNCTION IS DISPLAYED FOR DEMONSTRATION PURPOSES ONLY. YOUR CLIENT_SECRET SHOULD NEVER BE EXPOSED ON THE CLIENT SIDE!!!!
function retrieveAccessTokenAndRefreshToken(code) {
      $.post('https://www.googleapis.com/oauth2/v4/token',
      { //the headers passed in the request
        'code' : code,
        'client_id' : 'YOUR_CLIENT_ID.apps.googleusercontent.com',
        'client_secret' : 'YOUR_CLIENT_SECRET',
        'redirect_uri' : 'http://localhost:8000',
        'grant_type' : 'authorization_code'
      },
      function(returnedData) {
        console.log(returnedData);
        //pretty print JSON response
        var e = document.createElement("pre")
        e.innerHTML = JSON.stringify(returnedData, undefined, 2);
        document.body.appendChild(e);
        $('#refreshToken').val(returnedData['refresh_token'])
      });
}

//WARNING: THIS FUNCTION IS DISPLAYED FOR DEMONSTRATION PURPOSES ONLY. YOUR CLIENT_SECRET SHOULD NEVER BE EXPOSED ON THE CLIENT SIDE!!!!
function retrieveAccessTokenFromRefreshToken(refreshToken) {
    $.post('https://www.googleapis.com/oauth2/v4/token',
        { // the headers passed in the request
        'refresh_token' : refreshToken,
        'client_id' : 'YOUR_CLIENT_ID.apps.googleusercontent.com',
        'client_secret' : 'YOUR_CLIENT_SECRET',
        'redirect_uri' : 'http://localhost:8000',
        'grant_type' : 'refresh_token'
      },
      function(returnedData) {
        var e = document.createElement("pre")
        e.innerHTML = JSON.stringify(returnedData, undefined, 2);
        document.body.appendChild(e);
        $('#accessToken').val(returnedData['access_token'])
      });
}

function retrieveGoogleMyBusinessAccounts(accessToken) {
    $.ajax({
        type: 'GET',
        url: 'https://mybusinessaccountmanagement.googleapis.com/v1/accounts',
        headers: {
            'Authorization' : 'Bearer ' + accessToken
        },
        success: function(returnedData) {
            var e = document.createElement("pre")
            e.innerHTML = JSON.stringify(returnedData, undefined, 2);
            document.body.appendChild(e);
        }
    });
}
</script>
</body>
</html>
仅在线访问
为便于实现,您可让用户在不缓存用户刷新令牌的情况下执行商家资料 API 调用。但是,用户必须先登录平台,然后才能以用户身份执行 API 调用。
下面的代码段演示了如何实现 Google 登录流程,以及如何执行特定于用户的 API 调用。用户使用其 Google 账号登录并向您的应用授予访问权限后,您将获得访问令牌。此访问令牌用于确定用户身份,且需要在商家资料 API 请求中作为标头进行传递。
如需运行此代码,请参阅运行示例代码。
<!-- The top of file index.html -->
<html lang="en">
  <head>
    <meta name="google-signin-scope" content="profile email https://www.googleapis.com/auth/business.manage">
    <meta name="google-signin-client_id" content="YOUR_CLIENT_ID.apps.googleusercontent.com">
    <script src="https://apis.google.com/js/platform.js" async defer></script>
  </head>
  <body>
    <div class="g-signin2" data-onsuccess="onSignIn" data-theme="dark"></div>
    <script>
      var gmb_api_version = 'https://mybusinessaccountmanagement.googleapis.com/v1';
      function onSignIn(googleUser) {
        // Useful data for your client-side scripts:
        var profile = googleUser.getBasicProfile();
        console.log('Full Name: ' + profile.getName());
        console.log("Email: " + profile.getEmail());
        var access_token = googleUser.getAuthResponse().access_token;

        //Using the sign in data to make a Business Profile APIs call
        var req = gmb_api_version + '/accounts';
        var xhr = new XMLHttpRequest();
        xhr.open('GET', req);
        xhr.setRequestHeader('Authorization', 'Bearer ' + access_token);

        //Displaying the API response
        xhr.onload = function () {
          document.body.appendChild(document.createTextNode(xhr.responseText));
        }
        xhr.send();
      }
    </script>
  </body>
</html>
运行示例代码
如需运行提供的示例代码,请按以下步骤操作:
- 将代码段保存到名为
index.html的文件中。确保您已在文件中设置了客户端 ID。 在工作目录中使用以下命令启动 Web 服务器:
Python 2.X
python -m SimpleHTTPServer 8000
Python 3.X
python -m http.server 8000
在 API 控制台的“凭据”页面上,选择使用的客户端 ID。
在“已获授权的 JavaScript 来源”字段中,输入您的网站网址。如需运行本指南中的示例代码,您还必须添加
http://localhost:8000。在您的浏览器中打开以下网址:
http://localhost:8000/index.html