बैकग्राउंड
सुरक्षित निजी इमेज की सुविधा की मदद से, पास पर ऐसी इमेज तय की जा सकती हैं जिन्हें सार्वजनिक यूआरएल से ऐक्सेस करने की ज़रूरत नहीं होती. हालांकि, पास पर इमेज को सही तरीके से रेंडर करने के लिए, सार्वजनिक यूआरएल से ऐक्सेस करने की ज़रूरत होती है. Wallet API का इस्तेमाल करके, इमेज अपलोड की जाती है. इसके बाद, आपको एक आइडेंटिफ़ायर मिलता है. इसका इस्तेमाल, Wallet पास ऑब्जेक्ट पर उस इमेज का रेफ़रंस देने के लिए किया जा सकता है.
इन पास टाइप के लिए यह सुविधा काम करती है;
- इवेंट का टिकट
- बोर्डिंग पास
- बस, मेट्रो वगैरह से यात्रा का पास
- ऑफ़र कार्ड
- Gift Card
- लॉयल्टी पास
- जेनरिक पास
सुविधा का उदाहरण

|
| सुरक्षित निजी इमेज का इस्तेमाल करके बनाया गया सदस्यता कार्ड |
उपयोग के उदाहरण
निजी इमेज को सुरक्षित रखने की सुविधा की मदद से, ऐसी इमेज का इस्तेमाल किया जा सकता है जिन्हें सार्वजनिक तौर पर ऐक्सेस करने की ज़रूरत नहीं होती. इसलिए, इनका इस्तेमाल प्रोफ़ाइल फ़ोटो जैसी चीज़ों के लिए किया जा सकता है. इससे इन जैसे इस्तेमाल के उदाहरणों को लागू किया जा सकता है. हालांकि, इसके अलावा और भी उदाहरण हो सकते हैं:
- सालाना सदस्यता पास
- बिज़नेस कार्ड
- बस, मेट्रो वगैरह से यात्रा का पास
ध्यान दें: सुरक्षित की गई निजी इमेज का इस्तेमाल, पास को सरकार की ओर से जारी किए गए पहचान दस्तावेज़ के तौर पर दिखाने के लिए नहीं किया जाना चाहिए. साथ ही, इस्तेमाल की स्वीकार्य नीति में बताए गए अन्य दिशा-निर्देशों का पालन करना चाहिए
Wallet की सुविधा का इस्तेमाल करते समय ध्यान रखने वाली बातें
- इसका इस्तेमाल, सामान्य प्राइवेट पास के साथ नहीं किया जा सकता
- इसे सिर्फ़ पास ऑब्जेक्ट में जोड़ा जा सकता है, क्लास में नहीं
- इसका इस्तेमाल सिर्फ़ एक ऑब्जेक्ट के साथ किया जा सकता है
- इसका इस्तेमाल सिर्फ़ ImageModuleData के साथ किया जा सकता है.अन्य इमेज के साथ नहीं. जैसे, लोगो और वाइड हेडर लोगो
डेवलप की जा रही सुविधाएं
- वेब पर सहायता
- हीरो इमेज पर मौजूद निजी इमेज
इंटिग्रेशन का तरीका
privateImageIdपाने के लिए, Google Wallet API का इस्तेमाल करके अपनी निजी इमेज अपलोड करें.- पास ऑब्जेक्ट में कोई इमेज जोड़ें. उदाहरण के लिए,
ImageModuleData. इमेज परsourceUriफ़ील्ड सेट करने के बजाय, आपकोprivateImageIdफ़ील्ड सेट करना होगा. इसके लिए, पिछले चरण से मिली वैल्यू का इस्तेमाल करें.
सीक्वेंस डायग्राम
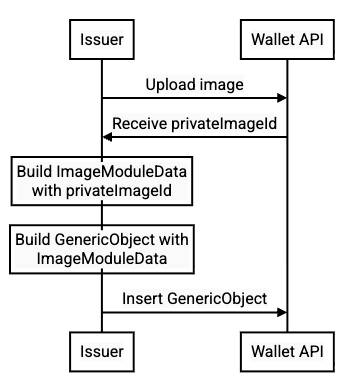
|
| निजी इमेज के क्रम को सुरक्षित करना |
कोड का उदाहरण
इमेज अपलोड करें
String issuerId = "12345";
String keyFilePath = "/path/to/key.json";
GoogleCredential credential =
    GoogleCredential.fromStream(new FileInputStream(keyFilePath))
        .createScoped(Arrays.asList("https://www.googleapis.com/auth/wallet_object.issuer"));
HttpTransport httpTransport = GoogleNetHttpTransport.newTrustedTransport();

// Prepare request to upload image
String contentType = "image/jpeg";  // MIME type of image
String imageFilePath = "/path/to/image.jpg";
HttpContent content =
    new ByteArrayContent(
        contentType, ByteStreams.toByteArray(new FileInputStream(imageFilePath)));

String url =
    String.format(
        "https://walletobjects.googleapis.com/upload/walletobjects/v1/privateContent/%s/uploadPrivateImage",
        issuerId);

// Make request to upload image
HttpResponse response =
    httpTransport
        .createRequestFactory(credential)
        .buildPostRequest(new GenericUrl(url), content)
        .execute();

// Get privateImageId from response
Gson gson = new Gson();
JsonObject jsonObject = gson.fromJson(response.parseAsString(), JsonObject.class);
String privateImageId = jsonObject.get("privateImageId").getAsString();
पास ऑब्जेक्ट पर मौजूद निजी इमेज का इस्तेमाल करना
// Build GenericObject with privateImageId in ImageModuleData (also adding an optional TextModuleData)
Image image = new Image().setPrivateImageId(privateImageId);
ImageModuleData imageModuleData = new ImageModuleData().setId("imageId").setMainImage(image);
TextModuleData textModuleData =
    new TextModuleData().setId("textId").setHeader("Card holder").setBody("John Doe");
GenericObject genericObject =
    new GenericObject()
        .setId(issuerId + ".objectId")
        // class must be inserted before inserting object
        .setClassId(issuerId + ".classId")
        .setCardTitle("Business name")
        .setHeader("My membership card")
        .setImageModulesData(Arrays.asList(imageModuleData))
        .setTextModulesData(Arrays.asList(textModuleData));

// Insert GenericObject (or can use in JWT without inserting ahead of time)
Walletobjects service =
    new Walletobjects.Builder(httpTransport, GsonFactory.getDefaultInstance(), credential)
        .setApplicationName("My Application")
        .build();

service.genericobject().insert(genericObject).execute();
पास को अपडेट करें, ताकि सामने की ओर इमेज दिखे
सुरक्षित निजी इमेज का इस्तेमाल, किसी भी imageModulesDatafield पर किया जा सकता है. यहां एक उदाहरण दिया गया है. इसमें बताया गया है कि टेंप्लेट को बदलने की सुविधा का इस्तेमाल करके, कार्ड के सामने की ओर इमेज को पोज़िशन करने के लिए, imageModulesData फ़ील्ड का इस्तेमाल कैसे किया जाता है. यहां टेंप्लेट ओवरराइड के साथ क्लास डालने का उदाहरण दिया गया है:
CardTemplateOverride cardTemplateOverride =
    new CardTemplateOverride()
        .setCardRowTemplateInfos(
            Arrays.asList(
                new CardRowTemplateInfo()
                    .setTwoItems(
                        new CardRowTwoItems()
                            // The ids chosen here must be set on the object's TextModuleData and ImageModuleData
                            .setStartItem(
                                createTemplateItem("object.textModulesData['textId']"))
                            .setEndItem(
                                createTemplateItem("object.imageModulesData['imageId']")))));
GenericClass genericClass =
    new GenericClass()
        .setId(issuerId + ".classId")
        .setClassTemplateInfo(
            new ClassTemplateInfo().setCardTemplateOverride(cardTemplateOverride));

service.genericclass().insert(genericClass);


...


private static TemplateItem createTemplateItem(String fieldPath) {
  return new TemplateItem()
      .setFirstValue(
          new FieldSelector()
              .setFields(Arrays.asList(new FieldReference().setFieldPath(fieldPath))));
}
अपवाद मैनेज करना
Wallet FeatureAPI का गलत इस्तेमाल करने पर, ये गड़बड़ियां हो सकती हैं:
| मैसेज | वजह |
|---|---|
| इमेज में source_uri और private_image_id, दोनों नहीं हो सकते | जारी करने वाली संस्था ने एक ही इमेज पर source_uri और private_image_id सेट करने की कोशिश की है. ऐसा करने की अनुमति नहीं है |
| जारी करने वाले %s के लिए, आईडी %s वाली निजी इमेज नहीं मिली | किसी ऑब्जेक्ट पर ऐसा प्राइवेट इमेज आईडी सेट करना जो मौजूद नहीं है |
| हम आईडी %s वाली प्राइवेट इमेज को, जारी करने वाले %s के लिए ऑब्जेक्ट %s में नहीं जोड़ सके, क्योंकि इसका इस्तेमाल पहले से ही ऑब्जेक्ट %s के साथ किया जा रहा है. किसी प्राइवेट इमेज का इस्तेमाल, सिर्फ़ एक ऑब्जेक्ट के साथ किया जा सकता है. | एक से ज़्यादा ऑब्जेक्ट पर एक ही निजी इमेज का इस्तेमाल करने की कोशिश की जा रही है. एक से ज़्यादा ऑब्जेक्ट के साथ एक ही निजी इमेज का इस्तेमाल करने के लिए, उसे फिर से अपलोड करना होगा. इसके बाद, आपको एक नया निजी इमेज आईडी मिलेगा. इसका इस्तेमाल दूसरे ऑब्जेक्ट के साथ किया जा सकता है |